Sharpening

UKworkshop.co.uk

Help Support UKworkshop.co.uk:

This site may earn a commission from merchant affiliate links, including eBay, Amazon, and others.
It's not a term I've ever heard before this thread, but it's the trick of planing/jointing the edges of two boards in one operation by clamping the boards face-to-face in the vice. When you flip them together to edge-joint, if you planed the edges slightly out of square the angles should cancel out.


So the "expert" PS shows use how to do this, it takes him 3 or 4 times and about 1/8" of stock to get it almost right on soft pine about 24-30 inches long.
This is not something most people would employ on anything longer or harder. Small projects, it might be fine, just make sure you have enough material to waste in the form of shavings while you search for the perfect match.
 
Thank you, it was quite easy really 🙂
Had a nosey at your website, love your work.
Personally (hobby only) I enjoy using both new and old hand tools, machinery and 'bling/jewellery' in equal measure. Best inspiration comes from seeing work like yours and all the others who kindly post for our pleasure. Thank you.
 
I have a website www.markwhitefurniturecabinetmaker.com some of my work is on there and I make a living from what I do.
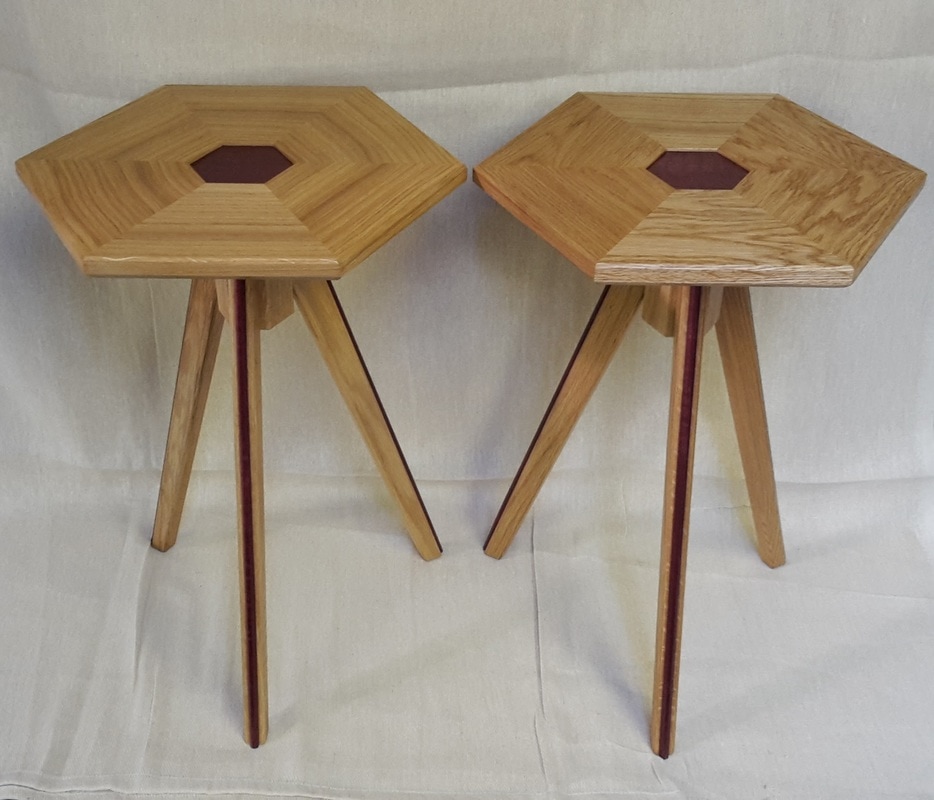
I've seen your work before Mark, and I can tell you know what you're doing. But I have, since I first spotted them, always rather wondered how well the joints of the (solid wood ?) hexagonal table tops hold up over time? Further below I offer up examples of joint failure in a similar construction. In my case, admittedly, it was to illustrate how such joinery might fail, and by how much for a text I was working on. Slainte.

20170204-121009_orig.jpg


121MitreFail.jpg


122MitreFail.jpg

 
I've seen your work before Mark, and I can tell you know what you're doing. But I have, since I first spotted them, always rather wondered how well the joints of the (solid wood ?) hexagonal table tops hold up over time? Further below I offer up examples of joint failure in a similar construction. In my case, admittedly, it was to illustrate how such joinery might fail, and by how much for a text I was working on. Slainte.

Hi Richard, good question 😀. I broke the rules a little bit when I made those tables. Of course I could have veneered some ply or MDF but I had some small sections of oak I wanted to use, offcuts from a larger job. I rather liked the look of the solid wood as well.
I gave some thought to minimising the movement, I had read that Alan Peters insisted on plywood tongues in similar joints, (mitres I think it was) to minimise the joints opening up, I had also read that Matthew Burt had designed and made a table top with very thick workshop cut veneers which tapered to a point at the centre of the top, he said this was pushing the limits on such a large area. With these points in mind I used plywood tongues which were quite wide and thick leaving about 2mm to 3mm of solid wood above and below the tongues, the width of the tongues went in about 25mm into each solid wood section, I hoped this would simulate a veneer at the joint of each section, these were glued together with cascamite which as you would know is quite a rigid glue which again I hoped would hold it all together restricting movement. The design of the tops does away with a centre point which I also believed would help, each section is quite small so I thought I had a good chance of things working out. I first made a prototype which after three months in my workshop, with its massive climate changes, held up, so I made some with curved legs and put them up for sale in the Somerset Guild of Craftsmans gallery. Two pairs sold very quickly, one pair were still in the gallery when it had an ingress of rain water, the tops got wet and yes after they dried small gaps appeared on the inside of the joints about 5mm long, I replaced these tops. Undeterred I made three more pairs with the straight legs, these sold fairly quickly but did spend some time in the now damp gallery, which did not have any affect on the tops. None of them have been returned to me and no complaints received, everything I make comes with a guarantee, if any faults arise I will either repair (to it's original condition) or replace the item free of charge, so whoever bought them would have no reason not to contact me if they were faulty. I may still have the prototype, if I do I'll post a photo of the top, I may have given it away though, I can't remember 🙂
If I had to make them again and purchase the wood for the tops rather than use offcuts as before, I probably would cut veneers and use a plywood core.
I just remembered, I also made one pair of tables but I had no offcuts left so I made solid tops cut to shape with the centre cut out for the contrasting centre wood, they didn't look as nice being one piece of wood but my customer was happy and no problem with movement 🙂
Looks like the thread has wandered off topic but that's perfectly all right on a sharpening thread. :)
 
Hi Richard, good question 😀. I broke the rules a little bit when I made those tables.
It looks like you've mostly got away with using that construction. I suspect the reasons for dodging a bullet, so to speak, might be:
1. Six pieces go to make up the top rather than four (thus reducing potential movement at each joint)
2. There being a hole at the centre reducing the overall width of each piece, which reduces overall cross-grain movement to contend with
3. The substantial joinery you used, i.e., ply tongue, deep groove, adhesive.

That's about it. Slainte.
 
It looks like you've mostly got away with using that construction. I suspect the reasons for dodging a bullet, so to speak, might be:
1. Six pieces go to make up the top rather than four (thus reducing potential movement at each joint)
2. There being a hole at the centre reducing the overall width of each piece, which reduces overall cross-grain movement to contend with
3. The substantial joinery you used, i.e., ply tongue, deep groove, adhesive.

That's about it. Slainte.
I think what would really help me Richard is for someone to send me a free book on wood movement, if only I knew of someone 🤔😂
 
Interesting looking at Mark's finely worked "post modern" designs, where no effort is spared.
As compared to traditional/vernacular where the opposite is the case; doing things as easily and simply as possible.
Just a thought!
 
Gillow, Seddon, and Chippendale would have to had grindstones all over the place for all the craftsmen they employed to hollow grind. Maybe they did, but I have my doubts.
 
Last edited:
Gillow, Seddon, and Chippendale would have to had grindstones all over the place for all the craftsmen they employed to hollow grind. Maybe they did, but I have my doubts.
Well no doubt but the bench worker would only need to use them if normal routine sharpening had been neglected.
Hollow grind is just a non essential byproduct of the grindstone.
With normal freehand sharpening it would disappear gradually and end up as a slightly convex bevel; often seen on old plane blades and chisels if they haven't already been attacked by an over-enthusiastic modern sharpener! Normal on Japanese chisels too.
 
..... a jigsaw was my preferred choice of tool to cut to a scribed line, particularly if it was very uneven.
Axe can be the best choice especially if you are on site - you stand the board end-down on the floor, held with one hand and use axe in the other. Easier in workshop too - you have to lay a board down in order to use a jig saw and clamp it. Axe also easy to undercut for easier fitting, etc.
Free hand tool usage (and freehand sharpening!) are very under rated.
 
Back
Top