Open Frame Bookcase

UKworkshop.co.uk

Help Support UKworkshop.co.uk:

This site may earn a commission from merchant affiliate links, including eBay, Amazon, and others.
catface":augj2prx said:
Hello Woodbloke,
ive used the heartwood (ie lighter colouring) when joining the boards because I like the whole range of colours and textures of the wood to come through in the finished piece. As long as there aren' t issues around different degrees of wood movement when joining the pieces, I like to use heartwood for contrast (some suggest that heartwood has a different rate of expansion/contraction compared to the rest of the tree). I guess I'm just at the other end of the scale to folk who like it all one colour, usually with a gloss finish (might as well use plastic & be done with it , eh ?) . You can see similar use of heartwood by choice on the front of my "Krenov style cupboard" (previous post). In the latter example the streaks of lighter wood assist in giving the piece a more vertical feel. But enough dribble ! I guess I just like the wood. In this bookcase the use of heartwood on the join of the shelves emphasises that each shelf is made from two distinct pieces of oak, yet the joint is very good, - you really have to lookfor it even with the colour change in the woods - and this I like. Regards, Catface.
That's fair enough...if you like the lighter wood, then use it. The lighter coloured timber though in oak is sapwood, not heartwood. The light straw coloured stripe down the top of the upper shelf is sap and if you like it that's fine, but I tend to avoid it like the plague :evil: and would never knowingly include it on a very nice piece like this. If you look at any pieces from the classic Arts & Crafts movement (early Barnsley) you won't see any sapwood and it was not included for a good reason...it's the softer part of the tree where growth takes place and as such is prone to attack by all sorts of nasty, wood boring little beasties - Rob
 
Well done Catface, a truly great job. I like arts and crafts furniture very much.

I have a number of arts and craft books and just must pick out a project to tackle this year.

I also like your clamping system very handy.

All the best, Tony.
 
Hello Woodbloke,
you're quite right, viz sapwood not heartwood (I got it back to front). I had not heard that sapwood once incorporated into a piece of furniture was subject to a greater possibility of attack by nasty bugs, subject to proper finishing and storage prior to wood use. But looking in the Encyclopaedia of Furniture Making (By Ernest Joyce, Alan Peters ) (page 2 & following ) : I see that it says :

“no amount of after treatment will darken sapwood, harden its fibres or drive out the sugars and starches locked in its cells which form the essential food-stuffs of all destructive wood-boring pests. This is the only reason why sapwood might not be recommended for use in furniture, although apart from that there is little, if any, difference in the structural strength."

So aesthetic preferences aside you must be right ie,the danger in using sapwood is the risk of using a bug infested piece of wood in your build.
Be interesting to know if anyone has experienced this problem with modern speed dryed timbers, or if its a hangover from times past . More research needed. Thanks for the input.

"If you look at any pieces from the classic Arts & Crafts movement (early Barnsley) you won't see any sapwood " - certainly,but more modern A &C makers are using it, and not covering it up neither ! eg.

http://www.floatingstonewoodworks.com/

" If desired, I will show the lighter shaded "sap-wood" in cherry and walnut tabletops because of the wonderful color patterns it creates."
regards, Catface.
 
catface":21nwttrd said:
" If desired, I will show the lighter shaded "sap-wood" in cherry and walnut tabletops because of the wonderful color patterns it creates."

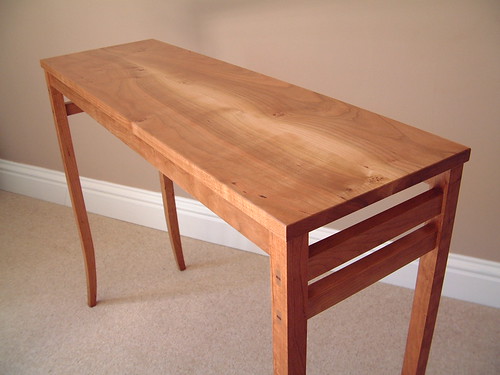
Well I did that with this cherry table I made, where the coloration of the sapwood became an integral part of the appearance of the top.
2655975503_7d7cf7e3d7.jpg


I made this several years ago and it has not yet succumbed to a plague of wood boring beetles...

Cheers, Ed
 
EdSutton":2y6k6n9a said:
catface":2y6k6n9a said:
" If desired, I will show the lighter shaded "sap-wood" in cherry and walnut tabletops because of the wonderful color patterns it creates."

Well I did that with this cherry table I made, where the coloration of the sapwood became an integral part of the appearance of the top.

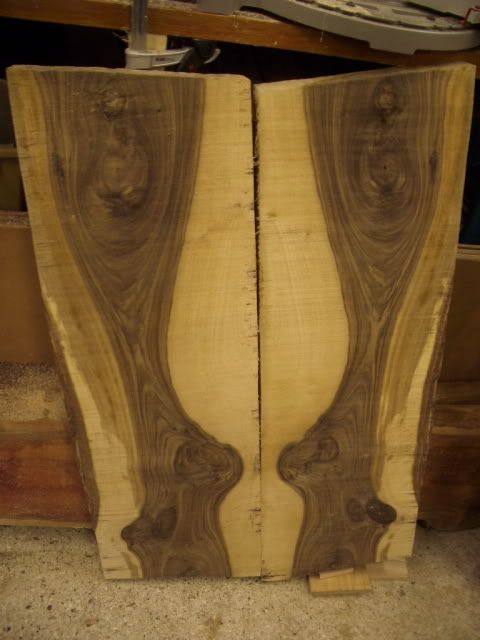
Despite the risks, I think it might, at times, be well-worth experimenting with the incorporation of sapwood for decorative effect. This is one of the pieces of Walnut that Chisel and I have been cutting up recently - quite stunning, I think, but you would only get the effect by including the sapwood

Walnut11.jpg


Nice table, Ed.

Cheers :wink:

Paul
 
I keep on banging on about using sapwood and as I said it's not something that I would ever knowingly use on a really good piece. The reason is that sap will be attacked by wood borers under the right conditions. These are in environments that are cool and possibly with more moisture in the air ie, properties without central heating. In modern houses with decent heating (which most of us have these days) the attack of the bugs ain't going to happen. However, all of us aspire (well I do anyway) to build heirloom type stuff that will hopefully outlast me and several generations down the line. The question is, how can you predict the environment where your furniture will be used in 2109 or even 2209? Simple answer, of course, is that you can't so why take the risk when it's just as easy to use the timber without the sap and give your piece a fighting chance of staying together...which is as I said earlier is the reason that the great makers years ago wouldn't have dreamed of using it their pieces - Rob
 
I really like Arts & Crafts furniture and this is an excellent piece, Catface. Thanks for all excellent WIP photo's as well. :)

Ed, I like your table and do think the sapwood in the centre works well. :wink:
 
thanks for all the WIP pictures - forgive me if these are stupid questions:
1) why all the masking tape around the joints?
2) can the excellent arrangement you have for clamping the shelves together (and useful for table tops I imagine) can disassembled or does it remain up all the time (and thus take up wall space)?

Many thanks

Miles
 
Hello miles_hot,

1) why all the masking tape around the joints?

This is to keep any glue squeeze-out off the wood when the sides are clamped up tight for the glue to dry. Usually glue traces left in the wood prevent the finish from taking properly & the end result is a patchy finish.

These case ends were clamped in the Plano press on the wall rather than with individual clamps because (if you've made the parts properly) this guarantees a flat glue up with no twist etc. However, once the piece being glued up is clamped up tight in the Plano press, there isn't enough room to get to all of the back of the wood (in order to remove any glue squeeze out). The way to avoid excess glue ruining the finish is therefore to tape off the joints prior to glue up.

Another reason for using the masking tape was to allow a check that each part was fitted to the correct mating part : most parts on this build were marked with letters and numbers to show eg which tenon fits to which mortice, etc. These markings are in pen or pencil placed on joint surfaces which don't show on the finished piece ie. inside the joints. All this is fine for dry assembly, but when you put glue in the joints for glue-up this glue covers all your pen & pencil markings & you no longer know which pieces go where. So before glueing I transfer the pen marks for each pair of joints onto the masking tape at the joint. Then when the glue goes on you can still know which pieces go into which joint holes.

Paper masking tape works well for this, but in hotter weather you can't leave it on longer that a day at most or the glue on the rear of the tape gets stuck in the wood grain (which stops the finish going on !)


2) can the excellent arrangement you have for clamping the shelves together (and useful for table tops I imagine) can disassembled or does it remain up all the time (and thus take up wall space)?

THe clamping arrangement I have stays up all the time. Currently it has 2 mounting rails which the clamps secure to at their tops, giving a run of 2 meters length. Plano suggest the clamp mounting rails screw onto a piece of 2 by 4 or similar, but wanting to avoid my clamp changing shape with the humidity of different seasons, I had a local blacksmith make me up a 2M by 1M box section steel frame & the clamp rails mount onto this. This way I know, having screwed the frame to the wall & shimmed it flat, that what comes out of the clamps will be flat.

The steel support frame & clamps are up all the time, but you can shove the clamps all up one end, where they occupy about 50cm of the rail.
Hope this answers your questions, regards, Catface
 
catface":1275cevp said:
Hello miles_hot,


2) can the excellent arrangement you have for clamping the shelves together (and useful for table tops I imagine) can disassembled or does it remain up all the time (and thus take up wall space)?

THe clamping arrangement I have stays up all the time. Currently it has 2 mounting rails which the clamps secure to at their tops, giving a run of 2 meters length. Plano suggest the clamp mounting rails screw onto a piece of 2 by 4 or similar, but wanting to avoid my clamp changing shape with the humidity of different seasons, I had a local blacksmith make me up a 2M by 1M box section steel frame & the clamp rails mount onto this. This way I know, having screwed the frame to the wall & shimmed it flat, that what comes out of the clamps will be flat.

The steel support frame & clamps are up all the time, but you can shove the clamps all up one end, where they occupy about 50cm of the rail.
Hope this answers your questions, regards, Catface

Sounds an excellent solution - do you have any more pictures of the rails etc as I'm having trouble seeing them in the picture and it sounds a very good arrangement which I maybe able to place on the wall below the expected position of the wood rat (when I finally buy it!)
Would there be any way of pivoting the clamped up unit to allow access to the rear of the panel to get to glue etc?

Miles
 
The other way to finish a project like this would have been to polish the inside of all component parts prior to the glue-up. You then haven't got to worry about glue squeeze out sticking to the timber...it just lifts of after a couple of hours with the point of a scalpel.
For marking the joints, I always use a 6mm chisel and deeply inscribe each fitting part with Roman numerals where they won't show when everything's together. So a m/t joint would have the tenon marked with say a IV and the mortise shoulder would be correspondingly marked, again with IV...just remember that 9 is IX and not VIIII :oops: as I once did - Rob
 
I made a comment earlier, but did not mention the sap element, even though I noticed! For once I agree with Rob, it is not really incorporated into the design, eg bookmatched boards like the walnut Paul posted. It does not stop the piece being well made, but it seems a shame that that board was right on top and not covered up by the books. I too love all the more unusual patterns caused by Sap, Knots, Burrs etc and everything I make has some element of this. I also use the masking tape for glue squeeze but only on certain woods.

Never the less a lovely item I'd be pleased to have made and own :wink:
 
woodbloke":17f5hf1u said:
I keep on banging on about using sapwood and as I said it's not something that I would ever knowingly use on a really good piece. The reason is that sap will be attacked by wood borers under the right conditions. These are in environments that are cool and possibly with more moisture in the air ie, properties without central heating. In modern houses with decent heating (which most of us have these days) the attack of the bugs ain't going to happen. However, all of us aspire (well I do anyway) to build heirloom type stuff that will hopefully outlast me and several generations down the line. The question is, how can you predict the environment where your furniture will be used in 2109 or even 2209? Simple answer, of course, is that you can't so why take the risk when it's just as easy to use the timber without the sap and give your piece a fighting chance of staying together...which is as I said earlier is the reason that the great makers years ago wouldn't have dreamed of using it their pieces - Rob


Rob

I have to admit to being somewhat surprised by your thoughts on sapwood and your verging on vitriolic blog entry on the matter.

http://woodbloker.blogspot.com/2009/01/lesson.html

Do you genuinely think that our homes are overrun with beetles looking for sapwood to attack? I think its also a bit strong to suggest that makers who incorporate sapwood into projects are in some way misguided or incompetent.

Each to their own view, but I don't personally see it as the massive issue that its being made out to be.

Cheers, Ed
 
I should also have said that a certain James Krenov, whose work I think you respect, quite freely mentions the use of sapwood for its aesthetic qualities in a number of his texts.

Cheers, Ed
 
Back
Top