MDF sheet on tablesaw

UKworkshop.co.uk

Help Support UKworkshop.co.uk:

This site may earn a commission from merchant affiliate links, including eBay, Amazon, and others.

mark84

Member
Joined
7 Jan 2014
Messages
10
Reaction score
0
Location
doncaster
Hi,
I'm wanting to slice up some 60 x 30cm MDF sheets into three 30 x 20 (roughly)boards on a tablesaw, i'm not totally confident on the safest and most efficient way of doing this- I guess you'd call it a crosscut so i'm wary of kickback as an inexperienced user.
Any help would be brilliant.
Thanks, Mark.
 
Use riving knife, crown guard, TWO PUSH STICKS of the standard pattern (below). At no point should your hands be nearer than about 8" to the blade.
If it goes wrong and you think its going to jam, kick back or go off line - BACK OFF - let it go - do not grab for it or attempt to hold it down other than with push sticks. This is where you are most likely to lose a finger!

But if you use a fence or a sliding table it shouldn't be a problem at all!

This sort of thing - make your own from ply, 2 or more, 15" or more. Have them around all the time:

push_stick1__61883_zoom.jpg


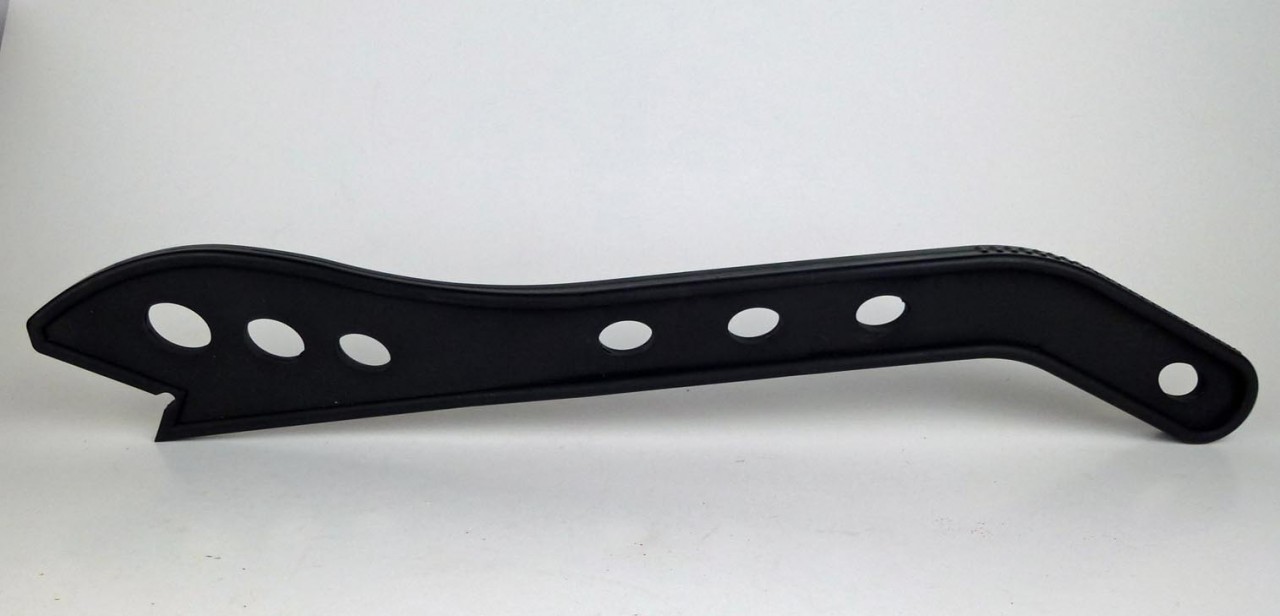
NOT this sort, these are dangerous - hands too forwards and near the blade:
IMG_2854.jpg
 
Agree with Jacob on everything said about the push sticks - in particular about the pattern to choose. Although I would like to add that if you are cutting MDF with a mitre gauge or correctly aligned fence, the risks of actual kickback are low in my (limited) experience.
 
This would be the ideal time to build a crosscut sled. A good one. With proper guarding. With a CC sled, the workpiece is supported on both sides of the cut and can't go anywhere. I don't think I have ever heard of kickback with a CC sled.

Failing that, attach a 2x4 to your mitre fence and push with that, although you may have to change your guard and RK, depending on how your saw is structured.

I agree with Jacob (shock horror) about the second pushstick picture above. In general I am a fan of the boot style (although I am currently using a pair more like the first picture) but that one is far too short and it doesn't have a notch at the front end. It should be 400mm long and have a notch at the front as well as the heel at the back. As soon as the front of the push stick reaches the blade, change position to push with the front end.
 
I agree and disagree with Jacob :D

The first push stick does indeed keep your hands well away from the blade, but the contact area is far too small, and can easily lead to lateral movement.

The second design is indeed way too short - the grip should be well above the max blade height.

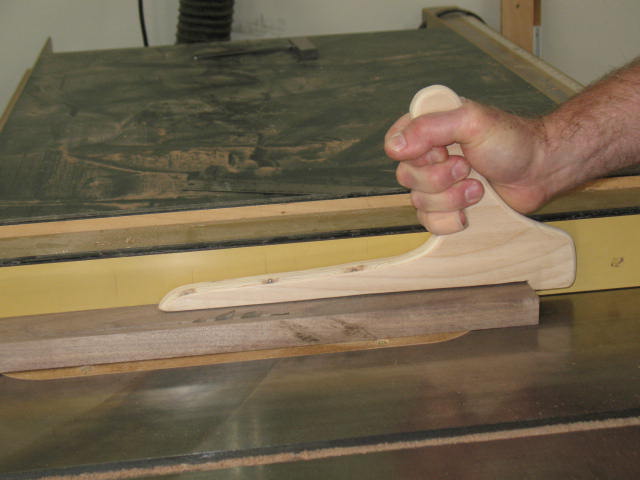
I'd argue that something similar to this design provides much more control

Pushstick%20Safety.jpg
 
Steve Maskery":3lewe4zl said:
It should be 400mm long and have a notch at the front as well as the heel at the back.

+1

If you have a dry run with the machine switched off (not a bad plan to sort out any problems in advance), you'll see that as the workpiece moves through the saw there's a tendency for the push stick to dip down as your arm becomes extended. That's a risky moment. A longer push stick allows you to keep your hand higher for longer, keeping it above blade height as well as keeping it further back from the blade.

Great that you're starting out with MDF. Some saw training schemes do all their initial rip fence training with MDF as it's inherent stability means it's much safer than solid timber. Trainees build up confidence and refine their technique on predictable MDF and only then move on to solid timber.

However, the cut you're proposing is a cross cut not a rip, so a sled is the right tool for the job. But don't avoid ripping when it's required (you may well need to rip materials to build your cross cut fence), if you've got a saw then use it, just ensure you're using it safely and confidently.

Good luck!
 
Seems to me the risk here is the difficulty of keeping a short edge straight against the fence whilst pushing the long edge. A table saw absent a slider is not ideal here, but if I had to do this on a table saw I would use a thicker/bigger/wider square/rectangular panel behind the cut piece as the left hand 'push stick' to run against the fence to give you more bearing on the fence keeping the cut straight. It's not the way I would do it but if all I had to cut it with was a TS with a rip-fence and nothing else then maybe I would.
 
MattRoberts":18l98ryg said:
I agree and disagree with Jacob :D

The first push stick does indeed keep your hands well away from the blade, but the contact area is far too small, and can easily lead to lateral movement.

The second design is indeed way too short - the grip should be well above the max blade height.

I'd argue that something similar to this design provides much more control

Pushstick%20Safety.jpg

I personally wouldn't use that one ever as to push forward you are exerting more downward force than you need to. If the timber and/or plastic blob catch and are flung off, all the force of your arm is directing your hand down and forwards into the blade. You don't actually have any more control, but you do have less flexibility about angles of pressure etc.

For the similar reasons, Steve M's reasoning re 'boot' push sticks seems misplaced to me. Even if you make them so long as to avoid the distance issue, by own admission it involves removing control mid-cut to replace the pushstick in the toe rather than heel position. Changing hand/pushstick position is always a bigger risk than just changing angles of direction once you have a pushstick engaged.

As there should be two pushsticks anyway, one naturally controls the toe near the blade and the other controls the heel. So the simpler thing is two 'straight' pushsticks. One right hand near the fence, left hand on the edge of the piece to keep the timber pressed straight against the fence.
 
But the reason you use two is so that you CAN change position without losing control.
It really doesn't matter what style you use, both have their merits and both have their drawbacks. Use whatever works for you. Certainly do not use either if you are not confident of their reliability (or indeed your reliability).
I have, and use, both sorts. I like the downward effort of the boot. And I change the position, in a safe, controlled manner, at the end of the cut. At no time is my hand at risk of getting near the blade

Incidentally, that last photo might show a decent push stick, but that looks like a ripping cut to me. There should be a riving knife, a guard and a short fence, never mind the push stick! All three are absent!
 
Steve Maskery":1zj266j4 said:
But the reason you use two is so that you CAN change position without losing control.

Yes if you have to it helps, but it is better to keep both in contact at all times so you can direct pressure both downwards and into the fence appropriately. Any point in time at which you reduce that to one point of pressure is undesirable - unavoidable maybe at points but to be kept to a minimum. So why build in a necessity to remove one point of control. during the cut to (essentially) change hand position? To the extent you can exert useful downwards pressure on the workpiece in the interests of safety, that pressure is exerted near to the back of the blade, not the front. The bird's mouth notch is more than ample for the front edge.
 
Jake":1p36c6sb said:
I personally wouldn't use that one ever as to push forward you are exerting more downward force than you need to. If the timber and/or plastic blob catch and are flung off, all the force of your arm is directing your hand down and forwards into the blade. You don't actually have any more control, but you do have less flexibility about angles of pressure etc.

For the similar reasons, Steve M's reasoning re 'boot' push sticks seems misplaced to me. Even if you make them so long as to avoid the distance issue, by own admission it involves removing control mid-cut to replace the pushstick in the toe rather than heel position. Changing hand/pushstick position is always a bigger risk than just changing angles of direction once you have a pushstick engaged.

As there should be two pushsticks anyway, one naturally controls the toe near the blade and the other controls the heel. So the simpler thing is two 'straight' pushsticks. One right hand near the fence, left hand on the edge of the piece to keep the timber pressed straight against the fence.

The pressure is forwards, not downwards. The heel of the Pushstick catching the work piece is what is providing the pressure. The entire base of the Pushstick is providing stability, not downward pressure.
 
You can see that's not intended to be the case from the angle of the handle. If the workpiece and/or toe of that pushstick gets spun upwards, the hand is going down and forwards (in that photo, which may not be perfect usage, perfectly aimed at the blade).
 
Lots of good advice here, I'd also add, (apologies if this is obvious) a combination blade (40 teeth or greater) is probably most appropriate- Id guess this is the standard on most saws. More teeth wcould give a smoother finish, and above all take your time and be smooth. The "dry run" is a great plan to get you used to the movement/path.
 
Matthias Wandel seems to use the '2 Push stick' style that some of you have mentioned (see link), but to me, using this approach, it seems very easy for the board to lift up? as there is very little support above the board keeping it down where it's being cut due to the angle and length of the sticks.

It seems as though the 2 stick method could be improved upon by always using a feather board. That way, the feather board is used to stop the bloard lifting, and all you have to worry about is guiding it.

https://www.youtube.com/watch?v=gdIQY_7T26k

I'm surprised the Grrrrripper hasn't come up yet?

https://www.youtube.com/watch?v=eG-GowLIIjk
 
Personally I wouldn't be too worried about putting the 30cm edge of a 60x30cm sheet against the fence and taking 20cm off it each time. 60x15cm would definitely have me reaching for the cross cut sled.

Given that the fence would be 20cm from the blade I would control the area in line with the blade with a push stick, but I would probably hook my hand over the fence and have a thumb and forefinger both pressing the sheet down onto the table surface, but also squeezing it against the fence. I wouldn't - and never - allow a hand to extend far enough forward to overlap/pass the blade though.

The latter point is why I don't like the "saw handle" type pushers - too many require your hand to pass over the top of the blade.

However, the best way would likely be with a cross cut sled. I built a copy of this https://woodgears.ca/delta_saw/small_sled.html though added a strip of polycarbonate across the top as a guard.

I later built a much bigger version to handle material up to 60cm deep. It's useful both for accurate cuts and reducing tearing/splintering as it's effectively a zero clearance insert for both the bottom and rear of the material you're cutting.

One final safety thought: MDF dust is nasty for your lungs, do wear a dustmask at the very minimum.
 
Just a point...the uTube above is really good and a good, safe sled when cutting, if you have 2 miter slots on your table.....but I have made a similar sled and think it is essential to extend the guarding to the back of the sled as well. Using it as the video your hands, and body, are too near the blade when it has passed through the cut.
 
Giff":36aby9tt said:
Just a point...the uTube above is really good and a good, safe sled when cutting, if you have 2 miter slots on your table.....but I have made a similar sled and think it is essential to extend the guarding to the back of the sled as well. Using it as the video your hands, and body, are too near the blade when it has passed through the cut.
I glued a block on the back of my smaller sled, such that when the highest point of the saw (i.e. the center of the blade) has passed the face of the rear fence (i.e. as far as you ever need to push the sled forward) the blade still doesn't appear out of the back. It wouldn't stop you absent mindedly pushing the sled all the way forward, but you would have to try that bit harder to hurt yourself.
 

Latest posts

Back
Top