You are using an out of date browser. It may not display this or other websites correctly.
You should upgrade or use an alternative browser.
You should upgrade or use an alternative browser.
Making a brass infill plane (Hattori Hanzo, DP)
- Thread starter Hattori-Hanzo
- Start date

Help Support UKworkshop.co.uk:
This site may earn a commission from merchant affiliate
links, including eBay, Amazon, and others.
AJB Temple
Finely figured
Your work is of the highest standard. I am full of admiration.
Hattori-Hanzo
Established Member
Thanks for all the comments guys really appreciate the welcome back 
Andy if I can get 1% of the standard of Shanes work I'd be happy, he really is on another level!
I recently watched the Bench talk video he did where he shares a lot of great information. The techniques he uses to tension his saw blades are incredibly well thought out and executed.
I'd love to own one of his saws, which one did you go for?
Marcros The handle is.........lets say experimental!
thetyreman
Established Member
great to see you back, this one's been added to my watch list, I always enjoy your contributions.

£12.50 (£1,250.00 / kg)
£14.45 (£1,445.00 / kg)
JSP M632 FFP3moulded Disposable Dustmask (Box of 10) One Size suitable for Construction, DIY, Industrial, Sanding, dust protection 99 Percent particle filtration Conforms and Complies to EN 149
Amazon.co.uk

£17.99 (£1.80 / count)
£27.44 (£2.74 / count)
3M 8822 Disposable-fine dust mask FFP2 (10-pack)
Amazon.co.uk

£238.91
£360.17
Trend Portable Benchtop Router Table with Robust Construction for Workshop & Site Use, 240V, CRT/MK3
Amazon.co.uk
Thanks for all the comments guys really appreciate the welcome back
Andy if I can get 1% of the standard of Shanes work I'd be happy, he really is on another level!
I recently watched the Bench talk video he did where he shares a lot of great information. The techniques he uses to tension his saw blades are incredibly well thought out and executed.
I'd love to own one of his saws, which one did you go for?
Marcros The handle is.........lets say experimental!
If you go with a handle like on these GENTS SAWS I have a piece of boxwood which I would happily donate to the project. I dont have anything big enough for a dovetail handle though.
HH, you do seem to have caught the tool-making virus!
I guess the same problem promotes similar solutions - your back-slitting jig bears a striking resemblance to mine:

I have several thicknesses of slitting blades & used to try & make the slot match the blade material as closely as I could, but I've found it's quite easy to squeeze the slotted back in a vise to make it a firm fit, so most of the time I use a 0.8mm blade, because it's sturdy & cuts a clean slot. As you've discovered, you need to take it slowly, I never try to cut more than about 1.5mm per pass. If you take too big a bite, the blade gets hot and can warp, resulting in a twisted slot. Not a very pleasing result when that happens.
One of the real joys of making your own saws is playing with handles, trying different positions & "hang angles" for the grip. I was very enthusiastic when I started out & stuck all sorts of handles on my saws, but funnily enough, after a while I drifted back to pretty standard-lookong handles. I guess they evolved to the way they are for pretty good reasons!
These are my everyday users, each has a different Casuarina wood for its handle.

The wood of most casuarinas is superficially oak-like, but they are harder & denser than most Quercus spp., and take a very fine polish. The early colonists called them "she-oaks", because the wood looked a bit like the oaks they were used to, but was inferior in their eyes. I don't share their jaundiced view, but then we have somewhat better tools to tackle them with, these days!
Cheers,
Ian
I guess the same problem promotes similar solutions - your back-slitting jig bears a striking resemblance to mine:

I have several thicknesses of slitting blades & used to try & make the slot match the blade material as closely as I could, but I've found it's quite easy to squeeze the slotted back in a vise to make it a firm fit, so most of the time I use a 0.8mm blade, because it's sturdy & cuts a clean slot. As you've discovered, you need to take it slowly, I never try to cut more than about 1.5mm per pass. If you take too big a bite, the blade gets hot and can warp, resulting in a twisted slot. Not a very pleasing result when that happens.
One of the real joys of making your own saws is playing with handles, trying different positions & "hang angles" for the grip. I was very enthusiastic when I started out & stuck all sorts of handles on my saws, but funnily enough, after a while I drifted back to pretty standard-lookong handles. I guess they evolved to the way they are for pretty good reasons!
These are my everyday users, each has a different Casuarina wood for its handle.

The wood of most casuarinas is superficially oak-like, but they are harder & denser than most Quercus spp., and take a very fine polish. The early colonists called them "she-oaks", because the wood looked a bit like the oaks they were used to, but was inferior in their eyes. I don't share their jaundiced view, but then we have somewhat better tools to tackle them with, these days!
Cheers,
Ian
AJB Temple
Finely figured
Ian, what is the reason for the curved shape on the blade for the top left saw? And why does the one below it have no back? Just curious. Your work looks very high quality.
Hattori-Hanzo
Established Member
If you go with a handle like on these GENTS SAWS I have a piece of boxwood which I would happily donate to the project.
Thank you for the kind offer Marcros, I've already selected the woods for these saws but a nice piece of box wood may come in handy for a future project I have in mind. I'll send you a pm when I get onto it
Thanks for the comment Ian, that's a nice selection of saws you've made yourself and they look superb, Lovely handle details. Am I right in saying the curved end is just decorative or does it serve a purpose?
clogs
just can't decide
Hattori,
nice work, neither time or patients for me I'm afraid......
that Vixen (US)file I seem to remember them as Dreadnought files (UK).....
they are used in car body work.....for shaping lead and later times on body filler......
they were never exp and the original I bought although a little blunt now must be 50 years old......
it's the flexi one with two holes, mine came from Brown Bros, Manchester...they were nation wide comp......
No idea if they still excist tho.....body shop supplies will still sell em.....
nebver really looked after it, shame on me......
have fun....
I find delecate filing turns my fingers numb.....
Tony Zaffuto
Established Member
Hattori,
nice work, neither time or patients for me I'm afraid......
that Vixen (US)file I seem to remember them as Dreadnought files (UK).....
they are used in car body work.....for shaping lead and later times on body filler......
they were never exp and the original I bought although a little blunt now must be 50 years old......
it's the flexi one with two holes, mine came from Brown Bros, Manchester...they were nation wide comp......
No idea if they still excist tho.....body shop supplies will still sell em.....
nebver really looked after it, shame on me......
have fun....
I find delecate filing turns my fingers numb.....
I believe similar files can be had, under the name "Iwasaki". A number of woodworking resellers handle them, as well as Amazon. On Amazon, there are many Chinese knock-offs of the Japanese "Dragon" rasp. I bought one, maybe $10 USD, and it works superbly, like a 13 grain Auriou.
Hattori-Hanzo
Established Member
Thanks for the comment Frank and for the info on the dreadnought files, I just did a quick search for them and they may well be a good addition to my file set.
Thank you for the follow up to Tony, I will check them out
With the saw backs partially done I moved onto the handles.
Like I said earlier the handles wont follow any traditional form, I had a vision in my mind as to how I wanted them to look and I've tried to stick closely to it.
I chose to use maple and cherry for one handle and ash and wenge for the other, I had these woods available to me at the time but I'm still waiting to get my hands on something really exotic.
I love maple and this piece had a small amount of "pip" which was complemented nicely by the cherry.
The dark and light contrast of ash and wenge goes together nicely too and they have a similar open grain structure.
I used them as I was toying with the idea of using a liming paste to further contrast the open grain but after a quick sample I preferred the natural colour and contrast of the woods.
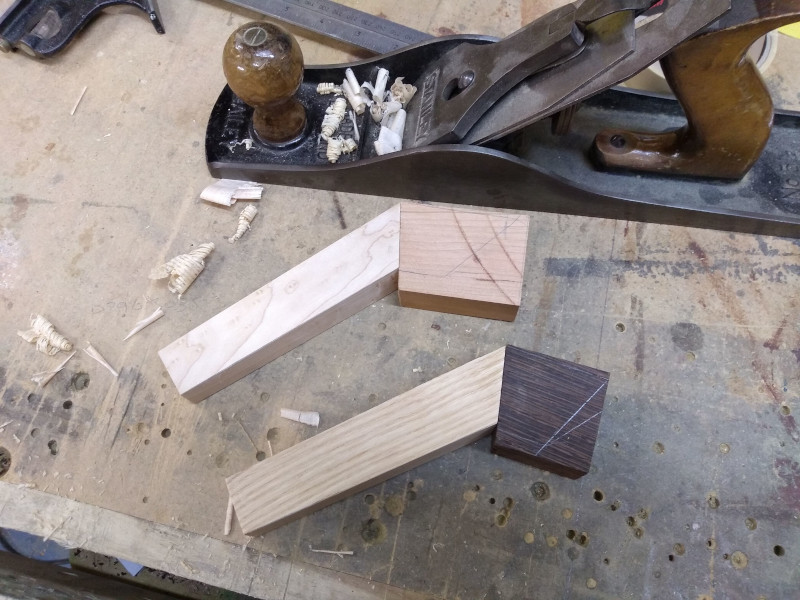
The woods are simply held together by beech dowels and glue, cramped up and left to cure over night.
After some early shaping and adding a 45 bevel to the handles I made a simple jig for cutting the slot in the upper portion of the handle to accept the brass backs.
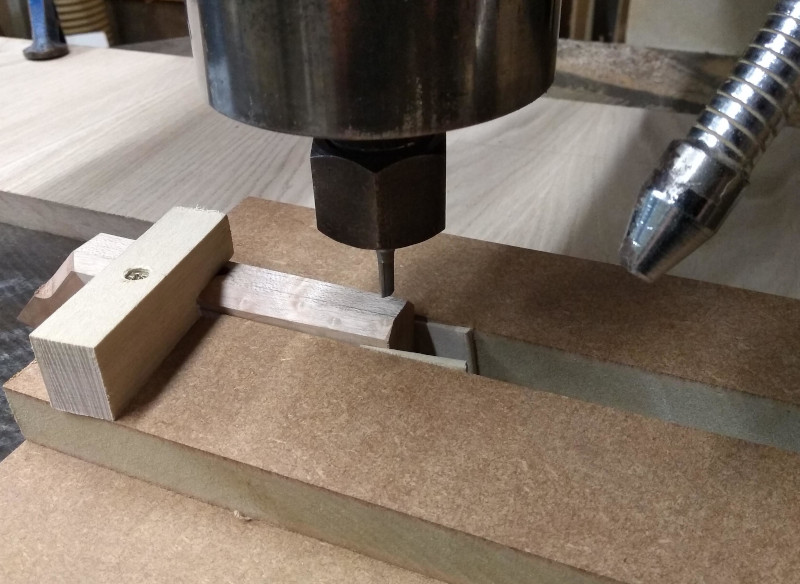
Using the over head router, taking shallow passes to reduce chatter I cut the majority of the wood away
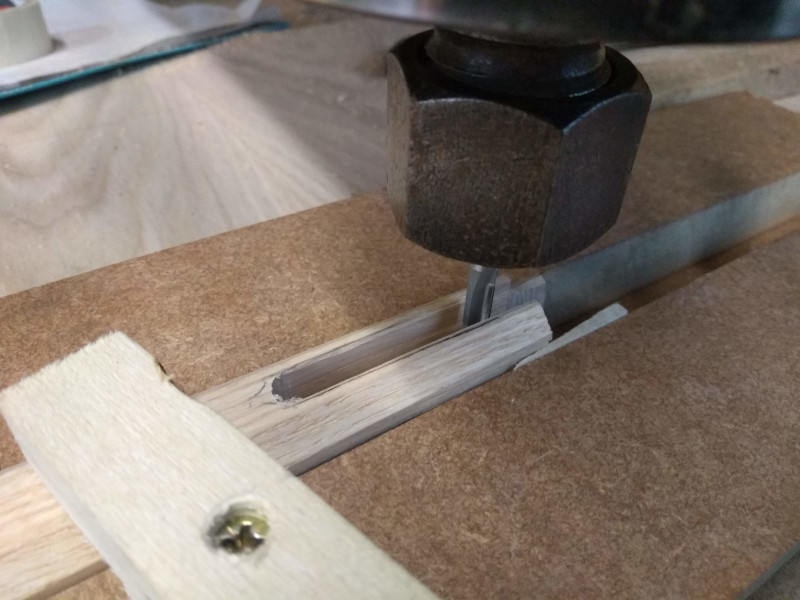
And then a lot of trial fitting and refinement with hand chisels. I used blue marker pen on the side of the brass backs when pushing them into position in the handle, this then left a mark of any tight spots in the groove which I could then cut away with the chisel.
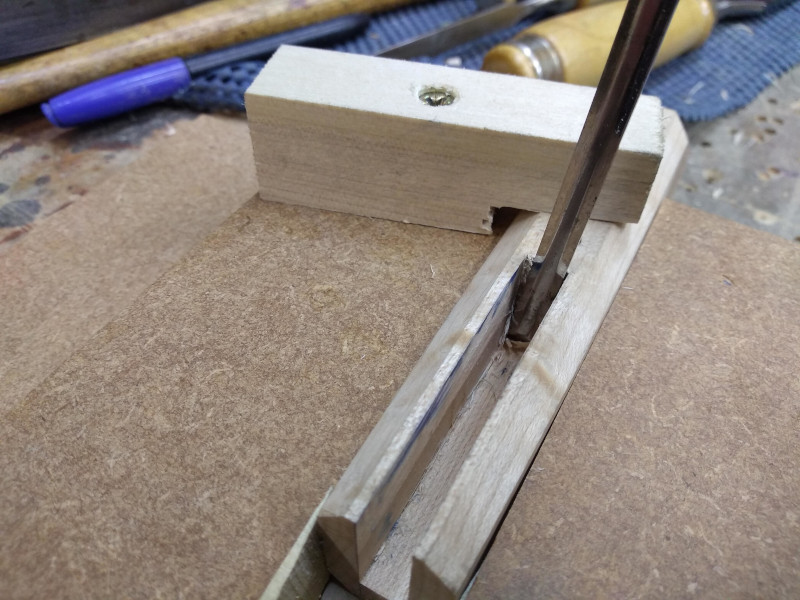
This is one of the grooves nearly finished, Rather than coming to abrupt square end I'm attempting to add a detail feature to finish it off
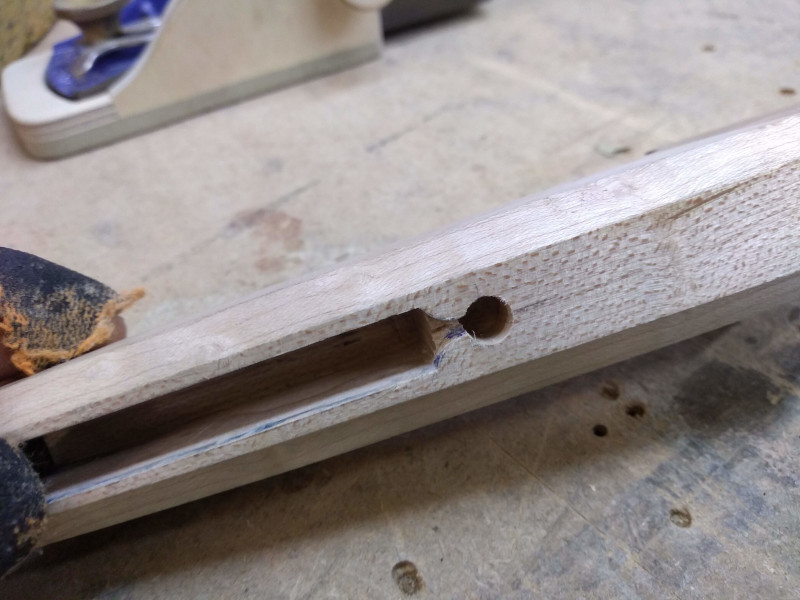
And here is the early stages of transferring that detail over to the brass back. I plan to use a piece of round stock in the hole getting the joint as tight fitting as possible to hopefully leave a near seamless joint.
This will require a lot of careful filing and gouge work.
I also drilled and taped for a bolt in the under side of the brass back. This will be fixed through the bottom of the handle when I come to assemble the saw.
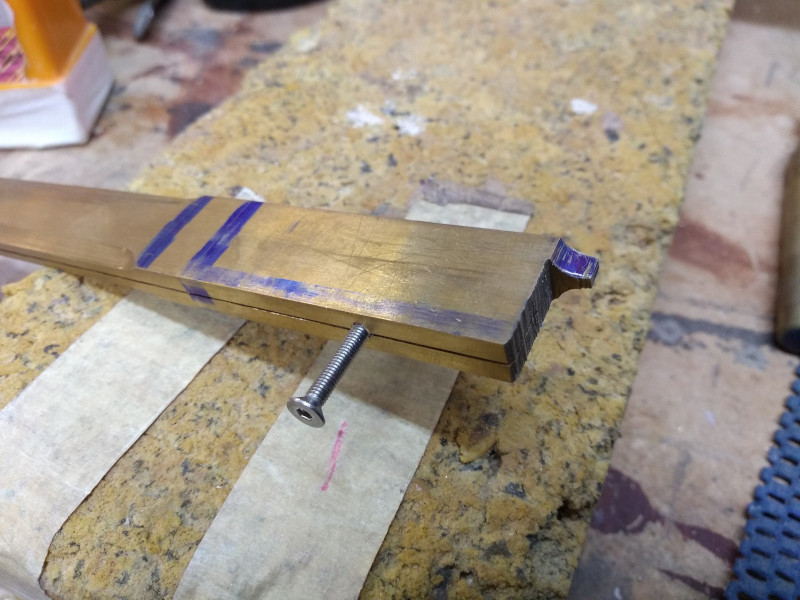
Thank you for the follow up to Tony, I will check them out
With the saw backs partially done I moved onto the handles.
Like I said earlier the handles wont follow any traditional form, I had a vision in my mind as to how I wanted them to look and I've tried to stick closely to it.
I chose to use maple and cherry for one handle and ash and wenge for the other, I had these woods available to me at the time but I'm still waiting to get my hands on something really exotic.
I love maple and this piece had a small amount of "pip" which was complemented nicely by the cherry.
The dark and light contrast of ash and wenge goes together nicely too and they have a similar open grain structure.
I used them as I was toying with the idea of using a liming paste to further contrast the open grain but after a quick sample I preferred the natural colour and contrast of the woods.

The woods are simply held together by beech dowels and glue, cramped up and left to cure over night.
After some early shaping and adding a 45 bevel to the handles I made a simple jig for cutting the slot in the upper portion of the handle to accept the brass backs.

Using the over head router, taking shallow passes to reduce chatter I cut the majority of the wood away

And then a lot of trial fitting and refinement with hand chisels. I used blue marker pen on the side of the brass backs when pushing them into position in the handle, this then left a mark of any tight spots in the groove which I could then cut away with the chisel.

This is one of the grooves nearly finished, Rather than coming to abrupt square end I'm attempting to add a detail feature to finish it off

And here is the early stages of transferring that detail over to the brass back. I plan to use a piece of round stock in the hole getting the joint as tight fitting as possible to hopefully leave a near seamless joint.
This will require a lot of careful filing and gouge work.
I also drilled and taped for a bolt in the under side of the brass back. This will be fixed through the bottom of the handle when I come to assemble the saw.

can I ask what the middle right handle is made from?...
Yep, Allocasuarina cunninghamiana, aka "River oak". It's normally a fairly bland pale brown colour, but this old tree was heavily spalted, hence the black lines....
Cheers,
Ian
Ian, what is the reason for the curved shape on the blade for the top left saw? And why does the one below it have no back? ...
Just whim, AJ., it's a loose copy of a Disston D9 backsaw.
The backless saw is a small panel saw...
Been making saws for 10 years or more now, so I'm starting to get the hang of it.......
..... Thanks for the comment Ian, that's a nice selection of saws you've made yourself and they look superb, Lovely handle details. Am I right in saying the curved end is just decorative or does it serve a purpose?
Mainly decorative, HH. As I said in the above post, it's a loose copy of the Disston D9 (scroll down page). I didn't copy the original handle very closely, I tried that thumb groove you'll see on the illustrated example and found it disconcerting, so I left that off the real thing. However, the protruding nose is actually useful, occasionally; it can reach into places where a normal square-ended saw can't. The emphasis is on "occasionally", I wouldn't go chopping-up a regular 300mm saw just for that purpose!
You're on a very slippery slope here, my lad (damhik!). Saw-making can be even worse than plane making - there are so many combinations & permutations to try - size, weight, tpi, hang-angles etc.! I have a few saws (most of those in the pic above) that are my regular daily users, but I have another half-dozen or more that I use infrequently that I can't bear to part with for one reason or another.
Making the handles is the major part of the job, partly because I'm a fusspot & want them to look decent and fit my hand like a glove, and partly because many of the woods I choose to work with are bone-hard. Lots of rasp-work (I find smaller "modellers" rasps invaluable for this job), required. I use small scraps of saw plate as scrapers, which greatly speed up the finishing, but there's still a fair bit of sanding required to fair all those curves.
We are spoilt for choice down here when it comes to selecting woods for handles - that's probably half the reason I've made so many. For example, here's a couple you've probably never heard of:
"Tiger Myrtle" (Nothofagus cunninghamii)

And "Budgeroo" (Lysicarpus angustifolia):

There are still quite a few woods I haven't explored, but fortunately, saw plate is very hard to get here, and costs a bundle to import, so my saw-making has slowed to a trickle this past year or two....
Cheers,
Ian
Hattori-Hanzo
Established Member
They are beautiful saws Ian, the wood on the last two look stunning.
Thanks for the link to, interesting reading about all the different Disston saws never knew there where so many.
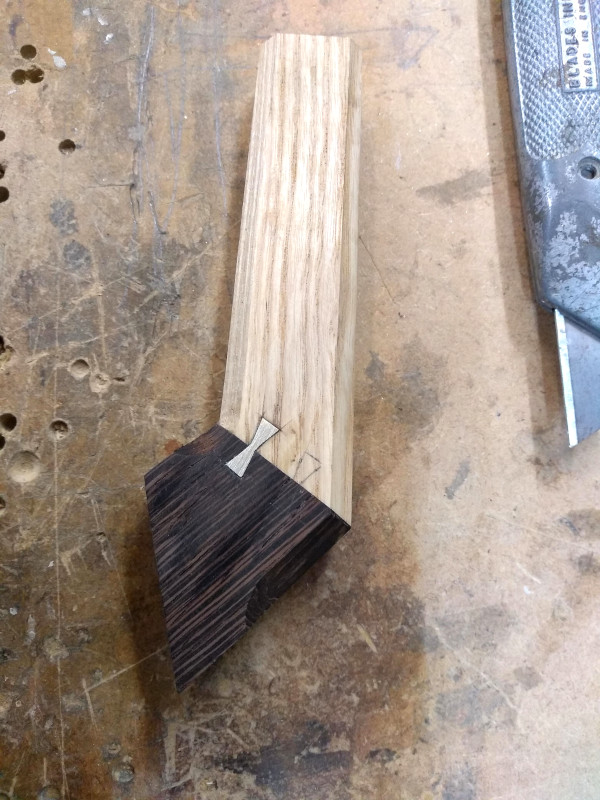
Progressing on with the handles and the vision in my mind I needed to add some brass bows between the contrasting woods.
I mark them out on an off cut of brass from the last plane I made glad I never throw any thing away, I knew that tiny strip would come in useful
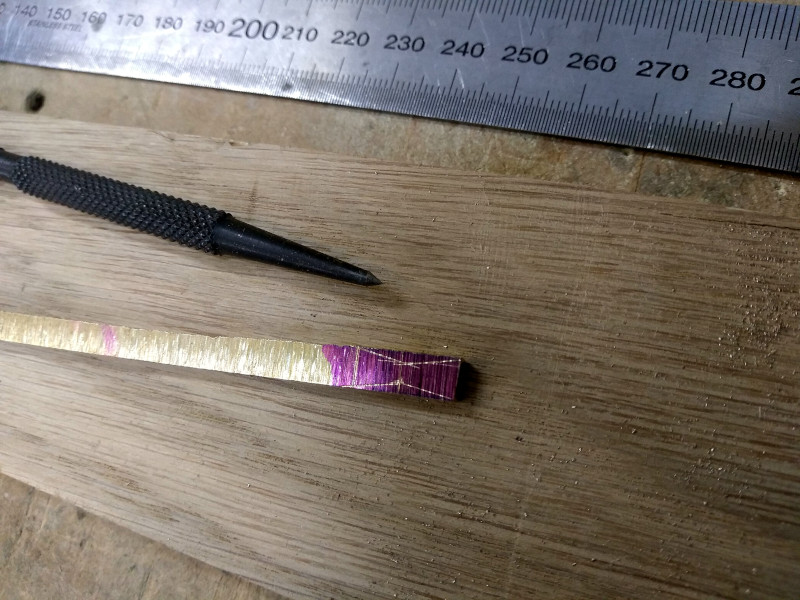
After setting several out I start to carefully file them
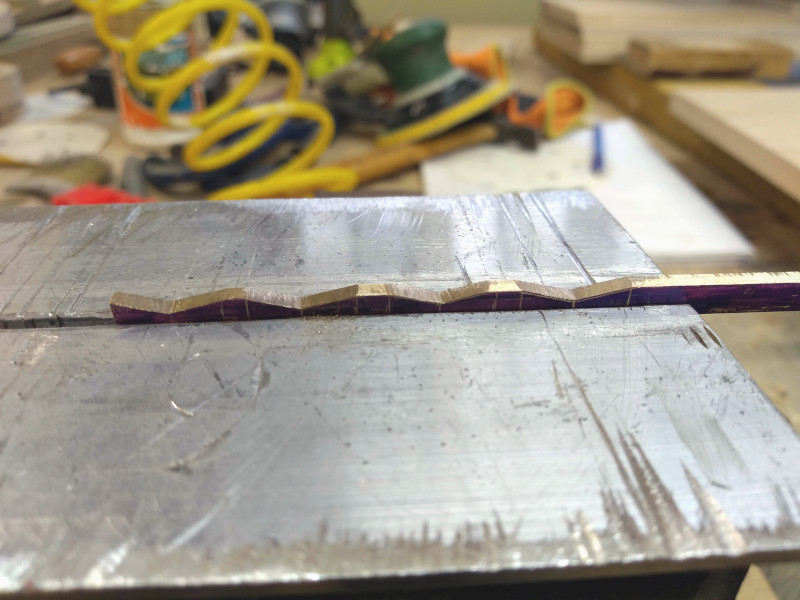
Delicate work trying to get them as uniform as possible while keeping the edges square.
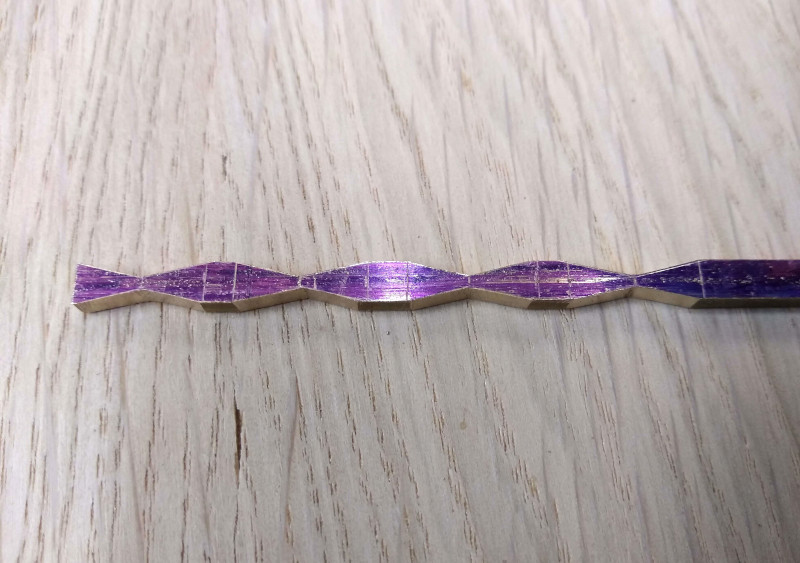
Once happy with the shape I roughly cut them to length with a junior hacksaw.
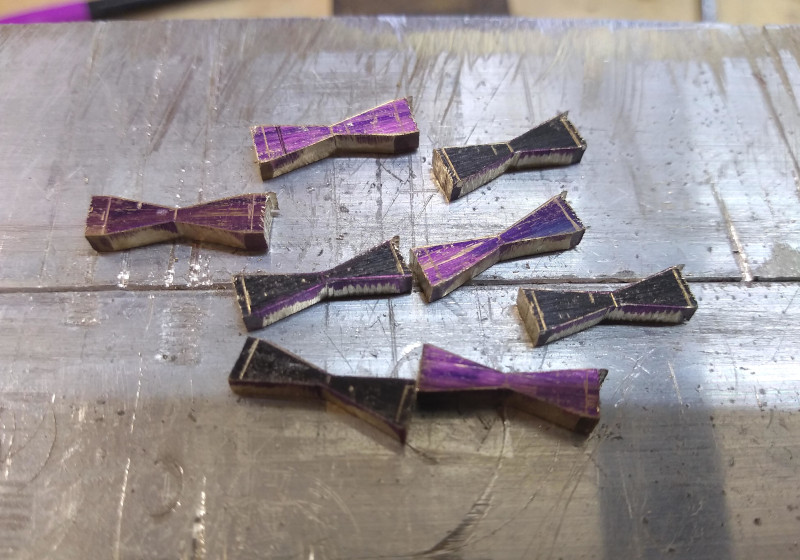
Then refined them with needle files to finish off.
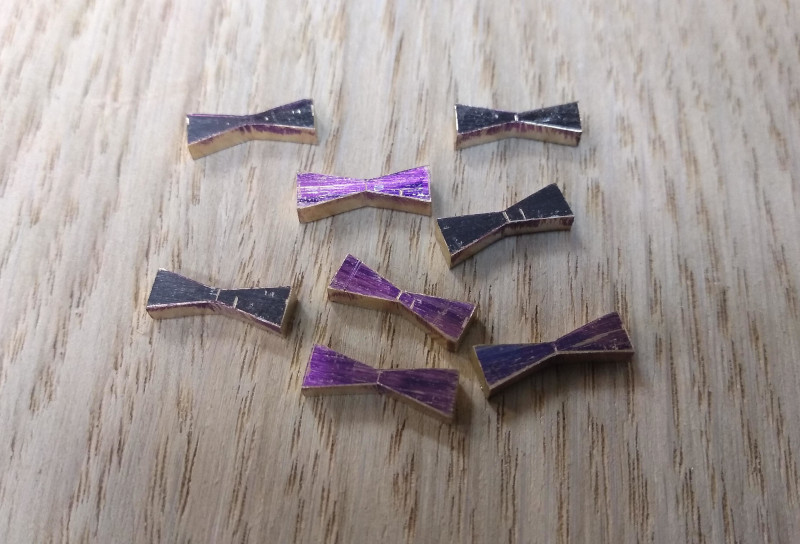
Next up was the painstaking task of cutting them into the wood. I used a modified chisel and stanley blade to carefully cut away the wood little by little.
I feared the open grain of the ash and wenge would cause issues cutting such a small detail but fortunately the wood worked in my favour.
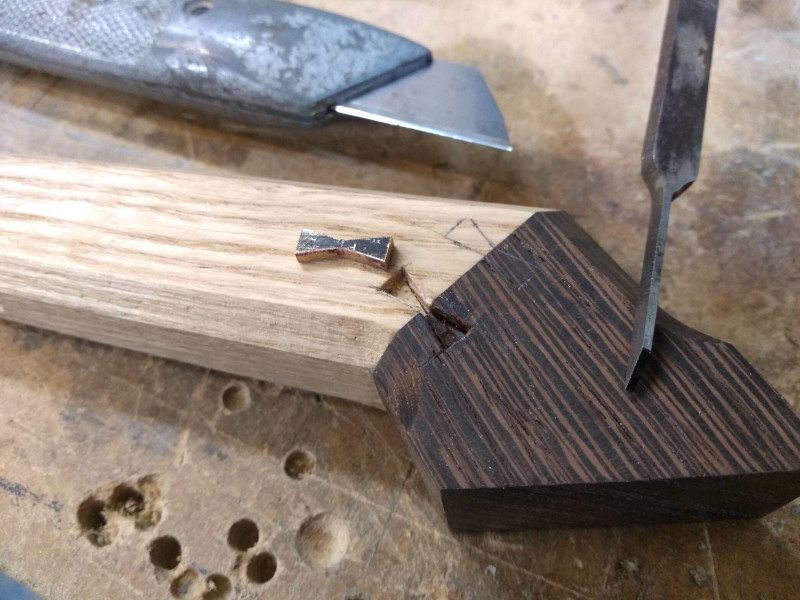
Just for a little context the bows are 14mm long and taper down to 1.5mm in the centre
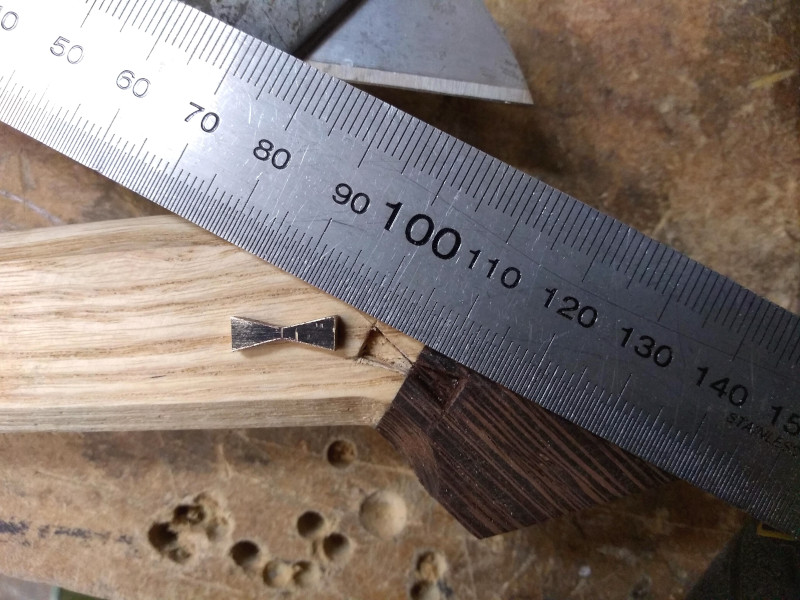
I then fixed the bow in place with epoxy. One down 7 to go...
Thanks for the link to, interesting reading about all the different Disston saws never knew there where so many.
Progressing on with the handles and the vision in my mind I needed to add some brass bows between the contrasting woods.
I mark them out on an off cut of brass from the last plane I made glad I never throw any thing away, I knew that tiny strip would come in useful

After setting several out I start to carefully file them

Delicate work trying to get them as uniform as possible while keeping the edges square.

Once happy with the shape I roughly cut them to length with a junior hacksaw.

Then refined them with needle files to finish off.

Next up was the painstaking task of cutting them into the wood. I used a modified chisel and stanley blade to carefully cut away the wood little by little.
I feared the open grain of the ash and wenge would cause issues cutting such a small detail but fortunately the wood worked in my favour.

Just for a little context the bows are 14mm long and taper down to 1.5mm in the centre

I then fixed the bow in place with epoxy. One down 7 to go...

Hattori-Hanzo
Established Member
Got to keep my hand in somehow Ian 
Other than the addition of a brass counter weight and some fettling that's roughly the handles final shape.
I'm trying to stay true to what I had envisioned so tradition and comfort are kind of taking second place at the moment.
I did have concerns that the sharp angles would be uncomfortable to hold but it's actually not bad and the rear section nestles into my palm nicely.
Once the handle is at its final shape and the sharp edges have been removed I'm hoping it will be as comfortable as a traditional gents saw.
Similar threads
- Replies
- 4
- Views
- 861


