Ash platter with WIP pics.

UKworkshop.co.uk

Help Support UKworkshop.co.uk:

This site may earn a commission from merchant affiliate links, including eBay, Amazon, and others.

johnny.t.

Established Member
Joined
29 Oct 2008
Messages
1,714
Reaction score
0
Location
Norfolk, near the sea.
Took the camera out to the shed this morning.

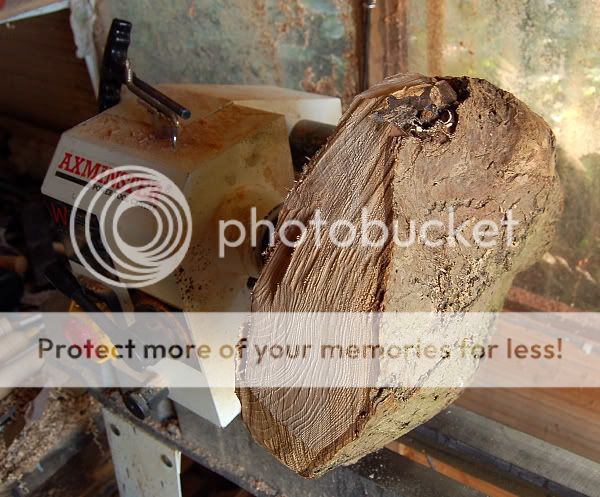
Started off with a crotch of ash and split it in half with the chainsaw.
ashplatter001.jpg


Trimmed it near round with the chainsaw and put it on the lathe with the screw chuck.
ashplatter003.jpg


Flattened the back off enough to form the dovetail socket for the chuck and mark out the foot.
ashplatter004.jpg


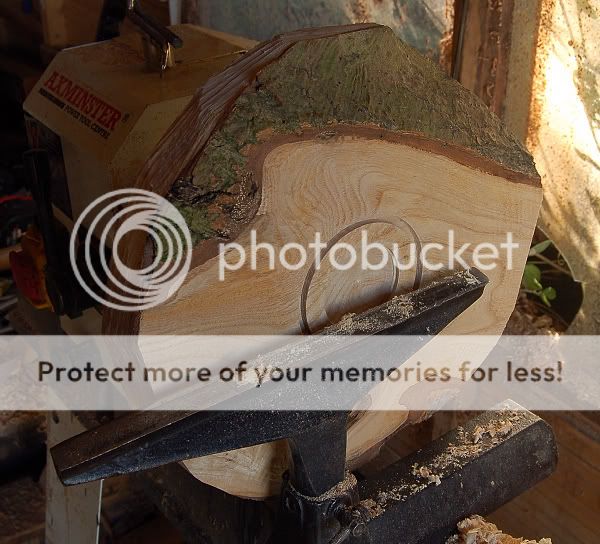
Formed the back and started to find holes! :shock:
ashplatter005.jpg


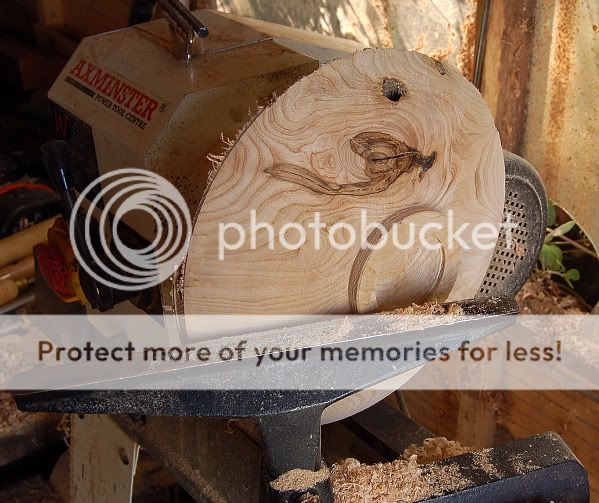
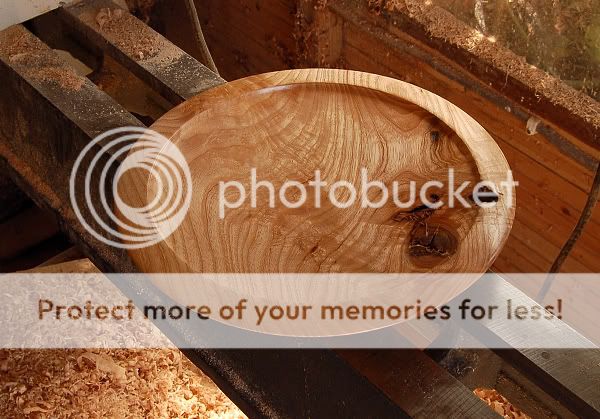
Reversed, cut the front but sadly had to loose a couple of inches due to those holes...
ashplatter007.jpg


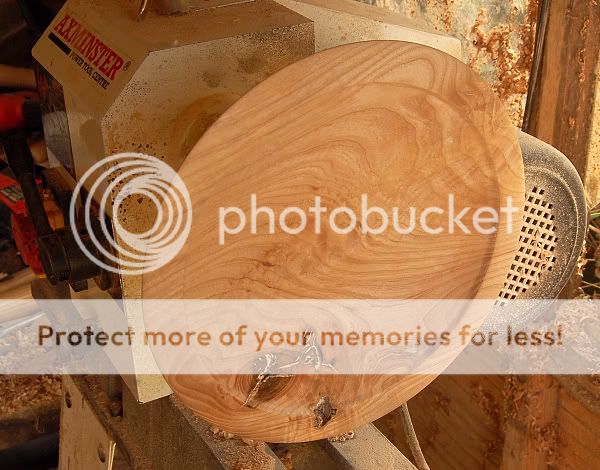
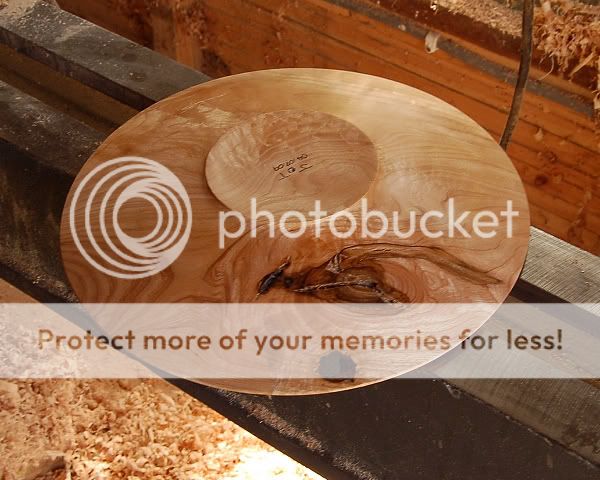
The front was then finished and the whole piece reversed onto a disc of plywood and held in place with the tailstock to finish the foot(I forgot to take a pic :oops: ).

The finished article.
ashplatter008.jpg

ashplatter009.jpg


Comments welcomed.

JT
 
cornucopia":2rrxhqkc said:
the bowl is excellent...but for me your signature is too crude looking for such a nice piece.

Sadly a problem that has plagued my whole life George. My hand writing is akin to that of a small child :cry: . But what can I do? I like to mark what I make but a sticker would be tacky(no pun intended) and my only other real choice would be to get swmbo to do it for me but that just wouldn't feel right.
 
Johnny,

Another lovely piece, where do you keep magicing these wonderful pieces of timber from? :shock:

As for a signature (if you want a change) could you not draw a design (or get one drawn) that you trace onto a piece.

I`ve seen a few professional turners who use a symbol rather than there name to identify there work, each symbol looks identical, so i imagine they must use a stamp or template of some description.
 
Very nice JT :D
The Ash is lovely and grain wild looking,with a lovely colour to it.
Nice wip piccys too :D
I'm afraid my handwriting leaves a lot to be desired,so you are not alone :shock:
 
my doctor cant even read my writing johnny- i just meant less in your face- more subtle. i use a dremel with a small point tip in it and just sign like you would with a pen but very small and in an out of the way place.
to give you an idea of size i can sign my name 4/5 times on a 5p piece.

still this is a small point on an otherwise lovely piece of work =D>
 
A beautiful piece of work, very tactile, elegant, quirky and a sort of wedding present type of gift. I would agree about signing your bowl on the base. Personally I would use a Peter Childs pyrography machine with the wire tip and develop a nice calligraphic style. You can just practice on scraps of wood. Also if you get some Abel labels printed with your address and phone number you can stick on the base of your pieces and you can get quite a bit of follow up trade after your things have sold.
 
Very nice Johnny. Much nicer than my attempt. Not sure how I feel about 'holes', I've been lucky not to encounter them yet.

I've thought a lot about signing my work. My signature is a sloppy mess which I'd not put anywhere near any work I was proud of. I thought about having some sort of miniature brand made up but that seems a little costly. Actually, thinking about it, I don't think stickers are such a bad idea. Most gift items have them on. We have a pair of wedgewood candlesticks here which have stickers on.
 
Soulfly wrote
Also if you get some Abel labels printed with your address and phone number you can stick on the base of your pieces and you can get quite a bit of follow up trade after your things have sold.
Where could you get those printed,or could it be done on the home printer :?:
 
Paul.J":1b0ewpfr said:
Where could you get those printed,or could it be done on the home printer :?:

Staples do sheet labels the size you want. You can create your own in word or similar program and print your own

Fred
 
Great platter Johnny.

I like this kind of platter with some 'character' more than a perfect piece of timber. Each is definitely unique.

Regards,

Mike C
 
Well done on controlling that 'blank' on the Axminster during the initial stages, I guess the spectacular figuring added to the determination to tame it.

Appreciate the surface finish you have achieved without blending in the occlusions,

What finish did you use by the way?
 
Thanks for the input and comments 8)

I still dont like stickers, I just find them tacky looking, more belonging to mass produced gifts,rather than one off unique items,that I feel benefit from a makers mark.,i.e signature or other design. I'll have to come up with something that works :? :?


wizer":r4ww6bbc said:
......Not sure how I feel about 'holes', I've been lucky not to encounter them yet......

Lucky! No way, holes = character, its something left in the item by nature,something unique. If I come across them I always try to use them in the design,OK sometimes you can't and they are cut away but usually I find a way to keep them. They always look great on a rim of a chunky bowl or included in an arty piece. Wood is a natural product after all and a hole or bit of rot shows that in a nice contrast to a smooth 'perfect' finish.
Least thats how I feel :lol:

Chas, the little Axminster loves it :lol: ! The finish is 2 generous coats of sanding sealer,sanded back with 600 grit as this seems to make Ash really 'pop' and just a drop of wax over the top.

Cheers JT
 
loved the how it was done photos Jt, well done. The bowl is excellent, and the wood is stunning, you really did well with this piece. What tool do you finish with, a scraper?
On the pyrography front as already mentioned, try it out on several different pieces before attempting it on any of your bowls, because not only does it burn differently on different woods, but also at different heat too.
 
stevebuk":1lql6iis said:
......What tool do you finish with, a scraper?

I do a lot of things Steve but ash seems to really hate my scraper and as sharp as I can get it and gentle as I can be it still tears the endgrain bits, so the final cuts here were with the 1/2" bowl gouge turned right on its side and barely touching the wood, you know when you get it right as you make really thin light shavings. I think Bobham posted a video showing this cut recently.

JT
 
johnny.t.":bqn58vu9 said:
......Chas, the little Axminster loves it :lol: ! The finish is 2 generous coats of sanding sealer,sanded back with 600 grit as this seems to make Ash really 'pop' and just a drop of wax over the top...

I agree, my basic for Ash is cellulose sealer lightly waxed unless it's likely to need wet wiping.

For some reason I like the look of Shellac and wax on similar grained Oak, I think it's something to do with the partial pore filling of the Shellac.
 
Can someone tell me what WIP is? I'm scratching my head!.... I've an idea but not 100%.
 
Back
Top