Achieving a perfect 45 degree chamfer.

UKworkshop.co.uk

Help Support UKworkshop.co.uk:

This site may earn a commission from merchant affiliate links, including eBay, Amazon, and others.

Escudo

Established Member
UKW Supporter
Joined
26 Nov 2006
Messages
965
Reaction score
81
Location
Sheringham, North Norfolk
Hello there all,

I would like to know how members go about making a perfect chamfer on edges.

I recently acquired this accessory for my block plane, thinking this would be an easy solution - but it doesn't seem to be that effective or the answer it seems. Does anyone have one of these guides? - what do you think?

http://www.leevalley.com/wood/page.aspx?c=3&p=46296&cat=1,41182

I should be grateful for a few tips or sound approach to follow so I can perfect this task.

Cheers, Tony.
 
I have one of those Tony, and have also had lots of problems getting it to work properly. In fact I put mine back in the box and pretty much ignored it for almost a year until I had another bash with it a few weeks ago. I got it sorted out recently and have been meaning to write up the saga here for a while now, hadn't got round to it until your post prompted me.

I had always assumed it was me being thick and not using it correctly, but on the advice of Mathew of Workshop Heaven I e-mailed Rob Lee about my troubles. I have to say I have nothing but the highest praise for Rob and his colleague Steve Oszmian for their swift action. I got a reply from Rob within hours, despite having caught him on holiday, and he put Steve onto the problem.

It turns out that the design of LV's LA block plane was modified slightly to make it stronger and this involved making the toe a little thicker, and consequently the pocket for the adjustable part a little deeper. This means that when the chamfer guide (dimensioned to fit the shallower pocket) is substituted, the toe is now substatially lower than the rest of the sole.

This resulted in very heavy cuts when chamfering and therefore very poor results with lots of tearout, it really was unusable.

Steve's solution was to send me some shims to try out under the chamfer guide to rectify the difference. He sent me 20, 10 and 5 thou shims, and I found that .025" was just about perfect. I now have a chamfer guide that works perfectly. :D

I don't know whether your's suffers from the same problem Tony, I've no idea how many chamfer guides were made to the earlier dimensions and then wound up being paired with later planes, but it's worth checking. The easiest way is to remove the moveable part of the guide, then attach it to the plane and check with a straight edge (although as you can see from the first pic the problem's pretty easy to see without any dismantling). If you see a gap like this you'll need to get in touch with LV for some shims (or whatever other solution they've come up with) to get them level.


It's worth the effort of getting sorted. Once everything is as it should be nice crisp 45deg chamfers are easlily repeatable.
Hope this helps.
 
Tony/Mark,
I've just made a jig to cut chamfers but compared with the LV kit it is very cumbersome. Could you tell me who in the UK supplies most of the LV offerings or do you get them direct from Canada?

Cheers,
Jim
 
Thanks for that Mark, your spot on. I thought it was me being silly. I have just the same problem. In fact I wondered if a washer or something was missing from the guide. When installed you can see that it is not level with the base of the plane, which gives rise to deep cuts, no control, and inevitable tear-out.

I will make some enquiries with LV / CHT. They are a very good firm and I'm sure it can be resolved. I like the idea of this guide, not withstanding this issue I'm sure it will do a good job in the long run.

Hope we can catch-up for that pint when your in town, later this summer.

Gower, I use Classic Hand Tools for Veritas products, also Lie Nielsen etc. They are very helpful and I think it is good to support them as they are a small independent retailer. Brimarc are the UK distributors for Veritas and they are now part of Axminster group.

Thank you both for your interest. Cheers, Tony.
 
Glad to be of help Tony, and as for that pint I'm looking forward to it. (I'll PM you nearer the time.)

Jim, I got my LV stuff partly from Workshop Heaven and partly from CHT. Following Axminster's acquisition of Brimarc they now do the whole range too.
 
I also had a minor issue with my LV guide: it would leave marks on the face and/or side of the stock being chamfered. This was easily solved by applying a piece of UHMW tape of each side of the chamfer guide. LV sells this tape described as "slippery tape".

I never had an issue with tear-out with my guide, so the dimensions between the block plane and guide must have been correct.

Tony Z.
 
Esc - like lots of these things, the bolt on goodie to convert a small plane into a chamfer plane is just 'fancy waistcoats' (as my old dad would have said)...a gimmick not really needed, same as the fence attachment for the LV jointer to plane edges which was discussed recently. To make a decent chamfer, mark it with a pencil gauge (never a marking gauge) and simply use your block plane to take skewed shavings till you reach both the lines...takes a bit of practice, but it's not all that hard :wink: - Rob
 
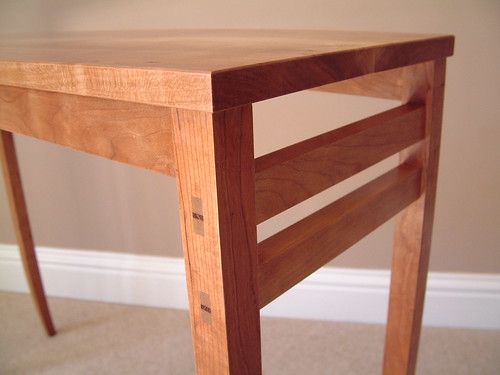
Doing it freehand always seems to work OK for me. I quite often use a very tiny chamfer that only needs a couple of passes of the block plane, which freehand is a quick and pleasurable job to do. Personally I would have thought the time setting up aparatus to jig the operation is not worth it.

I favour, as Rob suggested, skewing the plane quite heavily as this makes it easier to control the angle. I'm quite sure that the chamfer I generally produce is not accurately 45 degrees, or of geometrically defined proportions, but if it looks right then that must be good enough I would have thought.

Without wanting to get all Krenov on this, there is a view that doing these little details by hand is bringing you closer to the work and 'leaving fingerprints', which I think is good thing.

2656803360_0056ebe576.jpg


Cheers, Ed.
 
I've got that block plane and the chamfer guide, and must admit that I didn't get along with the guide at all. Tearout - although perhaps the comments above explain why.

I've reverted to doing them by hand - like Ed says, it is a bit of artistry back into the work which can be made mundane by jigs (although I accept they have their place).

Nice table Ed.

Cheers

Karl
 
...or done like this:

pwpfipekfkekri.jpg


all sharp arises were given a small chamfer, by hand, including the ebony blocks for the feet. Doing this sort of thing with an attachment would only make the job a lot harder - Rob
 
Your quite right fellas, freehand is best.

I am going to have to practice a bit, ........if it goes a bit wonky I guess it will only add character and that hand made feel to my pieces.

The chamfer guide may still have its place, perhaps for larger chamfers where imperfections will be more obvious. I am going to organise that shim to get it working properly as advised by Mark.
Ed that is a nice table. I like the through tenons. Very smart.

I am still building up my hand tool collection, and have been working on a tool cabinet (modifications to a second hand ercol server). I will post some pictures when my work is complete.

I do not have a pencil gauge, this looks like quite a good one.

http://shop.johnlloydfinefurniture.co.uk/product/asp/ProdID/5251/af/page.htm

My birthday is coming up as well. :)

Cheers, Tony.
 
Tony - for 130 of the folding I should think it is a good one...you could make (or modify) and existing oldish gauge for about £4.00 and that would be pushing it...have a look round your local second hand tool emporium for some cheapish gauges, very easy job to change a marking gauge into a pencil gauge - Rob
 
Tony,

There are various ways of making pencil gauges. There's the modified marking gauge type (as suggested by Rob). Another way is to drill a hole in the blade of one of those adjustable squares so that you can stick the point of a pencil through the hole (there are some expensive commercial ones that work like that). But for a lot of jobs, just holding the pencil in your hand and running it down the work piece with your finger acting as a fence is surprisingly accurate - I do it all the time having learnt that dodge from my old woodworking teacher back in the '50s.

Of course, if it's your birthday and someone has money to throw around, that John Lloyd one is rather nice and shiney :-k :lol:

Cheers :wink:

Paul
 
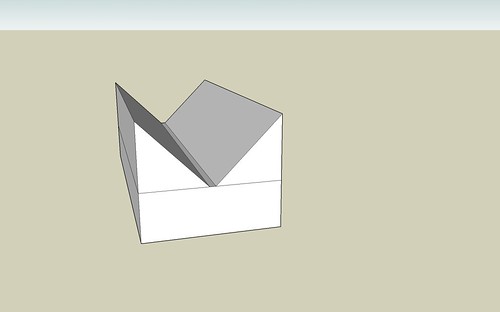
I have been trying to come up with a way of putting a small, neat chamfer on the front edges of a shelving unit after it has been constructed and wondered if something like this would work:

2660689247_bcfdfc913e.jpg


The idea would be to screw the 45 degree pieces from the bottom of the rectangular block, clamping a strip of sandpaper in the central groove. This should allow you to chamfer right up to the point where the shelves meet the carcase sides.

Joel
 

Latest posts

Back
Top