Turning Newbie toggle boring questions

UKworkshop.co.uk

Help Support UKworkshop.co.uk:

This site may earn a commission from merchant affiliate links, including eBay, Amazon, and others.

Togalosh

Established Member
Joined
22 Sep 2011
Messages
513
Reaction score
5
Location
Enclave Des Papes, France
Hello Gents,

I am attempting my first project after my training day & only my second in all & I have a few questions do with equipment. I have the lend of a Record lathe with a live centre on the tailstock (which might be obvious) & I've bought Rind centres & 4 lovely new RS chisels..but think it's not enough to do what I need.

I have been asked to make some pull cord toggles/knobs - so I made a great start & knocked up a few samples of various shapes n sizes that I am quite pleased with ..but then I needed to bore a 3-4mm hole down the centre & things stopped there very suddenly...

So, I believe I need a chuck for the head stock to hold the work at the 1 end only & a drill chuck for the tail stock that I could mount a drill bit into so that I could bring the 2 together - is this correct?

BUT a normal 3 - 5 mm drill bit is far too short & I cannot find anything on Axy - any suggestions?
Chucks?..there's a lot to choose from but I am thinking of one of the Axy SK's - good product?
Is there any turning tool/s that you have found to be "must have" ?

Thanks in advance
Togs
 
Hi Togalosh,

Have you got a face plate with your Record lathe? They normally come with one.

I've never made a light pull but if i wanted to make one without buying any extra equipment ( which is what I usually try to do) I'd drill the wood first. I would say you need to drill a large diameter on one end to hide the knot on the cord, and a smaller diameter to thread the cord through. If you make the large diameter hole deep enough, then you could make a tiny jam chuck form a chunk of wood attached to the face plate. You could probably bring the tailstock up to begin with until you need the space.

Otherwise you could buy a light pull drive, but you'd have to make a fair few to cover the cost of it.

http://www.axminster.co.uk/axminster-im ... pull-drive
 
I have one of those light pull drives, I have yet to figure out how the thing works!

I bought a set of very long brad spur drill bits on ebay for a very reasonable price (around a tenner for half a dozen or more, the smallest is 3mm and a good 250mm long, I use a jacobs chuck in the tailstock to hold them. Very few drill bits will go true for much of a distance though, so the best approach is to pre drill the blank and use the resulting holes as your centre points.
 
( http://www.ukdrills.com/product.php?catid=248)

1. cut your wood to length
2. drill 3 or 4mm hole through length
3. increase hole size in one end (about 10mm deep) to 8mm or 10mm or whatever size you like to accommodate knot.
4. place large hole in light pull (friction) drive or on an 8/10mm dowel in a jacobs chuck
5. pull up tailstock with live centre to support from small hole
6. turn /finish/sit back/admire/thread on cord/tie knot/pull on/pull off/simples :)
 
I think you need a drill chuck on an arbor (MT1 for a Record) but not a chuck really.

For long drill bits, you can't go far wrong with Toolstation. £3.21 for a pack of 10 3mm drills.

Towards the bottom of this page....

http://www.toolstation.com/shop/Power+Tool+Accessories/HSS+Drill+Bits/d80/sd1250

As Nev says drilling first is easier to ensure that the drill will go straight down the middle but if you're careful you may be able to drill just over half way from both ends and meet in the middle.

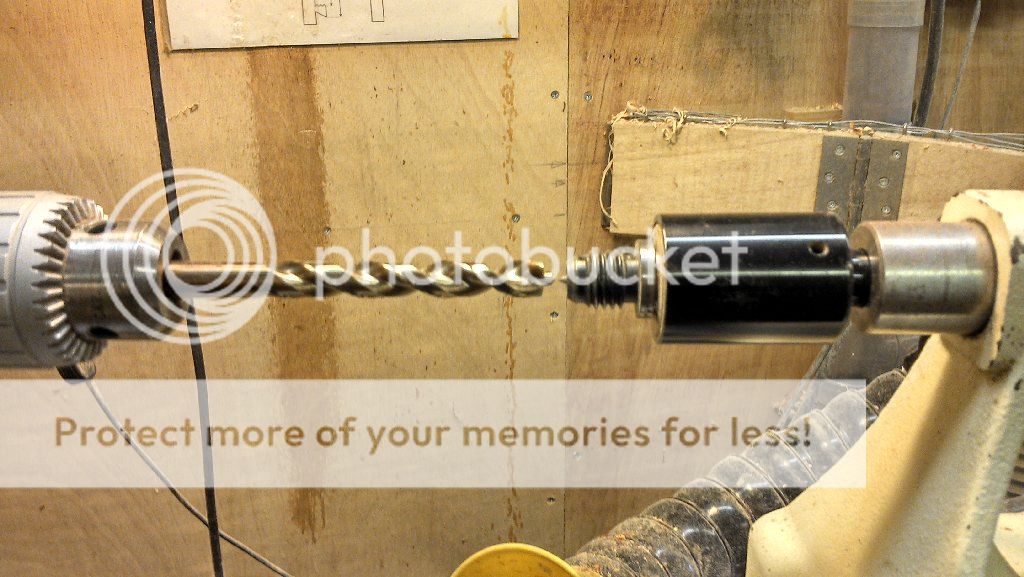
Your lathe should come close to passing the kiss the test with the drill bit like this...
kisstestbulletpoint_zps3f0a1b75.jpg


Mark both ends with an awl so the drill has a starting hole and the tailstock has a reference and then hold the lightpull in one hand and wind the tailstock in slowly with the other. Keep withdrawing the drill bit to clear the flutes (this will help it stay on course). When just over halfway turn it round and drill from the other side.

Good luck
Jon
 
heatherw":zwyh6i78 said:
Hi Togalosh,

Have you got a face plate with your Record lathe? They normally come with one.

I've never made a light pull but if i wanted to make one without buying any extra equipment ( which is what I usually try to do) I'd drill the wood first. I would say you need to drill a large diameter on one end to hide the knot on the cord, and a smaller diameter to thread the cord through. If you make the large diameter hole deep enough, then you could make a tiny jam chuck form a chunk of wood attached to the face plate. You could probably bring the tailstock up to begin with until you need the space.

Otherwise you could buy a light pull drive, but you'd have to make a fair few to cover the cost of it.

http://www.axminster.co.uk/axminster-im ... pull-drive

Hiya Heatherw,

(now I've YouTubed what one is) It would have to be a tiny Jam Chuck !..but if it'd work I'll give it a go. I've not got a faceplate but if I did would I screw the Jam Chuck to it ? How would I know what size thread in the faceplate to chose - just measure OD of shaft/spindle & count TPI & do some maths if it's not an inch long?

How does that Light Pull Drive work ..is it the only drive or or do you still use the tailstock too ?

Thanks for taking the time to help me out.
 
KimG":3fis8f8e said:
I have one of those light pull drives, I have yet to figure out how the thing works!

I bought a set of very long brad spur drill bits on ebay for a very reasonable price (around a tenner for half a dozen or more, the smallest is 3mm and a good 250mm long, I use a jacobs chuck in the tailstock to hold them. Very few drill bits will go true for much of a distance though, so the best approach is to pre drill the blank and use the resulting holes as your centre points.


Jacobs chuck..that's what I meant by drill chuck..ace.

Good idea about drilling first ..although it means working with individual small pieces instead of 1 long piece that I can cut many from.

Thanks !
 
nev":ac4fk243 said:
( http://www.ukdrills.com/product.php?catid=248)

1. cut your wood to length
2. drill 3 or 4mm hole through length
3. increase hole size in one end (about 10mm deep) to 8mm or 10mm or whatever size you like to accommodate knot.
4. place large hole in light pull (friction) drive or on an 8/10mm dowel in a jacobs chuck
5. pull up tailstock with live centre to support from small hole
6. turn /finish/sit back/admire/thread on cord/tie knot/pull on/pull off/simples :)


Great instructions Nev.. thanks !
 
The light pull drive or friction drive is just a stepped steel rod. the different steps designed to push fit into different sized holes. You push fit your previously drilled bit of wood onto this drive and it is held in place by friction, so you need the tailstock for support too. you also need to be gentle-ish with the gouges otherwise the wood stops spinning.
 
chipmunk":1h5ajmcq said:
I think you need a drill chuck on an arbor (MT1 for a Record) but not a chuck really.

For long drill bits, you can't go far wrong with Toolstation. £3.21 for a pack of 10 3mm drills.

Towards the bottom of this page....

http://www.toolstation.com/shop/Power+Tool+Accessories/HSS+Drill+Bits/d80/sd1250

As Nev says drilling first is easier to ensure that the drill will go straight down the middle but if you're careful you may be able to drill just over half way from both ends and meet in the middle.

Your lathe should come close to passing the kiss the test with the drill bit like this...
kisstestbulletpoint_zps3f0a1b75.jpg


Mark both ends with an awl so the drill has a starting hole and the tailstock has a reference and then hold the lightpull in one hand and wind the tailstock in slowly with the other. Keep withdrawing the drill bit to clear the flutes (this will help it stay on course). When just over halfway turn it round and drill from the other side.

Good luck
Jon

Hi Jon,

What is the advantage of using an arbor over a jacobs chuck? I cannot tell what they do axactly from the Axy site & what the differences are between the B's & J's but I guess they hold bits.

I'm glad you mentioned the kiss test..I noticed the other day that mine does not meet on the vertical plane - it does on the horizontal. I cannot see how I can raise or lower the tailstock or vise versa to get them to line up though. Can you advise me please ??

Thanks for the tips - much appreciated !
 
Tighten the tailstock down an inch or so away, then advance the tail centre. If the tailstock's not down tight, the centre might dip.

Also, you can buy long bits with a No1 M.T. - they're expensive but quicker (and more accurate) - it depends on the use they're likely to get.
 
Nev's instructions are pretty good, and a jacob's chuck is always going to come in useful. I should go with that option. Record lathes are all 3/4" x 16tpi as far as I know, and I believe they are all 1MT as well. My little one was, anyway. Just drill a 10mm hole and put a 10mm dowel in the jcob's chuck.

If you were going to go the faceplate way, you'd screw the lump of wood to the faceplate and then turn it to size but if you end up getting a scroll chuck (not Jacobs) you might never use your faceplate again. ( but then again you might......)
 
Thanks for that Nev, it should have been obvious, but I am often blind to that anyway!

As for the Jacob's chuck, the one I have is keyless, you just tighten it by hand, that makes quite a difference.
 
Togalosh":1v3fskzr said:
What is the advantage of using an arbor over a jacobs chuck? I cannot tell what they do axactly from the Axy site & what the differences are between the B's & J's but I guess they hold bits.

I'm glad you mentioned the kiss test..I noticed the other day that mine does not meet on the vertical plane - it does on the horizontal. I cannot see how I can raise or lower the tailstock or vise versa to get them to line up though. Can you advise me please ??

Hi Togalosh,
The arbor is really just an adaptor which has a morse taper on one end to match your lathe headstock and tailstock (MT1 for your lathe I think) and another taper on the other end which fits into the Jacobs-type chuck body (Rarely Jacobs these days). These second tapers are often either a Jacobs taper such as JT3 or JT6 or a metric taper usually B16.

You can often buy the chuck body and arbor together but any chuck body you buy will have the taper written on it somewhere because there are a bewildering array of possibilities...
http://www.arceurotrade.co.uk/Catalogue/Chucks/Drill-Chuck-Arbors

Adjusting the height of the headstock and tailstock can be tricky because it requires shimming but I wouldn't jump to conclusions about what to do too soon since it's quite likely that either the headstock or tailstock is pointing slightly uphill or downhill. To check this you could use various length drill bits in a chuck in the headstock and tailstocks and a centre in the other. If the error is always the same then the two are simply offset but if they are progressively further out with length then you need to change both height and direction. In any case shimming the headstock is easier than the tailstock because on most lathes that stays put. For shims, cheap feeler guages are probably the easiest and you can pick up these for a few quid from many places.

http://www.toolstation.com/shop/Feeler+Gauge/p70627

If you have a Jacobs chuck you can make a light pull drive very easily from a short piece of 6, 7 or 8mm rod (the same size as the counter-bored hole for the knot) held in your chuck. A cheap source of this sort of steel is a ground off piece of Carbon Steel drill rod from a pound shop or Wilko brad point wood drill bit - come to think of it it's the only thing these drill bits are useful for since they are usually cheese! :roll: Anyway just sharpen the end of it to a steep screwdriver blade shape and it will act like a two-prong drive in the counterbored hole.

HTH
Jon
 
So following on from all your pieces of advice I bought the 'Jacobs' chuck from Arc Eurotrade & also went to Axy ..they didn't have the light pull drive on the shelf & I forgot to get a Face Plate...& showing an un usual bout of self control I decided a jawed chuck could wait until I really needed one (it seems like another expensive, slippery slope)... & today I made these.

20131215_174849_opt.jpg


20131215_174922_opt.jpg


I was quite pleased with them until I took the photo's..& they then looked a bit kack..but they feel nice between my fingers.

Thanks again for the help.

Togs
 

Attachments

  • 20131215_174849_opt.jpg
    20131215_174849_opt.jpg
    34 KB
  • 20131215_174922_opt.jpg
    20131215_174922_opt.jpg
    31.6 KB
Back
Top