Steve's workshop - Painting the outside walls

UKworkshop.co.uk

Help Support UKworkshop.co.uk:

This site may earn a commission from merchant affiliate links, including eBay, Amazon, and others.
It should be reason to celebrate. We have finished cutting blocks, it's all laid.

P1040098.JPG


P1040099.JPG


P1040101.JPG


And this is all the waste from the whole job:

P1040100.JPG


Just a couple rubble-bags-worth.

So why the long face? Well we have had some rain in the last few days and the sand has sunk alarmingly. In some places the blocks are already below the edging, and that is before they are whackered. The are some areas - and I don't mean just a few blocks - where we are going to have to lift them and get some more sand down. We are even contemplating lifting the whole lot. I know that Ray is not happy with it.

So I don't know what's going to happen. We haven't whackered it at all yet. Ray is not coming again for a couple of weeks, he is busy next week and then on holiday.

I do have other stuff I can get on with on my own. I need a step up to the log cabin, and there is a pile of wooden cladding at the back of the workshop, which needs to be shifted so we can install the siding. I can order that and give it all a coat of paint before it goes on, so that it will need only one coat in situ.
 

Attachments

  • P1040098.JPG
    P1040098.JPG
    236.4 KB
  • P1040099.JPG
    P1040099.JPG
    190.6 KB
  • P1040101.JPG
    P1040101.JPG
    247.6 KB
  • P1040100.JPG
    P1040100.JPG
    192.5 KB
That looks awesome. OK, maybe the photos don't catch the detail that you're not happy with, but I'll bet it's ten times as good as many a driveway that I see laid by so-called pros. It's also obvious that you're aiming for a super high-quality job: not many people cut the fill-in pieces as accurately as you have done, let alone cut 1/2-inch triangles.
And to see that your waste volume totals about - what - two bricks ??
Brilliant work.
 
hi, in some of the pics the layer of laying sand looks very thick. Pic P1040017.JPG . It should only be 40mm-50mm max with the rest taken up by type 1 (hardcore). I have made this mistake before on a smaller area. Could not figure out where I had gone wrong, then I found this website http://www.pavingexpert.com/blocks.htm
It helped a lot, lots of tips from the paving expert on layout and grading. He also explains how to lift and reset sunken areas. I too used a block splitter, a mini belle, and while it did a great job on half cuts I found it chipped the ends on 45 degree cuts so used a big chop saw but was dusty.
You guys are getting there, it is a lot of work for one or two people. Remember it is easier to sort out the blocks that have sunk before joint sanding.
 
Hi Cammy, thank you for that. The sand is certainlyuneven, and I can certainly see what you mean, although I don't remember it looking that thick in reality. We aimed for 100mm from top of block to hardcore. The blocks are 65mm nominally so we laid 45mm sand to give us 10mm to whack down. At least, that was the idea.

But I'll have a look at that link. Thanks very much.

Steve
 
Well it certainly looks a lot better than the tip it was.
I'd use the next few weeks to see how it settles - today's rain should have some effect.
Then when Ray gets back you can decide what to do next.
Don't get preoccupied about it.
 
there is where you went wrong 10mm is not enough, it should be a minimum of 1", it doesn't matter if you have to go over it 10 times with the whacker, or even have to stand on it to get it down, but 10mm is not enough

Just wait a few months, than take it all up again (or at least the places which are low) then put new sand under and whack the hell out of it

get one with a rubber math under it, so you save your blocks from scratching

so do not put any sand over it just yet, otherwise you will not get them up easy
 
Mcluma":fp8cxyh9 said:
there is where you went wrong 10mm is not enough, it should be a minimum of 1", it doesn't matter if you have to go over it 10 times with the whacker, or even have to stand on it to get it down, but 10mm is not enough
Steve said "We aimed for 100mm from top of block to hardcore. The blocks are 65mm nominally so we laid 45mm sand to give us 10mm to whack down". I'm assuming you've read it as 10mm sand? Or do you mean you need to aim for whacking the bricks down by at least 1"?
 
sploo":8ppwv03b said:
Mcluma":8ppwv03b said:
there is where you went wrong 10mm is not enough, it should be a minimum of 1", it doesn't matter if you have to go over it 10 times with the whacker, or even have to stand on it to get it down, but 10mm is not enough
Steve said "We aimed for 100mm from top of block to hardcore. The blocks are 65mm nominally so we laid 45mm sand to give us 10mm to whack down". I'm assuming you've read it as 10mm sand? Or do you mean you need to aim for whacking the bricks down by at least 1"?

Based on what Steve had said I had assumed the post meant that 10mm of whackering was not enough and that the blocks needed to be whackered down by an inch. Have to say that did sound a lot, but then I have never laid blocks. But I am thinking of doing my drive so am very interested in the answer.

Mcluma, can you clarify?

Terry.
 
Steve,
I would not worry too much
If it settles then you might need to fix it here and there
The important thing is it now looks tidy and you are not taking muck into the house.

Even if you leave it months it's one of these jobs you can do in the winter, the urgent stuf is behind you now.
Turn your attention to something different in the workshop build job.
 
lurker":1duxa45p said:
Turn your attention to something different in the workshop build job.

Yes indeed.
I've had the OK from the BCO to use Cempanel as the outside cladding, so I plan to order that this week. It's a proper external product, I can use ordinary exterior paint on it and it is a lot cheaper, nearly half the cost, of the Glasroc that he originally suggested.

The only downside is that it is jolly heavy. IIUIC, each 10mm sheet weighs about 37kg. I'm not sure I can manage that on my own, and Ray isn't coming for the next 2 weeks. I'll have to see if I can rope in someone else.

I must admit it is nice not treading sand all over the place.
 
lurker":gcy9p7nr said:
Can you post some photos of the w shop from the house back door with new patio in the foreground?

Well not really. From the back door you don't really see the workshop at all, the log cabin is in the way.

Ok, Ok, I'll have a go :)
 
P1040102.JPG


I did warn you.

The OSB was just put there to dry as I had to hose it down after all that brick dust and slurry.
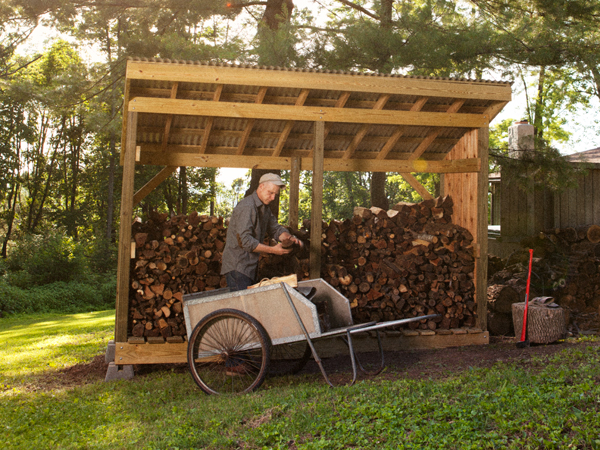
That bonfire is indeed firewood, mainly. I'm going to build a store using this as my starting point:

54ca5e7778f3d_-_firewood-shed-01-0912-de.jpg


which will be sited against the fence:

P1040103.JPG


I wish I could get rid of that ivy, it's a menace. And when it flowers, it stinks too. Horrid stuff.

I have enough wood left over from the build, with some from the better pallets, to build the store, and enough tiles to put a good roof on it, too.
 

Attachments

  • P1040102.JPG
    P1040102.JPG
    248.2 KB
  • P1040103.JPG
    P1040103.JPG
    250.3 KB
That's something I need.... A log store
It will look good against the fence and block out the background a bit.
I have been sawing logs this morning ...... It won't be long before we get evening chills and swimbo will want a fire lighting. :roll:
 
Steve,

on one of the photo's I can see that you're block paving is still sticking up above your edge,

NOW get that whacker plate back out before we get more rain and you are getting puddles, -which will make it worse on your low spots

Otherwise you will have a whole lot more work later.

get you're long level out (2400mm) and see where you're high and low spots are
 
You must be a great source of varied entertainment for the neighbourhood
:lol:

What's he doing now Mildred?
Well his slave isn't there and he is ironing his keks in the garden.
And he is moaning about someone called Ivy
 
I've had a day of bits and pieces today and it's all been quite productive.

First of all I promised APreston a pic of the angle grinder jig I made.

P1040107.JPG


The tool sits in the cradle and is bolted down using one of the holes in the machine designed for attaching the handle. The sliding table bit was going to have a fence screwed to it at 45 degrees. I've not actually tried it, because we hired the Big Bertha, but I think it would have worked fine, if being a bit dusty.

But on to today.

The log cabin is a bit of a step up, so I need a bit of help. I used some of the old decking to make it. The bearers increase in size by 5mm each, from left to right, to allow for the fall on the patio. I need to shorten the front a bit and put in a toe-board to make it prettier, but I want to try it out for a bit first. I think I have it a bit high at the mo. But it is certainly is a step in the right direction. Ha-ha. I've done something similar by my back door, too, but that is definitely temporary, I want a brick back step, but I can't do that until the blocks are sorted.

P1040105.JPG


P1040106.JPG


Then it was down to the workshop. Since moving the rest of the OSB out I could nearly get to the corner. So I took a piece of skirting and cut a bevel on the end.

P1040110.JPG


Then it was a case of nibbling away to follow the resulting profile. Here I'm using the bandsaw, but it was a bit coarse, really and the second one I did with a coping saw.

P1040111.JPG


The end result is a really neat scribe

P1040113.JPG


I've also put up another couple of lengths of French cleat on the wall

P1040108.JPG


Plus a trip to the tip with the patio rubble and best of all, I've done it all on my own without having to be chivvied along by Ray. That's the real progress.
 

Attachments

  • P1040107.JPG
    P1040107.JPG
    176.9 KB
  • P1040106.JPG
    P1040106.JPG
    242.1 KB
  • P1040105.JPG
    P1040105.JPG
    243.8 KB
  • P1040110.JPG
    P1040110.JPG
    215.9 KB
  • P1040111.JPG
    P1040111.JPG
    189.5 KB
  • P1040113.JPG
    P1040113.JPG
    125.1 KB
  • P1040108.JPG
    P1040108.JPG
    123.5 KB
Back
Top