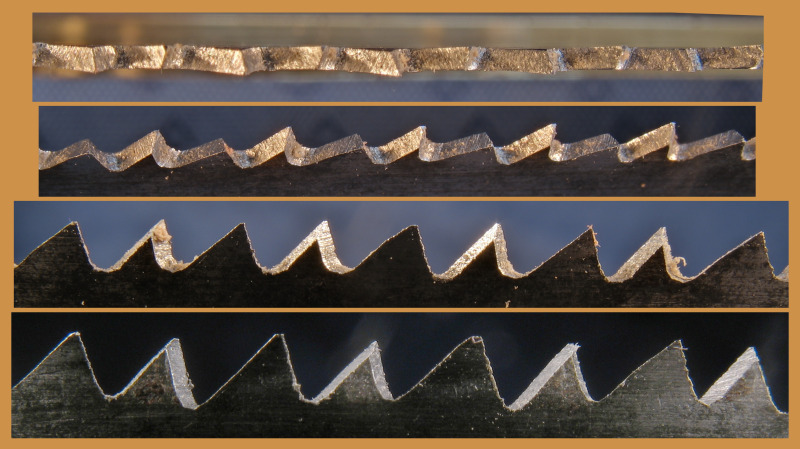
saw teeth

UKworkshop.co.uk

Help Support UKworkshop.co.uk:

This site may earn a commission from merchant affiliate links, including eBay, Amazon, and others.

bugbear

Established Member
Joined
16 Jul 2004
Messages
13,074
Reaction score
11
Location
North Suffolk
Following the general interest in saw sharpening, I took these photographs (which was an exercise in itself, let me tell you...)

This is a 10 TPI saw, freshly filed (although the file was a little too large, hence the rounded gullets)

(edit:) Fourth photo added, after re-file with smaller file.

saw_teeth.jpg


BugBear
 
Bugbear,

I like that, thank you for posting them.
I hope soon to be back try to hand sharpen some saws. I have a few from ebay to practise on, a saw vice and even a file or two, just need the tuit. :roll:
I now have a good reminder of what to aim for. 8)
 
Seeing these very clear photos of what is undoubtedly top quality sharpening, I find myself wondering about the inevitable file scratches.

We are so concerned to polish our plane and chisel blades so that they gleam like diamonds and have all sorts of reasons/science/folklore/superstition to back up the necessity of doing so and yet we don't do the same for saws.

No doubt a large part of the difference must be the difficulty of refining the filed surfaces but I still wonder what sort of - if any - difference, polished teeth would make.
 
Joe":1b9dawpq said:
I look forward to one day achieving the same evenness of tooth height...

Tooth height is controlled by watching (as carefully as possible) the "shiners" created on the top of the teeth by jointing. I don't see how anyone achieves or maintains uniform tooth height without some kind of guidance.

Note that uniform tooth height is the absolutely KEY requirment for a saw, far out weighing uniform tooth shaping or spacing. Even, symmetrical set is probably the second requirment.

I ALWAYS joint, even when touch up sharpening. However, jointing removes tooth height extremely rapidly, since the file is working on tiny tooth tips.

Jointing for touch up sharpening is therefore done with an india "fine" oil stone, not a file :)

I also have a very fine file for "next level" jointing. The oft-mentioned large mill file is rarely used (by me)

Here's my other thoughts, tips, and tools:

http://www.geocities.com/plybench/saw_sharpen.html

disclaimer; despite compliments here, I would not call myself an expert saw sharpener. I taught myself (well, I was taught by sources on the web...), because I couldn't find a local saw doctor who didn't pipper up my saws or charge a fortune. I have seen the work of expert saw doctors, and cannot match it.

BugBear
 
bugbear":21qdhvkt said:
Do you mean uneven in rake, spacing, size, set, or height?

BugBear

Good question. I know the effect of uneven set, but would be grateful if you could enlighten me about the others.

Joel
 
Joe":2rw8sfmb said:
bugbear":2rw8sfmb said:
Do you mean uneven in rake, spacing, size, set, or height?

BugBear

Good question. I know the effect of uneven set, but would be grateful if you could enlighten me about the others.

Joel

Since a low tooth won't cut, uneven height clearly has an effect. If all the teeth on one side (as defined by set) are higher, the saw will veer in that direction. Otherwise you're simply have an inefficient saw, where some teeth don't contribute any cutting.

Within reason (IMHO) random inter-tooth variations in rake, spacing and size have no effect.

BugBear (who would dearly like MikeW's opinion on this matter)
 
I have been trying to refile an old tenon saw to 14TPI with great difficulty!

I have tried Bugbear's print outs - cutting the profile out and sticking them to one side - but still find it difficult to get even spacings as the triangular file hides the underside (where it's cutting) so you cannot see the exact spot?

I then found an old mitre saw blade with the correct TPI and used that as a template - but found I was cutting away this blade as well and the spacings were just as uneven!

I am very tempted to try and mark out the teeth and do an initial cut/groove with a small hacksaw and use this to locate the file.

Any advice from the experts greatly appreciated.

Rod :?
 
Harbo":3u83xv4i said:
I have been trying to refile an old tenon saw to 14TPI with great difficulty!

I have tried Bugbear's print outs - cutting the profile out and sticking them to one side - but still find it difficult to get even spacings as the triangular file hides the underside (where it's cutting) so you cannot see the exact spot?

Yes, pretty difficult, and 14 TPI cross cut is about as hard as it gets. If you haven't successfully done other sharpenings before, I would strongly recommend getting your eye (and hand) in before attempting this.

When I have created teeth using the printouts, I simply use the template to guide the placement of an initial "mark", using a fine file. I then deepen the mark on a second pass.

I then remove the paper.

I then proceed as if it were a simple resharpen, getting the teeth(and gullets) spaced evenly by mk 1 eyeball, and pushing the file left/right in the direction needed to even things up.

I proceed slowly, taking around 4-5 passes to create the teeth. The first 2-3 passes are done with 90 fleam AKA no fleam, and all from one side (without turning the saw round). This makes it easier to move from one tooth the the other, evening things up, since I can file adjacent gullets.

The first 1-2 passes are also done without accurate rake control.

Once the teeth start appearing "properly", I start to apply fleam as desired, and switch to sharpen every other tooth in the normal way.

From hereon in, the teeth "exist" and can be sharpened in the normal way.

BugBear
 
Within reason (IMHO) random inter-tooth variations in rake, spacing and size have no effect.

Intuitively (dredged up from memories of learning that troops being ordered to break step when marching across a bridge) I wonder whether, say when dovetailing, it might even be beneficial by reducing the tendency of the saw to vibrate a slender workpiece.
 
Thanks for that bugbear.

I have resharpened a couple of 12TPI Rip and a 24TPI but this is the first attempt at a recut.
At the moment I am trying, as you suggested, just to achieve the correct 90degree spacing - then I will try out my new Bent Beach type jig!!
My friend and hobby metal worker suggested I should make a step jig (he's in to clocks!) - but that will require a lot of thought and effort to perfect!
He also suggested I should give up and send the saw away :shock:

Rod
 
Harbo":268i0im8 said:
My friend and hobby metal worker suggested I should make a step jig (he's in to clocks!) - but that will require a lot of thought and effort to perfect!

Graduated teeth!

BugBear
 
Since several people expressed an interest, here's the low down on how I
got those photos.

Executive summary:
it wasn't point 'n' shoot; it involved lots of light, close focus, HDR.

The long version...

The problem with saw teeth is that they're small,
and made from shiny metal. The size problem
is easy to get round if your camera will focus
VERY close. Mine will (many compact digital cameras will).

It's a Canon A630,
http://www.dpreview.com/reviews/specs/C ... n_a630.asp
and will focus down to 1 cm (under 1/2 inch, Paddy).

It also has manual focus (that's a pain
to use, but it has it).

The problem then becomes one of how do you
get a camera so very close to the subject;
I have a Benbo Trecker tripod, where the main
column can be adjusted to be horizontal, and the camera
facing down. I have often used this to get
"looking down" shots on flat items (books, saws etc).

link
http://tinyurl.com/3d9phs

But in this mode the only way to adjust the height
is by adjusting all 3 legs on the tripod, which is tedious.

I adjourned to my workshop and made a tripod-extension-widget:
http://galootcentral.com/components/cpg ... extend.jpg

This simply has a standard mount thread (1/4" UNC) at one end
(from Lee Valley, thanks to ALF)
http://www.leevalley.com/wood/page.aspx ... 3455,52800

and a camera fixing bolt (same spec...) at the other. In the middle
it's a simple sliding slot, held by a 1/4" bolt and wingnut. This allowed
the camera's height to be fine adjusted easily. This extension ain't exactly
rigid, but it's fine indoors, where there's no wind, and I use
a shutter delay of 5 second to allow
any movement generated by camera handling (pressing the shutter) to die down.

http://galootcentral.com/components/cpg ... _close.jpg

The light is supplied by 4 angle poise lamps; using multiple
light sources reduce shadows.

http://galootcentral.com/components/cpg ... p_long.jpg

Of course, if you simply take a photgraph under these circumstances,
you will encounter major issues with over/under exposure, since
saw teeth (especially freshly filed ones) are rather shiny.

The answer is HDR, which has been described elsewhere better
than I can do it:

http://en.wikipedia.org/wiki/High_dynamic_range_imaging

The task at the point of taking the photographs is to shoot
a "bracketed set"; a range of otherwise identical photos
which vary only in shutter speed. Some cameras
have built in support for this, but mine doesn't. However,
with the CHDK third party software, it can be added.

http://chdk.wikia.com/wiki/Main_Page

I set the shutter speed bracketing value to 1 2/3 EV,
http://chdk.wikia.com/wiki/CHDK_firmwar ... ting_value
and used "custom" drive mode, with 5 second delay, taking 5 photographs.

This gives me a massive overall EV range, the defining property of HDR.

I then downloaded the photos to my Linux laptop (Fedora FC8)

I used the "enfuse" program to merge them; since I only wanted
the saw teeth, I cropped that part of the image from each photo
to avoid unwanted pixels influencing the HDR merge operation.

http://wiki.panotools.org/Enfuse

Since the sawteeth image is pretty much monochrome, and
I was simply trying to get a "good" exposure I used the
following enfuse options:

enfuse -o output.jpg --wExposure=1.0 --wSaturation=0.1 --wContrast=0.1 --compression=92

followed by a list of input files.

To get the side shot of the teeth, I used another, more usual, tripod,
a Gitzo Tatalux Reporter,

http://groups.google.com/group/rec.phot ... fb34edad03
http://tinyurl.com/2ml8gq

and again used my home-brew extension for final position of the camera:

http://galootcentral.com/components/cpg ... _close.jpg

All other aspects "as before".

I hope this has been of at least some interest to at least
some member of the Porch. Since many of the choices I made
were driven by equipment or facilities I happen to have, I would
not expect anyone to follow what I did in all details, but I hope
it offers guidance or inspiration as to what is possible.

BugBear
 
I recently managed to obtain some fairly good close up shots of a plane mouth by photographing through a magnifying light (with the light on). My camera refused to focus automatically so I got round this by using the set 0.5m focal length.
 

Latest posts

Back
Top