New workshop build, with a difference!

UKworkshop.co.uk

Help Support UKworkshop.co.uk:

This site may earn a commission from merchant affiliate links, including eBay, Amazon, and others.
Would it help gluing up in pairs and shooting the angles to square?
Then gluing up into fours/halves and shooting to straight?

Keep up the great work.
xy
 
Hello xy,

Hmmm, why didn’t I think of that #-o ....because I am impatient by nature, and like to get things done, I suppose :roll:
Thanks for the method though,I will store that for future use =D> but I will be glueing up the second octagon when I have finished writing this. I do have to acknowledge that the octagon is less than perfect, but the required circle is still possible, and I won't have to caulk the gaps as Kirk suggested :lol: :lol:

Regards....****.
 
Hi folks,
Having just finished a mammoth routing session, I’m feeling dizzy.
Have any of you tried routing a mammoth? :shock: :smile:

The last two days have been spent walking round and round the window, gradually lowering the cut, it gets tedious to say the least.
I felt as if I had been transferred to an18th century sailing ship and was walking round the capstan raising the sails :shock: :shock:

Paddy, lay back (Paddy, lay back)!
Take in yer slack (take in yer slack)!
Take a turn around the capstan - heave a pawl - heave a pawl!
'Bout ship, stations, boys, be handy (be handy)!
For we're bound for Valaparaiser 'round the Horn!

Old folkies don’t die, they are recycled as woodworkers :shock:

The extended router base was the last word in routing accessories...literally :smile:

See below for the three steps to heaven (how did Eddie Cochran slip into a wood forum)?
I really must start taking my medication again......

routingtheoutside.jpg


routingtheinside.jpg


routingtherebate.jpg


I did have a few breakouts at some of the joins that were less than parfait; and I expect that if I had bothered to analyse the grain direction, and laid the pieces so that it flowed, it wouldn’t have happened so readily. Bruce Hoadly ..........I’m not; and I am working with rubbish Pine, not anything of quality.
But hey, that’s what filler was invented for..wasn’t it....Kirk :wink:

To my amazement, the windows fit in the rings quite well. I think that I should go and lay down in a darkened room now..........

Tot Ziens ........****.
 
Looks good ****,

so it it work out well, but next time, no cleaning up before shooting the pics

and why the dutch salutation at the end?

Groetjes
Chris
 
Hello Karl,

The song is called Paddy lay back, and it came to mind because we used to perform this, when I was in a group ..... a long time ago. Not that I am a very good singer; it was the bane of my life. I could play reasonably well, but the voice was thin, with limited range.
The link below gives you the best version that I could find, and is at best, adequate. If you could have heard it sung by The Taverners, back in the dim and distant past, it would have had much more about it.

http://www.youtube.com/watch?v=nyb6VZZc2TA

Hi Kirk,

Thanks for the kind support, I’ll always wear it :shock: :smile:

Hello Chris,

The build up of detritus after each ‘turn around the capstan’ was massive, so I had no option but to clean up after each circuit. If you look carefully, the floor is covered in sawdust - that’s a first for me :smile:

I don’t deliberately clean up before taking pics, it stems from serving an apprenticeship. The first tool was a broom; with ‘work tidily’, as an ethos.
If you look at (I think) Dodge’s workshop pics, he is the same.

If you reflect back on these missives, they are peppered with all sorts of languages; a lifelong interest...... Or to put it another way, why not :smile:
If I could find a way to use perestroika and glasnost, in a woodworking context, I would. They are just lovely sounding words.

In what passes for my mind, it was actually Afrikaans (same origin though). This is a hangover from working with a ‘Rhodesian’ chap, as an apprentice; and in the evenings, listening to Jeremy Taylor singing songs about South Africa, aparthied, etc. Ag Pleez Deddy - if you are familiar with his recordings, was similar to my drivel, in that it is in English, but peppered with Africaans. So, how did you know that it was Dutch, fess up.

Regards...****.
 
Cegidfa":1iif6p34 said:
The window ‘frame’ will be permanently fitted to the ring, and the IGU will have a bead of silicone as a seal, and then a removable ring inside. .

I'd be re-thinking that slightly if I were you.

1. the beading normally has a slope to shed water and sometimes overhangs the front face of the window (a smidge). Since you are internally beading it - you'll need to replicate that.

2. Don't silicone the window in. It's for cowboys. Use proper PolyButyl glazing tape and a method such as the B6 Method as listed at - http://www.hodgsonsealants.com/html/technical-library/ (on the 2nd tab). Using proper rubber setting blocks.

Me - I'd bead it externally. That way if you ever need to remove it - breaking the seal internally can be done - holding the unit via a suction ring. Breaking the seal from the outside - I wouldn't want to do that.

DGU - when securely fixed will be destroyed when being removed.

HIH

Dibs
 
Hello Dibs,

Thanks for that; .....err, the roof windows were put in cowboy style, bedded in neutral curing silicone :oops:
The point is that should any problems occur, I would knife the silicone and lift them out.
The same would apply to the round windows - the silicone bead would be knifed, and then removed from within. Using the tape, as you say, the IGU would be destroyed. Not good.

It might not be the best way, but at least I will be able to remove them with reasonable ease. However, if I can find a gasket that will sit on the angle of the window and be squeezed by the glass - giving me the angle for runoff, I will use that. The problem is that one normally has to buy miles of the gasketing, and I only need about 25m.
Please note that I wouldn’t do this for house windows; there I would use the tapes and a drained cavity. Thanks for the concern though; it will be interesting to see how long both sets of windows will last - if I’m spared, as they say in Ireland.

So it’s yeeehar from me, as he rides off into the sunset.......

Regards....****.
 
Cegidfa":1itocxi9 said:
Hello Dibs,

Thanks for that; .....err, the roof windows were put in cowboy style, bedded in neutral curing silicone :oops:
The point is that should any problems occur, I would knife the silicone and lift them out.
The same would apply to the round windows - the silicone bead would be knifed, and then removed from within. Using the tape, as you say, the IGU would be destroyed. Not good.

****

What i was trying to say was that if you bed them in silicone, you will destroy the unit\s getting them out, you can't knife them out! DAMHIKT!

Using tape (Butyl) they will come out, all be it with some serious effort. I've had a lot of panes of glass fitted for almost 8yrs now (following method statement B6 and Hodgsons Butyl Tape) without any issues. It also comes in 25m rolls. I'd give Hodgsons a ring and ask them for someone in your locality that they supply. That's what I did. Comes in brown and white.

HIH

Dibs
 
Hello Mick,

Yes it would help the drainage, but the window is going to be set back just over 60mm in the tube, so that the IGU lines up with the plane of the insulation. I have this morning, rounded over the outer edge of the window to facilitate some drainage, and because that is the look that I want. I’m not sure how I could taper and round over, without a special bit?
The main issue is not the window its self draining; as the tube will be extending as stated 60mm forward from the window. That will be a suck it and see situation. I am hoping that as the ‘shop has a massive overhang, and the window is high up under it, that it won’t fill up with water :sad: See below the degree of round over. Thanks for the encouragement.

roundingover.jpg


Hello Dibs,

Thanks for your experience based persistence. Ok. It’s time to hang up the spurs :oops:
I had assumed that the ‘secured by design’ meant that they would be impossible to remove without wrecking them. Do I take it that the tape is only stuck to the glass, and not over the black tape wrapped round the edge of the panel as well? I ask because the windows that I have used to date, have had a massive over wrap. Ergo, I would have to cut it back to almost the edge, the width of the overlapping backing tape?
Am I right in guessing that your concern is as much security as sealing?
If so, that isn’t really a problem here ........ no burglary recorded in this particular area, in living memory .......A very rare thing these days. TIA.

Regards...****.
 
Hello Chris,

I used a bearing guided ovolo cutter for rounding over - a big one in the grey monster, (Elu) balancing precariously on the narrow frame. I started off using the small Trend, and upped the size until I ran out of 1/4 inch cutters. That was fine and easily handled, but I decided that it needed to be larger, so had to switch to the 1/2 inch botty pouter.

So, how did you know about tot ziens ....nudge, nudge? :wink:

Small update......

clamping.jpg


I think that I might have left a clamp off...what do you think :smile:
They are holding the 60mm deep band that will position the window in the insulation, as mentioned earlier.

I have also stuck two lengths of oak together and planed the edges flat. This will be the first door frame threshhold. I used them as they were available, they had been on the living room ceiling ‘cladding’ the RSJ’s that cross the room - a right abortion, with ‘hacked’ edges to look like old beams ... not.

Regards........****.

Ah, I forgot to mention, the dark knotting shows through the paint so strongly - we can't buy the white/clear stuff here. So, having had the roof windows blister, in spite of double coating (it didn't half get hot on the roof in the summer) I decided to try another approach.... The hot air blower and a meths soaked (ish) rag. Ok, a recipe for disaster if misshandled. The trick is to bubble the err gum out of the wood and give a quick swipe with the cloth. It has worked quite well, apart from one big knot, and I singed the wood a little bit - it's a matter of practice I think. Having given the window a quick rub down, I used filler in the fissures left. Time, and temperature will tell how successful it is as a method.
 
Cegidfa":2q07f6pr said:
Hello Karl,

The song is called Paddy lay back, and it came to mind because we used to perform this, when I was in a group ..... a long time ago. Not that I am a very good singer; it was the bane of my life. I could play reasonably well, but the voice was thin, with limited range.
The link below gives you the best version that I could find, and is at best, adequate. If you could have heard it sung by The Taverners, back in the dim and distant past, it would have had much more about it.

http://www.youtube.com/watch?v=nyb6VZ2TA
****.
I think you missed a bit of the URL as it can't be found with that link
 
Hello Jerome,

Sorry about that. Given that I copied and pasted from an e-mail, two middle characters had changed - how does that work?
No pinkies were involved :smile:
I have changed the original post for future viewers, but here it is for your convenience.

http://www.youtube.com/watch?v=nyb6VZZc2TA

Thanks for letting me know.

Regards...****.
 
Hello Chris,

That would explain it then :lol: :lol:
So if I see 'voetsek' after one of my missives, I'll know that I have made a blunder :shock: :)

Regards...****.
 
Cegidfa":2goowusf said:
Hello Dibs,

Thanks for your experience based persistence. Ok. It’s time to hang up the spurs :oops:
I had assumed that the ‘secured by design’ meant that they would be impossible to remove without wrecking them. Do I take it that the tape is only stuck to the glass, and not over the black tape wrapped round the edge of the panel as well? I ask because the windows that I have used to date, have had a massive over wrap. Ergo, I would have to cut it back to almost the edge, the width of the overlapping backing tape?
Am I right in guessing that your concern is as much security as sealing?
If so, that isn’t really a problem here ........ no burglary recorded in this particular area, in living memory .......A very rare thing these days. TIA.

Regards...****.


****

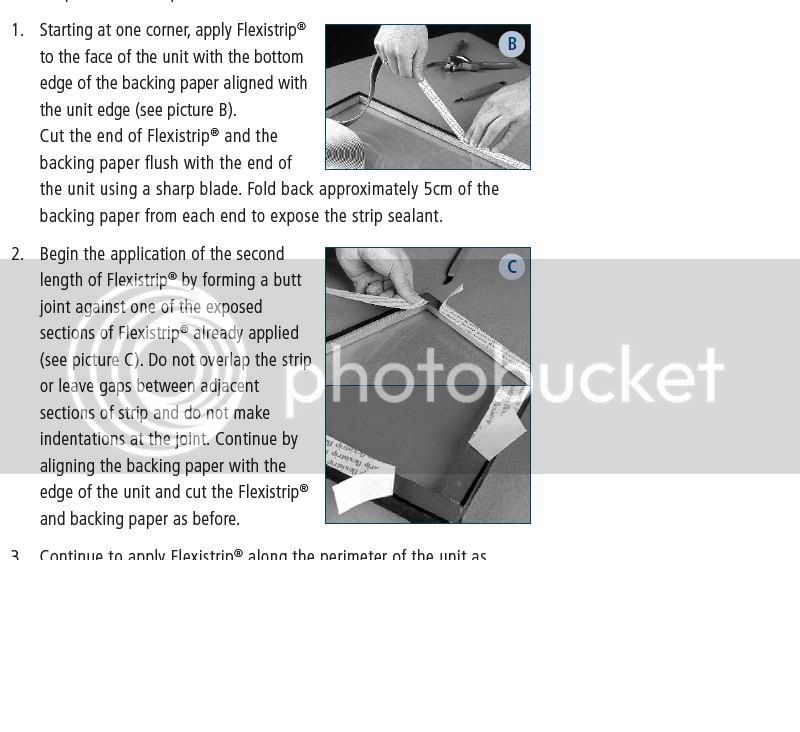
The tape is this stuff,

displayimage.php


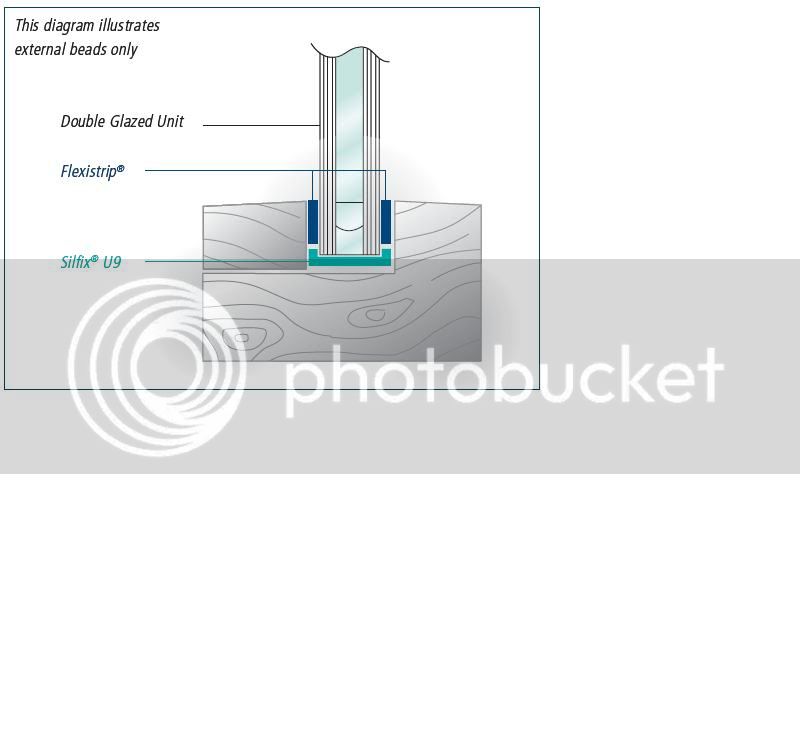
In the picture below, from the suppliers method statement, you can see where the tape goes and where the silicone goes,

B6_1.jpg


You can also see from the following picture it being applied to the glass - you apply it to the rebate on the window frame and then the external face of the DGU, as shown in the pictures, or rebate, fit glass and then apply to external face of DGU, in-situ. Either, or if you see what I mean.

B6_2.jpg


All the units I've fitted are DG, with the spacer and sealed with Bostik hot melt. Never had any tape over the edge. To my mind - tape is a sign of something isn't quite right.

On a related note - security is always a concern, but a burglar isn't going to be able to pop the beads and pop the DGU unit out, when they are taped in with Butyl tape. Certainly not in any reasonable time frame. A pro is more likely to use other methods to gain entry. But for a DGU unit - sealing is paramount, if it's not 100% - you are going to have issues. Security can be <100% as security is in layers on a property.

Besides - the realistic likelihood of having to remove the unit for maintenance purposes is ??

HIH

Dibs

p.s. read the method statement on their website - I certainly found it very useful and informative.
 
Cegidfa":2bt5jpmm said:
Hello Jerome,

Sorry about that. Given that I copied and pasted from an e-mail, two middle characters had changed - how does that work?
No pinkies were involved :smile:
I have changed the original post for future viewers, but here it is for your convenience.

http://www.youtube.com/watch?v=nyb6VZZc2TA

Thanks for letting me know.

Regards...****.
Thanks **** it's great.
It takes me back to the folk clubs I used to go to when I was still in England.
 
Back
Top