My first workshed and my new workshop basework

UKworkshop.co.uk

Help Support UKworkshop.co.uk:

This site may earn a commission from merchant affiliate links, including eBay, Amazon, and others.
A quick google brings up 5ltr @ £15.99 here
http://www.hardware-ironmongers.com/det ... de=0431550
Though they have presented the wrong picture :)

Having used a clear wood preserver (not water based) on my older shed I was very happy to see it all get sucked in by the wood rather than just lay on the surface like the water based treatments seem to do, but the outcome was imo not good with the surface going blackish as if the weather was also able to penetrate the timber within a few months. I then resorted to light creosote substitute which seems to be doing the job and costs considerably less.

Still at a loss really as to what to treat the new workshop wood with. The manufacturers say they used 2 coats of Cuprinol preserver.
 
I now have a slight roofing problem to deal with.

img2128x.jpg


I had the company back last week to nail down the rebated roof boards as they had failed to nail them all at the ends of the sections to the trusses and some were lifting so much the felt was being moved.

Now with some more sun it seems that other boards are cupping that are not at the ends of roof sections but again they have not nailed each board down to the truss.

img2108.jpg


I guess they thought good will would hold them in place. I'm a bit reluctant to call them back again for the same thing and was considering laying some roofing tile battoning on the outside directly above the trusses and screwing through from them to the trusses say every 6" to pin the lot down in place for now. I do intend to fit felt shingles instead of the felt thats there at some point but the way things are stacking up here it may not be until next spring.

I guess that once the boards have cupped and dried out they wont go back flat easily so I need to do something sooner rather than later.

img2113e.jpg


Im guessing that when they felted they were supposed to a) nail down all the boards to the trusses and b) make sure the strips of timber they fitted over the felt joins came at truss positions to hold down the boards more. Well if thats the case they failed on both counts.
 
Had a busy day today in the sunshine making an opening big enough for my new double glazed unit.

img2142.jpg


The original glazing was so well fitted I removed the glazing bars with my fingers, just pinned, and all 4 panes were out in a flash. Note to self to put security bars across the 4 windows on the end of the workshop soon.

I had to remove 4 plus lengths of shiplap and as I wanted to use them elsware this proved a bit if a pain as they were fixed with ring nails. I also wanted to keep the breathable fabric intact so had to take a hammer and block to the inside of the shiplap after sawing down at the required lenght ends to just release the boards by a couple of mil so I could get a hacksaw blade into the gap and cut all the nails, took a while!

I fitted some temp drilled metal plates to reinforce the head of the original windows hoping that would stop the side changing shape when the verticals were sawn out.

img2147f.jpg


Although this may have helped I still ended up with my saw jammed in the cut when I got to the second vertical to come out and had to rummage in the other store for an acrow to take the strain.

img2150.jpg


I reused the original noggins from the base of the small windows, just moved them down and screwed them back in place.

img2146r.jpg


Nearly ready to offer the window to the hole. Wood preserver painted on all the fresh untreated wood. I trimmed back the membrane and restapled it into the opening.

img2148.jpg


I had made the apature +10mm in both directions so I could adjust the frame and had to spend quite a lot of time messing with ply packing pieces as I forgot to get any plastic packers that the pro's seem to use.
I did eventually get it squared up and fixed nicely ready for the glazing.

I had never fitted a double glazed unit before so was well pleased when all the glass was in and the beading clipped down with my plastic hammer without breaking anything.

img2155v.jpg


I have some shiplap to fit to the left of the window tomorrow and mastic to apply where needed, plus some trim to tidy the surround.
Overall I am very pleased with the result, compare the last pic in the previous post to this last one, so much nicer.

I even managed to do a deal with her indoors. She is now having my workshed on the left in the pics for herself and I get the whole of my new workshop to myself :D
 
Finished trimming around the window today and siliconed to seal against the weather. Pity I didnt have any suitable nails for the shiplap, had to use nails from cable clips, hope they fade in soon :roll:

img2156v.jpg


img2157eao.jpg


I must be getting old, I used to be able to saw timber on a line and it always ended up square, these days even with a square line down 3 sides it near always ends up out of square. Am I alone or do you have the same happen since getting on in years?
I know you all use saw tables.... :lol:
 
Oldman":1l2c3ped said:
I must be getting old, I used to be able to saw timber on a line and it always ended up square, these days even with a square line down 3 sides it near always ends up out of square. Am I alone or do you have the same happen since getting on in years?
I can remember as a child, 9 or 10 getting very cross at not being able to saw a straight line. :? I wrote 'why cant I saw straight' on a bit of wonky cut wood, dad pick up the wood and I then got into trouble as my spelling was worse than my sawing. :shock:
I am please to say my spelling is good spelling not it wobbles, quote Poo Bear, however my sawing is much improved and the LOML is still amazed at how I can follow the line with a hand saw. \:D/
I like to make bread and often get sumond to cut it as LOML cannot cut straight. #-o
 
Last week the workshed looked like this.

img2155v.jpg


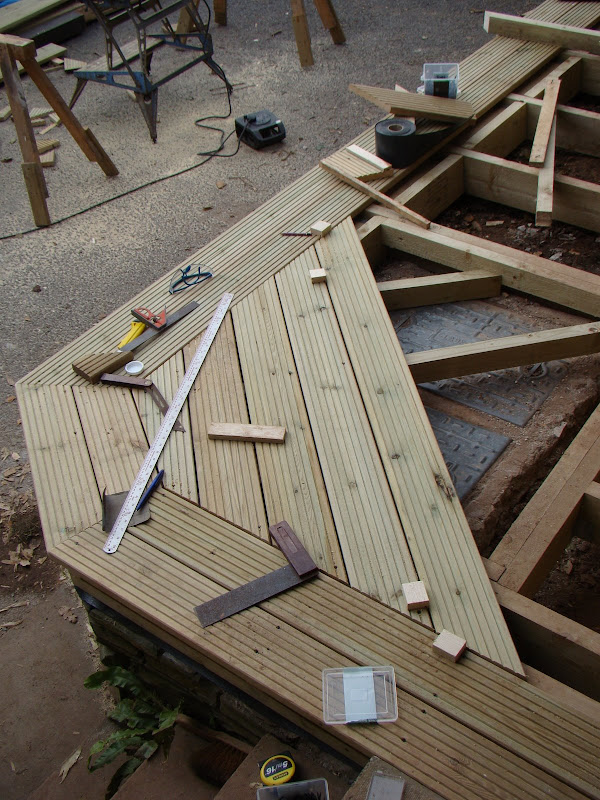
Needed to get some decking down for the wife to use in the summer when she entertains her friends to Barbeque's so it now looks like this.

img2167b.jpg


The little area to the right forground will be paved with the barbeque built on it.
I've screwed a bit of decking to the gap between shop and deck for now to keep the cats out from underneth, I have some shiplap which I hope will cover that area later.
 
Think I may need to get the circular saw out! The decking done at the weekend has boards running like this.

img2173.jpg


I was wondering this morning if it should have had room for expansion along the infilled sections.

Looking at Rogers super deck post from last year, it would seem I should have had a gap like his below.

DSC01915.JPG


Suggestions please?
 
I'm no expert but when I was planning mine I spoke to a bloke who spent most of his working days fitting decking and he said he would always advise a 6mm or so gap between boards. He just used his pencil as his guide.

HTH

Cheers

Mark
 
I did go for a gap along the boards sides of 3mm, it was going to be 5mm but I didnt like viewing the weedcontrol through the gaps. I made some alloy L shaped 3mm plates to hang in the gaps to try to get them uniform.

Its actually the ends of the boards that are cut at 45% that I was wondering about where they butt up against the side of the framing boards, should I have a gap there?

This area.

redlinev.jpg
 
Ah, my bad, now I understand. Well, I guess the expansion on the outer boards will go across the board and press on the ends, so I guess it would be preferred. But saying that, it is outdoors the whole time so maybe the movement won't be that massive. :?

Sorry I can't be of more help, maybe a quick google might help?

Cheers

Mark
 
TrimTheKing":2z0zz7cq said:
I'm no expert but when I was planning mine I spoke to a bloke who spent most of his working days fitting decking and he said he would always advise a 6mm or so gap between boards. He just used his pencil as his guide.

HTH

Cheers

Mark

Whenever I do decking I use a couple of 6" nails to act as spacers.

I would use a circular saw and create a relief on the area you have highlighted.

Cheers

Karl
 
If you've installed them in April, are they going to expand that much over the next season(s)?
 
I've done decking both with and without gaps and can honestly say that the times I have done it without the gaps I have not seen any problems with movement.

My personnel opinion is that the gap is only really needed as a way of allowing water to run off as as to avoid inadvertaintly creating a shallow swimming pool in your back garder!

If you have no gaps, or tight gaps on the deck, as long as there is a slight slope to allow water to run off you shouldnt see any problems.
 
Well I may have a go at putting the circular saw down the edge to get a gap sawn but I dont want to mess it up :( or I may just leave it as is :wink:

I managed to get some more shiplap along the bottom edge yesterday to hide the transition from shed to frame. Hard to find the time atm for "homers"

img2178.jpg


Need top make up a kickplate for under the door now from either stainless or alloy treadplate.

Thinking of what to treat the whole lot with now to get a uniform colour over shop and decking, its looking like Cuprinol decking protector in golden teak may be what I need. Just need a remortgage to afford it!
 
Had a word with Cuprinol customer service and they suggested Clear Decking protector for both workshop and deck to keep it "wood looking" without any stain.
Had to treat the old shed to the left as well so got some acorn brown shed and fence preserver thinking that would maybe match the other wood once finished.
Tested the acorn on some shiplap I had left over from the old shed, looked nice if a little orange but figured it will fade back some. Painted it onto the old shed and got a really red rich mahogany finish.
Whoops! It must have not liked whatever I had painted on it in previous years. Oh well it will fade...

I used the same on the new workshop back and sides as I had lots left over and it looks nice on there Acorn colour ;-)

Still not made up my mind between acorn or clear on the more visible front of the workshop but have busied myself shortening the head of the door and frame by 40mm so I can tomorrow get a run of guttering along the front.
Used the clear protector where the gutter will fit so at least thats well protected before the gutter goes on.

Once the gutters finished I have a long run of armoured cable to lay up to the workshop from the supply.
At this rate it will be winter again before I have the shop wired out as I want and my kit in and usable.
 
Had a busy week work wise but I have managed to get the guttering up on the front side of the workshop, the rest is laying on the ground below where its to be fitted hoping the fairy's will fit it for me.

I now have a run of 6mm armoured cable all the way up the garden to the older shed on the left, I hope to continue the run to the new workshop over the weekend.
I have drilled through into the back wall of my 36ft garage and terminated the armoured there in a 4x4" adaptable box.
From there to the consumer unit is another 46ft run of 6mm twin and earth. To make it easier for other circuits I need running through the garage I have just today finished fitting 3" galvanised cable tray at high level right back the cu.
Might just get some cable on the tray this week!

Once I get the supply to the workshop cu I still have all the circuits to wire for lights, 13amp power and a 32 amp socket for my plasma cutter. Need a 9 day week really.
 
I would like to see a photo of the finish. As I have said before, my wife has a log cabin as a workshop (Not woodwork I'm afraid, she is an entomologist) and treatment is a constant battle between colour, cost and not killing all her plants near the base.

Mick
 
Back
Top