Drawing DaveR's stand

UKworkshop.co.uk

Help Support UKworkshop.co.uk:

This site may earn a commission from merchant affiliate links, including eBay, Amazon, and others.

ColeyS1

Established Member
Joined
2 Nov 2009
Messages
4,245
Reaction score
39
Hi all, just trying to replicate DaveR's Fern stand

I'll post up pictures of my progress, hopefully you could point me in the right direction. This is really making my head hurt #-o

I've drawn the leg- saved as component, then flipped the right leg, then finally flipped the pair along the green axi.
Drawn the rectangle for the rail- but when i pull it, it pulls the line with it.

I've got a proper headache thinking about this :-({|=

Simon
 

Attachments

  • rail.jpg
    rail.jpg
    82.9 KB
  • rail pull.jpg
    rail pull.jpg
    88.2 KB
o.k, progress (hammer)

Must go and check the rules for posting images using ukw server
 

Attachments

  • corrected rai.jpg
    corrected rai.jpg
    78.4 KB
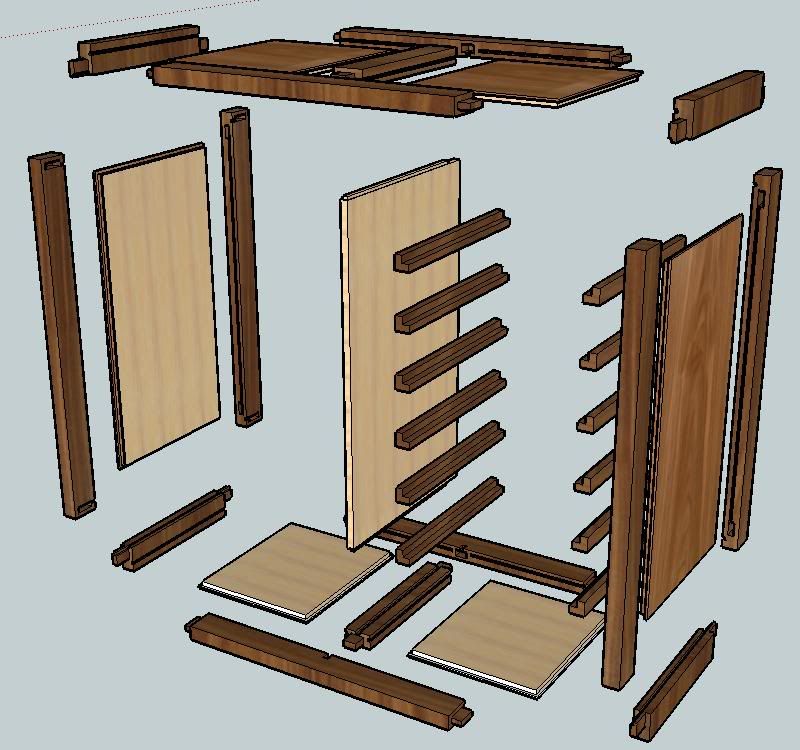
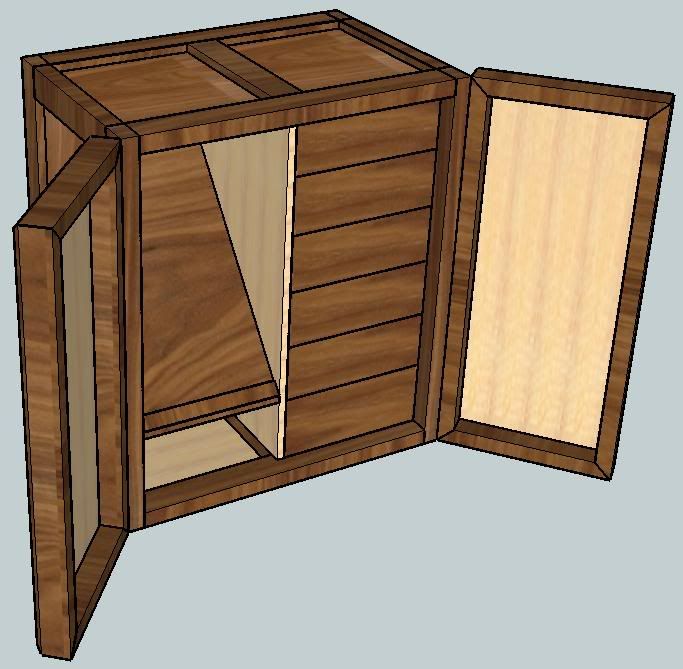
i learnt the hard way i started just making shapes then pushing and pulling, and then i realized that the way forward was to make up components, properly including tenons, mortices, rebates and grooves. doing that i can make drawings like these in not much time.

toolcabinetexploded.jpg


cabinetdoorsopen.jpg


if its the same dave r who posts sketchup drawings on here, his work is something else.

adidat
 
also keyboard shortcuts make things happen quicker,

M=move tool
P=push/pull
L=line
Space Bar=select
R=rectangle

im sure theres more just got to explore

adidat
 
I think from looking at your screen shots, you missed the step of making the leg a component before copying it. Thus the rail is actually being drawn as part of the leg geometry. Maybe in your second post, you've got the legs as components?

adidat, nice cabinet. Now we have to get you straightened out on the materials end of it.
 
Very impressive drawings adidat ! Like the way you've been able to show it as a exploded drawing :mrgreen:

Dave, i decided im going to use a 3 strikes and im out approach. - This works by 3 attempts at doing a certain part, then starting from scratch all over again. The thing im a little unsure of is if you automatically centre the slat (2m 14s in the video) ot just type in how much you like it stepped in. I can do the type it in * approach easily, just keep trying to get it to do it automatically. Needless to say, all the steps up to this point are a doddle now -Must have started from scratch atleast 4 times :roll: :lol: Good fun though, pleased with progress so far.

Thanks for your help, and patience :wink:

Simon
 
Simon, in the video I think I just moved components to center them using inferencing. If you select the component you wish to move, then get the Move tool, use the cursor to "feel" along the edge. You'll see it snaps to the midpoint of the edge when you get close to it. Grab the component there by clicking. then move along the edge of the neighboring component until you find its midpoint and click again to drop the component.

Make sure you're taking advantage of the 3D space you're working in by zooming and orbiting using the center mouse wheel/button so you can look at things from the right point of view.

Glad you're having fun. Once you get the hang of the nuances it will just go along like nothing. Let me know when you find yourself trying to orbit an image you're looking at on your computer.
 
thank you simon, a lot of work goes into them especially with the colouring.

the exploding part is quite simple its just a case of using the move tool and and once you using one of the 3 axis just type in 100mm, go around the drawing doing that. im sure there is a plugin for doing it, but i dont use any plugins just sketchup 7.0 and download the wood pictures of the tint

the centre tends to be automatic, or just hover over the line and right click then select divide it then goes into sections that increase in size as you move the mouse.

good luck, it certainly has a light bulb above head moment when you get it and realise how simple it is.

adidat
 
Dave R":39nbeqyd said:
Make sure you're taking advantage of the 3D space you're working in by zooming and orbiting using the center mouse wheel/button so you can look at things from the right point of view.

very useful point,

adidat
 
For some reason its not saving the slat as a component correctly. Meaning its only moving the one face of the slat. Is there a shortcut i can use to highlight the whole thing ive just drawn.

thanks

Simon
 
OK. Try this: get the Select tool. (Arrow) and triple click somewhere on the slat to select all of its geometry. Then make it a component.

I'll be home from work in about 3 hours. Hang on until then and we'll set up a session so I can demonstrate live.
 
(hammer) Reckon i should have it all sorted fairly soon Dave :p Starting from scratch i didnt seem to have any issues. Im wondering if by deleting and retrying every time, it may be leaving data behind :-k I really like how youve dragged the rail and slat over but using the corner of the leg as a reference.
 

Attachments

  • progress.jpg
    progress.jpg
    107.9 KB
Whenever you Move something you need to grab it by a logical point. A logical point is typically a corner or a midpoint. When you make the move, you move that point relative to something else. It may be a distance or in the case of moving the rails and slats, since the rails and slats are centered on the legs, you can use a corner on a leg and move to the corresponding corner on the other leg. And you probably noticed that I didn't actually click on the thing that was getting moved.
 
adidat":jwlu3tvf said:
dave hows this?

adidat

That is fantastic
Now how did you do it LOL?????

Fantastic thread this one guys getting a lot of good information from it

I only know about sketchup as My youngest Daughter has been using it for School work
I can draw a wall and extrude it and thats it but I am going to have a play over the weekend as I have a bit more free time coming up

Roger
 
He he he. That Copy rotate tool is awesome !!! At times i felt like throwing my laptop out the window- so glad i stuck with it. Ive stopped at the joinery stage( drawing tenons etc) I'll keep repeating it untill im confident, then move onto the next stage.

Thanks again for your patience :eek:ccasion5:

Off now to see if i can find a list of shortcuts for sketchup.

o = orbits well useful
h= move the image up down, around the screens good
spacebar= select
T= tapemeasure

If i can compile a decent list i'll print them out and stick them on my lunchroom wall- if that fails i'll get them tattooed on my arm !
 

Attachments

  • Success !.jpg
    Success !.jpg
    91.4 KB
RogerBoyle":xl05g5p9 said:
I can draw a wall and extrude it and thats it but I am going to have a play over the weekend as I have a bit more free time coming up

Roger

Try replicating Daves stand Roger :!: Plenty of pausing replaying and watching where he moves his cursor. It WILL get you stressed, but as soon as things start coming together, you'll be smiling from ear to ear.

Best of luck :wink:

Simon
 
Not bad. It's coming along nicely. I e-mailed you a plugin that will let you create a list of shortcuts that are currently assigned. You'll be able to copy and paste the text into a text editor and print that.

I modified some of the shortcuts and added others.

E= Delete Guides
F= Follow Me
O= Offset

I have a number of other keyboard shortcuts set up for things like the various flip commands, weld, dimension report on a selected component and so on.
 
ColeyS1":21xceicy said:
o = orbits well useful
h= move the image up down, around the screens good
spacebar= select
T= tapemeasure

Get in the habit of using the center mouse button to activate Orbit and the center mouse button while holding Shift to activate Pan (your "move the image up down, around the screens good") instead of selecting them from the toolbar or keyboard. It will make life a lot easier and your work a lot faster. When you let go of the center mouse button, you'll go back to the tool you were using. You don't have to select it again.
 
Back
Top