Cap Iron Deflection Angle.

UKworkshop.co.uk

Help Support UKworkshop.co.uk:

This site may earn a commission from merchant affiliate links, including eBay, Amazon, and others.

swagman

Established Member
Joined
13 Feb 2008
Messages
1,295
Reaction score
1
Location
Victoria, Australia
There has been a wide range of opinions on how close to set the Cap Iron in relation to the cutting edge of the blade. So much so that I am going to avoid further discussion on that topic, and focus instead on the defection angle that's required on front edge of the Cap Iron. The following study has nothing to do with a metal bodied bench plane, the likes of a Stanley or Record bench plane. imo, these type of planes exhibit such a low front wear face, that if you were to choose a defection angle in the upper range of 50 - 55* , it will have a little to no bearing on restricting the natural flow of shavings.

Moving onwards;

I have included 3 diagrams that replicate a 1/1 scale of the inner workings of the Edward Preston Try Plane that I recently posted photo's of.
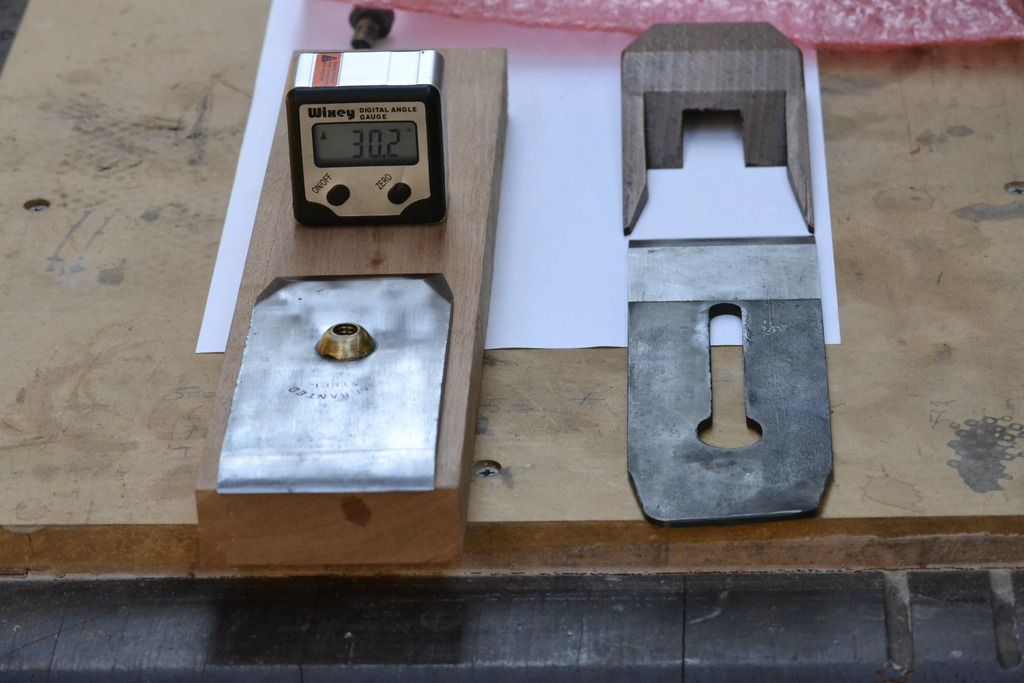


The 1st drawing shows the current defection angle that was measured at 30* from the Try Planes front edge profile. The front edge of the Cap Iron shows no sign of a steeper secondary bevel being applied. Other than showing signs of being polished by its previous owners , the Cap Iron is in original condition as supplied by the planes maker.

Take special note that with a 30* shaving deflection drawn in, its parallel alignment to the wear face are near exact. Also note that at this angle of shaving deflection, the wear face poses no real obstruction to the shaving as its directed through and exits the throat of the plane.
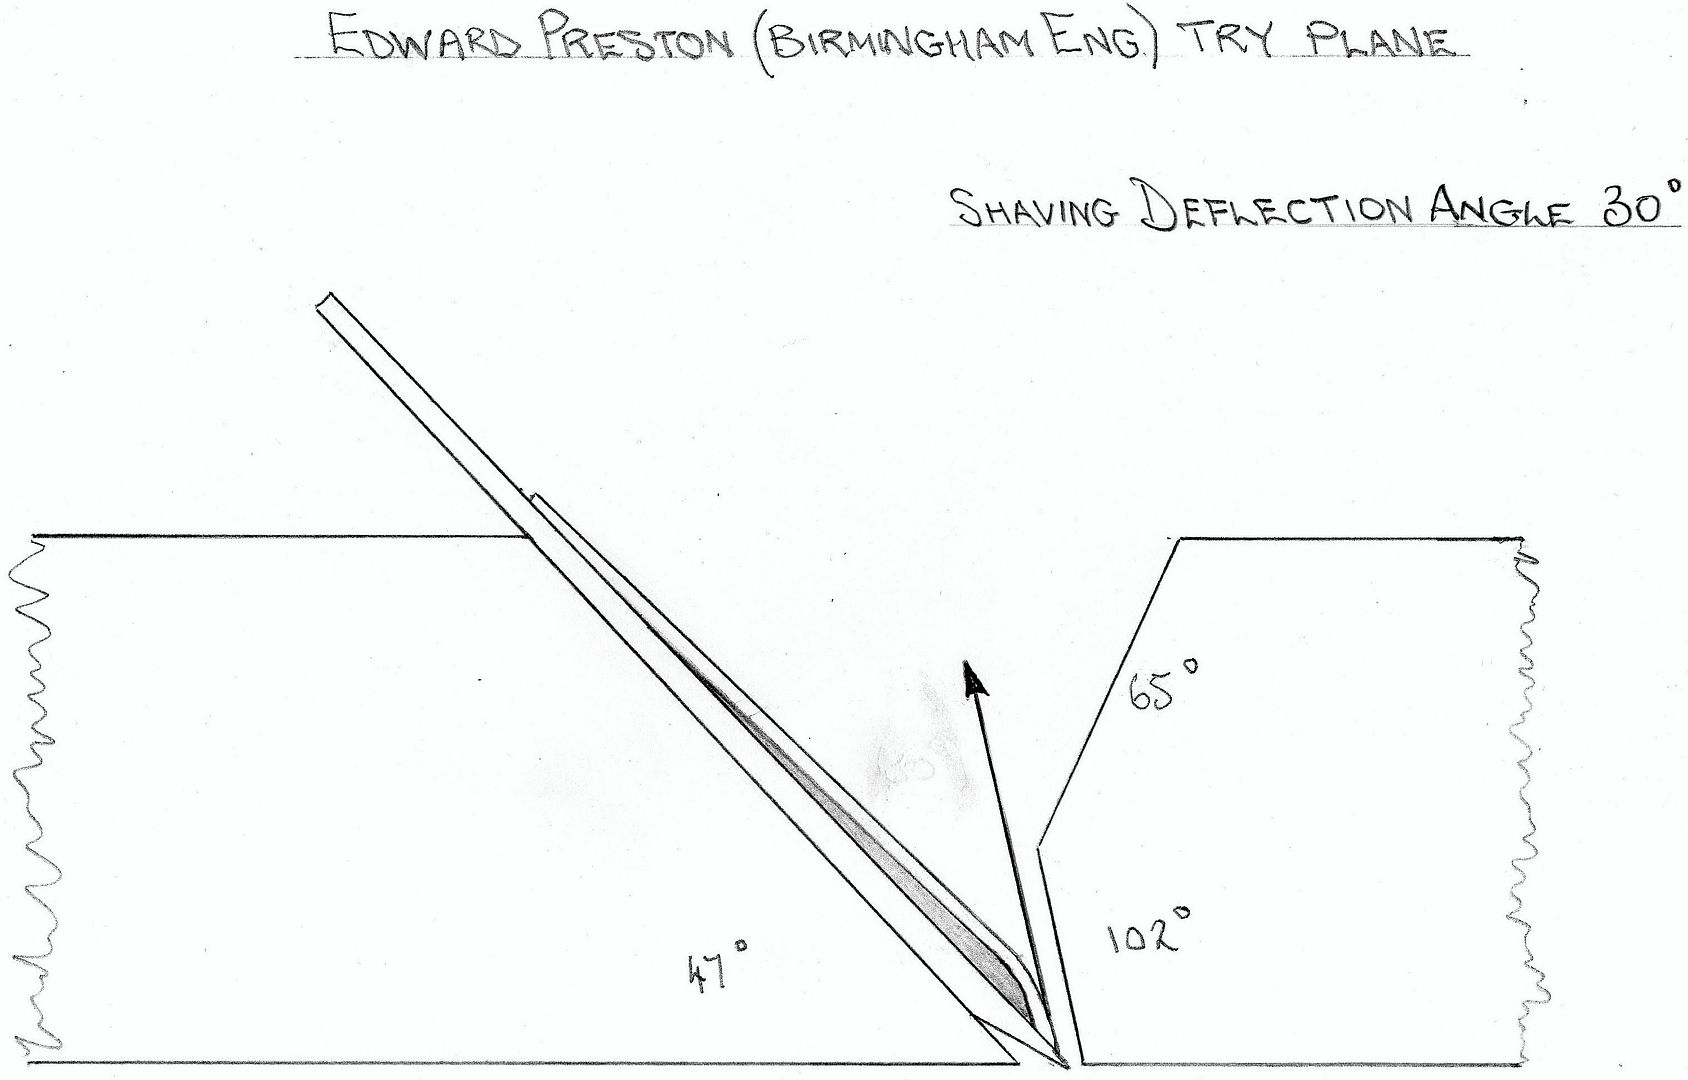


The next diagram shows the effect of increasing that shaving defection to 40*. Note how the wear face is starting to serve some role in redirecting the shaving.
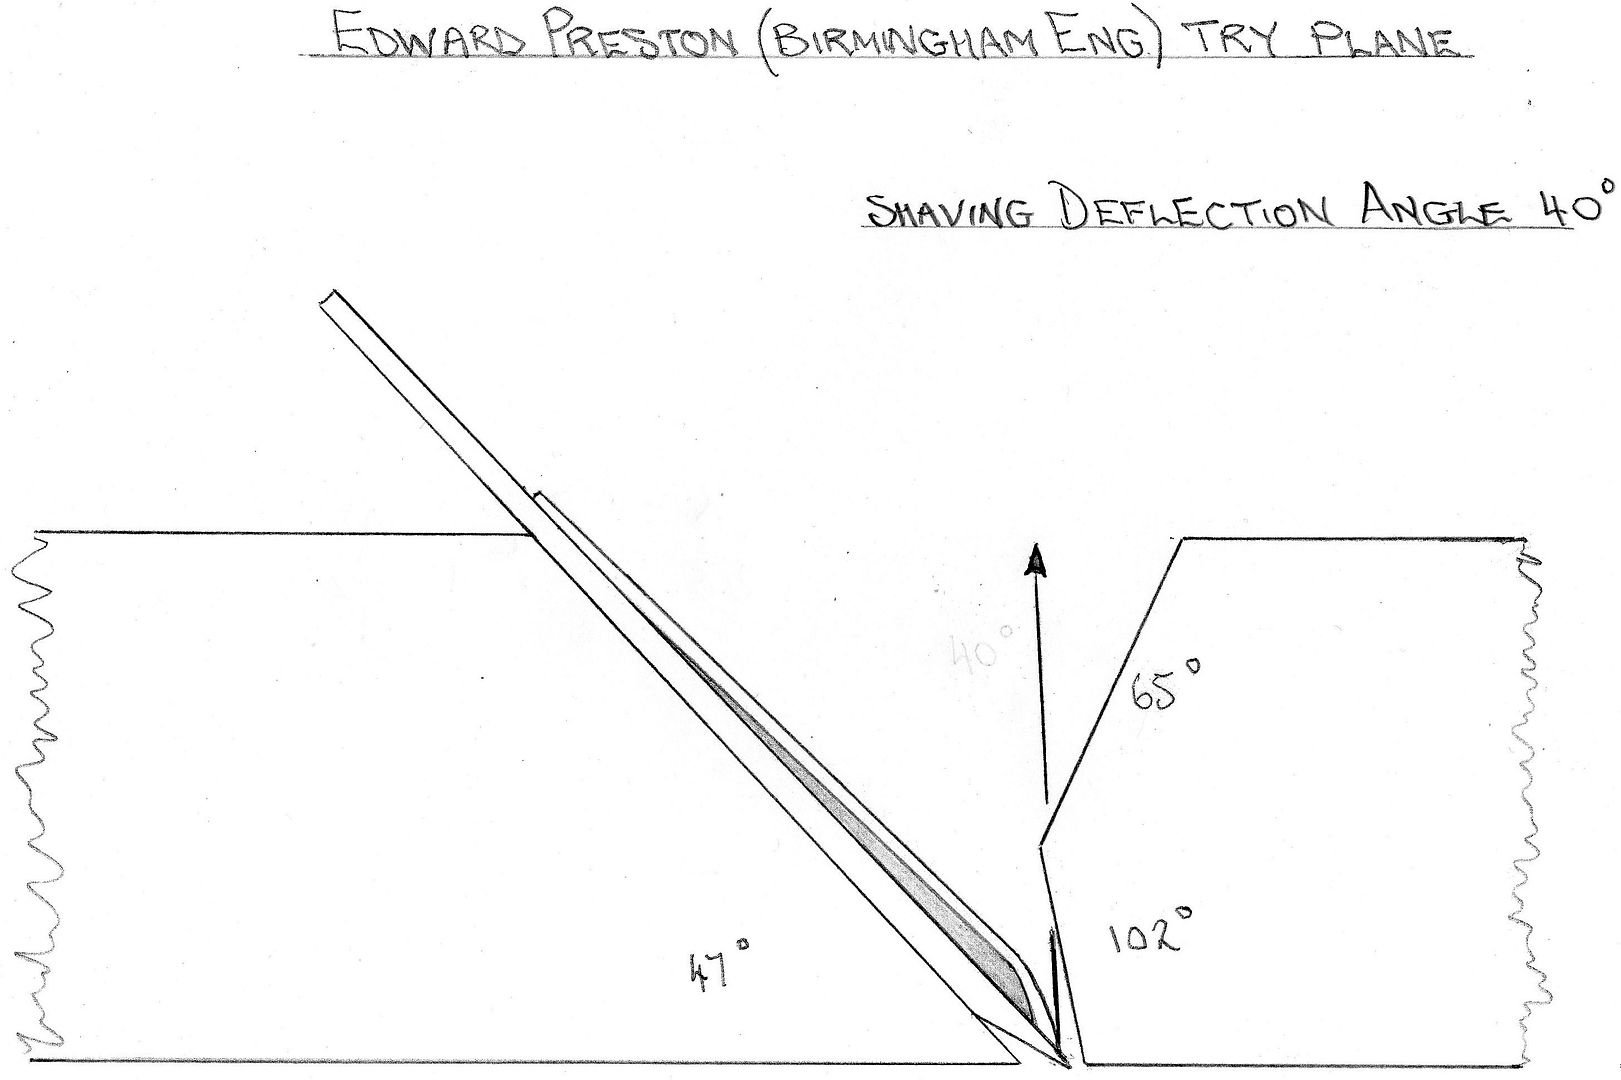


The final diagram shows the effect of further increasing the shaving defection to 50*. Note how the wear face is now serving a major role in redirecting the shaving, to the point, that may lead to a light obstruction at mouth opening to a full blockage at the mouth opening, if the user is less observant to intervene.
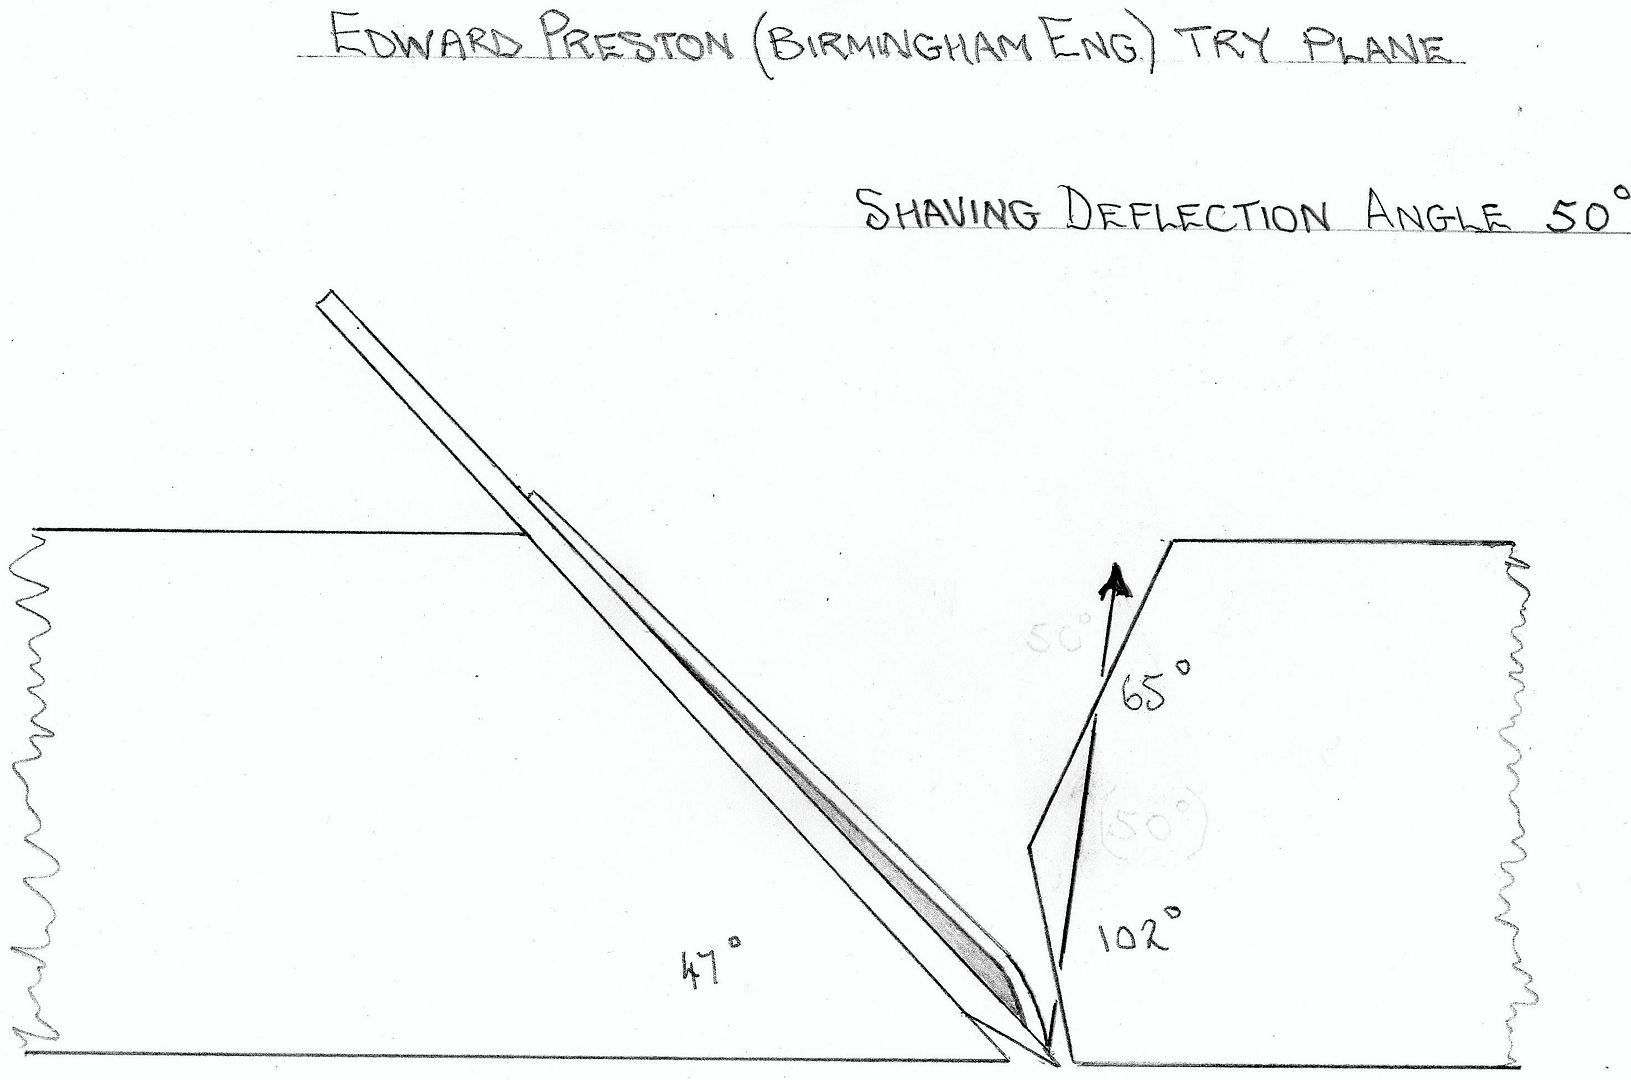


The question as to what is the best deflection angle for a traditional wooden plane of similar characteristics, that will not only serve to break the shaving earlier enough to mitigate tear-out, but not impede the natural flow of the shavings as it serves that vital role, is something that each user needs to experiment with.

Something to consider.

Stewie;
 
The diagrams embody a fairly significant (and unproven, AFAIK) assumption about the relationship between the cap iron angle and the direction the shaving takes.

BugBear
 
On woodies, the mouth size is also a major factor here. If the mouth is large and deliberately kept that way, as you can get away with precisely because of the cap iron (it is my belief this is why so many old double-iron coffin smoothers don't have patched mouths) then a wear of nearly any angle doesn't interact with the shaving close to the edge and will have little effect on ejection.

The following study has nothing to do with a metal bodied bench plane, the likes of a Stanley or Record bench plane. imo, these type of planes exhibit such a low front wear face, that if you were to choose a defection angle in the upper range of 50 - 55* , it will have a little to no bearing on restricting the natural flow of shavings.
It is possible to find metal bench planes where the front of the mouth is a problem for shaving ejection. Late last year I fettled an older Acorn no. 4 and filing to provide a relief angle was necessary to avoid shavings jamming instantly with even the finest shavings.
 
bugbear":1vijt1o5 said:
The diagrams embody a fairly significant (and unproven, AFAIK) assumption about the relationship between the cap iron angle and the direction the shaving takes.
In addition, whatever effect the angle of the leading edge of the cap iron has it isn't the only factor. The very thing that Stewie doesn't want to talk any more about has a direct bearing on the ejection angle of the shaving. This is precisely why you set the irons one way you get ribbons, you set them another way you get curls. Same plane, same shaving thickness.

So the two things can't be usefully separated and discussed separately I don't think.
 
The shaving deflects off the wear, not through it. It clogs only if the deflection angle is too steep.

If shavings are things, they can loiter some before they passed out. The relationship between the wear and the 50 degree small bevel is important because the cap isn't very effective with a low angle point of contact.

For users thinking about increasing the mouth size, increasing the angle of the wear opening is more effective and less damaging. Also, making sure the restriction isn't occurring on the primary angle of the cap is also important. If it is, that angle can be bent some or filed some.

Making the wear steeper does not involve opening the mouth, and it's not a major issue down the road because there should be very little subsequent flattening of the sole of a double iron plane later.

Few enough people are going to do this to wooden planes that the discussion may not be worth having.
 
ED65":ml1xle5h said:
On woodies, the mouth size is also a major factor here. If the mouth is large and deliberately kept that way, as you can get away with precisely because of the cap iron (it is my belief this is why so many old double-iron coffin smoothers don't have patched mouths) then a wear of nearly any angle doesn't interact with the shaving close to the edge and will have little effect on ejection.

The following study has nothing to do with a metal bodied bench plane, the likes of a Stanley or Record bench plane. imo, these type of planes exhibit such a low front wear face, that if you were to choose a defection angle in the upper range of 50 - 55* , it will have a little to no bearing on restricting the natural flow of shavings.
It is possible to find metal bench planes where the front of the mouth is a problem for shaving ejection. Late last year I fettled an older Acorn no. 4 and filing to provide a relief angle was necessary to avoid shavings jamming instantly with even the finest shavings.

I've also seen problems with metal planes, especially if someone replaces a cap iron with a thicker one.
 
D_W":1p2f0a2i said:
For users thinking about increasing the mouth size....

.

Are you capable of reading in human mind? I was just thinking that :mrgreen:

D_W":1p2f0a2i said:
..... increasing the angle of the wear opening is more effective and less damaging.....
So, what wear angle do you utilize when you start in making a double iron wooden plane in which you intend to use the chipbreaker for having control on tearout?

Ciao
Giuliano :D
 

Are you capable of reading in human mind? I was just thinking that :mrgreen:

I've seen a lot of planes with the mouths opened up garishly (like with a rasp or something) because a user got tired of clogging - like a user 100 years ago. The trouble with opening the mouth without moving the wear is that sometimes you have to open it a significant amount to get relief where a small wear angle would've been fine, and a plane with a really wide mouth becomes somewhat undesirable because of the ability to catch the ends of a board or panel at the start of a cut. Still nice to have a small mouth if possible, and twice the size of the thickest shaving you'll take is big enough.

Of course, it's harder to increase the wear angle precisely without opening the mouth, but not much harder, and it can be done with a paring chisel and a good eye.

D_W":uev7ij7t said:
..... increasing the angle of the wear opening is more effective and less damaging.....
So, what wear angle do you utilize when you start in making a double iron wooden plane in which you intend to use the chipbreaker for having control on tearout?
Ciao
Giuliano :D[/quote]

There's no great reason that the wear needs to be steep other than that it looks good, and that the mouth opens less on final truing of the sole. I like to shoot for 76 degrees or so (angle from below the iron to the wear, in stewie's picture, it would say 104º) if I have a good cap iron like the picture above. If the cap iron is very round and fat and interfering well up from the cut, then I make the wear closer to 90 degrees, but only as much as I have to. I will file some of the hump off of the cap iron, too. A lot of modern irons for european planes (Ulmia, Berg, etc) have fat bulbous cap iron leading edges that stick way up off of the irons. The wear in those planes is very short and low - not very elegant, but easier to make by machine. Because the wear is short and low, they don't care as much if the cap iron is shaped like that - I'm sure it's easier to make that type than it is the shallow primary angle type like ward makes.

At any rate, with a good cap, I shoot for 76 degrees or so for looks, and then may open that up a couple of degrees after testing the plane. I've gotten unused marples planes that needed the same treatment (cap iron filed and wear relieved) - I think the maker expected to make an elegant plane and then assumed that the user knew enough to trouble shoot the wear if they were going to use the cap iron, because you can only do two things to guarantee good feed:
* do something to completely move the wear out of the way (as modern euro makers do, or in an older style plane, just make it close to 90 degrees)
* make it tighter like I do and actually use the plane for an hour or so and modify it as needed (the open market wouldn't like the idea of getting a used plane, and makers wouldn't like the idea of spending an hour troubleshooting, either).

Also, I've seen the speed that the makers of those planes were making them (marples, etc), and while some would conclude that maybe the maker didn't think people would be using the cap iron, they wouldn't have gone to the expense to put one in if they didn't expect people to. I'd imagine the marples factory makers were making several finished planes a day, or more. It takes me 15 hours to make a try plane entirely by hand - I'd get fired the first day.
 
D_W":1t86cmw2 said:

Are you capable of reading in human mind? I was just thinking that :mrgreen:

I've seen a lot of planes with the mouths opened up garishly (like with a rasp or something) because a user got tired of clogging - like a user 100 years ago. The trouble with opening the mouth without moving the wear is that sometimes you have to open it a significant amount to get relief where a small wear angle would've been fine, and a plane with a really wide mouth becomes somewhat undesirable because of the ability to catch the ends of a board or panel at the start of a cut. Still nice to have a small mouth if possible, and twice the size of the thickest shaving you'll take is big enough.

Of course, it's harder to increase the wear angle precisely without opening the mouth, but not much harder, and it can be done with a paring chisel and a good eye.

D_W":1t86cmw2 said:
..... increasing the angle of the wear opening is more effective and less damaging.....
So, what wear angle do you utilize when you start in making a double iron wooden plane in which you intend to use the chipbreaker for having control on tearout?
Ciao
Giuliano :D

There's no great reason that the wear needs to be steep other than that it looks good, and that the mouth opens less on final truing of the sole. I like to shoot for 76 degrees or so (angle from below the iron to the wear, in stewie's picture, it would say 104º) if I have a good cap iron like the picture above. If the cap iron is very round and fat and interfering well up from the cut, then I make the wear closer to 90 degrees, but only as much as I have to. I will file some of the hump off of the cap iron, too. A lot of modern irons for european planes (Ulmia, Berg, etc) have fat bulbous cap iron leading edges that stick way up off of the irons. The wear in those planes is very short and low - not very elegant, but easier to make by machine. Because the wear is short and low, they don't care as much if the cap iron is shaped like that - I'm sure it's easier to make that type than it is the shallow primary angle type like ward makes.

At any rate, with a good cap, I shoot for 76 degrees or so for looks, and then may open that up a couple of degrees after testing the plane. I've gotten unused marples planes that needed the same treatment (cap iron filed and wear relieved) - I think the maker expected to make an elegant plane and then assumed that the user knew enough to trouble shoot the wear if they were going to use the cap iron, because you can only do two things to guarantee good feed:
* do something to completely move the wear out of the way (as modern euro makers do, or in an older style plane, just make it close to 90 degrees)
* make it tighter like I do and actually use the plane for an hour or so and modify it as needed (the open market wouldn't like the idea of getting a used plane, and makers wouldn't like the idea of spending an hour troubleshooting, either).

Also, I've seen the speed that the makers of those planes were making them (marples, etc), and while some would conclude that maybe the maker didn't think people would be using the cap iron, they wouldn't have gone to the expense to put one in if they didn't expect people to. I'd imagine the marples factory makers were making several finished planes a day, or more. It takes me 15 hours to make a try plane entirely by hand - I'd get fired the first day.[/quote]

Watch DWs video on Marking Out a Double Iron Try Plane and compare the similarities. ( from 5.30 min) https://www.youtube.com/watch?v=y4KDaq2cnjs

E.PRESTON Bed Angle (47*) DW 45*
E.PRESTON Wear Angle (102*) DW 101*
E.PRESTON Wear Height 1 1/4") DW between 1 1/4 - 1 /3/8")

And where is DW referencing his layout measurements from. Looks to be an earlier made Try Plane. Likely a British Planemaker, The only major difference; DW made the decision to change the original Bed Angle from 47* to 45*. To then use a tapered iron, you are lowering that effective approach angle by another 1 1/2* to 43 1/2*.
 
swagman":oc3a4zi9 said:
D_W":oc3a4zi9 said:

Are you capable of reading in human mind? I was just thinking that :mrgreen:

I've seen a lot of planes with the mouths opened up garishly (like with a rasp or something) because a user got tired of clogging - like a user 100 years ago. The trouble with opening the mouth without moving the wear is that sometimes you have to open it a significant amount to get relief where a small wear angle would've been fine, and a plane with a really wide mouth becomes somewhat undesirable because of the ability to catch the ends of a board or panel at the start of a cut. Still nice to have a small mouth if possible, and twice the size of the thickest shaving you'll take is big enough.

Of course, it's harder to increase the wear angle precisely without opening the mouth, but not much harder, and it can be done with a paring chisel and a good eye.

D_W":oc3a4zi9 said:
..... increasing the angle of the wear opening is more effective and less damaging.....
So, what wear angle do you utilize when you start in making a double iron wooden plane in which you intend to use the chipbreaker for having control on tearout?
Ciao
Giuliano :D

There's no great reason that the wear needs to be steep other than that it looks good, and that the mouth opens less on final truing of the sole. I like to shoot for 76 degrees or so (angle from below the iron to the wear, in stewie's picture, it would say 104º) if I have a good cap iron like the picture above. If the cap iron is very round and fat and interfering well up from the cut, then I make the wear closer to 90 degrees, but only as much as I have to. I will file some of the hump off of the cap iron, too. A lot of modern irons for european planes (Ulmia, Berg, etc) have fat bulbous cap iron leading edges that stick way up off of the irons. The wear in those planes is very short and low - not very elegant, but easier to make by machine. Because the wear is short and low, they don't care as much if the cap iron is shaped like that - I'm sure it's easier to make that type than it is the shallow primary angle type like ward makes.

At any rate, with a good cap, I shoot for 76 degrees or so for looks, and then may open that up a couple of degrees after testing the plane. I've gotten unused marples planes that needed the same treatment (cap iron filed and wear relieved) - I think the maker expected to make an elegant plane and then assumed that the user knew enough to trouble shoot the wear if they were going to use the cap iron, because you can only do two things to guarantee good feed:
* do something to completely move the wear out of the way (as modern euro makers do, or in an older style plane, just make it close to 90 degrees)
* make it tighter like I do and actually use the plane for an hour or so and modify it as needed (the open market wouldn't like the idea of getting a used plane, and makers wouldn't like the idea of spending an hour troubleshooting, either).

Also, I've seen the speed that the makers of those planes were making them (marples, etc), and while some would conclude that maybe the maker didn't think people would be using the cap iron, they wouldn't have gone to the expense to put one in if they didn't expect people to. I'd imagine the marples factory makers were making several finished planes a day, or more. It takes me 15 hours to make a try plane entirely by hand - I'd get fired the first day.

Watch DWs video on Marking Out a Double Iron Try Plane and compare the similarities. ( from 5.30 min) https://www.youtube.com/watch?v=y4KDaq2cnjs

E.PRESTON Bed Angle (47*) DW 45*
E.PRESTON Wear Angle (102*) DW 101*
E.PRESTON Wear Height 1 1/4") DW between 1 1/4 - 1 /3/8")

And where is DW referencing his layout measurements from. Looks to be an earlier made Try Plane. Likely a British Planemaker, The only major difference; DW made the decision to change the original Bed Angle from 47* to 45*. To then use a tapered iron, you are lowering that effective approach angle by another 1 1/2* to 43 1/2*.[/quote]

Thanks both for these accurate answers. Now I have enough info for trying the chipbreaker settings myself on metal as well as on wooden planes
Ciao
Giuliano :D
 
swagman":3hucx1ei said:
Watch DWs video on Marking Out a Double Iron Try Plane and compare the similarities. ( from 5.30 min) https://www.youtube.com/watch?v=y4KDaq2cnjs

E.PRESTON Bed Angle (47*) DW 45*
E.PRESTON Wear Angle (102*) DW 101*
E.PRESTON Wear Height 1 1/4") DW between 1 1/4 - 1 /3/8")

And where is DW referencing his layout measurements from. Looks to be an earlier made Try Plane. Likely a British Planemaker, The only major difference; DW made the decision to change the original Bed Angle from 47* to 45*. To then use a tapered iron, you are lowering that effective approach angle by another 1 1/2* to 43 1/2*.

Certainly, one is well advised to start with a good example and make small changes as needed. I have learned this with planes, and maybe you have, too. I know you have learned from saws that freelancing the design is not a good idea.

The plane I took those measurements from was a griffiths plane. The wear was below what I used in angle, very tight, and it had a superbly elegant ward cap iron on it. I learned a hard lesson on the next plane that took me a long time to figure out - a very nice butcher double iron set where the iron was no less than sublime, but the cap is very rounded and intruding across the entire length of the front bevel. I could see a gap between it and the wear, but I couldn't get it to feed. It needs a different wear setup than the griffiths that I had. I started by opening the mouth and only later figured out that I'd have been much better off steepening the wear.

So, I'm not sure if you're trying to make the point that all I did was copy something else. Certainly for my first plane, I did. Anyone foolish enough to think they can better hundreds of years of plane design and freelance before they even know what they're copying ends up with planes like my first try and saw handles like your early tries.

But you have to move on from there and actually understand the wear, and why it may not work if you just copy planes and use a variety of irons. That understanding is what I've come to figure out to a point that I don't think my plans will change, even if I keep building planes for 3 decades. I've settled on proportion based on an array of older planes that I have (mostly griffiths and mathiesons, but some others) and design details (eyes, handle, chamfers) based on a mish-mash of 18th and 19th century elements. I bought 10 try planes before I found one that I'd wanted to use as a basis for my first try. It's unwise to buy one and copy it unless you're just over the moon - especially if you intend to maybe make a few hundred over the years - much better to buy ten, use them in the context of work and take proportions from the one that's most comfortable.
 
This discussion has become too esoteric at this point, I think, for anyone other than makers.

Anyone who is just trying to get a plane they've bought to work should follow the advice above:
* set up the front of the cap iron
* if there's clogs, start by seeing if you can flatten the profile of the cap a little bit so that it doesn't create a trap by unfortunate geometry (this can happen even when you can see a gap, the cap just directs the shaving into the wrong place if the shape isn't right for the wear)
* if flattening the cap by bending or filing is undesirable or too much work, increase the wear opening without opening the mouth. The one thing to be careful about is that the wear needs to be opened all the way down to the mouth so that it's open both where the shaving is hitting the cap and anywhere above that the shaving might run into.

The rest of the talk about design and testing can be ignored. I found working through this stuff fulfilling, because there is no documentation of it. It is, admittedly, frustrating to get the point where I understood it all, though - I didn't know just how much effect the design of a particular cap can have on influencing the wear and making the plane not work well even opening the mouth a fair amount. It's definitely frustrating to make a crisp plane after 15 hours worth of work and then have it boggle you by clogging - until you've opened the mouth an ugly amount (I'm all for blocking the mouth with an insert later, though - it makes an old plane nearly valueless from a selling point, but my favorite smoother is a plane with an eskilstuna cap iron that is horribly shaped. I had to overcut the wear and then come back and insert a plug that had a negative angle (facing away from the cap). It works a charm, but it's never a plane that anyone would sell, and it's a geometry that can't be made out of a solid billet.
 
I did refurb a couple of Mathieson wooden planes last year, the irons were a bit of a mess but cleaned up and sharpened OK. They worked OK but not great just did not feel right so I tried a steeper bevel on the CB about 45 degrees. Accordion shavings and continual jams, returning to a CB bevel of between 25-30 degrees smoothly tapered and both planes work great. Wear is about 100 degrees and I surmised that the original maker had forgotten more about making planes than I will ever know so I left it well alone. I think that if you add the bedding and CB bevel angles together then if the sum of this plus the wear angle exceed 180 degrees then you will have problems. Of course I had read this already but had to find out for myself. So for a wear angle of 100 degrees, bedding angle of 45 degrees I would aim for a CB bevel of 30 degrees or less. I have no way of knowing if either plane had been modified after manufacture or if they were running on original double irons.
Both planes mouths are quite wide so I only cleaned them up.
 
There is a problem with a 30 degree angle on a cap iron - it doesn't do much. Not all cap irons are 30 degrees - the butcher cap that I have terminates somewhere around 45 or 50.

I suspect that the makers expected anyone who wanted to do more than stock set to know how to modify the planes. If other folks were using the planes as joiners where tearout may not have matter as much (as opposed to finer work), then they probably figured they could use them at stock setting.

The total angles will be greater than 180 when you add them together. The cap iron is expected to push a shaving into the wear to some extent, just as it is expected to do it on a single iron plane.
 
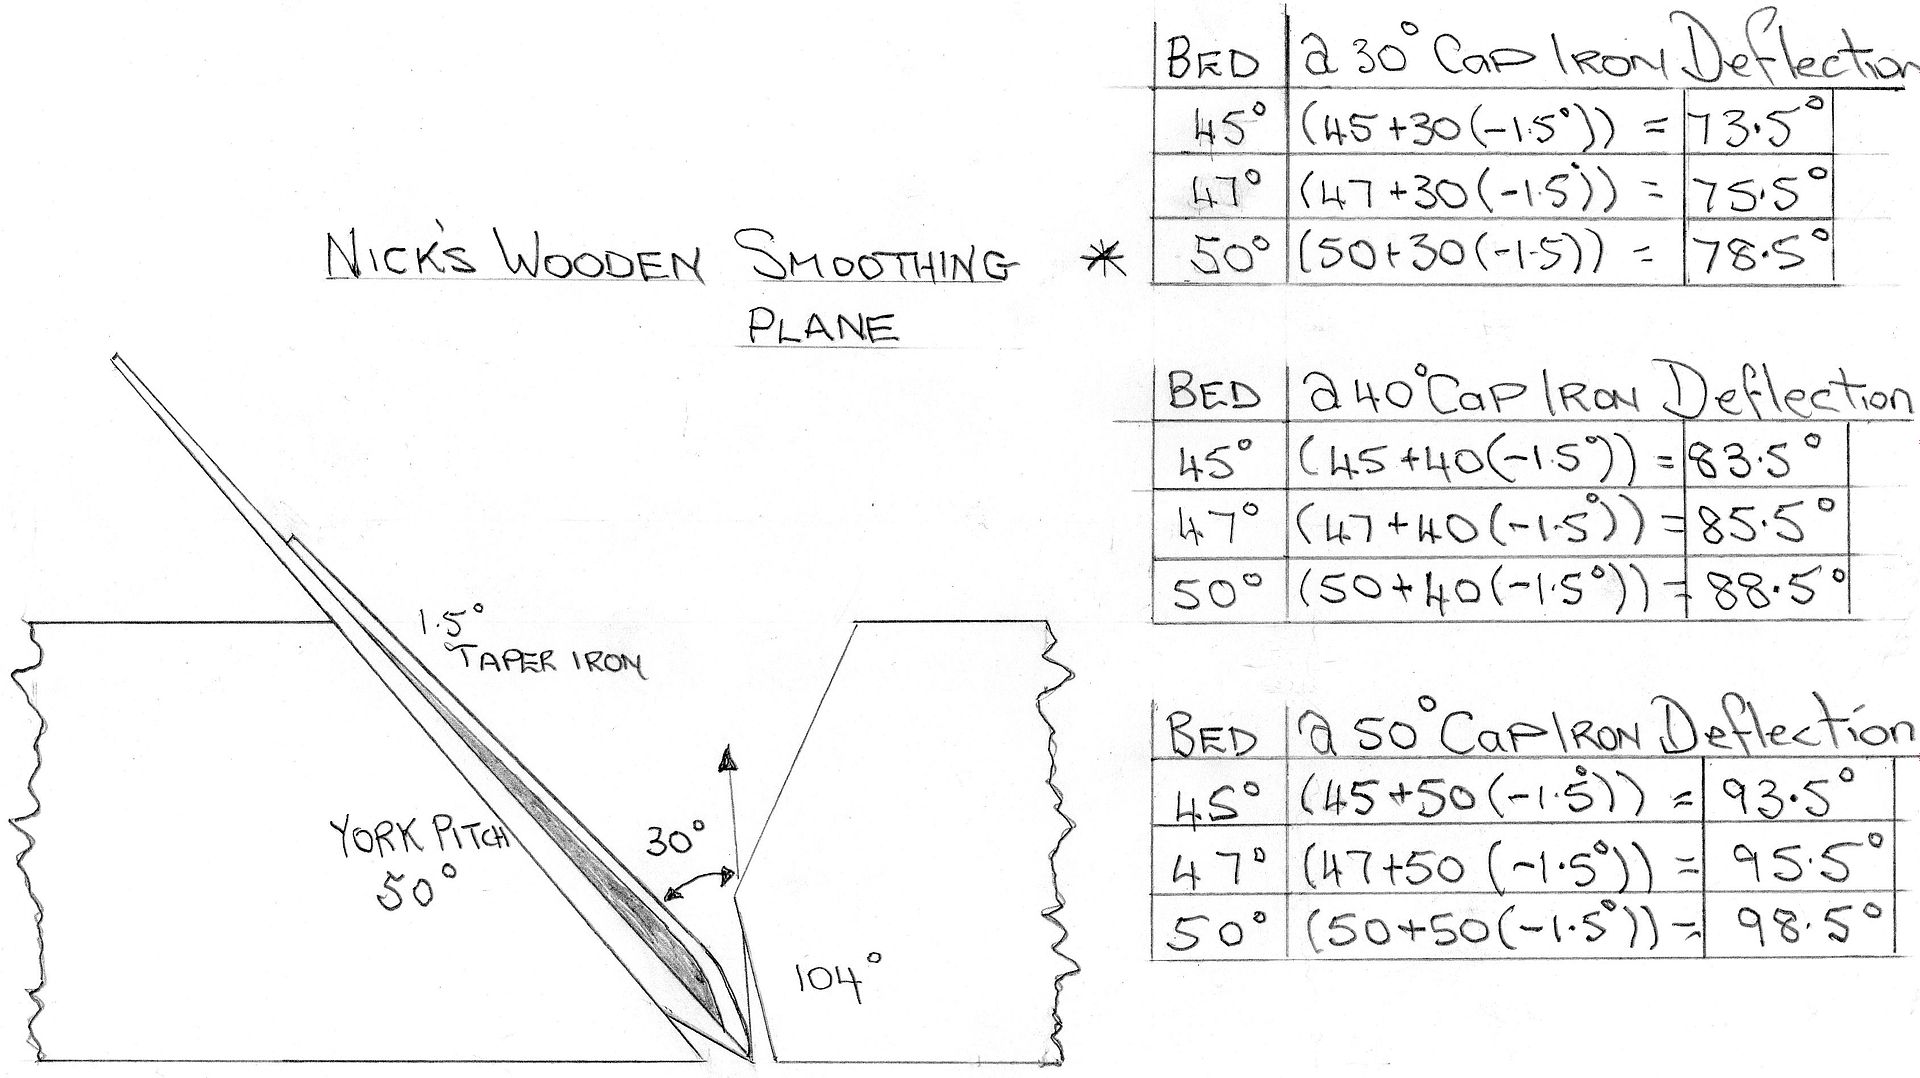
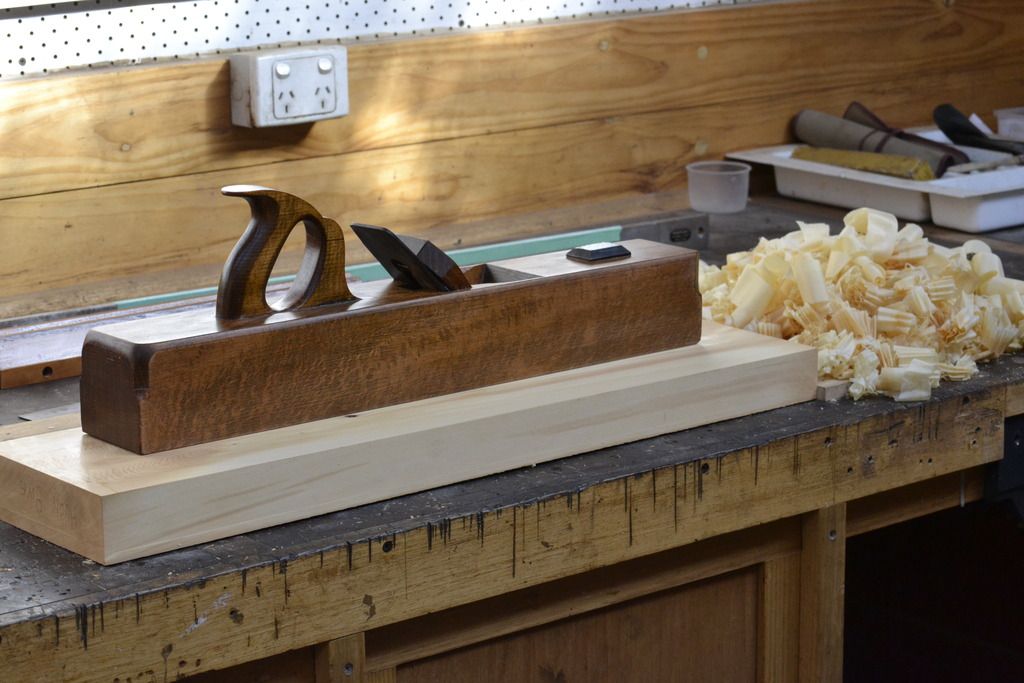
Following Stewie's post, I thought I would try a few experiments with my wooden smoother, which I have posted about previously - it is unusual in as far as it is marked 'cabinet' and has a 50 degree bed angle. The Wear is 104 degrees and the cap iron is 30.

the plane is always clog-free when taking reasonably thick shavings and when the cap-iron is not set fine, since the shavings shoot out straight (see picture), but this does not leave a very good surface (I was testing on a bit of knotty cheap pine against the grain). When I tried to set the cap-iron fine and use a thick saving it was really hard to push and the plane and hitting the knots tended to force the cap iron off its setting.

So I tired a thinner shaving and fine-set cap-iron, and eventually got the desired effect that removed the tear-out, but the difference between the setting where it worked and the one where it was set too fine was tiny (too fine and the shaving crinkles and immediately clogs). No doubt this is a reflection of my inexperience, but I found it very difficult to get right.

I'm not sure there are any lessons here, other than than that these wooden planes really are complex and even tiny differences between their layout and usage can effect how they perform - D_W must surely be right about their being no magic recipe for how they should be set up.

It was interesting to compare a standard bailey no 4, which was very easy to get an exact and effective fine cap-iron setting repeatably and reliably. You can see why they caught on!

9hCam_LQUexmvn6ArdJlt_fp3hLeFR5mZawWDJ9pbztE0rPPKef0XA
 
When I tried to set the cap-iron fine and use a thick saving it was really hard to push and the plane and hitting the knots tended to force the cap iron off its setting.

Nick; my recommendation would be that you sell that 50* wooden smoothing plane to someone who knows how to use it.

regards Stewie;
 
nabs":1ttas06k said:
Following Stewie's post, I thought I would try a few experiments with my wooden smoother, which I have posted about previously - it is unusual in as far as it is marked 'cabinet' and has a 50 degree bed angle. The Wear is 104 degrees and the cap iron is 30.

the plane is always clog-free when taking reasonably thick shavings and when the cap-iron is not set fine, since the shavings shoot out straight (see picture), but this does not leave a very good surface (I was testing on a bit of knotty cheap pine against the grain). When I tried to set the cap-iron fine and use a thick saving it was really hard to push and the plane and hitting the knots tended to force the cap iron off its setting.

So I tired a thinner shaving and fine-set cap-iron, and eventually got the desired effect that removed the tear-out, but the difference between the setting where it worked and the one where it was set too fine was tiny (too fine and the shaving crinkles and immediately clogs). No doubt this is a reflection of my inexperience, but I found it very difficult to get right.

I'm not sure there are any lessons here, other than than that these wooden planes really are complex and even tiny differences between their layout and usage can effect how they perform - D_W must surely be right about their being no magic recipe for how they should be set up.

It was interesting to compare a standard bailey no 4, which was very easy to get an exact and effective fine cap-iron setting repeatably and reliably. You can see why they caught on!

9hCam_LQUexmvn6ArdJlt_fp3hLeFR5mZawWDJ9pbztE0rPPKef0XA

That's a lovely looking plane - such planes are not as common over here in the US as they are there.

I'm sure it has it in it to be a good worker. Yes on the stanley 4 - it is much easier to set the cap iron right on one, almost right away. Using a coffin smoother is part figuring out the setup, and then part relationship building. I think that even though I regard myself as a competent amateur maker, I still always put away every coffin smoother I make in favor of going back to a relatively modern US made stanley 4 that the only thing made by me in it is the iron. Nothing special about the iron, either, just figured since I took the time to make it, I might as well use it.

Yes also on no magic formula. I know that unused planes don't necessarily come from the factory ready to work with the cap set tight as in the last year, I got my hands on two unused English planes, and both of them needed troubleshooting to work.

The other thing that makes coffin smoothers hard to work with in a heavy cut is that they always feel like they could use another pound of weight. If I had one like yours and just couldn't get right with it, I'd steepen the wear a little, but I'd also try it first on a junk plane before working into a nice plane like that.

If you just can't get along with that plane, I'm sure it would fit in my mailbox. :)

Of course, while we're on the subject of handouts, I'm also looking for unicorns and $200 ideal shape rosewood norris A5s or 5s. I could put those on the shelf and not use them much, too.
 
swagman":enplinp4 said:
When I tried to set the cap-iron fine and use a thick saving it was really hard to push and the plane and hitting the knots tended to force the cap iron off its setting.

Nick; my recommendation would be that you sell that 50* wooden smoothing plane to someone who knows how to use it.

regards Stewie;

we all need to start somewhere, Stewie!

I was experimenting with thicker shavings to try and understand why it was clogging with shavings.

Thanks for the diagram - I think it shows that, on the reasonable assumption that a shaving, once broken by the cap iron, will tend to continue on at the 'deflection' angle until it hits the wear, then then the angle it eventually meets the wear is determined by all the angles you've shown. I suppose the thicker shavings are strong enough to resist bending when hitting the wear, but thinner shavings are more prone to curling over in the other direction (and thus more likely to clog).

D_W it makes perfect sense that altering the wear angle would reduce the chance of the plane clogging, but I am think the main problem is that I am still learning how to use it. I shall persevere!
 

Latest posts

Back
Top