Advice on taking Photo's

UKworkshop.co.uk

Help Support UKworkshop.co.uk:

This site may earn a commission from merchant affiliate links, including eBay, Amazon, and others.

Mike.C

Established Member
Joined
14 Jun 2003
Messages
4,428
Reaction score
1
Location
Scotland Via London
As some of you will know I upgraded my camera from the Fuji Finepix 2200 to the Fuji S9600 with the hope that my photos's would improve, but as you will see from below this does not seemed to have worked, so can someone please tell me where I am going wrong?

First of all there are a couple of my best buddies "Gunner the potty Rottie" and the boss of the house "Mischief" (who lives up to her name) the Jack Russell.
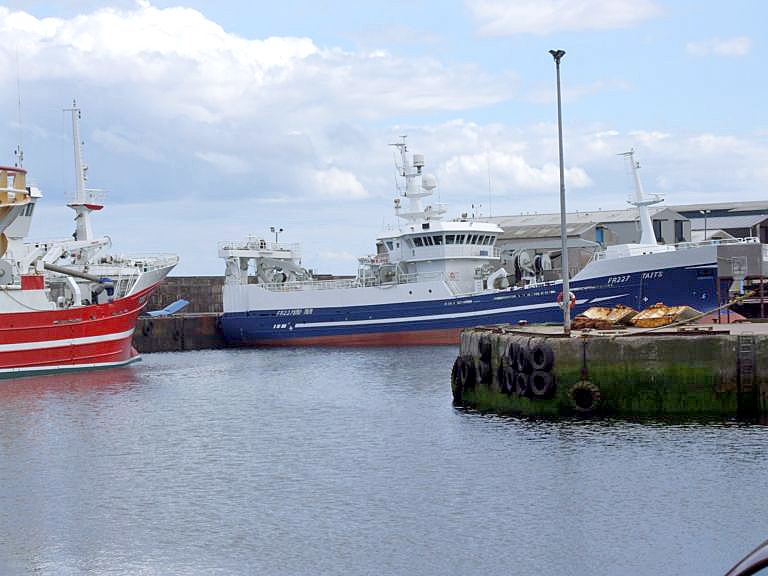
The other photos are of the harbour, which is just over the road from us.

Sorry that the photos are so big, but the AOL site where these particular ones are stored, won't for some reason allow me to reduce them today.

WQ68iNSBIgeRiU4Esi-fwH0jg3Z0aLbc0300.jpg

hPBPxTVu-F5nEridLbalH21D5JDg5WUv0300.jpg

UWk4B9kD9oz5Fvth3eho789rvSuwK-k+0300.jpg

y-Fb8turh+eQm5WWo2LouDDPTRTgQVju0300.jpg

0TJd6lhgQ3l1EY+DoLstON1DKPCDA9At0300.jpg

Ec4cVRs--rXaPfaLJ8HQ-ZY62Rvic7XV0300.jpg

yKAKkG2sh39429bCDXzUNuSQTYJtYdIJ0300.jpg

0UT-uYAan5k6J5unU0Hc1LPUds8UJqE-0300.jpg

iuNWl3zR9lNnIiBnpmdjgf6pVEp7iNXW0300.jpg


I cannot explain what I mean, but for want of a better word, the pictures just look "dead" to me.

Cheers

Mike
 
Mike,
A little post processing to bump up the contrast, sharpen it etc. will improve things. For example here:-

1302944610_b8c85ede59_o.jpg


You may be able to make these adjustments in camera but I am unfamiliar with your model.
 
Thanks Chris, that certainly does make a difference. I have just been looking at a software called Photoshop CS3, which gives you a 30 day free trial, would something like that help?
The only trouble with that particular one is it costs a few hundred dollars for the full program, so can you recommend a cheaper one, if of course that is the sort of program I need.


Chris,

You may be able to make these adjustments in camera but I am unfamiliar with your model.

You can make a hell of a lot of adjustments, but the only trouble is I have not got off automatic yet, and I am still going through the 160 page manual. :roll:

Thanks for your advice.

Cheers

Mike
 
Mike,
Photoshop is the 600lb gorilla for working with images and it is not at all necessary unless you are deadly serious about photography. There are plenty of freebies out there including Picasa (from Google) and this one http://www.faststone.org/FSViewerDetail.htm that I used to use when in living in PC hell (I'm now a Mac User and use other things that aren't on the PC). These will allow you to do the very basic sort of adjustments I applied to your picture and more besides.

Moving up a couple of notches you can try Photoshop Elements or Adobe Lightroom both of which handle the categorisation and library management tasks that become important if you take lots of photos - easy with digital!
 
Hi Chris,

Thanks for the link, I will download that one and see how the photos look then. Theres one thing for sure they cannot look any worse :lol: :lol:

Cheers

Mike
 
Post processing as mentioned will certainly help - but requires as you know quite a lot of time to get used to the application and just what it can do.

Just a couple of comments (not criticism):

1. Pic of Rottie. Does not look dead sharp. Reasons could be either focus or camera shake.
Focus - automatic focus does not always lock onto the area you want in sharp focus. In this case (portrait) the eyes I believe should be the sharpest. Do not know if you can use manual focus on your camera. On most digital cameras I have played with the centre of the screen is the area the camera focusses on using autofocus. You can also lock focus by holding the shutter button partly down. So in this case you would centre the camera over the eyes press shutter button in partially (until you here focus click!!) then still holding the button recompose and finally take picture.

Camera shake. If this is the case then if possible try and use a higher shutter speed or consider a tripod for static subjects.

2. Other pictures. Some look a little underexposed - can be recovered by post processing.
It may be that your camera metering is being fooled by taking into account too much of the sky thereby underexposing the main interest. If you can override this and open up by a stop then all ok. If not you may be able to use the shutter button technique similar to above for focus and lock onto an area of interest first (ideally something mid grey).

I do not think your pictures are too bad - you just picked some poor days to shoot.

Hope this of some help
Cheers :D
Tony
 
Most digital cameras underexpose, this is because it is easy to enhance an underexposed photo. Whereas if a picture is overexposed the detail is gone and post production can't bring it back. I agree with Tony your pictures are not bad at all but a bit of post production may give you the images you want. I picked what I considered the most awkward and spent a coupe of minutes with Nikon's Capture NX.

0UT-uYAan5k6J5unU0Hc1LPUds8UJqE-030.jpg
 
A couple of tips from me would be:

1) Apply the two thirds rule to landscape composition. Sometimes a striking picture can be sought by applying 2/3 to the foreground and 1/3 to the sky, using the horizon as the datum (obviously). In portraits, this can be applied horizontally so two thirds of the person or background. This time you envisage the datum being perpendicular to the horizon.
2) Focus on the eyes of animals and pets such that even when large apertures mean less is in focus, at least the 'soul' of the subject is caught through the focussed eyes.
3) Where backlighting is so bright, say on bright sunny days, such that the foreground underexposes, force on the flash (or use a reflector like a large sheet of paper). This techniques actually enlivens an otherwise static image where people are involved without losing any possible drama in the bright sky.

I actually like the Jack Russell picture which seems to have character and depth

I like this from Steve's Digicams site

09022007.jpg


Two thirds rule applied to the edge of the pitch, with the heads bobbing above into the open space that represents the crowd and sky/upper stand. The great thing about this picture is that it draws your attention to look more closely and discover the band playing near the photo's pictorial horizon. The otherwise boring crowd scene is dramatically punctuated by the media/press box at the top
 
my tip would be to invest in a tripod, as many of your pictures feature water defying gravity and running downhill!

sorry, just kiddin. :D

try out the GIMP. it does pretty much everything Photoshop does, but it's free. there are tutorials freely available on the old electric interweb as well, regarding the post-processing treatments advised above.
 
You've got plenty of camera there, Mike, you just need to get familiar with it and its settings.

The problem for cameras that meter using averaging is that they do just that - average over the whole picture, rather that on the subject you want. You may have spot metering - if so, change to that and see if that improves things. Try not to change more than one thing at a time though, otherwise you may not discover what change did what.

Use the viewfinder, rather than the screen, to compose your shots. First look through the viewfinder, then look at it - check for level horizons, poles growing out of heads, etc. If you've got a choice of programmes to work with, try exposure priority then aperture priority on the same subject, then compare your results.

Ray.
 
Hie Mike,

Plenty of good advice above.

You don't need Photoshop CS3 at almost £600.00 but Photoshop Elements will do everything you need and more for about a tenth of the price. Post processing may not be necessary if you can improve your pictures in camera. Try experimenting with manual focus as the pics of the dogs in particular definitely appear a little soft to me.

Check to see if your camera has effects settings, if you have something like 'vivid' this will increase contrast and saturation which will have a dramatic impact on your photos.

If you are serious about improving your photography then you could do worse than joining a local camera club. They are seasonal and should be about to start their new season in September. If there is more than one locally then visit them all so you get a feel for the one best able to help you. (some camera clubs can be a bit clicky).

Keep taking lots of photos and experiment, making careful note of what you do.

Hope this helps

regards

Brian
 
Had a look at your pictures again. I really do think they are not bad at all -just need a little tweaking with some post processing as others have shown.

Hope you dont mind but could not resist a quick tweak myself. I would do something like this with the images (this is just my personal pref of course and you may not agree)

Cropped and removed distracting background


Rotated about 3 degrees, cropped and brightness and contrast changed


Rotated, cropped brightness contrast and colour balance changed


Rotated, cropped, brightness contrast and colour balance changed. Lightened grass area. Bit more work could be done on this I think

The changes made are all fairly simple and only took a couple of minutes - any photo editing package should be able to offer these facilities.

One thing I would suggest is copying the files to your computer and saving them as Tiff images if you are going to play about editing and saving. The reason being that every time you save/resave an image as jpeg you will loose some image information. Tiff allows you to save images without any losses.

Cheers :D
Tony
 
Thanks you all very much for your advice guys. I am sure with that and some software I will get there in the end.

I will try messing about with the software and then let you see what I have come up with. Also if the weather is better tomorrow I will put some of your tips into practise.

Thanks again, I do appreciate it.

Cheers

Mike
 
I agree with the majority of the advice you have been given. Everyone needs a tripod for those "timer" family gathering shots, so why not choose a subject and try lots of different settings on the same subject. Play around with exposure, aperture, shutter speed, ISO etc, as well as average metering, spot metering etc and analyse the difference. See what improves the image and what makes it worse.

The great thing with digital photography is that you can play and play and play and it costs you nothing. Have fun!
 
Tony sorry mate, I do not know how I missed your improvements, they are a million times better then mine.

Roger I think that is the key, practise, practise, practise, and of course a tripod.

Cheers

Mike
 
It is difficult to offer advice without knowing what settings you are using on the camera. Pictures usually contain exif data that has all the settings.

Photoshop 'save for web' removes all this useful data to save file space. The first picture has exif which just says photoshop CS3 edited it but none of the usual information. The others appear to have no exif at all.

If you want the best picture quality you can get then shoot in RAW not jpeg. the editing software that came with the camera will then let you produce a jpeg with all the contrast, saturation, sharpening etc. that you are looking for.

To get the look you want straight from jpegs saved in the camera is possible but not to the same quality as from RAW. There will be parameters you can set for sharpness contrast and saturation and you need to play with these settings to get the look you want.

Finally, if you are not already, start learning to use the more manual modes - aperture priority and full manual. It will be a struggle at first but once you master them the camera will be doing what you want not the auto programs best guess.

Some of your compositions are a little weak but some are good. So I don't doubt that will improve once you are confident with the camera. The rule of thirds mentioned above is a great aid to composition. Rules are made to be broken but it is a great start and works for most things. The forum where I moderate has a great write up of the rule.
http://www.talkphotography.co.uk/forums/showthread.php?t=24859
 
If you are going to purchase imaging software, I recommend Paint Shop Pro X1.
Adobe elements is all right but the program does treat its users as infants!
 
Some of those photos are just plain bad. That's a good thing. If you don't have a nice big media card in your camera stuffed full of photos fit only for the bin then you're doing something wrong. The trick is knowing which ones to throw away and what went wrong with them and which ones are alright and what went wrong with them. I suppose one should never say never, but you should never expect to take a digital photograph that doesn't need post processing.

As you take more bad photos and understand what went wrong and why the more you'll start to anticipate problems and improve your technique accordingly.

The picture of Gunner is nearly a nice photo. He's nicely composed with his eyes being nicely off centre (someone's already mentioned the rule of thirds). Unfortunately it just isn't sharp, it would be nice if his eyes and nose were in sharp focus; it's over exposed by a country mile, hence the white background on the right and the background we can see on the left is a bit busy (simple is key to good composition) but it is out of focus which is good because that helps hide the fact that it's a bit busy. If you're not already, the Aperture Priority mode lets you control depth of field (how much infront and behind of your subject is in/out of focus). Playing with Aperture is great for portraits.

You might need to practice with the auto focus with your camera. You may have twigged that there's a conflict of interest between getting the composition so the subject is off centre and sharp, because auto focus will focus on whatever is in the centre, which is where your subject isn't. Centre the dogs face, hold the shutter button half way to lock the focus and then (keep the button half depressed) move the camera (keeping distance from the subject constant - focus is fixed, not 'locked on' so to speak) to compose the shot and shoot. Go take Gunner outside so you've got lots of light (no point making life hard) and practice.

That the picture is over exposed (too much light) could have worked in your favor. You could have used a faster shutter speed and reduced the danger of camera shake. The camera probably got confuseled because the dog is dark and over compensated. Some cameras have an auto bracket mode. Use it. It will take three photos in quick succession with different exposure settings. You'll soon learn what works and what doesn't. Some cameras allow you to lock the automatic exposure settings with an AE lock (point at something roughly mid tone and then AE lock and then compose your shot on your subject). Some cameras will let you adjust the exposure setting and others you'll just have to do the old way using shutter speed and aperture. Go practice.

A couple of the Dock photos are just bad subject/composition (the first of the three is better to my eye). Photography and how we see things when we're out and about looking at stuff are fundamentally different. Thinking, ooh that looks interesting and taking a photo simply doesn't work. Sometimes you need to find something specific that captures the 'interesting' in some way and take a photo of that. Ah, the art of interpretation. The lighthouse that Keith tweaked on the other hand is very nearly respectable.

Post processing is beyond the scope of this post (A chap called David Nightingale has posted a nice little primer about curves and tonal range) but very quickly...

Here's your original of Mischief (nice shot)


hPBPxTVu-F5nEridLbalH21D5JDg5WUv0300.jpg


A quick look at the levels dialogue in Gimp shows a wee gap to the left of the histogram. Shifting the little black arrow (the 'black point') right a bit (I went a touch too far) so it's under some image data helps balance the tonal range. The spike at the far right (white) of the histogram (over exposure again) is a bit of a problem - that's why there's some glare on the fur on Mischief's head. There's not much you can do about that as the data simply doesn't exist in the image to get the detail back. It's off the scale so to speak.

mischief.png

A little bit of unsharp mask (actually way too much unsharp mask, the default is a bit harsh but hey, this is only quick) and a bit off the top (rule of thirds - mischief's eyes)...
mischief.jpg


I'm not sure it's any better, I think the over exposedness in your original is a happy accident. If I had all day I'd try to edit the weed under Mischief out.
 
This might be taken the wrong way... I hope not... but I suggest you read this link from Ken Rockwell. Anyone who thinks they will take better pictures by upgrading their camera is misguided. Yes, you may need Photoshop Elements (or even the full-on package if you want to turn pro) to tweak your shots. But buying a fancy camera and some software will not guarantee Pro results. I'm afraid that will only come about through correct technique, understanding exposure, having an "eye" for creating images and lots of practise. All of which cannot be bought.
 
What is your white balance setting Mike? They look very blue to me. Might be worth checking its not set to something other than "Auto" or "Daylight" if you are taking pictures out and about. They all have a coloured tinge which could be the misapplication of a white balance setting internally to the camera.

Adam
 
Back
Top