Norwegian wood(shop) build

UKworkshop.co.uk

Help Support UKworkshop.co.uk:

This site may earn a commission from merchant affiliate links, including eBay, Amazon, and others.

Krysstel

Established Member
Joined
28 Oct 2008
Messages
633
Reaction score
2
Location
Norway
I have to admit that this thread will for a while be after the fact as I'm actually finished with the external build but bear with me and we'll soon be up to date :D
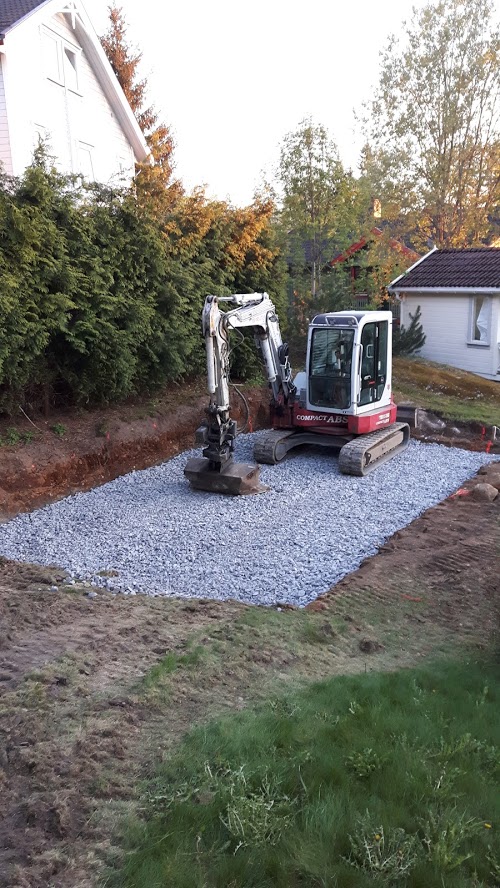
Ground zero in late April 2019 was this corner of the garden then occupied by an apple tree and various bushes.
On it will stand a wood frame building on a cast concrete slab. This will be partially buried in the sloping terrain with the back and end walls being partially constructed from cinder blocks.
Outside dimensions 4.5m x 7.5m.
I'll be doing all the construction above ground myself and none of the ground or concrete works !

2019-09-16 16_07_34-Windows Media Player.jpg
 

Attachments

  • 2019-09-16 16_07_34-Windows Media Player.jpg
    2019-09-16 16_07_34-Windows Media Player.jpg
    95.8 KB
As soon as the ground thawed out and the weather improved in early May the man with the digger got started. His brief was 100% complete and ready for me to start with the wood :)

End of day 2 :

1.jpg
 

Attachments

  • 1.jpg
    1.jpg
    169.6 KB
Being Norway the ground will freeze for several months in the winter. The ground works and foundations therefore get quite complicated.
We first excavated to a depth of about 1.5 meters and 1m around the building and filled this with course gravel that was vibrated and compacted. The first layer of blocks are u-shaped, filled with concrete and reinforcing steel. This forms the foundation for the rest of the block work walls.
IMO we could have used insulated cinder blocks for the rest of the block work but my builder preferred the stronger uninsulated construction blocks since we were building below ground. Instead we insulated them with EPS on the inside and XPS on the outside. All the blocks were then filled with concrete at the same time as the floor slab was cast.

How does all this compare with how something similar would be built in the UK ?

More to come :D
Mark
 
I can't speak to the UK but in the Vancouver area of the West Coast of Canada where the climate is much like the UK they dig to just below the frost line (75cm give or take). Put in concrete forms and either pour the footing (approx 60cm x 15cm to 20cm thick) in concrete and when set would then put forms on top and pour the walls (15cm to 20cm depending on the size of the wall). Or would do the same in a single pour. Blocks are used sometimes but not often and they would be still laid on a concrete footing. Other parts of the country use blocks more often.

Here in Saskatoon where winters can get to -50C the footings are 3 meters or more below the ground.

ICF (insulated concrete forms) foundations are used by some in both places with under slab insulation sometimes used on the West Coast and almost always here. Here foundation walls are insulated on the outside but out west it may only be on the inside.

On the West Coast they sometimes pour a slab with a thickened perimeter and where bearing walls would be in one pour.

Naturally the soil conditions and size of structure play a big roll in the type of foundation.

Pete
 
Interesting Pete. ICFs are also very common in Norway but it was cheaper to use blocks for the small amount we were doing here.

On top of the initial gravel fill we put a layer of 50mm XPS insulation all around the building area and 1,2m out. That was then covered over by backfilling with gravel close into the walls and soil otherwise. I guess it's about 15-20cm down. This is a common method used in Norway to avoid frost creeping under the slab and lifting the building.

Under the slab there's also 100mm of EPS insulation laid on top of the gravel. The slab itself is 100mm thick.

In the initial gravel fill we buried 100mm perforated drainage pipe all round the building and several meters sloping away under the lawn.

Mark
 
Unfortunately (or perhaps fortunately !) I was at work when the big pour was done so havn't any pictures of the events. But apparently it went according to plan and here's the finished foundations. Now the fun part starts :D
 

Attachments

  • 4.jpg
    4.jpg
    239.7 KB
So here's the floor plan as was when I decided where the windows and door would be.
Any thoughts or ideas on a better layout ? I'm definitely open to suggestions as I'm still no where near filling the space up with tools and machines :lol:

One thing I'll probably change is to swap the metalwork bench with the dust extractor. The assembly table will also be a full 1.2 x 2.4 (8' x 4')
 

Attachments

  • 5.jpg
    5.jpg
    64.2 KB
I would have the router table, mitre saw and PT in a line on the back wall, easier to feed dust extraction to and have them all at the same height, set into a support bench unit or with fold down rollers to provide support to long pieces
 
Krysstel":3pvhg2al said:
...Any thoughts or ideas on a better layout ?...
I see you have the sharpening station near good light, but far from the metalwork bench. I think I would have tried to get the metalwork bench, sharpening station, and pillar drill together at one end - so that all my metal fileings occur in the same area.

Cheers, Vann.
 
Fidget":1r4y0t33 said:
A bigger door to get things in and out! :D
Yes, you're not the first person to point that out :| However, for the past 10 years I've worked out of a basement workshop with the same size door and never had an issue with it being too small so I hope this will work. :wink:

Droogs":1r4y0t33 said:
I would have the router table, mitre saw and PT in a line on the back wall, easier to feed dust extraction to and have them all at the same height, set into a support bench unit or with fold down rollers to provide support to long pieces
Good idea thanks :wink: I look into that possibility.

Vann":1r4y0t33 said:
I see you have the sharpening station near good light, but far from the metalwork bench. I think I would have tried to get the metalwork bench, sharpening station, and pillar drill together at one end - so that all my metal fileings occur in the same area.
Cheers, Vann.
In my latest plan the dust extraction is pushed into the corner and the metalwork bench relocated beside the pillar drill :)

Thanks for all your suggestions and ideas :wink:
Mark
 
Finally it's my turn to do something :D

From early in the planning I was determined to have maximum internal height in the room and that meant using a glue-lam beam for the ridge beam. At 7.5 meters length and with Norwegian building regs for snow loading etc it came out as 140x495mm x 7.5m and an approximate weight of 250kg :shock: The building site is as far from the road as it's possible to get on our property so there was no other option than manhandling it (with the aid of a trolley built on gocart axles :) ) the 30 meters from where the truck delivered it to and lifting it into place with a block and tackle !
 

Attachments

  • 6.jpg
    6.jpg
    206.9 KB
Ready for lifting.

I built the back wall and half the gable ends first. The idea was then to slide/winch the beam up and onto the supporting cradles.

Ground zero :-
 

Attachments

  • 7.jpg
    7.jpg
    251.7 KB
I built a temporary framework for the block and tackle to hang from above the beam and started lifting :shock:
 

Attachments

  • 8.jpg
    8.jpg
    325.1 KB
My shop is above the 2 car garage and has scissor trusses over the long dimension on the 24' x 28' (7.3m x 8.5m), no beams, to give me a clear span and greatest hight. The roof pitch is 4/12 (18.4º) with the inside having a 2/12 (9.5º). I have 9' (2.7m) along the walls and about 11' (3.4m) in the middle of the shop. They were lifted up to the roof with a telescoping handler, basically and offload forklift from a rental company. Once up on the roof easily set by the two framers. With your smaller shop they could have been lifted up by a couple strong guys and ladders. I will watch the rest of the build unfold to see how the rest is done. Interesting to see how people approach their builds.

Pete
 
that beam is way bigger than the 140x95 you stated, so for our curiositys sake what is it??
nice place for a workshop though and a good looking one so far
 
flying haggis":1a4o9lbr said:
that beam is way bigger than the 140x95 you stated, so for our curiositys sake what is it??
nice place for a workshop though and a good looking one so far

140 x 495 x 7500mm.

Mark
 
Back
Top