Xcalibur/Harvey set up

UKworkshop.co.uk

Help Support UKworkshop.co.uk:

This site may earn a commission from merchant affiliate links, including eBay, Amazon, and others.
Yer, It just hadn't occurred to me to even think about what the tilt was...

First I have to get it set up, always the frustrating part as you really want to get on and play with it, but can't cut corners...

Also it has a commando plug, so I need to get a caravan adaptor, Amazon said 4-12 days!

However I just got an email that it has been dispatched... no weekend playing with the toys though :-(
 
Also cannot see the word Excalibur anywhere on there. It always was a rebadged machine, however the logo was fairly distinctive.
 
Having spent a day setting up, worth a few thoughts, and perhaps even a question.

Still very excited, and impressed, really solid kit. The sliding table is massive, true and very smooth, so there are many good things.

However as always there are some bad as well. I would rate the saw 4.5, and here's where it loses the 0.5

The manual. I must admit i have yet to fine a very good one, and this one is not too bad, but it's still not good.

I read them both, ts and sliding table before starting.

The sliding one said to remove the left wing, so i knew i could leave that out, but that was it, so i started on the saw proper, intention to get it right before i started attachments.

The rails as usual were a pain. What we really need is auxiliary rail with set screws holding the main one above it. One has to hold the nut at the back, turn at the front, all the while trying to keep it level. As the fence rides on front and back, this needs to be fairly good.

It also holds the far right table, so you have to hold that in place too!

Bolts are 13mm bar 3 that are 9/16 for some reason. On the back rail you actually cannot get a spanner in to hold front whilst tighten back, and two go into main body of saw and cannot be accessed at all! If you do not have a socket set you can't get in there. This adds to the whole holding whilst tightening problem. Need four hands. Some of the bolts are allen keys, for example the top is bolted with them. This would have been far better for the back rail too.

The manual explains how to set the tape to the zero point by sliding fence against blade. However this is before the section on how to install blade, so you go out of sequence.

Got to sliding table, and found that it's easy to get upside down.

Then the attaching holes are in two sets, but at different heights.. Trial and error there to get the right one. Manual shows only one set.

Clearly when installing, the front rail wont fit anymore, but it's ok, there are offset holes clearly designed for this.

Shame i'd spent two hours getting that all straight though!

Then i see the rail, which is attched to a bar that the fence actually slides on still won't fit. The bar sticks out At both ends, and the left side still obstructs the sliding table.

However i see some bolts attaching the bar to rail, and some extra holes in rail.

Take it all apart and no extra holes in bar, and the rail still wouldn't fit.

This means drill and tap new holes (beyond most in terms of tools/skils perhaps), or cut off the left end of bar. That seems both extreme, a shame, and again, I am not sure everyone has a large angle grinder...

I have done nothing for now and will talk to woodford.

The kit as i said seems really great, and once set up, will be fantastic. The table and mitre on the sliding table are great.

However some of the shine has been taken off by a few setup issues/manual issues that seemingly could be easily avoided.

Back to it tomorrow, hope to actually use it within a week of getting it!
 
Oh and as I've had to move the rail the tape will no longer be right. The adhesive had taken hold so I'll need to get a new sticky tape strip :-(

Sent from my GT-I9100 using Tapatalk
 
It seems like the saw has mutated from the original design tha Steve, I and others have had for several years. No such set up problems or need to move holes etc.
I would be very surprised indeed if the bolts are mixed metric and imperial.
9/16'' is of course very close to 14mm so the confusion could well indicate gaps in the op's spanner set.
 
Good luck with your new saw, it will be worth the effort of setting it up properly. However I must agree with you about instruction manuals, the quality of some are atrocious at best, and downright illegible at the worst. Problems with translation with a bit of common sense you can work out for yourself, but when for instance you get fit fig E to fig F as in diagram and the diagram is just a black blob I find really annoying. Do the marketing departments of these companies not realise the frustration with there product this causes.

All I ask for is to be able to take something out of the box, put it together and enjoy using it. Which on two recent purchases has proved almost impossible, sorry didn't intend to highjack your thread it just hit a nerve.

Berns
 
This looks like the saw I want!!
Is this from Xcalibur? I can't seem to find any info giving detailed specs of their saws.
Would you be so kind as to let me know where you got this from, the model number and if it's not being too cheeky how much it was?
I'd be very grateful.
 
Myfordman":1462d5iw said:
It seems like the saw has mutated from the original design tha Steve, I and others have had for several years. No such set up problems or need to move holes etc.
I would be very surprised indeed if the bolts are mixed metric and imperial.
9/16'' is of course very close to 14mm so the confusion could well indicate gaps in the op's spanner set.

It may be 14mm, however the point is that a couple radomly seem to be a different size.

The reason the same setup issue may not have been encountered is that Steve and many others do not have the sliding table.
 
What I believe you have is the Laguna TS from the platinum series range.

http://www.lagunatools.com/tablesaws/ta ... platinumlt

There are two models, one with the normal trunnion under carriage or, as with the one I have with the heavy dovetail ways.

You will find it an excellent saw.

On another point, it is not the same saw as the one mentioned by an earlier poster on this thread. This saw is a heavier better made saw than the original WWM saw IMHO. Heavier more robust fence, heavier trunnions, heavier turn handles.

Oops......here is the manual. :oops:

https://system.netsuite.com/core/media/ ... id=1EphzXr
 
Yes that's the one.

A couple of differences however in this version.

The fence is aluminium and can only be used on right side (without taking the face off and moving to other side).
Doesn't bother me about the side, and I don't really know that the aluminium makes a difference.

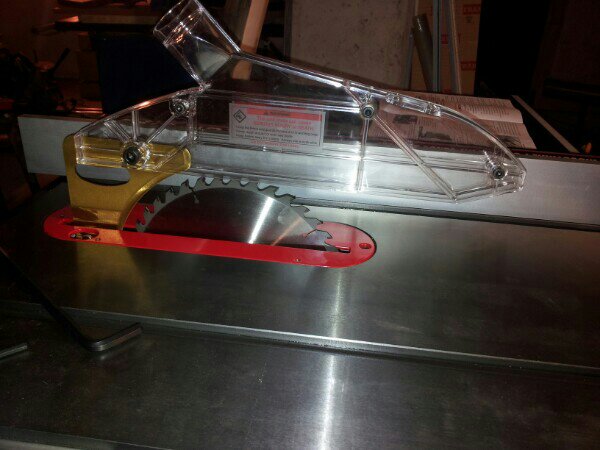
Guard is not as shown. the one shown has a nice parallel rise and anti-kickback teeth things at the back.
The one I have has dust collection on top (may never use), so it would have been nicer to have the pictured one.

The pictured one has a very large right side table.
I was hoping to take the left wing, and add to right wing + extension table (the black part) to get something similar in size to that shown in your Laguna picture.
I can do this, however with custom Mods, including making some legs, and boring and tapping some holes.
Given the fence bar doesn't go that far anyway, I will probably just forget it, seems a waste of a cast iron table!

I could have got the router table extension and removed the router to achieve what I intended, however it's really not a big deal and I tend to use track saw anyway for larger sheets.

I talked to Berniesquash and he said that he did have to hack the end off his fence bar when fitting sliding table, so I feel a little better that I am not about to make some hideous mistake!
 
I got confirmation from Roy that you have to cut off the end of the rail. Angle grinder made quick work of that.

Then found I need new reliefs cut in the rail for the mitre slots. Definitely could be a challenge without angle grinder.

Of course now the bar Is shifted to the right so I cut off my tape prematurely..

I left the far right supporting table slightly lower than the main table, perhaps 0.5mm.

The alternate (to the pictures from web site) guard won't meet Steve's approval. The one in picture has a parallelogram that rises and falls one one or both sides. This one is fixed so at full height there's plenty of space for fingers.

8u8uqeze.jpg


I don't think the extraction on top is worth this compromise.

Everything else very good indeed.


Sent from my GT-I9100 using Tapatalk
 
My adapter from commando to euro plug arrived today, so first time switched on.

Did not like using 4 chained 16A extension leads, so had to get out a site one.

Pretty quiet, very smooth. I cut my first piece and thought perhaps I'd left the blade lowered all the way, as there was no resistance!
 
Dave, Would you say that you are now happy with the new style Xcalibur saw?

I've got one of the older ones and very pleased with it. A mate is thinking of getting one and I want to make sure I give appropriate advice given the new model. I doubt that he will have room for the sliding table (same here).
I know the blade tilts the other way but I can switch my fence to the other side of the blade easily it that becomes an issue.
It looked from your write up that most of the issues you had were related to the slider and the manual? would that be a fair summary?

Cheers

MM
 
Myfordman":1u4wf9kk said:
Dave, Would you say that you are now happy with the new style Xcalibur saw?

I've got one of the older ones and very pleased with it. A mate is thinking of getting one and I want to make sure I give appropriate advice given the new model. I doubt that he will have room for the sliding table (same here).
I know the blade tilts the other way but I can switch my fence to the other side of the blade easily it that becomes an issue.
It looked from your write up that most of the issues you had were related to the slider and the manual? would that be a fair summary?

Cheers

MM

With respect to the saw you have, there are no comparisons between the two saws. The new one, as featured here is a better saw all round, heavier cabinet, polished tables, heavy and larger steel chromed wheels as opopsed to cast ali on the older version. Heavier and more substanitail fence and rails (larger box sections on both). I have seen both saws and happy to state the newer saw is even a betetr looking saw. Having spoken to Roy at WW machinery (distributor) he is also convinced the new saw is greatly superior.

A buddy of mine has recnetly chopped in the older version for the newer version, for the reasons I highlighted.

I don't think there was anything wrong with the original saw, just the newer one is a heavier and beefier saw. It is usual that on newer models there are on or two compromises but if there are, I can't see any.

You can be confident to recommend this saw to your mate without regret.

BTW - I have no connection or financial interest in the saw or the chap who sells them.

David
 
Thank you David,

That does put my mind at rest. It would not be the first time that a new version of a machine to hit the market was a poorer item compared to the original.

I'm pretty certain mine, circa 2005, has steel/CI handwheels. From other references the new one looks more like a laguna clone rather the earlier which I think was knock off of a Delta design. I'm still very happy with it whatever it's parentage.

Have they kept the interchangeable arbour adaptor to allow mounting of Dado blades??

Cheers

MM
 
Hi. I am very happy. The sliding table is fine, it's really just the manual that could use work.

The crown guard is not as nice as the one pictured on the website.

I also notice that blade changing is a knuckle bruising experience. The spanner to hold the spindle has a nice kink in it. The one you have to turn next to the blade is straight and about as long as the radius of the blade. Ie about 6"too short.

The arbor looks plenty long for dado.

Of course there's the tedious business of fettling, however the saw itself is great.

I don't have the original to compare, but I spent enough time with Steve on workshop essentials that I think it's a very decent upgrade.

Sent from my GT-I9100 using Tapatalk
 
I have bought the same exact machine with sliding table and router table. I am in the process of putting it together. Am I right in assuming that the cast iron wings won't be used and instead the ST and RT are installed?
 
From this picture

hw110wse.jpg


That certainly looks to be the case.

It does seem a shame that one can't extend the table... however you'd possibly need to build extra support legs, and the fence doesn't go that far anyway.
 
A few things to note if you have the same model with ST. I may have noted them above, but perhaps in a disjointed way.

The front and back rails can be mounted in two positions.

If you mount in the "intended" position, you will need to cut off about 12" from the left side to fit the ST.
If you mount one hole along to the right, you still need to cut off only the front rail (box only not the actual rail).

The benefit of the latter is that you get more rail to the right. The downside is that then the gaps for the mitre slots won't line up and you will also need to make new cut outs for this.

As another member suggested, i cut off the end then remounted the plastic cap.

DO NOT stick on the tape until you are completely finished!

The mark for the tape can be fitted to right or left side. choose which side BEFORE you cut and stick the tape on!

Get the saw blade parallel to mitre slots before you fit the sliding table.

For me the router table is just in the wrong place, you can't stand in front of it. maybe one can put it the other way round from the picture i posted above, however as I don't have this I can't comment on the router setup.

I made my sliding table a hair above the main table so that boards on the sliding table don't catch on the main table.

Getting the sliding table parallel and square, and adjusting the legs is awkward, so you really don't want to have to move this afterwards. Also the mobile base is out when you have the TS/RT.

If I think of anything else I will add it. Here's some more photos, showing the decent sliding table capacity.

20140902_101356.jpg


20140902_101410.jpg
 
Back
Top