petermillard
Established Member
Hey Folks.
I don’t post much here as what I mostly make are pretty bog-standard MDF boxes - wardrobes, alcove units, shelves and storage etc... - but I thought it might be of interest to show how a job progresses from start to finish. I had a call back in September from a previous customer - I first built some flat-pack for her years ago, then a couple of years later some alcove units, and now a few more years on she wanted some wardrobes and alcove cabinets for the bedroom - more MDF boxes, yay!
It’s an awkward room, high ceilings and wobbly walls at odd angles, and not particularly big. When I do a first site visit to discuss the requirements, I take a few reference pictures and make a quick floor plan just to give me an idea of the basic shape, like this:-
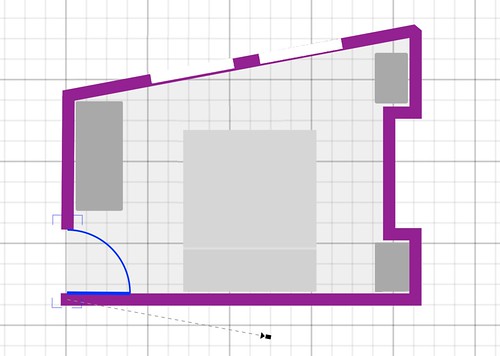
There’s an iPad/iPhone app I use to do the basic capture, and all the text notes are also in an app. that syncs across all devices. With this room it was pretty straightforward what was needed - large wardrobe, and two alcove units with a mix of shelves and drawers. WIth the measurements confirmed, I do a set of basic 2-D plans, as much to get things straight in my own head as for the customer; the space for the wardrobe was particularly awkward at 1300mm - a bit too big for a straightforward double (the doors would be tight opening against the bed) so I suggested a ‘narrow’ double at 800mm and a single at 500mm - subsequently reduced to 480mm to give myself a bit more wiggle room.
There’s usually a few revisions before the final layout is decided - three in this case, all done by email - and the preferred layout was this:-
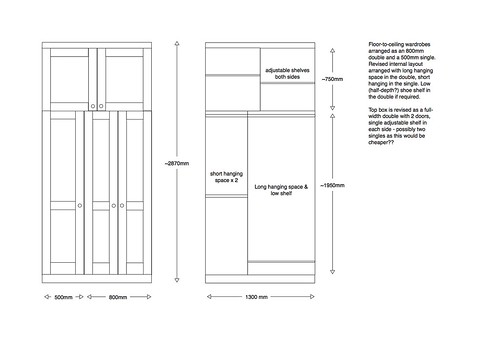
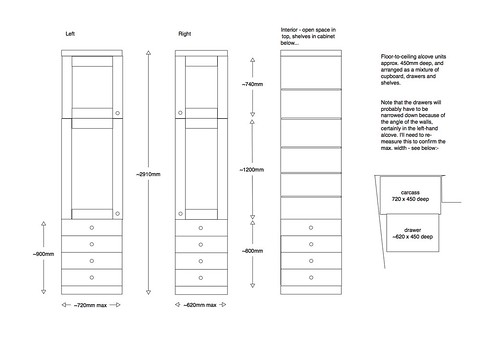
Although I’m not wild about the wardrobe double top-boxes above a triple door, the customer specifically wanted two big cabinets up there, so who am I to argue; she’s the one who has to live with it... I also provide an estimate of costs - again, using an iPad App - that has greatly improved the speed with which I can produce estimates as I now have set prices for e.g. a double wardrobe with flush doors, then add extras for an upgrade to panel doors, drawers etc...
With the design and costs finalised, I invoice for 25% of the total; this books a production slot in the workshop, and a provisional fitting date. It also gives me the bulk of the material costs in advance, which is good for my cash flow.
Next, its on to some quality time with my ‘carcass cutlist’ spreadsheet - each carcass is slightly different, so each type has it’s own workbook; below is a sample of the single wardrobe:-
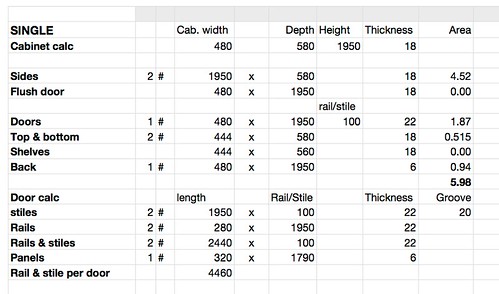
It’s pretty straightforward - I feed in the cabinet width, height, depth and material thickness, and it gives me the dimensions for the sides, top and bottom panels, back, shelves etc... If I’m having panel doors then I get accurate measurements for the rails, stiles and panels; the materials for the rails and stiles is simply cut in strips from a full sheet, so I can see how many lengths I need for each door. There’s also an ‘area’ calculation that I use for pricing up the painting, if required.
Once this is produced for each carcass, the list is ‘rationalised’ to put it in a format for the timber yard - I don’t cut my own sheet material unless I have an unusual amount of appropriate off-cuts available, and I’m fortunate to have a very good local timber yard who will cut to order very accurately for a modest charge, usually next day.
In this instance, as there was a lot to be done - double and a single wardrobe carcass, two top-box carcasses, four alcove cabinet carcasses and two alcove drawer units - I opted to get the wardrobes and top boxes cut first (18mm) along with the rail/stile strips in 22mm, and the panels for the doors in 6mm. All MR MDF, nothing fancy.
Sorry, no WIP pictures of the cabinets in the workshop - too small, too busy, and frankly too straightforward - but the carcasses are joined with Dominos for alignment, and Spax M-cut screws where the faces aren’t seen. Faces that are visible are domino’d, glued and clamped - but this is all on-site, as everything is dry-fitted, then painted up and flat-packed for delivery. Only the drawer units were made up complete, as I wanted to be able to fit & fettle the drawers in the workshop.
Drawers were regular Blum Metabox, with soft-closers. I use Birch ply for the base and back, as this ‘softens’ the slightly industrial feel of the metal sides; again, this was an area for discussion with the customer, who would have liked solid wood and Blumotion runner drawers, but didn’t much like the cost - Metabox was a pretty good compromise. The Birch ply is finished in Junkers Strong water-based floor lacquer - quick drying, and looks great in semi-gloss finish.
Drawer fronts were 22mm MR MDF to match the doors above. Painted finish is Dulux Diamond white water-based eggshell, applied with a foam roller then blended out with a soft brush; works pretty well, and dries fast. Don’t have space for a spray booth, and so far can’t find anyone interested in taking on small spraying jobs locally
The doors are shaker-style panel doors made from 22mm MR MDF with a 1/4” groover in a router table - this gives a slightly loose fit for the 6mm panels, and makes assembly easier. Doors are made with loose tenons - I’ve seen the very clever system put forward by Doctor and explained again recently by Mailee, but until I find time to fiddle with it, loose tenons are a known quantity and a reliable way of getting what I need done quickly, when I’m working to a deadline.
All the carcasses are 18mm MR MDF, with a 6mm back rebated on the wardrobes and top boxes, but just planted on the alcove units as they’ll never be seen.
All told I took me about seven days in the workshop to fab & paint the ten carcasses, plus another day to fit all the drawers. All the carcasses were flat-packed and wrapped for protection during transport - a roll of cheap foam laminate-flooring underlay makes a great packing material; I work alone, but have a good ‘man & van’ who I use for local deliveries - wish I could get him interested in doing the fittings, lol.
Thankfully, the customer had (mostly) cleared the room, so I had some space to move - not much though, as I was still working around the bed.
All the base cabinets sit on a 4x2 plinth, and the first job is to cut back the skirtings to make as snug a fit as possible to the walls, then the plinths are leveled up with wedges...
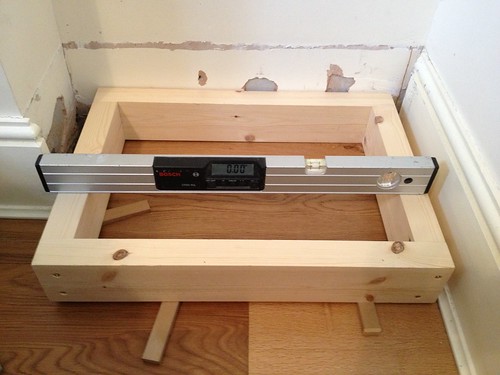
Once level, the plinths are fixed in position with small angle plates screwed direct to the floor, and/or small MDF ‘feet’ takes the strain off the wedges; the wedges stay in position, but are cut flush with the front face of the plinth.
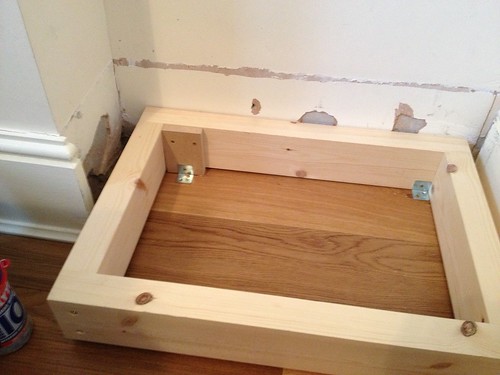
The drawer units are pre-assembled, so once centred up are just screwed through the carcass base into the plinth to fix their position. Then the cabinet carcasses are made up. As the alcove cabinets will be mostly concealed, they are just screwed together, with only one end of one face needing gluing and clamping. The alcove cabinets are 450mm deep, so only need three dominos for alignment. Handy hint - if the customer has a nice hardwood floor laid, I put sheets of hardboard down to work on; it protects the floor and is much better work on than dustsheet.
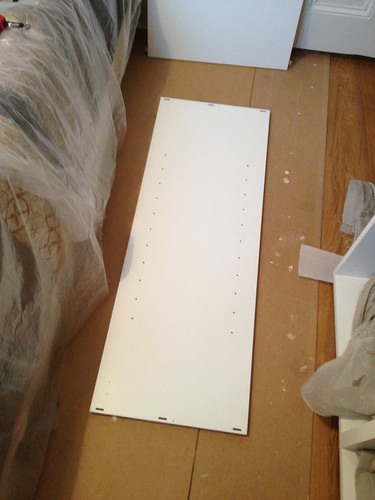
With so many carcasses to keep track of, it pays to be organised - every piece is identified with what it is, and where it goes...
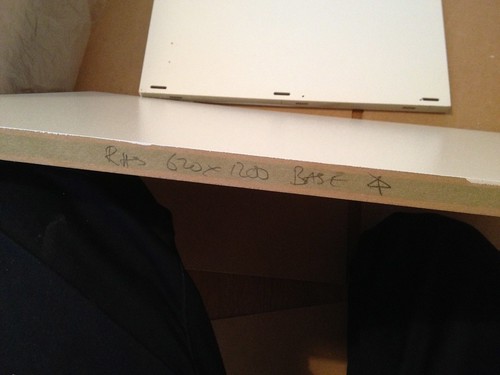
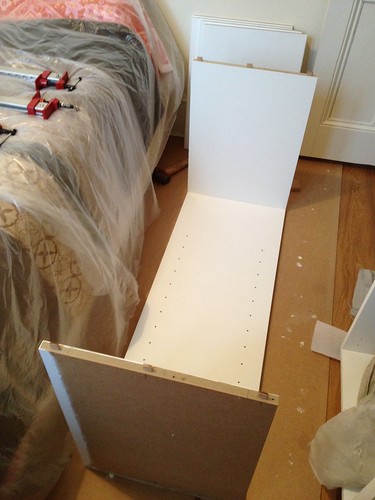
before being slotted into place and screwed together...
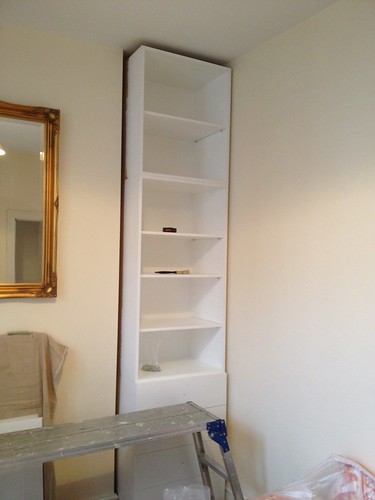
With the base (drawer) carcasses screwed to the plinth, the next cabinets up are screwed to the drawer carcass (from underneath, obviously) and secured to the wall with small angle plates screwed to the back of the carcass, and the top cabinets are screwed through their base to fix them in place.
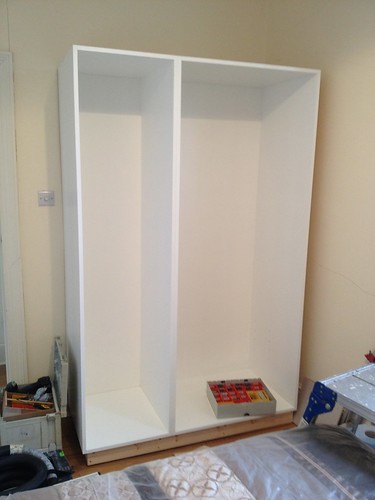
Same goes for the wardrobe carcasses and top boxes:-
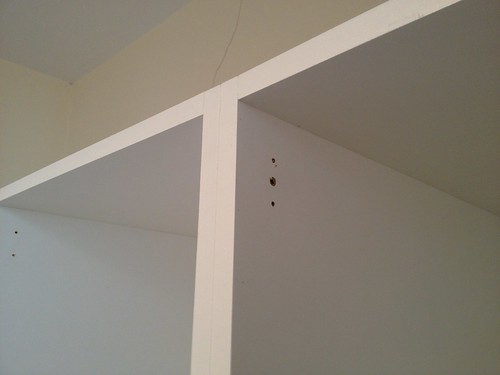
These are secured to each other with screws that will be hidden behind the hinge plates...
With everything secured in place, I can start scribing the infills. Again, many thanks to JasonB and Chippy1970 for detailing this in a recent forum post; the infills are 6mm MDF, pre-painted, and glued to 18mm MDF blocks; as the carcass is also 18mm, these can be clamped inside the carcass, and scribed to the wall or ceiling with a couple of small pieces of 18mm MDF..
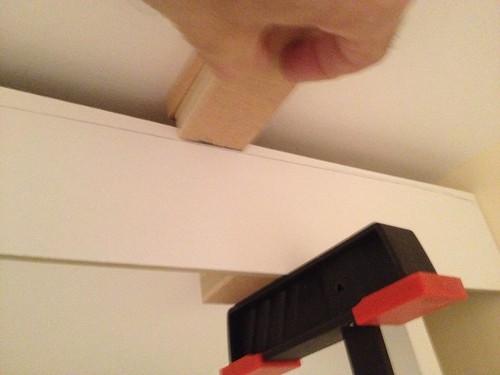
...which gives a nice accurate line to scribe to:-
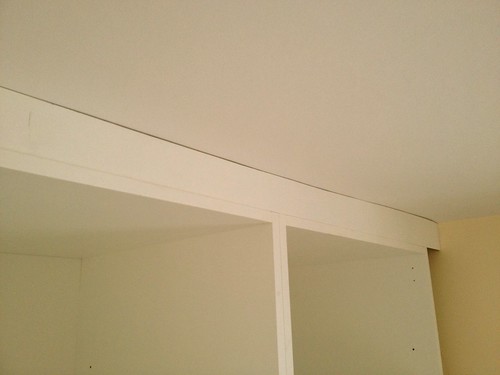
Great technique, thanks again.The plinths are covered in 6mm MDF ‘skirting’, pre-painted, and just glued on.
So with all the infills scribed, it’s just a question of fitting the doors; handy hint #2:- keep the hinges equally spaced top & bottom, and don’t drill the doors for handles until they’re fitted. That way, when the customer says “You know what Peter, I think you were right - let’s have the doors on the right of those cabinets after all...” you can make the change with minimum fuss. DAMHIKT...
Hinges are Blum clip-ons with built-in soft closers, so it’s quick work to fit the doors and tweak them as required.
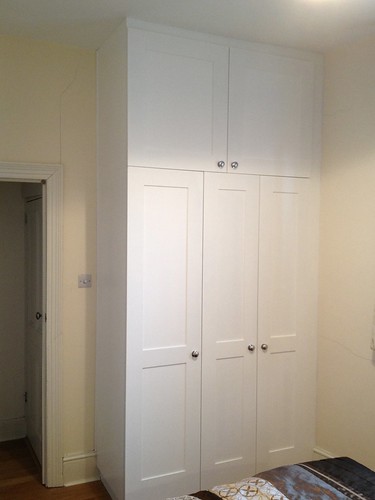
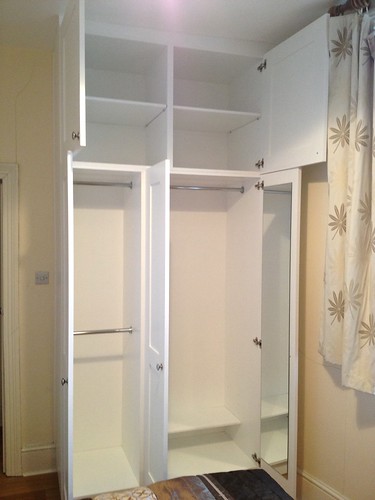
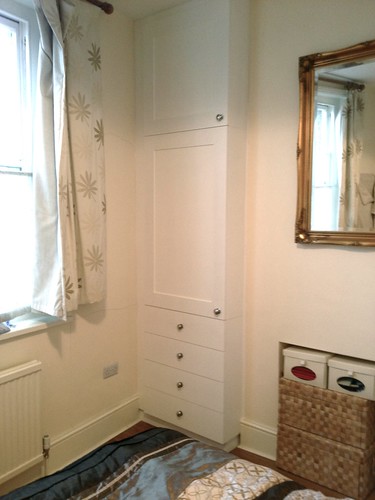
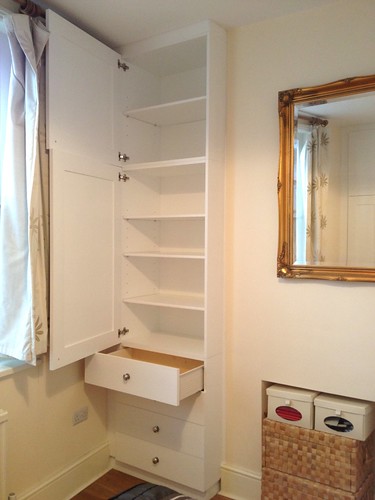
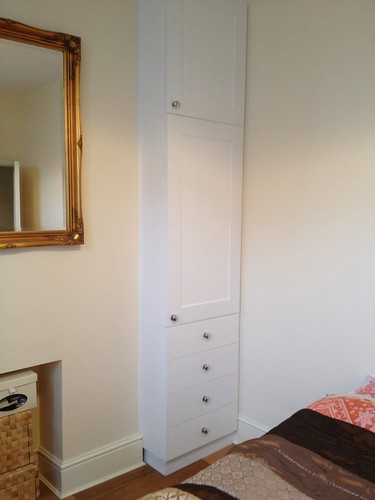
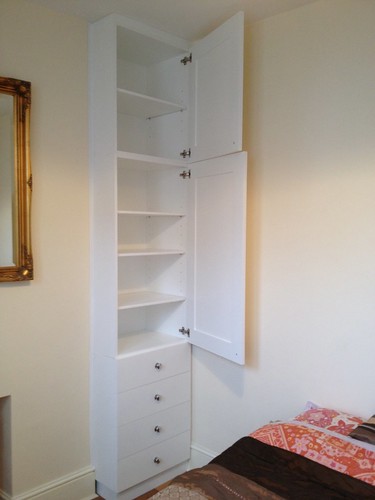
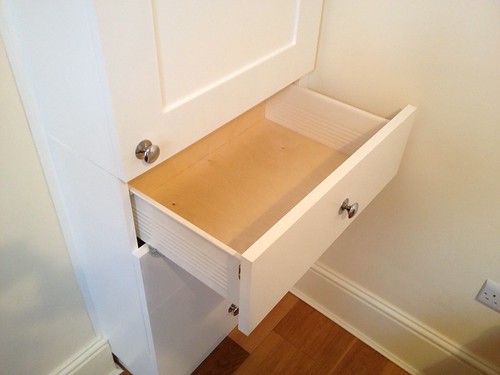
Sorry, quickie snaps taken late in the day in artificial light, but you get the idea.
Once the customer is happy, I schedule a call-back in a few weeks time to check that everything’s OK - it’s not unknown for the doors to settle a bit on their hinges, so worth scheduling a short visit with a screwdriver if necessary.
And that’s it. Invoice is raised and emailed (iPad app, again) and usually settled by transfer.
Job done, next please...
Cheers for now, Pete.
I don’t post much here as what I mostly make are pretty bog-standard MDF boxes - wardrobes, alcove units, shelves and storage etc... - but I thought it might be of interest to show how a job progresses from start to finish. I had a call back in September from a previous customer - I first built some flat-pack for her years ago, then a couple of years later some alcove units, and now a few more years on she wanted some wardrobes and alcove cabinets for the bedroom - more MDF boxes, yay!
It’s an awkward room, high ceilings and wobbly walls at odd angles, and not particularly big. When I do a first site visit to discuss the requirements, I take a few reference pictures and make a quick floor plan just to give me an idea of the basic shape, like this:-

There’s an iPad/iPhone app I use to do the basic capture, and all the text notes are also in an app. that syncs across all devices. With this room it was pretty straightforward what was needed - large wardrobe, and two alcove units with a mix of shelves and drawers. WIth the measurements confirmed, I do a set of basic 2-D plans, as much to get things straight in my own head as for the customer; the space for the wardrobe was particularly awkward at 1300mm - a bit too big for a straightforward double (the doors would be tight opening against the bed) so I suggested a ‘narrow’ double at 800mm and a single at 500mm - subsequently reduced to 480mm to give myself a bit more wiggle room.
There’s usually a few revisions before the final layout is decided - three in this case, all done by email - and the preferred layout was this:-


Although I’m not wild about the wardrobe double top-boxes above a triple door, the customer specifically wanted two big cabinets up there, so who am I to argue; she’s the one who has to live with it... I also provide an estimate of costs - again, using an iPad App - that has greatly improved the speed with which I can produce estimates as I now have set prices for e.g. a double wardrobe with flush doors, then add extras for an upgrade to panel doors, drawers etc...
With the design and costs finalised, I invoice for 25% of the total; this books a production slot in the workshop, and a provisional fitting date. It also gives me the bulk of the material costs in advance, which is good for my cash flow.
Next, its on to some quality time with my ‘carcass cutlist’ spreadsheet - each carcass is slightly different, so each type has it’s own workbook; below is a sample of the single wardrobe:-

It’s pretty straightforward - I feed in the cabinet width, height, depth and material thickness, and it gives me the dimensions for the sides, top and bottom panels, back, shelves etc... If I’m having panel doors then I get accurate measurements for the rails, stiles and panels; the materials for the rails and stiles is simply cut in strips from a full sheet, so I can see how many lengths I need for each door. There’s also an ‘area’ calculation that I use for pricing up the painting, if required.
Once this is produced for each carcass, the list is ‘rationalised’ to put it in a format for the timber yard - I don’t cut my own sheet material unless I have an unusual amount of appropriate off-cuts available, and I’m fortunate to have a very good local timber yard who will cut to order very accurately for a modest charge, usually next day.
In this instance, as there was a lot to be done - double and a single wardrobe carcass, two top-box carcasses, four alcove cabinet carcasses and two alcove drawer units - I opted to get the wardrobes and top boxes cut first (18mm) along with the rail/stile strips in 22mm, and the panels for the doors in 6mm. All MR MDF, nothing fancy.
Sorry, no WIP pictures of the cabinets in the workshop - too small, too busy, and frankly too straightforward - but the carcasses are joined with Dominos for alignment, and Spax M-cut screws where the faces aren’t seen. Faces that are visible are domino’d, glued and clamped - but this is all on-site, as everything is dry-fitted, then painted up and flat-packed for delivery. Only the drawer units were made up complete, as I wanted to be able to fit & fettle the drawers in the workshop.
Drawers were regular Blum Metabox, with soft-closers. I use Birch ply for the base and back, as this ‘softens’ the slightly industrial feel of the metal sides; again, this was an area for discussion with the customer, who would have liked solid wood and Blumotion runner drawers, but didn’t much like the cost - Metabox was a pretty good compromise. The Birch ply is finished in Junkers Strong water-based floor lacquer - quick drying, and looks great in semi-gloss finish.
Drawer fronts were 22mm MR MDF to match the doors above. Painted finish is Dulux Diamond white water-based eggshell, applied with a foam roller then blended out with a soft brush; works pretty well, and dries fast. Don’t have space for a spray booth, and so far can’t find anyone interested in taking on small spraying jobs locally
The doors are shaker-style panel doors made from 22mm MR MDF with a 1/4” groover in a router table - this gives a slightly loose fit for the 6mm panels, and makes assembly easier. Doors are made with loose tenons - I’ve seen the very clever system put forward by Doctor and explained again recently by Mailee, but until I find time to fiddle with it, loose tenons are a known quantity and a reliable way of getting what I need done quickly, when I’m working to a deadline.
All the carcasses are 18mm MR MDF, with a 6mm back rebated on the wardrobes and top boxes, but just planted on the alcove units as they’ll never be seen.
All told I took me about seven days in the workshop to fab & paint the ten carcasses, plus another day to fit all the drawers. All the carcasses were flat-packed and wrapped for protection during transport - a roll of cheap foam laminate-flooring underlay makes a great packing material; I work alone, but have a good ‘man & van’ who I use for local deliveries - wish I could get him interested in doing the fittings, lol.
Thankfully, the customer had (mostly) cleared the room, so I had some space to move - not much though, as I was still working around the bed.
All the base cabinets sit on a 4x2 plinth, and the first job is to cut back the skirtings to make as snug a fit as possible to the walls, then the plinths are leveled up with wedges...

Once level, the plinths are fixed in position with small angle plates screwed direct to the floor, and/or small MDF ‘feet’ takes the strain off the wedges; the wedges stay in position, but are cut flush with the front face of the plinth.

The drawer units are pre-assembled, so once centred up are just screwed through the carcass base into the plinth to fix their position. Then the cabinet carcasses are made up. As the alcove cabinets will be mostly concealed, they are just screwed together, with only one end of one face needing gluing and clamping. The alcove cabinets are 450mm deep, so only need three dominos for alignment. Handy hint - if the customer has a nice hardwood floor laid, I put sheets of hardboard down to work on; it protects the floor and is much better work on than dustsheet.

With so many carcasses to keep track of, it pays to be organised - every piece is identified with what it is, and where it goes...

before being slotted into place and screwed together...

With the base (drawer) carcasses screwed to the plinth, the next cabinets up are screwed to the drawer carcass (from underneath, obviously) and secured to the wall with small angle plates screwed to the back of the carcass, and the top cabinets are screwed through their base to fix them in place.

Same goes for the wardrobe carcasses and top boxes:-

These are secured to each other with screws that will be hidden behind the hinge plates...

With everything secured in place, I can start scribing the infills. Again, many thanks to JasonB and Chippy1970 for detailing this in a recent forum post; the infills are 6mm MDF, pre-painted, and glued to 18mm MDF blocks; as the carcass is also 18mm, these can be clamped inside the carcass, and scribed to the wall or ceiling with a couple of small pieces of 18mm MDF..

...which gives a nice accurate line to scribe to:-

Great technique, thanks again.The plinths are covered in 6mm MDF ‘skirting’, pre-painted, and just glued on.
So with all the infills scribed, it’s just a question of fitting the doors; handy hint #2:- keep the hinges equally spaced top & bottom, and don’t drill the doors for handles until they’re fitted. That way, when the customer says “You know what Peter, I think you were right - let’s have the doors on the right of those cabinets after all...” you can make the change with minimum fuss. DAMHIKT...
Hinges are Blum clip-ons with built-in soft closers, so it’s quick work to fit the doors and tweak them as required.


Sorry, quickie snaps taken late in the day in artificial light, but you get the idea.
Once the customer is happy, I schedule a call-back in a few weeks time to check that everything’s OK - it’s not unknown for the doors to settle a bit on their hinges, so worth scheduling a short visit with a screwdriver if necessary.
And that’s it. Invoice is raised and emailed (iPad app, again) and usually settled by transfer.
Job done, next please...
Cheers for now, Pete.


