Workbench alteration nearly ready for Christmas

UKworkshop.co.uk

Help Support UKworkshop.co.uk:

This site may earn a commission from merchant affiliate links, including eBay, Amazon, and others.

ColeyS1

Established Member
Joined
2 Nov 2009
Messages
4,245
Reaction score
38
Evening all, just put the final lick of paint on my bench
qamuvy3a.jpg

I've always wanted to build a nice one from beech or something but instead settled on chopping and changing my old one. I couldnt really justify the cost as it will get used and abused on a daily basis :smile:
I wanted to gadget it up, in the end all I added was an electric pencil sharpener - I'm snookered when my workmates kids find out what it's for :lol:

Coley
 
Wow ... that is a huge bench :mrgreen: Not sure it would fit in my workshop :lol:

What size is it please?

Just think that I would prefer the top to be flatter :wink:
 
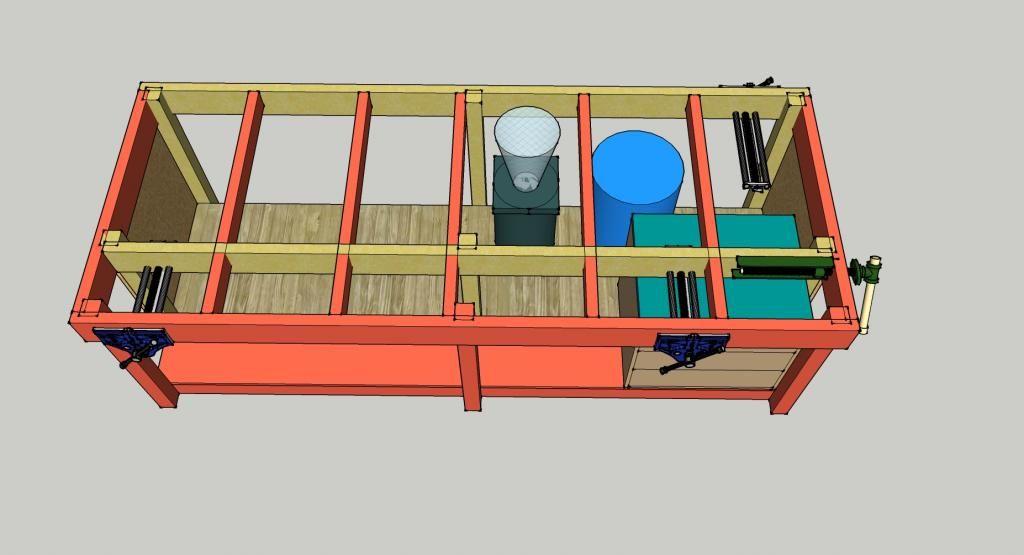
It started off as a 10ft by 3ft but i always thought an extra foot deeper would be better so now its 10x4.

mybenchalteredtop_zpsac477ed4.jpg


The red colour is all the alteration bits - In hindsight i should have just started from scratch as it was a right pain working with what was already there #-o
 
That looks fantastic, really like the colour as well. I'm rebuilding my workbench but I only have the space for a bench half as big as this one.
 
Mainly joinery stuff Charlie. Windows, doors , stairs etc :wink:

Thanks beachcricket.The paint did cause me issues. I decided to use 'little green' oil eggshell. The website specifically said don't go ordering paint assuming it will be exactly as you see on screen. Well,I was kind of in a rush...... and ordered what I thought looked to be green on my laptop. My own fault completely- I was kind of viewing the screen at a funny angle

usa5ebyb.jpg

The one on the left is what turned up, after thinking long and hard I went and got dulux to colormatch a farrow and ball sample- only 28 for 2.5 litres compared with £45 for the little green :|

I'm going to try and get all the doors back on tomorrow
y4ure8eq.jpg

Put these back in with the fronts and handles on and if there's time/can be bothered :p get the deadman running. I've got some 8mm stainless bar expoxied for it to run on, just need to screw on some old sash pulleys to act as the wheels
u5uguzu2.jpg


This is the megafugly side that needs a little tlc on the top front piece of wood
jynuhy4a.jpg

That'll have to wait till next Christmas :lol:
 
Thanks rich, it'll do the job till funds/time allow a new one.
Dw, paigntons probably about 30 miles away- only really visit the place to go to the zoo :)

suveze7e.jpg

ezyvape9.jpg


I got all the painted stuff on now and got the sliding deadman on. I was 2 handles short somehow, so had a day off to go get some more- my adding ups gone down the pan lately:lol: I'm trying to get a batch of stuff ready for lacquer so I still haven't got the shelves done or the face piece to cover the rough unfinished side. Does seem a bit of a luxury having so many drawers now :eek: the panels on the end are hinged on the bottom- this should free up a few more drawers, get rid of the g clamps and gain some extra space.
Thanks for looking

Coley
 
yny9amu5.jpg


Shelves are ready for spraying.

Last minute I thought I could add a sliding foldup deadman to the other side. I kind of ballsed up the front as I'd have liked to av been able to fit a door between the two record vices.
tusebu4u.jpg

e4eruhah.jpg

I can't quite figure out how I'm gonna keep the leg up. At the moment the mdf 'mock up' is held up with a magnet- not sure whether it'll be man enough for a lump of hardwood :-?

Coley
 
Looks good, and a nice big workshop as well! Is that the benchcrafted tailvice screw?
 
Its the veritas tailvice that axminster sell Andy
dagu9y5y.jpg

I always liked the look of the benchcrafted one, just not the price :D I bought a grubby handwheel ages ago. It just needed the hole for the tail bolt drilling out and a grub screw to hold it in place. Can't understand why they don't supply fitting instructions with the tail vice :?Just taking 2012's pictures off my phone and spotted a few others of the bench in progress
apavu6ys.jpg

u3azu8er.jpg


Cheers and a happy new year to you all !!
 
Wow! That is one amazing bench. I love the hinged end panel idea.
Excellent craftsmanship too. Definitely one to inspire.

Thanks for sharing.

Adam.
 
Cheers Adam, even the added tailvice I now wonder how I managed without- if only I'd fitted one years ago :geek:

Few more pics from today
evamepuj.jpg

I've got the apron made up and notched around the vice. My work mate was making a go kart with his kids using an old mobility thing he got from the tip. The brackets that held on the wheels were quick release so I thought they might be o.k to hold up the deadman
y2uqapyg.jpg

7y4uhe6e.jpg

I was quite surprised at how easily it might work so then wasted over an hour (half hour finding the chuck key :lol: :x) turning a few bits from brass to replace the plastic red bit. I've epoxied some bits together and gone home for dinner. I'm bored now and some how need to find some motivation :?

Coley
 
A few more
yvaby2yb.jpg

I loaded up all the cupboards, felt quite a relief finally putting all the clutter away. The paints quite easy to scratch though :cry:
ty8u3a3y.jpg

The cyclone box seems to be working alright- must remember not to push through drawer in too quick though :ugeek:
You'll notice a gap above the cupboard. The other cupboard next to it has got the same so I've slid a few sheets of 6mm mdf in the gap to pull out when I'm gluing up. I gave the mdf a couple coats of lacquer thinking it would get the glue to come off a bit easier- it failed miserably but a coat of wax on top seems to have sorted it.
aza8ysu6.jpg

These are the two end cupboards. Not very big, but it should free up a few of the smaller drawers I've got filled with clamps. The bits of oak to the left of the picture is what the clamps will hang on. I can't decide whether to just screw right through the oak into the mdf, or............... take out all the drawers, unscrew the runners and screw it that way. The bench is starting to drag on now :-|
 
Should never have taken 5+ years to make a silly vice packer/box
62db322cf67d0eb3d9d53b724b58a09b.jpg

I can now hold a door in the vice without it fouling/hitting the other. I now have a bench that does everything I need. It took about an hour to make but its really gonna make life easier !!

Sent from my SM-G960F using Tapatalk
 
Awwww Yisssss! *Pumps fist* I am officially not the longest bench build on UKW anymore. Nice One Coley Ole Lad. 8)

Regards as always slooooooowcoach. :wink:
Chris
 
ColeyS1 wrote a very, very long time ago, years in fact:
I can't decide whether to just screw right through the oak into the mdf, or............... take out all the drawers, unscrew the runners and screw it that way. The bench is starting to drag on now

Well?

Seriously, still looks well and we all know those little things can take time.
 
Bm101":gtuf87is said:
Awwww Yisssss! *Pumps fist* I am officially not the longest bench build on UKW anymore. Nice One Coley Ole Lad. 8)

Regards as always slooooooowcoach. :wink:
Chris
Ha, in my defence it was only a bench accessory, kind of lol

Sent from my SM-G960F using Tapatalk
 
Noel":2mkk2u17 said:
ColeyS1 wrote a very, very long time ago, years in fact:
I can't decide whether to just screw right through the oak into the mdf, or............... take out all the drawers, unscrew the runners and screw it that way. The bench is starting to drag on now

Well?

Seriously, still looks well and we all know those little things can take time.
I put screws through the oak.
66702480f08eebd340c9e45be902eb14.jpg

Very rarely gets seen by anyone else but me. The bench has a few bumps and scrapes but it's still fully functional. The banks of drawers didn't stay empty for long ! I blame the cider on Saturday for dredging this thread back up [SMILING FACE WITH OPEN MOUTH AND SMILING EYES]

Sent from my SM-G960F using Tapatalk
 
Back
Top