Steve's workshop - Painting the outside walls

UKworkshop.co.uk

Help Support UKworkshop.co.uk:

This site may earn a commission from merchant affiliate links, including eBay, Amazon, and others.
Steve Maskery":2b7a70o5 said:
Now, you see, Lagavulin would not be mine. Too harsh, too smokey) and I don't mind a bit a smoke in my scotch), too everything, really.
In the old life, Glenmorangie was my normal tipple,

See I've never liked Glenmorangie that much myself. It's ok. But I much prefer Islay Malts.

Out of curiosity, what's a Paslode? Google says it's a nailer? Which would make sense.
 
Yes

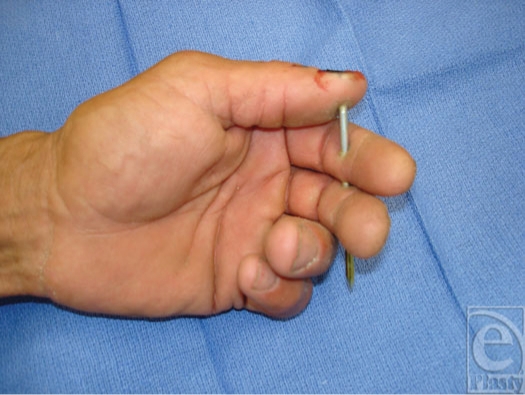
eplasty08e52_fig3.jpg
 
Blimey they are expensive. Nice of the chap to lend it to you.

Please tell me that's not your fingers there?
 
I used paslodes for years, I really liked them. We then swapped to Stanley bostitch and about 50 paslodes went in the skip. The amount of times I have seen nails go in nasty places is unreal or the amount of times new starters nailed there hand to a piece of wood.
Isle of Jura is a nice smooth tipple, much better then that peaty lagavulin. :D
 
Glen Campbell Glen Miller or Glen Hoddle for me.

Pete
 
Well this week I have cut and joined the four mudsill plates (although one is quite bent, I may have to pull it apart and re-fix it) and today I've cut 51 studs:

P1020617.JPG


I set up a roller stand (I'm in the way in the picture), screwed a 4x2 to the fence and clamped a stop block to it. That way they all end up exactly the same. I've cut them to 2.9m. With the top and bottom plates and the mudsill, it should work out pretty much exactly 2.5 sheets of OSB sheathing in height, allowing for a 25mm overhang at the bottom.

The trusses have a raised tie, giving me 450mm extra, so my ceiling should be about 11 ft in the middle. Nice!

I should be able to build the walls this week, so if anyone is up for a barn-raising next Saturday, I'll get the bacon in.

S
 

Attachments

  • P1020617.JPG
    P1020617.JPG
    155.4 KB
Excellent day today, chaps and chappesses.
Ray is back off holiday (Hoorah!) and while he was gone I had discovered that our nice square concrete base was not quite as nice and square as we had planned. I still don't know how it happened, but we did find out where. Front right corner, short by about 30mm on the RHS.
But the good news was that when we removed the shuttering, the vast majority of the concrete was beautifully smooth and quite a lot of it was straight. A bit wonky where we'd had to do emergency bracing when we were pouring, but mostly very good.
But we had to decide what to do about the bits were not right.
I don't want any concrete at all sticking out from underneath the structure, because the sheathing is going to overlap so that it sheds water nicely. So, although I had already made the mudsills, we made one a bit longer and adjusted the rest so that we ended up with a square mudsill base. There is a bit at the front where we are going to have to point up. The concrete is an inch or so shy underneath, for a depth of a couple of inches. But we have set it up with opposite mudsills that match, with strings for straight and with a big square of Thales for square. We've got stuff stacked inthe middle of the site again, so we can't measure diagonals without moving a lot of boards about, but we are confident we are not far out.
The silver stuff is a damp-proof membrane, bitumen on the underside. There is a protective film over the bitumen which is supposed to peel off, but it is old stuff, the film is perished and comes off in shreds, it took us ages.
The mudsill is held down just with hammer fixings. They are not what will tie the building down eventually, of course, they are just to hold it in place until we get the walls up and and then the whole structure can be locked down with expanding bolts.
Ray has got a garden to deal with in the next couple of days, so I'll be on my own, but my studs are cut so I only have to cut the top and bottom plates and nail the walls together. I think I can manage that. Fingers crossed. So the plan is still to have a barn-raising on Saturday. All welcome!
Here are some pictures:

We decided we'd better have a bit of a clean up, it was getting a bit trippy-uppy:
P1020635.JPG


The DPC is about 3mm thick and comes in rolls. Just cut to size:
P1020634.JPG


The first fixed point - Hooray!
P1020636.JPG


We only had to make one mudsill longer, then we could trim the others. No jigs were harmed in the fitting of this mudsill.
P1020638.JPG


This is my biggest Square of Thales. Even so, it is quite small for a job of this size.
P1020643.JPG


So now I have a square base and I can build on that.
P1020639.JPG


Now I've got some walls to build.
 

Attachments

  • P1020635.JPG
    P1020635.JPG
    142.1 KB
  • P1020634.JPG
    P1020634.JPG
    154.4 KB
  • P1020636.JPG
    P1020636.JPG
    198.7 KB
  • P1020638.JPG
    P1020638.JPG
    137.8 KB
  • P1020643.JPG
    P1020643.JPG
    182.7 KB
  • P1020639.JPG
    P1020639.JPG
    176.3 KB
Mudsill is the piece of wood that contacts the concrete slab. In this case it doesn't contact it, I have a DPM in between.
Normally you would then build a floor on the mudsill and then build the walls up from that. I'm not doing that, so the mudsill is probably not entirely necessary, but it does provide a good datum on which to build. Getting a mudsill straight and true is easier, I think, than getting a rather flexible wall straight and true. So that is why I am doing it.
I plan to have what is called a Floating Floor. In other words, it is not structural and not fixed to anything. It is simply a layer of rigid foam insulation with two layers of chipboard on top. Apparently lots of houses are built that way today. Sounds good and easy to me.
S
 
They did a mudsill on my house. It's much easier to fix a sill to the concrete and to get it all square etc than when you're working with great big walls.

It's then much easier to initially fix wooden walls to other wood than concrete, especially if they are large and heavy.

I suppose it depends on your walls as to the extent of the benefit.

It's too late now but one could consider a little concrete sill, finished with wood on top.

That way any lying water is not in contact with wood.

Sent from my GT-I9100 using Tapatalk
 
Woodmonkey":1363raxj said:
Picture 4 someone has glued a piece of wood to the top of your head

Either that or he has been using the Paslode again.

Pete


p.s. Me and Sam are ready for Saturday
 
Racers":3efnt1z4 said:
Woodmonkey":3efnt1z4 said:
Picture 4 someone has glued a piece of wood to the top of your head

Either that or he has been using the Paslode again.

Pete


p.s. Me and Sam are ready for Saturday
I never noticed the wood, at first, I do like the Ramboesque headband though! :lol:

Enjoying this thread Steve, keep the WIP pics coming.

Baldhead
 
wcndave":1tpkpc6m said:
It's too late now but one could consider a little concrete sill, finished with wood on top.

That way any lying water is not in contact with wood.

I think in this case we have sort of done that. The whole slab is raised up. Not by much at the front, but by about 8" at the back. The walls will come down over the top of the slab, so any shed water will not sit on the wood.
S
 
Yes, it's probably overkill what I was thinking of.

12-06-2014 13-51-50.jpg


Basically it means any water either side does not touch wood. They are also good fro getting your building square.

So the slab does not have to be exactly level, or square, which is hard, but you can use shims to get the mudsill exactly level. Then you fill the gap between wood and slab with concrete for a good seal, and you have a perfectly square and level base easily created, without trying to create a flat and square slab.

As I said, probably overkill for a workshop, however you seem to be doing it with a very high level of attention to detail so you never know!
 

Attachments

  • 12-06-2014 13-51-50.jpg
    12-06-2014 13-51-50.jpg
    217 KB

Latest posts

Back
Top