SiP Table saw question

UKworkshop.co.uk

Help Support UKworkshop.co.uk:

This site may earn a commission from merchant affiliate links, including eBay, Amazon, and others.

Harlequin

Established Member
Joined
20 Sep 2008
Messages
386
Reaction score
0
Location
Leeds
Hi

Wonder if you guys could help me on this one.
The first pic shows the rear panel of the SiP 10 inch table saw.ThERE ARE 4 holes on the back panel - what are they for?

The second pic is a black painted steel piece - what is that for?

Am assembling the saw for the first time and the manual is pretty pathetic

Thanks


 
Harlequin":1t5otafn said:
Hi

Wonder if you guys could help me on this one.
The first pic shows the rear panel of the SiP 10 inch table saw.ThERE ARE 4 holes on the back panel - what are they for?

The second pic is a black painted steel piece - what is that for?

Am assembling the saw for the first time and the manual is pretty pathetic

Thanks
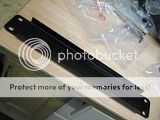


The second picture is part of the 06920 wheel kit, and bolts (using the 4 outside holes) onto the front legs of the machine right at the bottom (if you look at your saw you will see that there are 2 threaded holes in each of the 2 front legs). Then using the other two holes in the middle you bolt another metal piece which allows you to jack/lift the saw up and push it around the workshop. If needed I can post you a picture of the section in my saws manual.

Cheers

Mike
 
Mike.C":3rrp49ov said:
Harlequin":3rrp49ov said:
Hi

Wonder if you guys could help me on this one.
The first pic shows the rear panel of the SiP 10 inch table saw.ThERE ARE 4 holes on the back panel - what are they for?

The second pic is a black painted steel piece - what is that for?

Am assembling the saw for the first time and the manual is pretty pathetic

Thanks


The second picture is part of the 06920 wheel kit, and bolts (using the 4 outside holes) onto the front legs of the machine right at the bottom (if you look at your saw you will see that there are 2 threaded holes in each of the 2 front legs). Then using the other two holes in the middle you bolt another metal piece which allows you to jack/lift the saw up and push it around the workshop. If needed I can post you a picture of the section in my saws manual.

Cheers

Mike

Have you got the wheel kit? If so watch how you put the legs on because they can only be fitted one way, and as I am sure you have found out the saw is to heavy to make a mistake and have to tip it on its end to remove and reinstall the legs in the right position :wink:
Do you need to see the manual or the wheel kit in place?
 
Have got the dakota wheel kit from rutlands
pics would be useful
Also - does one need to disassemble the cast iron top before tipping the saw upright? Its damn heavy
 
Harlequin":3g4b3i9a said:
Have got the dakota wheel kit from rutlands
pics would be useful
Also - does one need to disassemble the cast iron top before tipping the saw upright? Its damn heavy

I would rather get someone to help me then remove the cast iron top.

Here's a link to SIP's accessories http://www.sip-group.com/catalogue/178.pdf and in it you can see the 06920 wheel kit.

What made you buy the Rutlands kit when SIP does one for your saw? The only problem with that sort of kit is you can only lock 2 wheels, which means that any sort of pressure allows it to move. But even if you were able to lock all 4 wheels, it has been my experience that there are times when you are working on the machine it is holding and as you push a piece of timber past the blade, router bit, or planer blade the base moves across the floor carrying the machine with it.
The good thing about the SIP kit is that after you have finished moving your saw, you can wind the wheels down which allows the whole machine to sit back on the floor making it unmovable.

As I said this is only my experience and your kit maybe ok.

Cheers

Mike
 
hi

snap , here's mine not yet finished but all oiled up waiting for me to return from holland , latest news about an hr ago skiphole airport closed and so is bristol with more snow to follow :roll: :roll: hc

PDR_2291-1.jpg
 
Bad luck, HC. :( Bristol Airport's open again but I guess it's a different story in Holland.
 
hi

pipper , thats bad news :lol: my daughter works for tom tom in amsterdam and every one was sent home at 4 ish it was snowing so badly , skiphole closed shortly after on the news here a traffic jamb some 39 klm long .

since we been here from boxing day it snowed nearly every day it never been above freezing all the time so no sign of any let up yet . hc :wink:
 
Martin, you've got the extractor outlet on upside down mate!

Roy.
 
Right assembly virtually complete - just a matter of turning it right side up now :D
 
this is 16 amp
my ring mains certainly would support it
wondered what sort of connectors(plugs) people have used here - pics would be nice if possible
 
Harlequin":1riq5aon said:
this is 16 amp
my ring mains certainly would support it
wondered what sort of connectors(plugs) people have used here - pics would be nice if possible

This is the setup I have on my SIP
p45085_l.jpg


with a socket like this
p44433_l.jpg


Both come from Screwfix

Cheers

Mike
 
Is any of that set up fused Harlequin? If not, what is the rating of your ring main fuse/MCB?

Roy.
 
Then why not simply put a 13 amp plug on the power cord?
That way, if you used with a switched outlet, you have the additional safe guard of an on/off switch to hand, it has been known for NVRs not to operate properly if sawdust obtains an entry. DAMHIK!

Roy.
 
Back
Top