Routing fluted panels

UKworkshop.co.uk

Help Support UKworkshop.co.uk:

This site may earn a commission from merchant affiliate links, including eBay, Amazon, and others.

tim

Established Member
Joined
5 Nov 2004
Messages
2,307
Reaction score
0
Location
Herefordshire
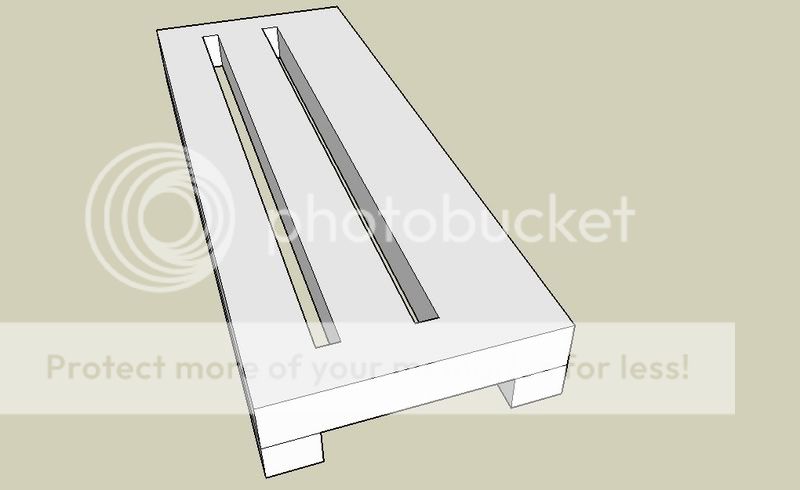
I have a whole bunch of panels (40 or so)to rout flutes into in the next few weeks. They are all 70mm wide and 20mm thick and vary in length from around 750mm to 2800mm. I am trying to come up with a cunning plan/ jig to simplify the process. The flutes will be stopped and there will be four across the width of each.

I had thought about using two fences and stops mounted to each piece but the fences are thicker than the timber which would mean raising the piece of the bench somehow which I'm not so keen on. Technically I only need two settings since I can flip each piece round but there may be smarter ways to do this that I can't think of. I was going to make stops with shoes that fit over the end of each piece to keep set up to a minimum.

If anyone has useful suggestions I'd be grateful.

Thanks

Tim
 
ok,. tim, never done it,but two thoughts

1/ use a woodrat :lol: :lol: :lol: :lol:

2/ make a box which is the length of the longest piece of
wood, and the width of one piece, internally. sides can be
higher and wider actually, maybe the width should be the width
of your router base, but that would restrict things, actually
i think one side should be moveable so you can run the fence
along it, and offset the right distances for the flutes.

the top of the box is solid also to but then you can block down for
the start.

i am sure that i have seen something similar in a mag, maybe alan holtham, or one of the jeremy broun books.

with the box, you don't need to change the height of the bench,
just sort out a decent base, and that should work.

paul :wink:
 
engineer one":18emsfsp said:
ok,. tim, never done it,but two thoughts

1/ use a woodrat :lol: :lol: :lol: :lol:
Or one of these?

IMG_0955.jpg


On a more serious note Paul's suggestion of a stop template with a plunge router is probably the way to go, but I think it could be made simpler. If you use the router with a sliding base template like this:

FluteJig.jpg


the router sits atop the jig with a guide bush and flute core box bit to cut the flute and is slid between stops fixed at each end of the strip being worked. If needs be make the strip too long, nail the stop to it and trim on the saw after fluting. Only two slots need to be machined, with different offsets.

Scrit
 
engineer one":10u6mc13 said:
but i prefer the mill :tool:
It's actually a Wadkin LQ recessor - patternmaker's machine. |Cross betwqeen a drill, a mill and I don't know what.....

Scrit
 
I'd go with Scrits idea, but I think you may have to make two jigs, one for the outer flutes and one for the inner ones. If your workpiece is only 70mm wide, I don't see how your jig will be wide enough to accommodate two slots without them interfering with each other.

How's the project coming along?
 
It's actually a Wadkin LQ recessor - patternmaker's machine. |Cross betwqeen a drill, a mill and I don't know what.....


Its the strapping to the pallet that worries me :shock: :lol:

I have seen one of these before which had a multiplier (speed increaser X4) on it which allowed its use as an overhead router as well, not an easy machine to clean though if used for the latter.

good solid looking machine

sorry what was the question :oops:

I
 
Thanks everyone.

I discounted the rat and similar because of the length of some of the pieces - would require a 6.5m clear run!

The guided channel was also one I considered and rejected it in principle because I had the same thought as Steve that in a narrow strip of 70mm the guide slots could interfere with each other. I hadn't thought of the channels 1 and 3 option that Scrit suggested. However, I'm also keen to not make up a 3m long jig that then has to be used for the shorter lengths.

Your thoughts have been very helpful though and I'm now wondering whether a shorter version of Scrit's suggestion would work as a shoe fixed to the router with essentially two holes in it (one for each channel 1, 3). By having the shoe project either side of the router, these projections could be used to stop the flutes by placing a block at the end of each strip thereby making the strip length irrelevant.

Project is chugging along fine at the mo - nothing really to show yet but I'll do my best to get some photos done along the way.

Cheers

Tim
 
This is what I mean:

routersled-full;init:.jpg


with the router fixed in two places to cut all 4 slots using a guide bush to centre on the hole so that fixing/ refixing isn't a nightmare. Does anyone see a major flaw with this - having pondered over the problem for a while I'm not so sure that I haven't made a **** somewhere. It was definitely the four guides that was making it difficult for me to see a solution.

Cheers

Tim
 
Tim

Just been reading this and was just about to suggest what you have drawn (honest!) as I figure you will get a smoother flute in a single pass (I assumed Scrits design would require it to be repositioned along the longer pieces :oops: )

Only issues I can think of are how to hold the workpiece and how far away from the ends of the workpiece you are intending to stop the flutes - maybe a scrap board with thin cleats fitted so that the workpiece fits into a 'channel' and then screw on end stops on...

Possibly also make the top of the router sled out of clear acrylic so that you can see what's going on...

Mike
 
tim, sorry about the rat, but in hindsight it would be difficult to keep the
wood level of course.

however, assuming your bench is long enough to carry the longest piece,
maybe the thing to do is adapt the rat principle of overhead routing,
by making a sled as we have all suggested, and moving the wood through it. how much space on either end of the bench to you have, it will be slightly less than might be needed with a rat.

do you remember those old pipe systems that picador etc sold?

i think you need a flat surface underneath, so you can have the end stop.
if the wood is moving, i think that is better than moving the router, cause you will have more control.

in my mind i had the idea of a version of the router thicknessing jig that
has been featured in a number of magazines. by moving the wood
instead of the router, you need a smaller jig.

more confusion i am sure.
but what i do see is that you need a fixed stop at the top,
and a moveable one at the bottom.

paul :wink:
 
Tim
I've just had a thought, and apologies in advance if this is so obvious it's insulting - not meant to be :)

Don't forget that if you want the flutes to appear to be equally spaced across the board, then the centre of the outside ones must be further from the edge than they are to the centre two. The eye sees the flat area between the flutes, and it's these flat areas that you may want to appear to be equal. That in turn depends on the depth of the cut.

Hope that's clear and not stupidly obvious
 
Tim, your idea is elegantly simple. If those holes are centered between the ends, setting up stops wouldn't be a problem. In fact the center part of the channel on the bottom could be relieved a bit more up to near the holes so a stop could slide under the jig. The relief cuts could be made to stop perhaps half the dimension from the end of the flute to the end of the work. The stops could clamp down over the ends of the work holding it in place.

If more work holding is required, how about fixing the work to the bench with a bit of carpet tape?
 

Latest posts

Back
Top