Regular Mortice Chisel or Bevel Edged for your Mortices

UKworkshop.co.uk

Help Support UKworkshop.co.uk:

This site may earn a commission from merchant affiliate links, including eBay, Amazon, and others.
One of the basic rules of cabinet making is "first make the hole, then make the thing that goes in the hole"
.............. which really makes little sense, when the hole is the easier part. :?
 
I have not explained it clearly - sorry!

There are 4 guides in total (2 for the tenon, 2 for the mortice). Both pairs are marked out and cut based on the original test joint.

Because the guides ensure that the cuts are always the correct distance from your reference face it does not matter if the tenon or mortice is done first.

it might be a bit clearer in his other intro videos:

https://www.theenglishwoodworker.com/th ... le-guides/
 
Cheshirechappie":1iquke37 said:
....
At school, we were taught and expected to cut them by the classical 'three triangles' method, and to have them fit from the saw. Nobody told us it was difficult, so we just did it - and most people managed it after a couple of goes. Not perfectly every time, but not too shoddy either. ....
Yep. Good marking with the mortice gauge, sharp saw and 3 triangles. Saw needs a good set on it so you can steer it if necessary.
In fact if the saw is in the right condition it's all very easy - makes you wonder if all the alternative strategies (guides etc) come down to not having a very good saw + technique, in the first place.
 
just for clarity, the guides discussed above were specifically intended for bridle joints - the question asked was 'could they be used for an ordinary mortice and tenon?'. to which I suspect the answer is 'yes' (but it may not save you any time).

PS re. jacob's other point on the state of the saw and technique - this is pretty much the only thing that could go wrong when making a bridle joint with these guides, which are basically silly person proof.
 
phil.p":21zg58x2 said:
One of the basic rules of cabinet making is "first make the hole, then make the thing that goes in the hole"
.............. which really makes little sense, when the hole is the easier part. :?
The hole and the tenon cheeks are easiest done before any mouldings, rebates have been applied. The tenon shoulders easiest as the last thing after everything else.
 
D_W":7sc4p7uj said:
Keep following the instructors who talk a lot and make little.
What makes you think I follow them in the first place?
None of them are making what I want to make, so there's little point there.

I'm more interested in finding what works for me and then practicing that, rather than repeating the same mistakes and expecting a different result. :wink:
 
The circle gets more confusing the longer we go. At the beginning of this, it was necessary to have a charismatic teacher because it was too difficult to figure out anything by watching a professional. Now we're to figuring things out by ourselves.

I'm sort of ashamed that I've stuck in this discussion this long.

I hope the other folks on here who are looking to make things, do it at a reasonable pace and improve find value in such things as the Chinese fellow mortising. I'm surprised Jacob had as many differences with it as he did (I'd like to see a video comparison), but I can just flat out say - that man mortises faster than I do. I've seen him do it before, but every time I watch him do it, I learn something that makes my shop experience nicer and more satisfying.
 
A regular bevel edged chisel works fine if that's what you have and presumably everybody has a few of these. If you spend weeks turning into months turning into years evaluating different kinds of mortise chisels - style, brand, vintage, new, etc. then you're missing the entire point of simply making a relatively neat hole in a piece of wood. During a period of time in which I had ear trouble, and loud noises were like torture, I became fond of and relatively adept at drilling and paring mortises. If you do all the drilling first, then come back and pare, it's about as fast as chopping with a mortise chisel. If it's your goal to become a pieceworker, the lowest common denominator, chopping mortises all day to the exclusion of all the other processes in a woodworking project, then feel free to jump in a time machine and have all the fun you can stand to have.

In the context of a complete project - design sketching, drafting, cut list, stock selection, setting out, four squaring, cutting joints, assembly, finishing, etc., etc. the difference in any one mortising method or style of mortise chisel is meaningless. Some will be horrified at the notion, others will find comfort in it.
 
G S Haydon":y2nsp8rk said:
There are quite a few ways of working tenons by hand. In my experience the most reliable method is cutting to gauge lines and pencil/knife lines. I always aim for off the saw, not always perfect but it seems to work. If they need some adjustment a 25mm chisel is great, perhaps a shoulder plane on a long shoulder such a string to newel post. I might also split a tenon cheek if the grain is favorable.
Using a fillister on really wide tenons can also be used, but not something I do very often.

I have seen people using metal hand routers to keep removing a little at a time. I see that as a very tedious way of working and would only be really effective of machine prepared stuff. My tip would be grab a tenon saw and practice!

The mortising video is great and sitting is really effective for many tasks. Having worked from sawhorses when required the reduced height can be real aid.

That's pretty much the way I go about it. Aim for the lines, hope for a fit on the first try. On the shoulders, I mark deeply, cut just shy of the lines and remove the material with a single cut right at the gauge line with a respectably wide chisel, leaving just a bit at the sides and then I pare that (I think some wouldn't be comfortable doing that, but it takes little time to learn to pare across that line accurately.

No faffing (no shoulder planes, no router planes, etc).

I think exposure (practice) is more my problem for speed, and developing more routines that are habitual (in getting everything in order and moving it around in the vise). It's certainly not the fault of my tools if something doesn't work out. More practice would probably lead to more direct fits off of the saw, too.
 
CStanford":9tf5ht21 said:
A regular bevel edged chisel works fine if that's what you have and presumably everybody has a few of these. If you spend weeks turning into months turning into years evaluating different kinds of mortise chisels - style, brand, vintage, new, etc. then you're missing the entire point of simply making a relatively neat hole in a piece of wood. During a period of time in which I had ear trouble, and loud noises were like torture, I became fond of and relatively adept at drilling and paring mortises. If you do all the drilling first, then come back and pare, it's about as fast as chopping with a mortise chisel. If it's your goal to become a pieceworker, the lowest common denominator, chopping mortises all day to the exclusion of all the other processes in a woodworking project, then feel free to jump in a time machine and have all the fun you can stand to have.

In the context of a complete project - design sketching, drafting, cut list, stock selection, setting out, four squaring, cutting joints, assembly, finishing, etc., etc. the difference in any one mortising method or style of mortise chisel is meaningless. Some will be horrified at the notion, others will find comfort in it.

Charlie, each individual thing contributes little in time. Doing a lot of them inefficiently, then that's not so. Certainly, the design, layout and glue up planning for certain things is much more of a challenge, and much less pleasant to discuss. I'd go so far to say that *marking* is more difficult than the joint cutting (I don't think that's a stretch).

If you're doing one piece, and then never the same again, everything other than the actual cutting becomes a time sink, and i don't think people will pay for it (i don't find it that interesting to build one of something and then move on - it feels like walking on a treadmill).

I've got ..well, I've not got more tools than everyone on here, but I do have more than most, I'd bet. When I'm working on something, though, I generally go back to the same ones. At some point, I'll grow up and sell off the rest, but not yet. And I'll always keep an extra stanley 4.

Still don't get much of a charge cutting mortises with a bevel edge chisel, and neither do most professionals that I've seen - just a personal thing, I guess.
 
At those points in time that I've accumulated more tools than I used on a regular basis, all they did was rust. Getting rid of them was liberating and the right thing to do. And I could still stand to get rid of a few more.
 
D_W":33al6i6v said:
The circle gets more confusing the longer we go. At the beginning of this, it was necessary to have a charismatic teacher because it was too difficult to figure out anything by watching a professional. Now we're to figuring things out by ourselves.
Not at all.
The teacher/guru/professional/forum-poster tells you what they're doing and/or how they're doing it.
You then decide, based partially on how well they've conveyed it, if that's of use to you and how you prefer to work, or not.
Pretty straightforward.
 
Bevel-edged, pig sticker, sash, then drill and pare, cutting by the layered method, cutting by the central-v method. All of these are well within orthodoxy. Pick the combination you like. Anybody demonstrating one of these methods or tools isn't guilty of practicing black magic or anything like that.
 
CStanford":38ix08ie said:
At those points in time that I've accumulated more tools than I used on a regular basis, all they did was rust. Getting rid of them was liberating and the right thing to do. And I could still stand to get rid of a few more.

I have a rust rule. If it rusts, I sell it within a week, but the area through the door of my garage is heated and dry, so the myriad of unnecessary tool gear in there is safe (mostly planes). My saws are all in my garage, and I have far fewer than I used to due to the rust rule. Waxing them in use tends to skew their survivability in the garage (where the humidity is extremely high in the summer due to the temperature trailing outside by 10-15 degrees, but sharing the same air. RH is usually above the 63% rust point).

I don't tend to keep a lot of planes of types that I'm not building, but if I am building something, I may have 10 to 20 of that type until I know how I'd like to build the type - and a pile of planes that I've built (they're essentially unsaleable if they're not perfect).

Chisels are another story, though - all are in my garage, and rust rule applies, but they're mostly enclosed and don't rust.

I can't recall selling anything and wishing i had it back.
 
Rust was meant metaphorically as well as literally. Certainly I could protect the tools from rust if I tried hard enough, but then that sort of magnifies the absurdity of the exercise of maintaining and storing surplus, unused tools.
 
CStanford":xgjj1v5w said:
Rust was meant metaphorically as well as literally. Certainly I could protect the tools from rust if I tried hard enough, but then that sort of magnifies the absurdity of the exercise of maintaining and storing surplus, unused tools.

Not rust in my case other than the literal sense. I have the dry space, it doesn't get "people traffic". If I had to periodically check unused tools, I'd sell them. I did that when I was a beginner - brand new boutique tools, kept them in the garage. If I was out of the garage for a week or two, I had to take half an hour and make sure nothing accumulated any rust. Not much fun.

I sense that most don't have a dry basement that stays dry, but thanks to the overspending old lady who lived in my house before me, the part of my downstairs inside the garage is totally dry. Not so for the neighbors. I guess I have her to thank for my ability to hoard to an extent, and the air conditioner condenser for removing moisture in the summer. Who knows? It works, and it allows me to delay selling the things I could potentially refer to in the near future. I wouldn't have 20 infills to look at if they had to stay in my garage. They'd rust in days.
 
Or one could just coat them in Cosmoline and seal the matter and status of the tools both literally and figuratively. The dry space you describe sounds like a good place to store lumber or veneer. Why waste it on tools? You could probably fit a lot of beech plane billets in there I'd imagine.
 
CStanford":2ns4259a said:
Or one could just coat them in Cosmoline and seal the matter and status of the tools both literally and figuratively. The dry space you describe sounds like a good place to store lumber or veneer. Why waste it on tools? You could probably fit a lot of beech plane billets in there I'd imagine.

Beech billets survive fine in the garage. Storing lumber in a carpeted basement would be a non-starter with the mrs (I have probably stashed 100 board feet of QS beech and tropical billets in there already, though - but stickering lumber out in the open would never go over due to the potential of "hiding spiders").

I've got room in the garage to store lumber (a space of about 12x20) and the practice of putting cars in the garage has been ceased.

Priorities would be different if I was storing materials for paying pieces, but at this point, I may have something in the range of 800 bd feet of wood, and that's plenty enough. 100 of that is beech, and even at that, I don't know if planemaking will outlast it, because I have made a grand total of:

$0

So far making planes.
 
D_W":3cpmvhm6 said:
G S Haydon":3cpmvhm6 said:
There are quite a few ways of working tenons by hand. In my experience the most reliable method is cutting to gauge lines and pencil/knife lines. I always aim for off the saw, not always perfect but it seems to work. If they need some adjustment a 25mm chisel is great, perhaps a shoulder plane on a long shoulder such a string to newel post. I might also split a tenon cheek if the grain is favorable.
Using a fillister on really wide tenons can also be used, but not something I do very often.

I have seen people using metal hand routers to keep removing a little at a time. I see that as a very tedious way of working and would only be really effective of machine prepared stuff. My tip would be grab a tenon saw and practice!

The mortising video is great and sitting is really effective for many tasks. Having worked from sawhorses when required the reduced height can be real aid.

That's pretty much the way I go about it. Aim for the lines, hope for a fit on the first try. On the shoulders, I mark deeply, cut just shy of the lines and remove the material with a single cut right at the gauge line with a respectably wide chisel, leaving just a bit at the sides and then I pare that (I think some wouldn't be comfortable doing that, but it takes little time to learn to pare across that line accurately.
No faffing (no shoulder planes, no router planes, etc).

I think exposure (practice) is more my problem for speed, and developing more routines that are habitual (in getting everything in order and moving it around in the vise). It's certainly not the fault of my tools if something doesn't work out. More practice would probably lead to more direct fits off of the saw, too.

I think Charles has a point with "overthink", however the point you've tried to make during this discussion is very valid. I'm very happy for anyone to have fun in the shop how they want, making practice joints, just tinkering, just taking a few shavings. I'm just not sure the video Andy linked to is that helpful, whereas the Chinese guy is very inspiring. In Andy's video it takes close to 45mins to make one joint with a router plane and a lot of faffing. If time is no issue and you're having fun, go ahead, take 3 hours to cut 4 joints to make one small door or such like. At some point though you'll want to get closer to the chinese guy if you want to have even a modest amount progress and enjoyment of completed projects.
 
custard":3hddkqwe said:
D_W":3hddkqwe said:
I sure could stand to learn a lot about what I could do more efficiently cutting tenons.

..............

Anyhow, these people gave an account of how they, as relatively inexperienced woodworkers, used a simple little home made jig that Richard Maguire designed to cut their bridle joints. They seemed to do a very accurate and creditable job. It occurred to me that if you can cut a bridle joint accurately with this simple jig then you could certainly cut a tenon.

It would be of huge practical help if, for example, one of them detailed exactly what they did and how it could be utilised for tenons.

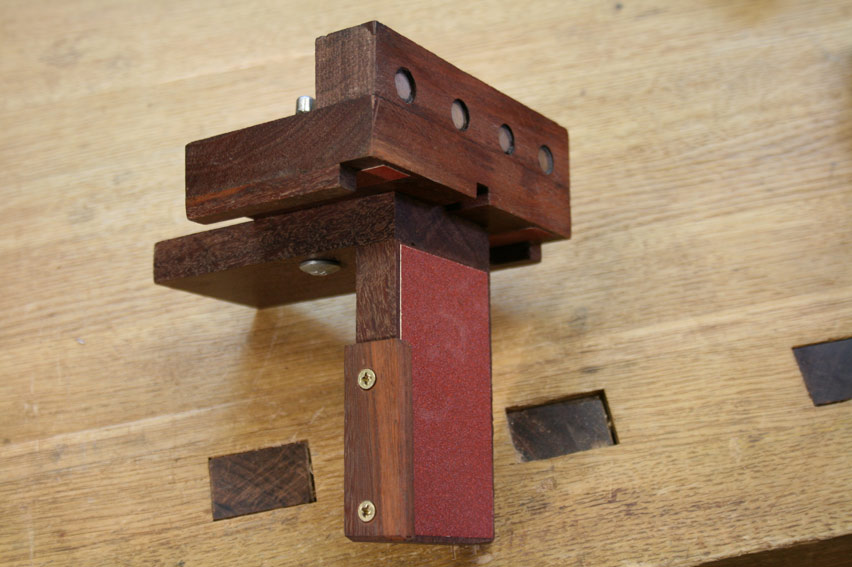
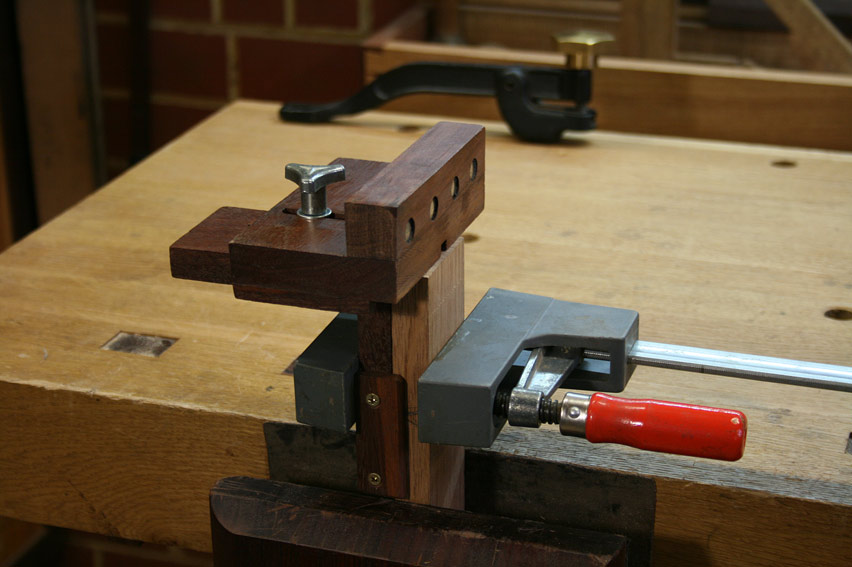
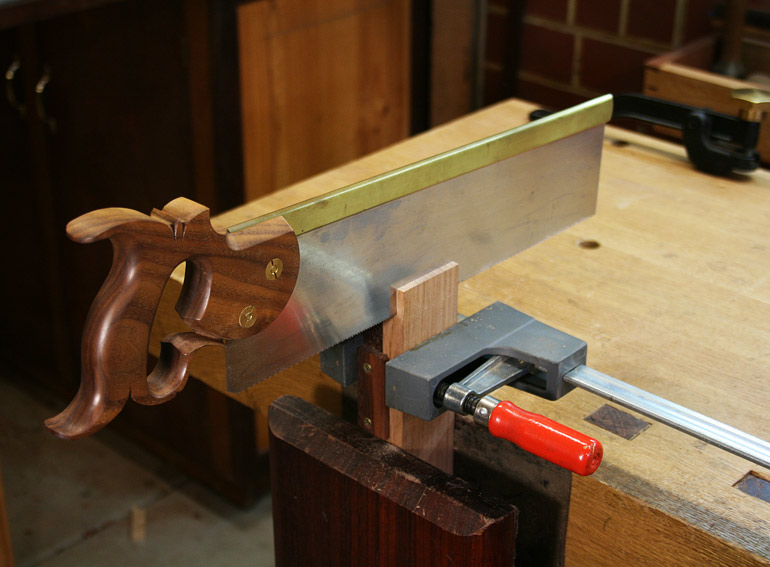
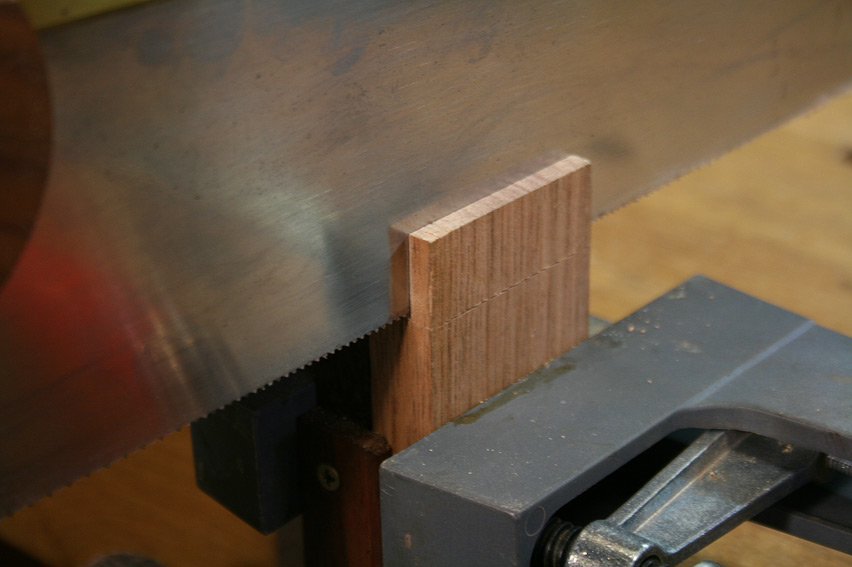
Custard, I designed a tenon guide for Lee Valley several years ago. They sat of a prototype they built, and could not make up their mind for a few more years. Eventually, they decided not to go with it. I subsequently put the design on my website ...

http://www.inthewoodshop.com/ShopMadeTo ... Guide.html

It is (says I modestly :) ) quite brilliant. Basically, it mimics hand sawing to guide the saw cut. One can use a spacer for widths, or saw to a line.

TenonGuide_html_25920fc6.jpg


TenonGuide_html_33b0e517.jpg


TenonGuide_html_29c40e46.jpg


TenonGuide_html_13e6575c.jpg


It guides the saw on cheeks and shoulders.

Regards from Perth

Derek
 
Back
Top