My TS-200 fettling and saw/RT bench build thread...

UKworkshop.co.uk

Help Support UKworkshop.co.uk:

This site may earn a commission from merchant affiliate links, including eBay, Amazon, and others.
Truth is I haven't given extraction a lot of thought :)

Up to now I've been using a 110v BVC industrial vac that I kept when the business closed. It has a 63mm inlet and just about keeps up with my planer thicknesser but it is definitely a vac rather than a chip collector.

I had (obviously wrongly) assumed that the dust would mainly be projected downwards and not necessarily be flung upwards and out of the slot again.

Got plenty of polycarbonate left so cutting some profiles and adding some silicone shouldn't be too big a job to seal the table to the chassis.

Thanks for the words of wisdom (though I still might try a test to see what happens :) )
 
I find the greatest use of these forums - apart from the obvious friendship this one excels in...is that it enables you to bypass the "I would have thought that would work" stage and get to the good result stage by listening to those who have "been there done that" before.

I have saved a huge amount of money not farting about with possible solutions and jumping right to the best answer...simply by taking the advice of the expert guys and gals here....
Just a thought.... :wink: 8)

Jim
 
Would it be possible/worthwhile to fit some sort of brush strip round the banana slot to reduce airflow through there? Or even a piece of leather or similar with a curved slot to allow movement?
My ancient Lurem spews dust in every direction, and it's taxing my ingenuity to work out a way of fixing some sort of extraction, so this is a very useful thread.
 
dickm":3pjf1k10 said:
Would it be possible/worthwhile to fit some sort of brush strip round the banana slot to reduce airflow through there? Or even a piece of leather or similar with a curved slot to allow movement?
My ancient Lurem spews dust in every direction, and it's taxing my ingenuity to work out a way of fixing some sort of extraction, so this is a very useful thread.

I looked at that - but eventually decided that it would be more airtight to just stick a bit of duct tape over the slot - i dont tilt the blade very often ( tend to use the scms for mitre cuts) so it makes more sense to just tape it up , and on the rare ocassion i want to tilt, just rip it off , move the handle and retape - at £1.20 for a 100yd roll duct tape is still a cost effective solution.
 
RobertMP":324r7ak4 said:
I had (obviously wrongly) assumed that the dust would mainly be projected downwards and not necessarily be flung upwards and out of the slot again.

chances are that quite a lot of it does go downwards but it very much depends what you are cutting - I ripped some mdf sheets the other day on my 419 without the dust extractor turned on ( My DE at home is in a state of flux as i'm in the middle of swapping extractors) and dust went ever which way - I was very grateful i was wearing my powercap which is usually reseve for turning.

I think quite a bit is also thrown forwards and also some stays on the blade for its full revolution before being projected upwards.

Course the other option for dealing with the above table dust is above table DE - but the extraction via the crown guard on the ts200/k419 is pityfull - imo the pipe is too small, our intention is to replace the crown guard with a suva style guard with a 63mm uptake which will plumb into the ducting via a blast gate seperately to the below table extraction.

(Ducting wise we are going to be running a twin motor DX5000 as the principal extractor (if this proves insufficient we will get a second DX5000 or camvac and split the ducting to machines between them - but we are a different fish of kettle to you are we usually have several people in the shop and multiple machines on at the same time) with a free standing RSDE2 for small more aplications like the ROS
 
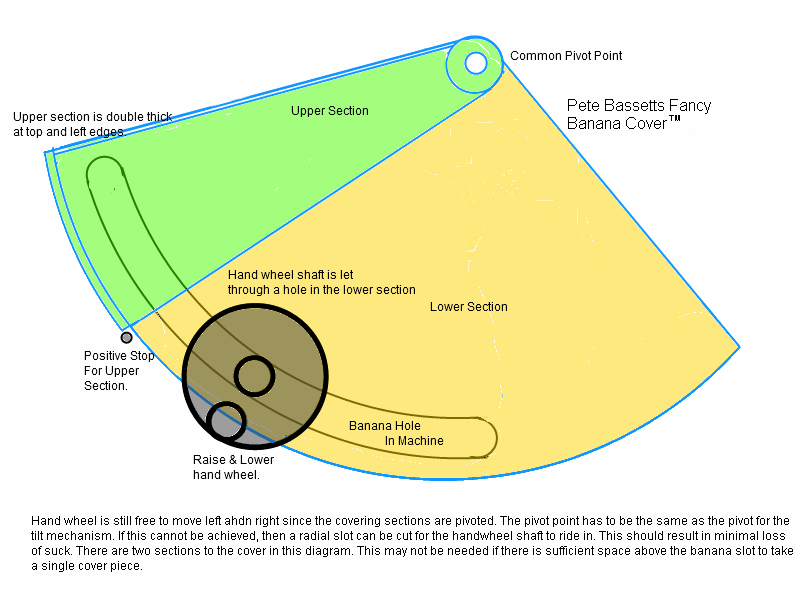
A slightly more complicated solution to the banana slot problem.

Some pivoted perspex cover pieces that follow the handwheel when tilting.

The yellow piece is directly next to the outside sheetmetal of the machine. The green piece sits on top of that.

rzROm.gif
 
I'm just trying something similar now :)

Problem with your idea is the locking handle for the tilt gets in the way as it is kind of above the height adjuster wheel. Hoping my idea gets round that.....
 
RobertMP":2p8wopsi said:
I'm just trying something similar now :)

Problem with your idea is the locking handle for the tilt gets in the way as it is kind of above the height adjuster wheel. Hoping my idea gets round that.....

True - but i think i might give petes idea a spin on my K419 - as the 419 has one handle for height and tilt and thus doesnt have the same issue with obstruction.
 
RobertMP":1a838q4o said:
Problem with your idea is the locking handle for the tilt gets in the way as it is kind of above the height adjuster wheel. Hoping my idea gets round that.....

Ah, not having a tablesaw to look at, I thought something might end up interfering with the movements.

big soft moose":1a838q4o said:
True - but i think i might give petes idea a spin on my K419 - as the 419 has one handle for height and tilt and thus doesnt have the same issue with obstruction.

Will be interested in seeing how well it works. BSM, you will have to pay quite close attention to the relative sizes of the sections and where you drill the hole for the handwheel shaft as these dimensions determine the overall coverage and clearance needed top and bottom. My drawing is very much not to scale. :lol:
 
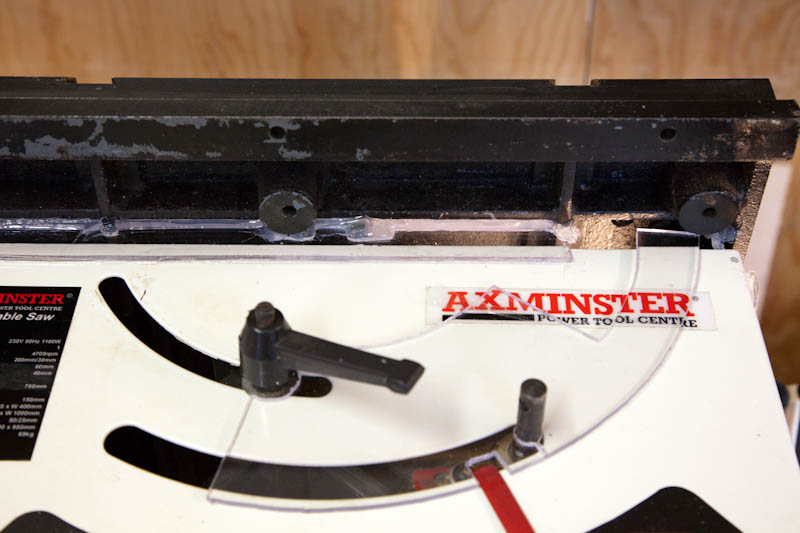
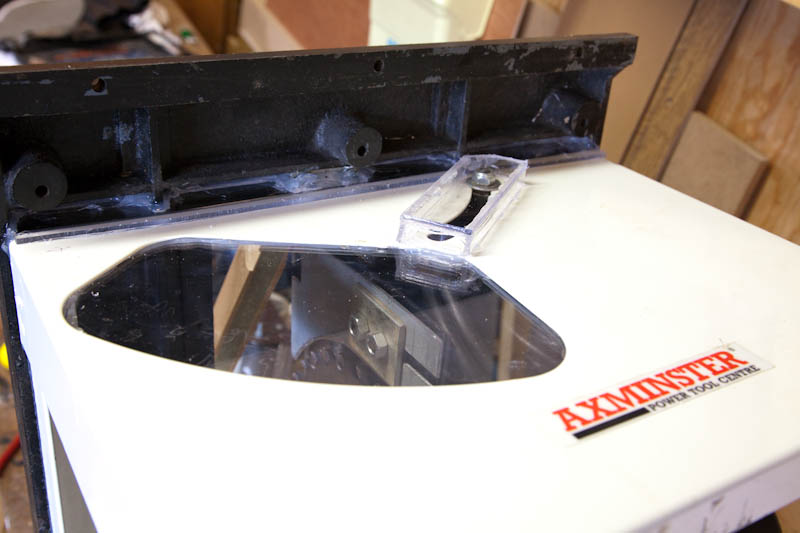
Makrolon to the rescue....


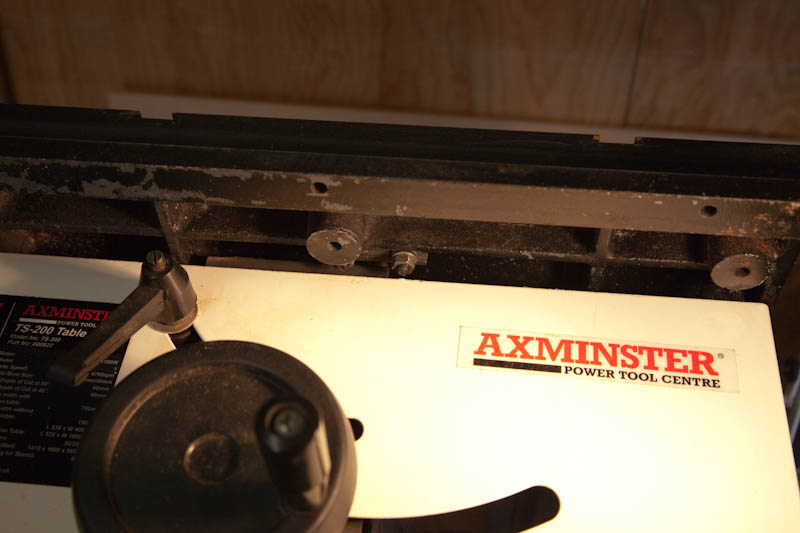
So there is a gap between the webbed underside of the table and the top of the chassis
ts-32.jpg


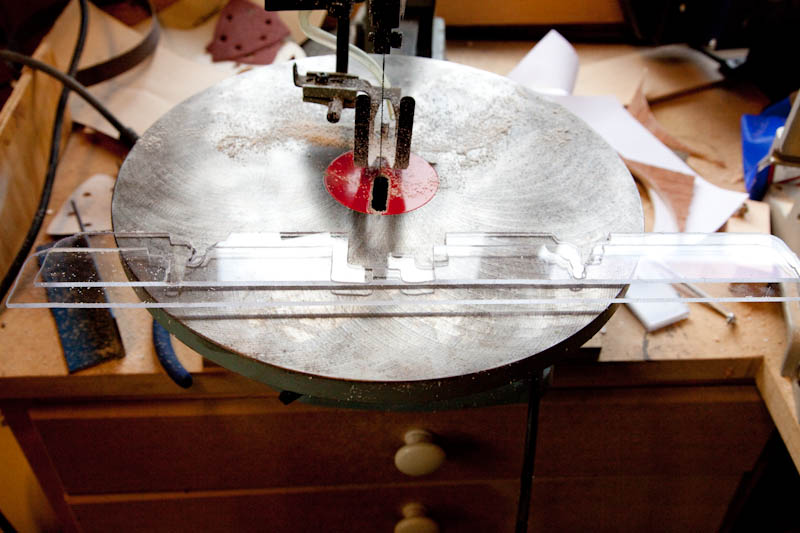
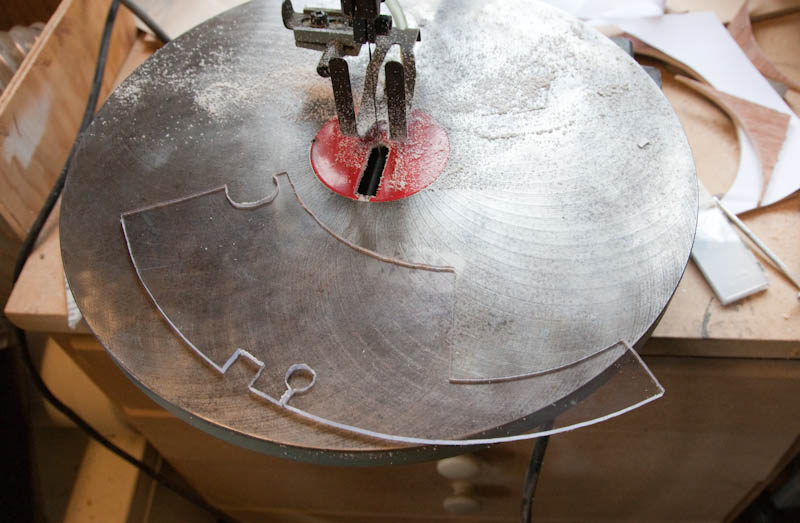
So I found a use for the scroll saw I was given recently and made a pair of infil strips
ts-33.jpg


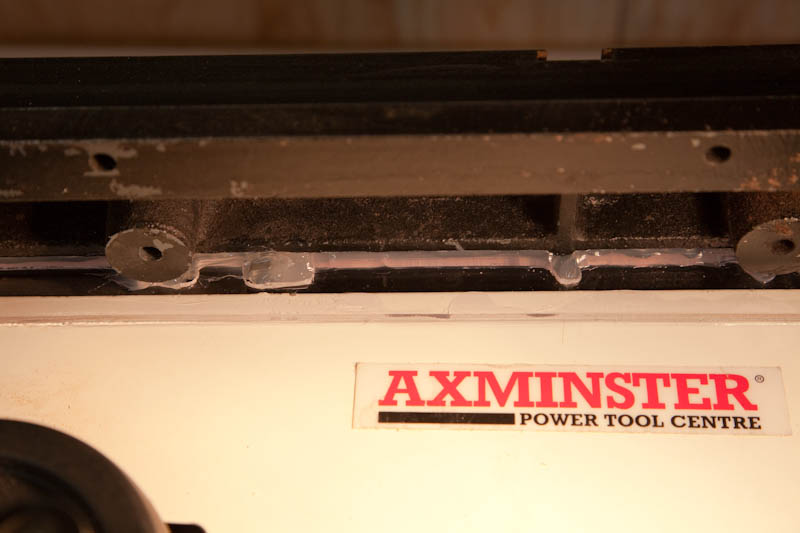
Which I then siliconed n place.
ts-34.jpg


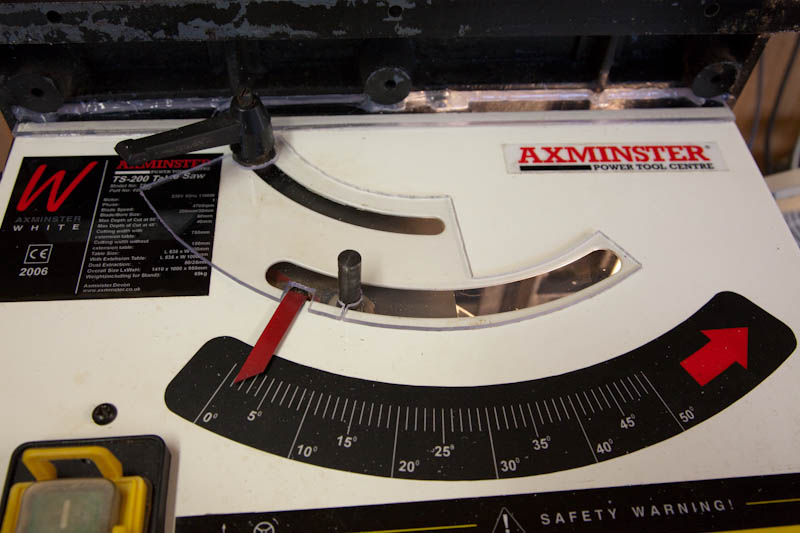
Then on to my idea for baffling the banana slots. Took longer to draw up the paper template in sketchup than it did to make it :)
ts-35.jpg


Closes all the opening in the 90deg position.
ts-36.jpg


And enough in the 45 degree as it will not get used there much. Had to hack away a bit of my sealing strip to clear it but i can get round that.
ts-37.jpg


Plan is that a simple spring between the polycarb plate and the back of the handwheel will keep it in place. being cut to fit round the washer on the locking lever stops it rotating out of positon so no pivot needed.

Other end to do next :)
 
nice - we fixed a bit of ply to the underside of the table so that it is flat rather than webbed anmd then sealed the gap between the ply and the side of the saw with duct tape - yours is nicer to look at though
 
Not much more to add..

the other end is sealed now -

ts-38.jpg


The two side panels are back on now and I've fitted and squared up the 2 aluminium bars that takes the fence and extension panel. Now to take a bunch of measurements so I can draw it up and work on the 'BSM' style unit to take it.
 
RobertMP":2p0xeayx said:
and work on the 'BSM' style unit to take it.

nice tho i take no credit for that design - I think it was tom who had the idea originally, tho he hasnt actually done it yet.

(also the unit ours is in used to be a norm style router table which i bought off paul J together with a T11 router - we just butchered it to take the ts , then cut the top to fit in the ext table)

btw a standard piece of kitchen worktop is exactly 18mm too thin to be at table level when fitted in the ext table supports - fortunately Mdf comes in 18mm and we had a bundle of offcuts kicking about, so it was dead easy to make it fit exactly.
 
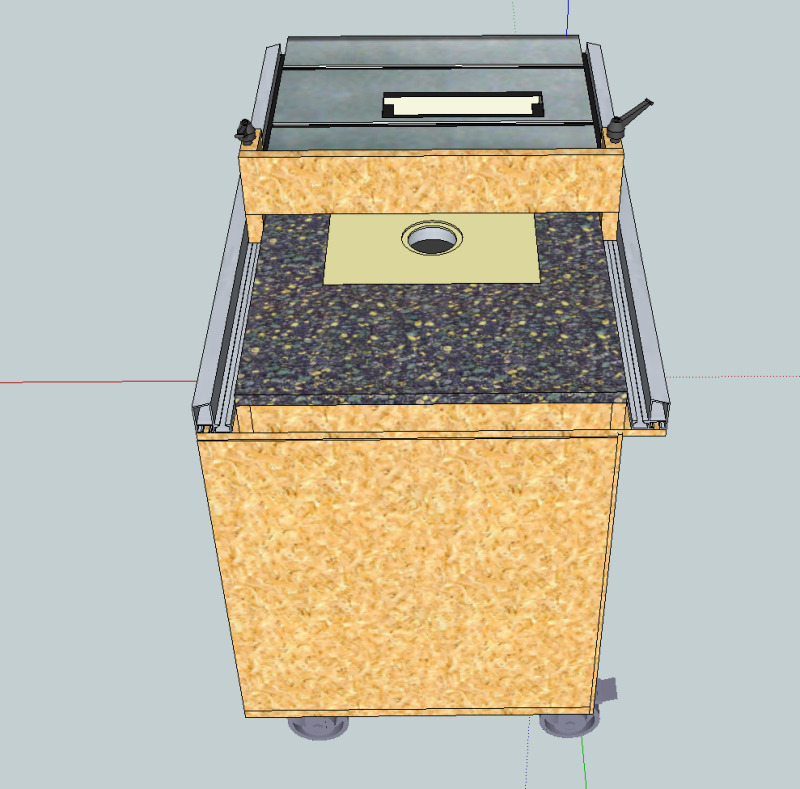
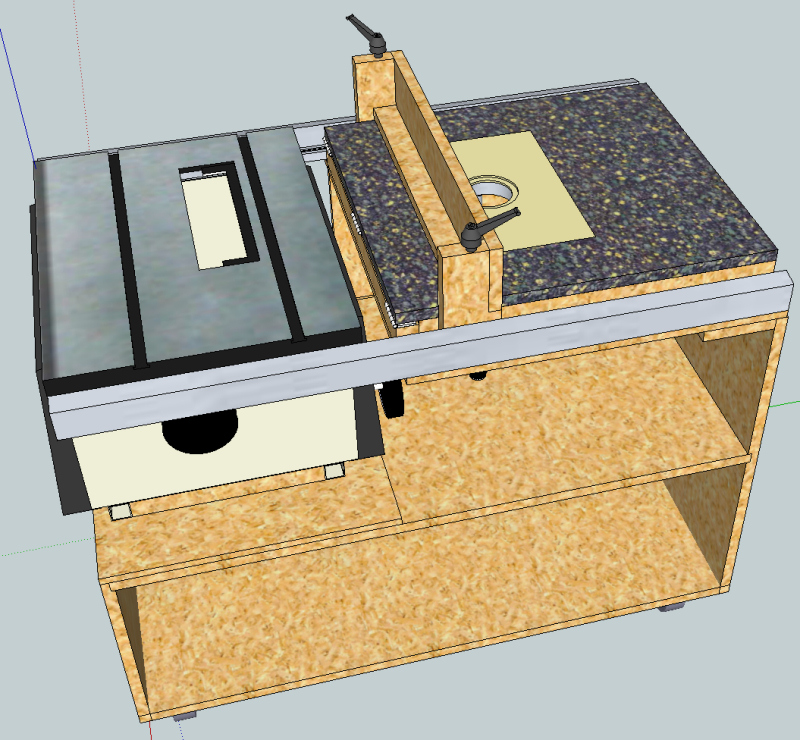
Well I've been drawing this cabinet up for a while now and thought it might be an idea to see if there are any pifalls i've not seen before I get too much further :)

I've ordered 100mm castors and a table insert plate but not bought any sheet yet.

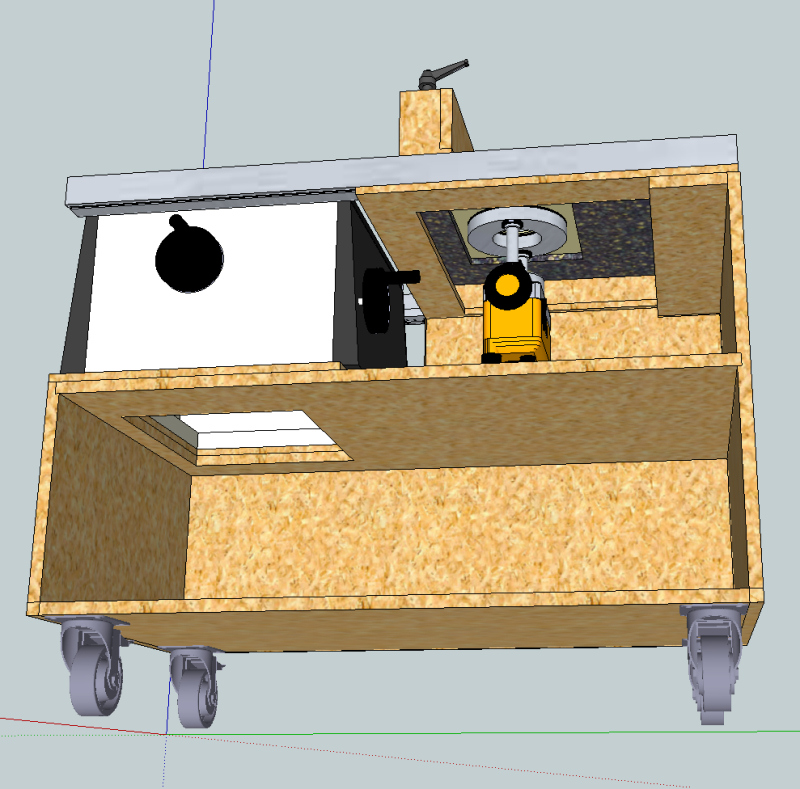
So here are some screenshots from sketchup. the router and castors are downloads and not exact representations.

The extrusions on the saw have some useful looking grooves in them so I was thinking of using them to fix a fence to using long T headed bolts - maybe studding welded to plates or something.

fence design can of course be developed more.

ts-39.jpg


Need to fabricate some kind of dust collection hopper to go under the saw position.
ts-40.jpg


idea is the saw sits on a flange plate base that allows it to be removed from the cabinet for maintenance - along with the router table top and under frame.
ts-41.jpg


Comments welcomed :)
 
You're really showing me up Robert!! ;) I love these mods that you're doing. Makes my efforts look puny.

One suggestion. The tilt locking lever, you might want to change that for a knob of some sort. In use, I find that lever incredibly annoying. In fact I find them annoying in general. Much prefer a knob unless absolutely necessary. You could make them like SteveM does with ply or hardwood or just buy one.

Any chance I could borrow a copy of the banana slot cover SU template, please? I could have sent you my SU file for the saw, tho it looks like you've done a good job.

This is how far I got with designing my TS200 cabinet

ts200_cabinet.png


I like your idea for the RT Fence, but you need to think about whether you're going to get on with the TS200's 'fence'. Personally I thought it was diabolical. The upgrade fence I put on is much nicer in use. But horses and courses. At the moment I just clamp my old RT fence to the TS fence. Works perfectly and I will continue to use it when I re-make the RT fence.

Also I replaced both side panels with ply, which will give me a bit more room inside the cabinet. All I had to go was chop a bit off the bottom of the motor assembly.

Keep the pics coming, enjoying watching your take on this.
 
The existing fence does look a bit crude. adding the fence that you did shouldn't make any difference to the cabinet I'd have thought.

The router fence could be turned round and used as a full width fence for larger panels as long as I take the time to square it up maybe? In any case the idea was to just slide the plate nuts out of the extrusion ends along with the fence when not in use for routing.

Print the template full size, cut it out then check it to the saw - it wasn't quite right and I pencilled the changes on the paper template before cutting the plastic. file is here. Think it was around the locking lever it was out.

Looking at your sketchup the rear extension support is something i'll have to give some thought to as well.

Solving design problems is what I've done all my working life..... just in sheet metal instead of wood :)
 
one possible issue with the fence, i built almost exactly the same unit as you are planning for my ts-200. The fence however I put in runners and this gave me one benefit which I hadn't foreseen :

i can lock off one side of the fence, and then make very fine micro adjustments by moving the other side only

however, I can see the benefits of your design, if you do come up with a solution I may be copying it :D
 
Thanks for the file Robert.

The idea with my flip up out feed is that it pivots up into place without needing hinges. But I've not got as far as firming up the technicalities yet. Whether or not I'll ever manage to get it built, remains to be seen ;)
 
wizer, i like your outfeed idea, its a problem i've had with the unit since the start and you've given me a possible solution.

i'll try and get some time in the shop this week and see if it will work for me
 
i'll get some pics of our outfeed next time i'm at the work 'shop, its very similar to what top is proposing except that its on simple hinges and has a gate leg on a castoring wheel for support

i like what robert is proposing for the fence too - i may do that on my 419.

by the way robert did you ever get a mitre guage ? - if not i may have a spare as i seem to have two with the 419 -( tho I'll need to take it to work to check to see if it'll fit on a ts200)

by the way if either tom or robert could send me their skippy for the ts200 - ( bigsoftmoose at googlemail .com) then that would be great.
 

Latest posts

Back
Top