Inca Table Saw Restoration

UKworkshop.co.uk

Help Support UKworkshop.co.uk:

This site may earn a commission from merchant affiliate links, including eBay, Amazon, and others.
Nice to see a lightweight piece of engineering like the Inca being restored for a change. I remember Inca having quite a reputation for quality in the seventies and early eighties and I know that Startrite in Gillingham certainly imported this model (rebadged Startrite and on a steel base) in the 1960s - probably when your saw dates from.

jimi43":1ajdmyyv said:
The mechanism for raising and lowering the blade is really beautiful...it actually raises and lowers the table....and the tilt does the same...I understand this is now banned in Europe...why would that be please?
This was quite a common mechanism for industrial rip saws prior to WWII, however in the 1930s Wadkin (and others) adopted a rising/falling arbor mechanism. This was more expensive to manufacture but allowed the user to build a run off table behind the saw, a much safer way to handle long rips. It was to take many years until the run off table became a legal requirement (I believe 1974 here in the UK). Obviously with a rising/falling table it is difficult to provide a run off table.....

dickm":1ajdmyyv said:
Do any of you Inca fans know why their small bandsaw was "back-to-front", with the neck on the right hand side rather than on the left as per usual? I think I've read somewhere that this is normal for butchers' saws, and the one in our local butcher is certainly that way on.
Not only for butchers saws. If you're ever lucky enough to find a proper sawmill with a Robinson resaw (or band rack) you'll find it is also arranged that way as are Stenners. Only "standard" bandsaw I can ever recall seeing like that was a Belgian Danckaert machine.
 
FatFreddysCat":2rfbkia1 said:
This was quite a common mechanism for industrial rip saws prior to WWII, however in the 1930s Wadkin (and others) adopted a rising/falling arbor mechanism. This was more expensive to manufacture but allowed the user to build a run off table behind the saw, a much safer way to handle long rips. It was to take many years until the run off table became a legal requirement (I believe 1974 here in the UK). Obviously with a rising/falling table it is difficult to provide a run off table.....

Yes...this was the subject of a discussion I read on the possible demise of these little machines. My view is that I doubt if I would be cutting large sheets or planks on this baby...and if I did want to venture that far I would use an adjustable roller rest as the outfeed...indeed I use one on my larger table saw anyway...

Cheers

Jim
 
Jim,

Many thanks for the Pictures, your knife is indeed much thinner than mine, - I'll have to modify it. The bronze washer although it looks like a bodge I suspect it is custom made on someones lathe, as if it wasn't the exact correct size and depth it just wouldn't work.

Sorry its taken a while to reply as I have two very small kids so get very little time in the workshop.

I will put up some pictures of the info and saw midweek sometime when I get the chance.

As to the bandsaw I'll ask my father in law - he has one also bought in the 70's and just as accurate/nicely made as the table saw. I've used it a few times, spotted one on ebay a while ago - went for 75 quid if I recall correctly, it was collect only and in Norfolk - a good drive from me.

More Later

Jon
 
Pete Maddex":28d85vra said:
Hi, jimi43


Can you get hold of a blade with a smaller hole and have it drilled out? I have had this done on a couple of blades. Its east to do you need a piece of bar the same size as the existing hole clamped in the chuck to center it, clamp the blade down swap to the correct sized drill and off you go, any engineering firm will be able to do it for you.

Pete

I've tried this and have a rather cautionary tale to tell: I had an almost new stanley combination hollow ground with a 10mm hole and used a cone drill to try to open it up to 15mm, after a while I had got to about 13.5mm I looked up at the drill press and where it had been shiny tool steel it was Rusty!!!

I can only think that the combination of the Chromium in the blade with the TiN in the drill bit, the cutting fluid and the considerable head generated caused some kind of noxious gas to be generated - possibly nitric acid -

Luckily I was wearing a full plexiglas visor so any fumes I might have breathed had to work their way round the back - So my advice is give it to an engineering shop to do!!!
 
I've not posted pictures to a forum before and don't seem to be able to get them to display in the page - so you'll just have to visit these links:
http://www.flickr.com/photos/mcclellans/4047869322/
http://www.flickr.com/photos/mcclellans/4047127895/
http://www.flickr.com/photos/mcclellans/4047126855/
http://www.flickr.com/photos/mcclellans/4047125789/

There's the Saw, Its the original as bought by my Father in Law on the restored and rewired startrite base.

Note the home made micrometer - something I knocked up on my lathe, the Fence Locking Knobs are home made too.

Also there is the original Mitre Guide.

Hope that worked, the brochures are going up next!!

Jon
 
Good LORD Jon...what on earth do you use as cutting fluid that creates nitric acid???

:shock: :shock:

A slow cutting speed with sharp reamer should not have created heat. As you know the tempering of the blade was probably compromised anyway. I am not that keen on doing that myself...rather I would prefer to shim.

So that base (which is the same as mine) is a STARTRITE one is it? I note in the US pics on the Yahoo group and in the great promo pic you posted, that the standard table in Europe is a wooden square one with the motor mounted on a shelf below.

The metal one...was painted in what looked like STARTRITE hammer finish...it did not match the INCA green...it almost does now on mine.

That guy with the pipe is using a table saw in the most dangerous way I think I have ever seen...don't ya just LOVE the 60s!!! :D

I think the reason your pics did not post before is you may have been below 3 posts. They should post ok now...

Thanks for posting them!

Cheers

Jim
 
Yes the reamer was brand new and the drill was on the slowest pully, - I was taking it very slowly to try to preserve the temper of the blade, Cutting fluid is just the normal stuff you get from screwfix or axminster. - I am just guessing it was some kind of acid - chemistry O level is now a distant and very murky memory.

The Base is a Startrite for sure - yes and mine too was hammered green with lots of rust, I took the removable blade cover from the saw to the local paint supplier shop and had them match the shade.

Jon
 
165, 180 and 184mm industrial grade, hand smithed, Sheffield made blades available here and sharpening services for the same (including return postage) here. It may be cheaper to go for disposable blades in the short run, but if the machine is a keeper then resharpenable industrial blades will give you the full benefit of the tool's stability and save you money over time.

A very impressive rebuild that really shows what can be done to conserve tools that were built right in the first place. I take my hat off to you.
 
You NAILED the supplier there Matthew! Brilliant!

I think I have a fair amount in PayPal at the moment and I may treat myself to a 30 tooth 15mm job....£43 is not bad at all!

I think I will also contact them to see if they have a suggestion for shims so I can use other blades if I need to.

Thanks for the superb links and the very kind words....

Jim
 
Jim ,

Very very nice restoration !
I was trying to get some info on inca saws on the web and I stumbled on your forum post .
I am a satisfied owner of an inca planer ( already made in France factory) .
I had it for 15 years and the precision is great .

I own a old Kity saw similar to the inca . It also has a 15 mm arbor .
Recently I made some reduction bushings ( 30 to 15mm ) myself in a fiberglass material .
I own a home built cnc router and the precision I get was enough to use it with standard saw blades .

You can buy a reduction bushing in France for 5 euro .
Here's the link .
http://www.hmdiffusion.com/Bague-de-red ... -4109p.htm

If you want I'll send you some of my home made one's .
The pictures of your restoration have inspired me and I hope I'll be able to find an old inca saw in the near future .

Greetings ,

Paul
 
Hi Paul

Thanks for the kind words and pleased that this has given you the inspiration to get your own saw. As I have said before...these things are beautifully made and some of the help I have had here has inspired me also to make some slight improvements...particularly in the micro-adjuster which, on mine, was busted and so I am not really worried about originality (not that I was anyway!)

Thanks for the links and offer for the spacers....let me see how the new saw blade which I have ordered pans out....I ordered a custom one from Workshop Heaven - the link that Matthew put me onto...and am looking forward to seeing how that cuts..

Can you post some pictures of your jointer please?

Cheers

Jim
 
Thanks DaveL , the forum looks great.

Jim ,

Here are some pics of some machines I have.
I actually bought a secondhand INCA universal saw ( 341.017 ) this afternoon . It is a bit rusty but it still works . some bits and pieces are missing . (splitter etc )
I made a test cut with it while still on the wooden stand and it already worked quite well (see ad picture for model ) . I'll have to take of the rust and paint it here and there .
It's a very nice little machine . I got it with the wooden stand ( mostly beech ) but the parts that are particle board have been too humid and are swollen . I'll replace that with some plywood I think ."
Tomorrow I'm going to see another Inca machine this time it's a "major " model (341.018 ). Maybe I'll buy it . It's really a coincidence that there are two machines on sale . Somewhere in the north of Holland they sell one very nice one too .
For my luthiery work I could use these little saws very well . I would set each one up with a dedicated blade for certain tasks .
The jointer planer I own is already manufactured in France . I bought it new 15 years ago . It has a TERSA (3 knives ) cutterhead and it has two feed speeds .The precision is great .
In the picture I stuck a piece of melamine to the fence to have a bit more support .
The drive mechanism of the planer broke ( a nylon wormgear ) . I decided not to use this feature anymore because it was a bit too much work to convert it from jointer to planer .
I bought myself a portable Dewalt planer wich works very good ( except for the noise it makes ).
You can also see a picture of my Kity 617 saw ( modified ) . I got it together with a few other kity machines ( al were in bad shape ). I was able to get the saw working but it vibrates a little . The Inca is cast and the kity is made out of bend plate steel .
Here are the links to the pics .
http://www.flickr.com/photos/28378319@N00/4069797320/
[img]http://www.flickr.com/photos/28378319@N00/4069795422/in/photostream/
[img]http://www.flickr.com/photos/28378319@N00/4069038043/in/photostream/
[img]http://www.flickr.com/photos/28378319@N00/4069797138/in/photostream/

I'll keep you updated about my INCA adventure.

Greetings ,

Paul
 
jimi43":1uzf3pfz said:
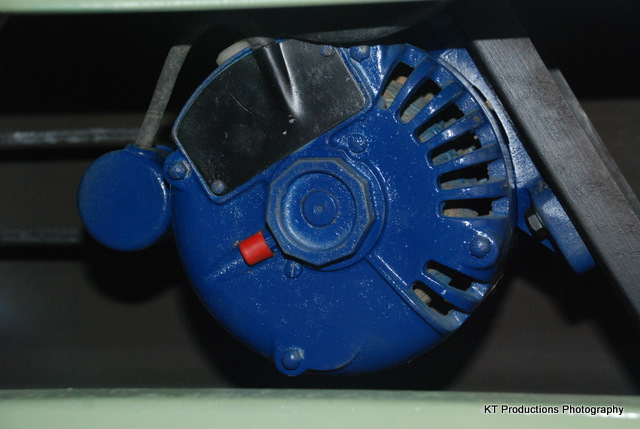
The motor was not an INCA one so that became enamel blue...just for a bit of contrast...

DSC_0004.JPG

The Inca Combi I have just acquired also had a UK Gryphon Motor. I assume that the machines were imported and then had local motors added to ensure that they matched the local standards. The paint on the motor is a slightly different texture and colour than the rest of the bodywork.
 
Any possiblity of a picture or three of yours frugal when you get a chance?

If that is the case I shall have mine out again and respray it. I think I may now have a source of STARTRITE metalic hammered green...(will find out this weekend) and in which case....I would like the whole base to go back to that colour.

Also - although the switch unit was in a dreadful state and much better now...that too could do with being that "green grey" that originals are. A kind of "dirge"....or is it "bilge" colour!! :)

I can't wait to see more pics of your acquisition frugal.

Jim
 
Hi Paul

The links didn't come out but I cut and pasted them and found your pictures.

This is some beautiful equipment....I am going to work now but will comment further later....

Edit...squeezed in a few minutes to look at your pictures and a couple of questions too....

Can you take and post a picture of the extension table to the right of the main bed...how it bolts on and a picture of the underside of it. I am thinking of getting or making one and this would help me.

Also in the picture if the 341.017...I assume you are cleaning it there...I take it you are not using it off the bench like that...?

Again...great pictures and thanks for posting


Cheers

Jim
 
jimi43":13qpnab8 said:
Can you take and post a picture of the extension table to the right of the main bed...how it bolts on and a picture of the underside of it. I am thinking of getting or making one and this would help me.

I will try to get some more pictures as soon as I can. The whole thing has been stripped down so that I could get it on it's back to get the motor out ;)

In the mean time. The picture below shows the extension wing on the left hand side. The fence is bolted onto the main table with the two left hand bolts, the fence then extends about 9" to the left of the main table. the extention wing is then attached with a single bolt to the fence.

In order to move the wing to the right hand side, you can undo the left most bolt; remove the wing; slacken the two remaining bolts; slide the fence all the way to the right; tighten up the bolts; attach the wing to the fence that is now pretruding from the right hand side.

4060811103_6f073809fa.jpg
 
Oh I see...so the extension table is not connected to the main table side at all rather it lays in the L shapes of front and back rails...is that correct?

Jim
 
jimi43":1pall8x9 said:
If that is the case I shall have mine out again and respray it. I think I may now have a source of STARTRITE metalic hammered green...(will find out this weekend) and in which case....I would like the whole base to go back to that colour.

If you do find a source for it then I would certainly be interested.
 
Back
Top