How good are button jaws?

UKworkshop.co.uk

Help Support UKworkshop.co.uk:

This site may earn a commission from merchant affiliate links, including eBay, Amazon, and others.

LancsRick

Established Member
Joined
30 Dec 2011
Messages
969
Reaction score
19
Location
Lancashire
I've got a set of Axminster button jaws that I've been meaning to try out, but was wondering how good they are for the complete bowl turning process. The reason I'm asking is because I have some blanks that are already rounded and 100% decent wood, so I'm loathe to waste material turning a spigot on any of them. Equally, for more delicate pieces, I don't want the depth restrictions that a recess in the base for dovetail jaws would impose on me.

Thoughts/experience?

Thanks!
 
No, i wouldn't. You can only take quite light delicate cuts, if you try and hollow a bowl blank it will probably come off. I've had a couple come off just doing the bottoms.
 
Agreed. Button jaws are for removing unwanted chucking points etc and should be used with the lathe running slowly, fine cuts with sharp tools.

To solve your problem, turn a very shallow recess and incorporate the design into the foot of the bowl. The shallower it is, the less it will affect the depth of hollowing although personally I wouldn't go less than 2 or 3 mm for safety sake and particularly if the bowl is big (more dangerous).

If you're so hell bent on not wasting any wood to the extent of doing without a recess then hot melt glue a sacrificial base on and use that for the chucking point and turn it off at the end.
 
+1 for a hot-glued sacrificial base... and as above regarding the button jaws.
 
+2 for ^^ - easy. Any old bit of scrap, just turn it off when you reverse it. Or a brown paper joint.
Or, of course, you can use button jaws and a tail centre until you get right to the end then take the tail centre away.
 
Button jaws have their uses but I wouldn't use them for reverse chucking a bowl. There are easier, quicker and safer ways of doing it.

Don't be concerned about using a few millimetres of that precious blank to create a spigot. You can either incorporate the spigot into the design of the bowl by re-turning it into a foot after you have turned the rest of the bowl or you can blow the expense and just turn it away! Generally trying to do otherwise compromises the shape and design of the bowl, which is much more important than wasting a tiny bit of wood!
 
Good counsel in here, thanks. I would never have tried the hot glue method without it being suggested, I never would have thought it strong enough.

Part of the issue is I've got a mentality to make fairly big recesses, so I need to stop being overkill!

Cheers.
 
LancsRick":3naxk17j said:
Good counsel in here, thanks. I would never have tried the hot glue method without it being suggested, I never would have thought it strong enough.

Part of the issue is I've got a mentality to make fairly big recesses, so I need to stop being overkill!

Cheers.
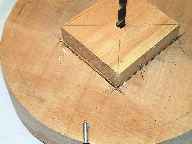
Starting with a Suitable Blank and not wishing to penetrate the surface with fixings I attach a scrap block to take a worm screw.
First action is to determine the centre of the blank if not previously marked during cutting.
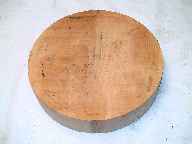
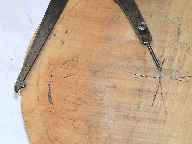
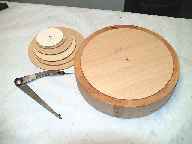
I use OddLeg callipers and scribe centre or place pattern discs visually in centre and mark through centre hole. I then use a spur bit to drill some scrap and using the drill bit locate the scrap on the centre and mark the blank and scrap with a pencil witness marks to aid location.
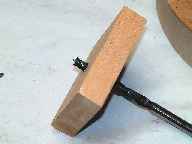
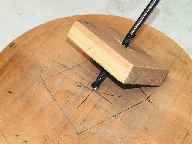
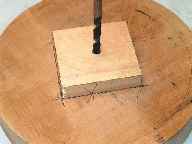
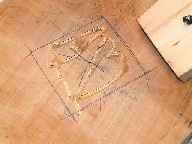
I then apply Hot Melt Glue to the blank and using the drill bit as before press home the scrap wood, applying a little extra glue along the edge joins if felt necessary. (Glue needs to be very hot at the bubbling stage, not just flowing)

This results in a blank that runs true when mounted on the screw chuck, requiring little truing up.


Cole Jaws and buttons can be very useful,See this WIP but caution is needed with direction of turning forces when using the Axy supplied soft rubber buttons.
In the WIP example the buttons used are much harder rubber and forces are in the main pressing towards the chuck, the majority of my turning with Cole jaws is done with home made buttons turned from harder plastic (old chopping boards for instance) and stacked on longer bolts or contoured to retain the piece in question.

For a large heavy blank I would always use the tailstock with padded revolving centre to keep the blank pressed towards the chuck whilst working on its periphery to true up or form a holding lip on the rim.
 
LancsRick":2yojzx1n said:
Good counsel in here, thanks. I would never have tried the hot glue method without it being suggested, I never would have thought it strong enough.

Cheers.

At our club meet last week the demonstrator (live) hot melt glued a circa 15" disc (like a platter blank) onto a chuck held backing disc by just squeezing it round the outside edge. That is to say no glue at all got behind the front disc and lay on the actual mating faces of the two bits of wood. I was truly amazed to see what was essentially a layer of "mastic" made from hot melt glue hold this arrangement steady enough to turn. Furthermore, he didn't even go right round the circumference, instead just piped 4 sections and the rest was left unglued.

To summarise, imagine two 15" discs of plywood about an inch thick...you glue one to t'other but no glue lies between them, only on the circumference.

I was very impressed with the holding capacity of hot melt glue!

He did it that way because he needed to remove it at the end of the process, which he did using a paint scraper.

Also, you'd be surprised at how shallow a recess is needed to get a secure grip with dovetail jaws. Try measuring one at 3mm next time you do a turning but remember, light cuts with sharp tools is always the caveat.
 
I regularly use hot melt to tack packers onto uneven blanks held on screw chuck or Cole jaws or Secure extended Clamps used with Cole jaws.

When turning things like large diameter thin platters Hot Melt can be used on a finished surface to mount a spigot to hold the piece whilst turning the reverse, careful pealing off afterwards leaves little to be touched up on the finished surface.
 
If you look at our club newsletter Andy Coates demonstrated an emerging bowl. Look on the first page on the right you will see he uses hot melt glue on the edge of the piece once turned he then heats it up with a electric paint stripper to release it
 
Dalboy":j4mncwy3 said:
If you look at our club newsletter Andy Coates demonstrated an emerging bowl. Look on the first page on the right you will see he uses hot melt glue on the edge of the piece once turned he then heats it up with a electric paint stripper to release it

Yes, I forgot to mention our man did the same before he used the paint scraper
 
What's not been mentioned is the type of hot melt glue used but according to two of the demonstrators at my club you need to use the transparent glue sticks, not the opaque ones. Not used it myself, just passing on what I've been told.
 
woodpig":cgsdf15w said:
What's not been mentioned is the type of hot melt glue used but according to two of the demonstrators at my club you need to use the transparent glue sticks, not the opaque ones. Not used it myself, just passing on what I've been told.

Although there are differences In melting temperature and adhesion properties with the various specifications, for the temporary fix and then destroy bond for turning use I've not had any problems with the cheapest of cheap versions be they clear, opaque, white or yellow.
I buy in bulk whenever I see some at a silly price and know the stock is getting low.

Secret with them all is to get them to bubbling temperature so that they don't chill as soon as they touch cold wood and readily absorb any surface dust. Expect to have to wait at least 2-3 mins for them to set enough to prevent stringing if you were to spin the lathe.
 
CHJ":3a0dzfw4 said:
Secret with them all is to get them to bubbling temperature so that they don't chill as soon as they touch cold wood and readily absorb any surface dust.
I find it essential to use wood at 'normal' room temperature (about 20C) by bringing blanks indoors first to warm up when the workshop is cool/cold and to clean the blank of all dust very thoroughly before attempting to use HM glue.
But maybe my gun doesn't get as hot as others ?
 
I use hot glue sometimes, when I remember to restock. I have a handful of sacrificial blocks permanently screwed to faceplates and generally attach them with just a bead of glue round the edge. The main issue that I tend to have is centering the sacrificial block on the blank if I've done anything other than make the face completely flat and featureless, which I don't always want.

Sent from my LG-H815 using Tapatalk
 
Back
Top