Getting brass shiny

UKworkshop.co.uk

Help Support UKworkshop.co.uk:

This site may earn a commission from merchant affiliate links, including eBay, Amazon, and others.

Rhyolith

Established Member
Joined
15 Dec 2015
Messages
818
Reaction score
3
Location
Darlington
I am doing up some old footpumps with brass cylinders. I want to get the outside to a mirror like finish, how is this done?
 
Sand through the grits up to at least 1000 then polish, ideally with a power buffer.
 
Be careful about sanding: As long as they're solid brass you'll be fine, but some things, like brass musical instruments, have a shiny brass plating on the surface, with lower quality brass beneath. You can break through.

Personally I'd use only paste as the most aggressive thing.

The bottom line really is elbow grease - and surgical gloves. Brasso works well, and you can use a powered mop, but it removes the tarnish chemically and abrasively. The removed oxide is black and messy. You'll need something like meths to wash off the surface after the Brasso, to get the gunge out of the crevices and corners. There are less chemically active pastes too. I'd do gentle first, to see. Even cheap toothpaste can be quite effective, and toothbrushes are good for getting onto crevices (I keep old electric brushes for this).

You can use a polishing mop kit on a bench grinder, but you'll need eye protection, a mask, and old clothes or an apron - you have to stand in line with the mop and you'll get covered in muck. Also beware of the spinning spiral and any sticking out grub screws - if it catches the brass item it'll wreck it (DAMHIKT). Brass is very soft for a polishing mop though, and again there is risk of breaking through the surface finish.

It will re-tarnish quickly, so when done, clean and degrease thoroughly and finish with spray lacquer, ideally something cellulose (acetone) based, Wherever you spray needs to be very clean and with no draught, as any dust particles will show - you can't easily de-nib as if it's paint. You can pre-heat the brass gently in a clean oven (60-80 deg C at a guess). This helps the solvent flash off when you spray. You can also heat the can in a bucket of hot water (I weight them down with kitchen scales weights). To ensure a good finish, clean the aerosol nozzle in acetone every time you use it.

It's really hard to get a good result - you have been warned!

E.
 
They are solid brass cylinders. Their was some very shiny bits they met have been some kind of finish once but its long since been wrecked anyway... I just removed the lot with a power brush, white spirt and wire wool.

I am just looking for the final finish, unfortunately I don't have a power buffer or an spraying equipment (they are somewhere in the very very long list of stuff I might get at some point :) ) so only cheap manual options are available to me.
 
A polishing buffer on an electric drill would be a cheap option. You can get a buffer for around £3 from Halfords. I'm assuming you have an electric drill. That might do the bulk of the work for you. If you could stretch to buying a Dremel type tool you could get into awkward areas. I bought an Aldi one (Workzone) for about £25 and it has been very useful for occasional use. Comes with a three year guarantee.
I have a tube of metal polish called Solvol Autosol which seems quite an effective product. I don't know how it compares with Brasso etc.

K
 
I have an assormant of electric drills :) So will go with that option. Thanks all for the advice.
 
Rhyolith":pdxr93xu said:
I have an assormant of electric drills :) So will go with that option.
I don't think you'll regret that decision. I grew tired of polishing stuff by hand and with small buffers in a motor tool, quite apart from how long and tiring the process could be often I wouldn't get the finish I wanted anyway, so when I saw this Am-Tech kit on sale in a local tool merchant I decided to give it a try and I'm very pleased I did: Am-Tech Precious Metal Polish Set.

Don't be put off by the "precious metal" part of the title. that's misleading since it will do far more than precious metals.

So far I've used it for polishing steel, aluminium and brass and I haven't even had to use the white compound, the grey gives a finish that's as fine as I need. The three compounds are white, grey and black and I'm guessing the white is straight aluminium oxide, the black iron oxide and the grey a mixture.
 
If you're doing it by hand then, rub down with emery up to 1200 grit and then use "Duraglit". This is a wadding impregnated with a polishing cream, comes in a red and gold tin. Once nice and shinny give it a couple of very thin coats of laquer to keep that way. Thats what you probably rubbed off already.
 
I haven't thought of Duraglit in years! I'm sure I still have an old tin of it around somewhere, used to love using it for polishing white metal castings.
 
I have used a wire brush on a drill to clean off muck and oxidation (does brass oxidise? it certain had something that look like rust all over it) and then cotton buffer on a drill to shine it up. I worked down through the polishes from grey to maroon, though I am not shore there was much benefit below blue.

I am happy with the result.

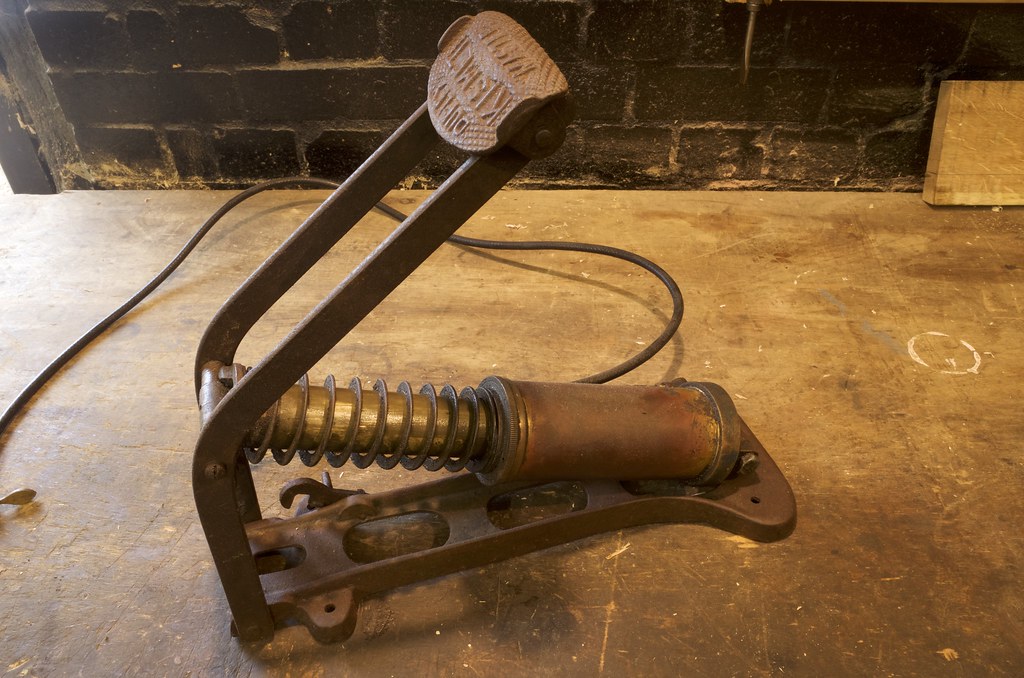
Before:
Duplex Kismet Master Ait Ministry 1944 (un-restored) by Rhyolith, on Flickr
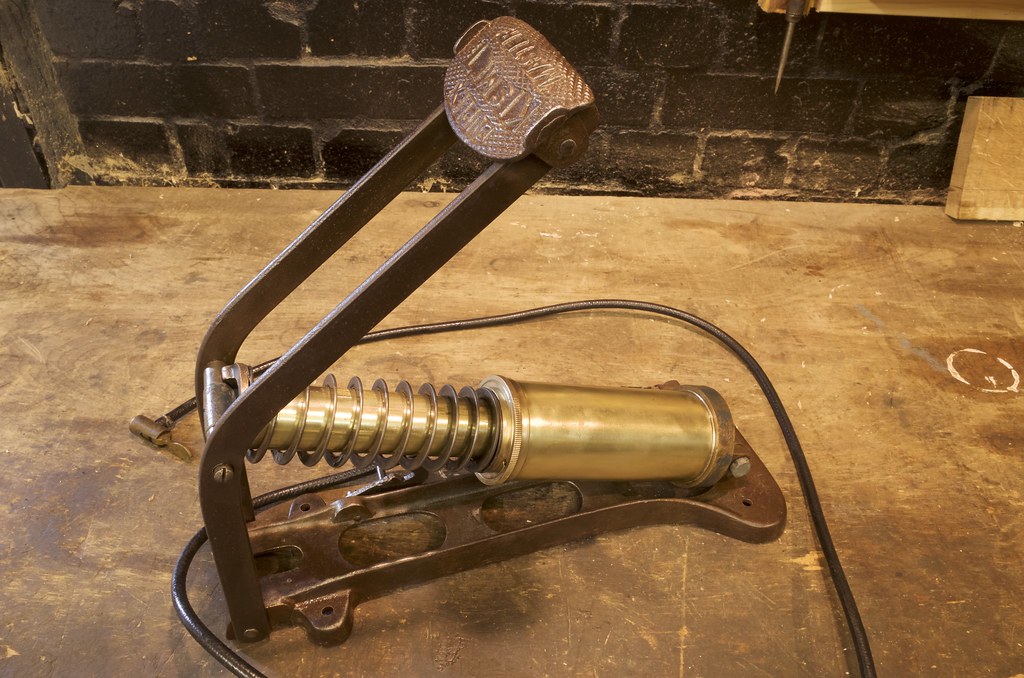
After
Duplex Kismet Master Air Ministry 1944 by Rhyolith, on Flickr

I think a lot more prephoration with grits over 600p (which I don't have) would be necessary for a truly mirror finish, however I do quite like the fact that only using flexible wheels to clean and polish results in the aged (little dings and marks) being retained, while also looking neat and shiny. I may try to get a true micro finish on another one out of curiosity, but I like this result and how its quite quick to get to it.
 
Stop there!

Brasso and an old bedsheet should take you the rest of the way, if you really want to.

Clean it down thoroughly afterwards with meths or perhaps acetone (watch out for anything plastic or rubber that might be affected) then use spray lacquer from a can (cellulose if you can find it). Warm both can (in a bucket of hot water) and parts (oven, on a clean baking tray), before starting, and clean the nozzle immediately after use in whatever solvent is recommended. I'd mask off any fine threads, just in case. Two coats if you want to be pedantic, letting it harden off and de-nibbing between really gently (try Brasso - wet+dry is too abrasive). After the final coat has hardened (allow a week at least), you can polish it with toothpaste or Dura-Glit or Brasso (latter is quite abrasive though). Jewellers' rouge also works, but is more messy. They are only used for their abrasive polishing properties - the reducing agent component has no effect on the lacquer.

Tarnish (on anything - steel, nickel, brass, copper, aluminium, etc.) is mainly oxidation.

A pump of that vintage may have a leather disc/washer as the seal inside - was the common method before synthetic rubber and flexible plastics. I think they are supposed to be greased, although I've had success in years past by using clean engine oil - you need something that penetrates the leather as well as lubricates it, in order to keep it flexible. I've also cut new washers too, but only for low-pressure garden spray and stirrup pumps.

It's looking really nice, BTW. Do I assume it was part of vehicle kit? I note the mounting lugs, and was wondering what it might have been supposed to be fixed to. Something like that ought to be back in use - way better than anything from Halfords these days!


E.
 
That sounds like it requires spraying equipment? I don't have this. I have applied 3 in 1 oil with a cloth to the whole thing to protect against oxidation, I assume the lacquer your referring to is a another method of doing the same thing?

Yes it has a double leather plunger, which I have lubricated with vegetable oil as apparently mineral based lubricates stiffen the leather: http://vintagepumps.co.uk/oiling.html This has certainly worked very well on this pump and the other one I have restored, which pumps brilliantly now!

Its a Air Ministry pump from 1944. I assume it was mounted on a general repair trolly using those mounting lugs, and used for inflating the airplane tyres. Apparently (also info from that pump site) these would go up to 300psi! Its certain way better quality and prettier than any modern foot pump... as with most of my antique and vintage tools I got into them in the first place out of being appalled at the quality offered in today's stores.
 
Rhyolith":1s7xoq1z said:
That sounds like it requires spraying equipment?

Aerosol spray cans. The stuff from car accessory shops used to be cellulose, but nowadays it has to come from restoration people like Frosts, I think. I don't rate the water-based stuff, but haven't tried it for a long time. Definitely DIY, but clean, dust free, draughtless working space preferred, obviously, although I have used it out of doors in my youth (we had better summers!).

Yes it has a double leather plunger, which I have lubricated with vegetable oil as apparently mineral based lubricates stiffen the leather: http://vintagepumps.co.uk/oiling.html This has certainly worked very well on this pump and the other one I have restored, which pumps brilliantly now!

Its a Air Ministry pump from 1944. I assume it was mounted on a general repair trolly using those mounting lugs, and used for inflating the airplane tyres. Apparently (also info from that pump site) these would go up to 300psi! Its certain way better quality and prettier than any modern foot pump... as with most of my antique and vintage tools I got into them in the first place out of being appalled at the quality offered in today's stores.

It's really nice, and good that it's being loved and used too.
 
Pump looks great Ryolith. Some great info generally on polishing in this thread. Thanks all.
 

Latest posts

Back
Top