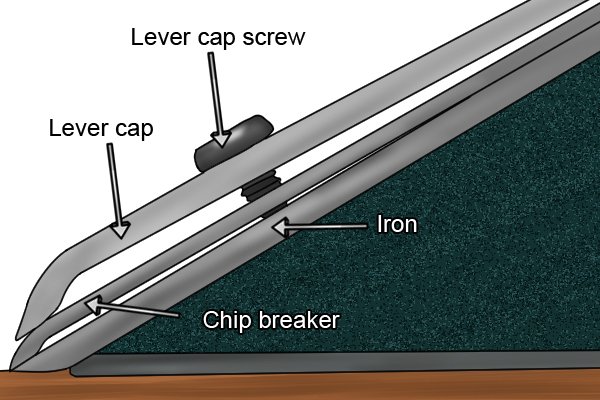
"Flattening" Chip Breaker

UKworkshop.co.uk

Help Support UKworkshop.co.uk:

This site may earn a commission from merchant affiliate links, including eBay, Amazon, and others.

El Barto

👍
Joined
20 Nov 2016
Messages
1,107
Reaction score
51
Location
North Hampshire
Doing a bit of sharpening today and on a couple of second hand planes the chip breakers don't sit perfectly flush with the iron.

A few goes on the stone gets an improvement but still got gaps on both sides. Is it just a case of working the breaker on the stone until it's square and flat?
 
Yes.

If you still get no success, you could try flattening it with a file rather than a stone.

Some people recommend assembling the cap iron onto the cutting iron, then running a burnisher or hard screwdriver along the leading edge of the cap iron to make sure that it seats entirely snug. As it's mild steel, it should deform quite easily.
 
El Barto":3i9irrof said:
Doing a bit of sharpening today and on a couple of second hand planes the chip breakers don't sit perfectly flush with the iron.

A few goes on the stone gets an improvement but still got gaps on both sides. Is it just a case of working the breaker on the stone until it's square and flat?

Agree with the file comment above. Make sure the back of the cutting iron isn't crowned, too - check with a ruler.

If it's a challenge to prepare a badly worn cap iron without rocking a little bit and creating that curved surface, finish straightening the cap iron edge with strokes in one direction only on the stone.
 
El Barto":edz4wb2m said:
Doing a bit of sharpening today and on a couple of second hand planes the chip breakers don't sit perfectly flush with the iron.

A few goes on the stone gets an improvement but still got gaps on both sides. Is it just a case of working the breaker on the stone until it's square and flat?

Check the blade too - gaps at the edges can be formed by laterally-convex chip breaker, blade, or both.

If you're lucky (many variables are involved) the pressure of the lever cap may deform the parts into alignment, but it's best not to rely on this.

BugBear
 
Its something I struggle with, I find the best way is to lap the cap iron on a diamond plate resting on the blade, the thickness gives you a clearance angle and by using the blade as a base it comes out parallel to the cutting edge.

If you don't get a good fit shavings will clog the blade very fast.

Pete
 
The way I do it is file the cap iron slightly concave first and then finish on a diamond stone. This helps to stop you making it convex.
 
I wonder if it's this issue more than any other that pushes so many woodworking newcomers towards expensive LN/Veritas planes or Bevel Up planes? If you have even the slightest gap between cap iron and blade then planing becomes a horrible chore as you end up with the cap iron way too far back and you still spend most of your time picking out trapped shavings. That's such a dispiriting scenario that it wouldn't be surprising if many aspirant woodworkers just pack it in as a bad job and spend the money on a premium tool that generally works okay straight from the box.

I've been around experienced furniture makers most of my life and the only solution I've ever heard is meticulous flattening to resolve the problem, but IMO that's not really appropriate for most newbies, flattening a crowned plane iron requires quite a delicate touch if you're not to rock the blade from side to side, which then means you could make the problem worse rather than better.

Paul Sellers has a brutal but effective solution for thinner Stanley or Record plane irons, place the iron bevel down on a piece of softwood and bash it once about an inch back from the cutting edge and dead centre with a nylon headed hammer.

I tried this a few times but couldn't get it to work. Turns out I was being too timid. I repeated the exercise with a piece of 6mm MDF on top of the iron and hit it moderately hard with the ball end of a ball pein hammer. This produced an iron with a minute hollow on the cutting face, which made flattening very fast and the cap iron then closed up to give an air tight seal.

I've since repeated the exercise on about four or five thin Bailey style plane irons, returning to a nylon faced hammer but hitting it much harder, it's now worked every time. Make sure there's a piece of flat softwood under the iron, and make sure you're proficient enough with a hammer to get it dead centre.

With that problem sorted cheap Stanley and Record planes are superb tools, toss in DW's closely set cap iron trick and one or two budget priced Record or Stanley tools are all the bench planes that most woodworkers will ever need.

Incidentally, I've sometimes become unstuck with flattening a cap iron because the metal's so soft you can quickly raise a massive wire edge that's tricky to then get rid of, the soft metal means it doesn't just float away like with harder steel and just bends back and forth for ages. I've found that stropping can help, and not to use too aggressive a stone in the first place.
 
That sounds like a neat trick, I'm going to give it a go - thanks!!! How thin are we talking here? I'm working on a number 4 and 5.

It would be a shame if an issue such as this was putting people off these kinds of planes - they're such wonderful tools and the closer I get it to perfect the more I appreciate it and enjoy it. I'm certainly still in the infancy of my woodworking experience but the idea of buying something new and easier to use because the alternative is proving too difficult is an unpleasant one.
 
El Barto":3he92veb said:
That sounds like a neat trick, I'm going to give it a go - thanks!!! How thin are we talking here?

All the Bailey style original irons are fairly similar thickness, around 2mm.
 
Cool thanks. Could the same general concept be applied to the chip breaker? Assembling the chip breaker and iron and then bashing any areas of the breaker edge that are turned up and liable to clog up.
 
El Barto":34yt9frs said:
Cool thanks. Could the same general concept be applied to the chip breaker? Assembling the chip breaker and iron and then bashing any areas of the breaker edge that are turned up and liable to clog up.

I don't think so, because there's a curve in the body of the chip breaker that would complicate things enormously. But then again, I've never tried so maybe I'm wrong.
 
I've found chip breakers that are nearly flat, and also that are twisted. As Custard said the steel is soft, so they are easy to re shape with a bit of round bar (large screwdriver?) and a nylon faced hammer, then the leading edge flattened with a little clearance towards the back so it seats 100%.
 
@Beau My preferred method too if a cap iron is giving me trouble. I find this much more repeatable than doing my very best not to rock the iron slightly when there's a fair amount of metal to remove before there's no radius left on the leading edge.

@custard A close-set cap iron is hardly D_W's trick. Credit where credit is due, he's done more to bring it back to people's attention than anyone in recent years (although many still haven't received the memo), but using the cap iron properly dates to their earliest days in the 18th century.
 
I presume I'm not the only one who has come across this, occasionally you get a cap iron that's high on one side only, sometimes high enough that if you tried to use abrasion only to get to level you end up with the leading edge no longer being square to the sides. (Found that out the hard way :oops: )

So what I do now if I encounter this is to clamp the iron curve-up on the edge of a piece strong ply and either using a small C-clamp or pliers (padded) to try to massage out the twist in the iron, or percussive means to bend that one corner down using the end grain of a small piece of hardwood struck with my heaviest hammer.
 
I've also used the Paul Sellars method. I followed his video on bringing an old plane back to life, including all the flattening and easing the edges with sandpaper on a flat surface and they work much better now than they used to. After years of site work, my planes were not in a very good state. In fact it wasn't until i gave my Stanley 41/2 a good clean that i noticed a crack in the side of it in line with the mouth. Don't know how long it has been there but it seems to work just fine.
 
Having read this thread with interest, followed up by some internet research last night, I completely stripped down my entire plane collection today (both of them) and started from scratch... It's like night & day, they were set up by Stevie Wonder's dog, I think. I never used them much but when I did it was a horrid experience. Loving them now though.

Anyhoooo, they are both Stanley Bailey planes and both chipbreakers had an 'S' stamped on them.

Is this something as obvious as 'S' for Stanley of is there some other reason for the letter stamp?
 
23WHP-4-4_.jpg
 

Latest posts

Back
Top