Design me a workshop roof

UKworkshop.co.uk

Help Support UKworkshop.co.uk:

This site may earn a commission from merchant affiliate links, including eBay, Amazon, and others.
bodgermatic":3bj3egxl said:
I've gone for 620mm spacing between trusses - can I get away with that?

Yes, structurally. However, practically, it wont work for your boards. The OSB or ply will be 1220x2440, (or possibly 1200x2400) so going to 620 spacings will produce a lot of waste as you cut it back to the previous truss. Obviously the joints between boards must occur on a rafter. You will find it cheaper to make up an extra truss.


bodgermatic":3bj3egxl said:
what are MS straps? If I remember correctly, the panels each have a through hole top centre - would it do to bolt the wall plate down to every panel through this hole?

MS= Mild Steel. These are the normal galvanised straps bought from any builder's merchant. If you can bolt the plate down to the top of every panel, so much the better, but I can't picture it.

bodgermatic":3bj3egxl said:
I understand that the wall plate needs to be continuous, so that's 2x5m lengths and 2x3m lengths - Is there a recommended joint at the corners? Half Lap?

Half-lap is perfect.

bodgermatic":3bj3egxl said:
how do you actually fix the joists to the rafters?

They bolt onto the face of the rafters.........not as you have drawn them. Correctly sized (ie 10mm for a 10mm bolt) holes on the centre-lines (ie where the centreline of the joist intersects with the centreline of the rafter). Plate washer front & back. Don't bother with dog-toothed connectors.

As for building the roof (you'll need a scaffold tower).........first, fix your plates in position. Second, cut a piece of batten the exact length of the span across the plates. Use this to set out your first pair of rafters on the ground (don't forget to cut a short section of ridgeboard so that you have the proper gap at the apex......mark and cut.....and the best one of this pair becomes your pattern. Mark it clearly. Cut out all your rafters and joists.

What happens next depends on whether you are working alone, or your own preference. My usual technique is to clamp a vertical timber into place in the middle of each end wall, sticking up to above the ridge position. Then, clamp your ridgeboard to this.......having first marked out your rafter positions, properly with a square, both sides. Now, offer up your first pair of rafters at either end of the building. Nail them into position at the plate, regardless of how they meet the ridgeboard. Then, go and adjust the ridgeboard to suit the rafters......releasing the clamp, and tapping rafters and ridgeboard until everything sits right...then nail.

Once the 2 ends are in place, I would do a temporary diagonal brace on the underside of the timber.....ridge to plate, then just infil all the rafters.

Finally, having got the rafters into position, fix the end two joists in place, ping a string line between them at the junction of the rafter and the joists, nail a pair of battens into place along this series of lines, then you can sit your joists on this batten at each rafter position to ensure that they are all horizontal. (Eye up your joists so that any curve you sags down in the middle of the roof.........some will find that controversial).

Leave your temporary diagonal brace in place until you have boarded the outside.

Put the kettle on and enjoy your new space.

Mike

edit PS. Be very careful when taking the existing roof off that you don't leave the walls unstable. You might consider temporarily fixing a sturdy piece of wood along the outside face of each wall, towards the top, with a couple of sturdy diagonal props staked to the ground. Get the roof plates fixed in position as soon as possible.
 
jack55":mv0eeyju said:
Hi all. If you don't mind me jumping in on this thread.


The roof has been the hardest bit and it may still not be right? We had three foot of snow sitting on the shed and house roofs this winter, and so it has to be able to shed snow.

Before I start gathering materials any comments are more than welcome.

Jack,

I really will save myself some typing one day by doing the definitive "Mike's Guide to Building a Shed"!!

Firstly, the key to a decent long-lasting timber-framed workshop is to build it on a low brick plinth. This is the single most important thing you can do to improve your design.......it protects the sole plate, adding decades to your shed's life. Two courses of bricks is all you need, but 3 can look quite good.

Secondly, a building that size I would build of 4x2s not 3x2s, oh, and don't forget to double up the studs at openings.

Finally, whilst on the walls, if you are lining the inside of the walls with OSB or ply, you don't need a vapour barrier as these materials are so resistant to the passage of water vapour. Put it in if you feel more comfortable though. The next huge detail that elevates this above a temporary store shed is to not fix your cladding directly to the studs, but to counter-batten vertically on each stud with 2x1 battens, and then clad on that. Forming a ventilated void this way virtually guarantees that your walls will stay dry. You should place insect mesh at the top and bottom.....and don't have a horizontal batten at the bottom.

As for your roof......well, you've drawn a pre-made truss roof. If that is what you want the truss manufacturer will tell you exactly what is required. However, I wouldn't bother and would cut my own. Let me know and I'll calculate it for you. Same comment re- air gaps as per Chris's roof......there should be a 50mm clear ventilated void above your insulation running eaves to ridge......again, insect mesh is vital.

Again, as for Chris, the rafters should be spaced to suit your sheet materials. 24" centres should suit, even if there is an odd gap at one end of the roof. You waste a lot of material otherwise.

Mike
 
Thanks for the advice Mike. There is definitely a book here, or maybe a DVD. I did get a book called Building a Shed, but its not a great deal of use.

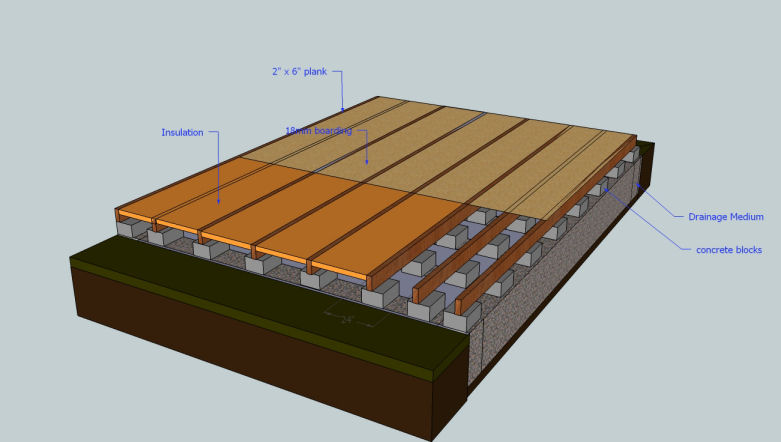
I have a separate plan for the foundation. I need to keep the floor about a foot off the ground to keep it out of the snow. Normally I step up into my shed, at the moment its almost a step down.

I plan on using concrete blocks on top of some drainage material with the joists placed to support the edges and middle of the flooring material (18mm T&G chip board). Going across the floor joists.


The roof joist were going to be positioned on top of the studs which should be around 24" centres, to accommodate the insulation. I wasn't planning on having them manufactured was going to build them on site.

I take it fitting the internal walls on secondary studs is to keep an airflow around the wall, hence no horizontal board at the bottom?

Any ideas on the outer cladding? The last time I clad the wifes garden shed the sun caused it to dry out and shrink. That was 18mm ship lap T&G from the local builders merchant.

foundation%20plan%2014_18sml.jpg
 
jack55":1dafo833 said:
I have a separate plan for the foundation. I need to keep the floor about a foot off the ground to keep it out of the snow.

The roof joist were going to be positioned on top of the studs which should be around 24" centres, to accommodate the insulation. I wasn't planning on having them manufactured was going to build them on site.

Any ideas on the outer cladding? The last time I clad the wifes garden shed the sun caused it to dry out and shrink. That was 18mm ship lap T&G from the local builders merchant.


Hmmm......no sign of a masonry plinth! And all that space for the rats to run around in......

Even with a timber suspended floor I would still be going for a brick plinth with the frame built off that, and the floor hanging off it.

I take it fitting the internal walls on secondary studs is to keep an airflow around the wall, hence no horizontal board at the bottom?

This I don't follow. There are no internal walls. If you are talking about the external walls and the vertical counterbattens, then yes, that is the purpose. Any moisture that makes its way through the wall from inside gets dried off by the airflow behind the boarding. Any water that gets through the boarding from the outside can't migrate across to the main body of the wall, and wil similarly be dried off by airflow. It works brilliantly.

As for your roof.......too tired now. I'll look at it tomorrow. At least, if I remember I'll look at it tomorrow. :wink:

Cladding? Ex 7" x1-1/4" feather-edge board is a robust yet cheap solution. For a really posh version of it, you could buy a rebated version which sits flat against the battens (or you could rebate it yourself).

Mike
 

Latest posts

Back
Top