You are using an out of date browser. It may not display this or other websites correctly.
You should upgrade or use an alternative browser.
You should upgrade or use an alternative browser.
DBT85s Workshop - Moved in and now time to fit it out
- Thread starter DBT85
- Start date

Help Support UKworkshop.co.uk:
This site may earn a commission from merchant affiliate
links, including eBay, Amazon, and others.
DBT85
Established Member
I absolutely should have started at the bottom with a couple of securing battens and worked my way up. I was a fool doing it the way I did. A gnat farts at 100 paces and the membrane billows all over the place!Great video.
My roof is 'flat' and max 2.5m and it was still scary. Took a while to build up some confidence.
Could you have started at the bottom of the roof and put some battens on as you go?
Then you'd have something to stop you sliding off? Just a thought for others.
Also, why not insulate the window openings but without the foam? Easy to remove if/when you decide to install them and no cold spots this winter.
Hard work doing that single handed - but satisfying. Especially those boards.
When I started I didn't have the technique/grip/strength to carry 11mm boards let alone the 18mm ones. Eventually got the knack and was throwing them up on the roof. Found there's a board carrier gadget but too late by then.
Looking forward to P7
I didn't do the openings at the time because I thought I might actually get to the windows this year
As for the boards. Yeah, I'm glad I only had 11mm OSB to worry about. The walls were easy enough but those 4 nearly whole ones could have been done in 1/6th the time with a gopher to help.
I just put it on more of the insulation board as I didn't insulate the slab. The reason for not insulating the slab was that I'm not going to be in there 8 hours a day putting heat into the slab and using it as@DBT85 - a quick question if I may ...
It looks like you have used 18 or 22mm caberfloor - did you lay it straight on the concrete or does it need an underlay first?
Cheers
Ahh sorry Nick. They are unlisted at the moment to prevent them appearing in a search. The links for them are all in the OP and reproduced here.Curious... the videos are not listed on your page, so can't find episodes 1 to 5?
Shows "unlisted" on the video's page itself, and none of them on your videos page:
View attachment 97346
View attachment 97347
Time Lapse videos
Part 1 - Site clearance
Part 2 - Digging a hole
Part 3 - Filling it up
Part 4 - Brick and Block
Part 5 - Framing
DBT85
Established Member
Thank you! I promise I'll render the other 2 videos at some pointi love this thread, what an amazing build... well done
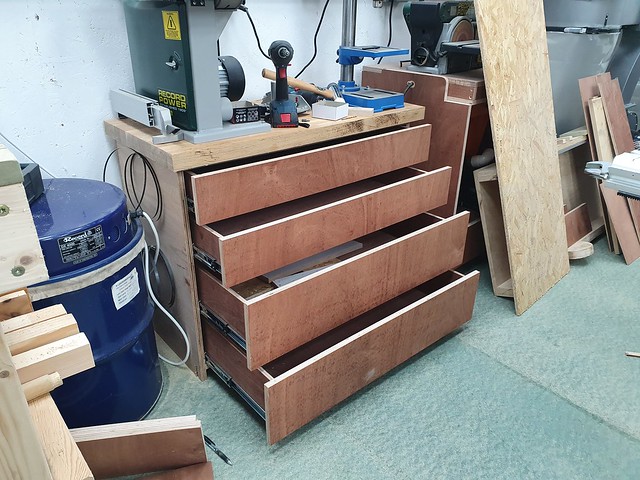
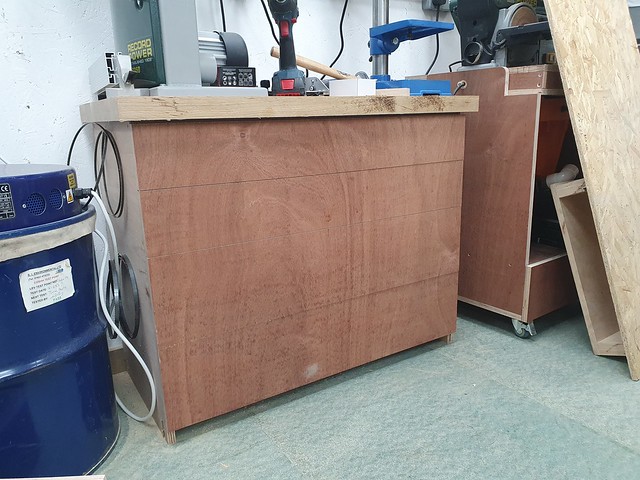
Not much going on due to work and other stuff. I did finally add some more drawers to the bandsaw cabinet I hacked together 18 months ago. Boy was that a learning experience. The only other drawer I've made was on the flip cart and being one drawer you don;t have to think about spacings and stuff.
With the table saw proving to be good enough I managed to cut all the parts to size and then cut a slot for the 6mm ply bottoms also on the table saw. That all went without incident. I'd have rather used a router table to do the slot but since I haven't yet nailed my router to a board I just took the route that will make people squirm.
Since the domino had arrived I figured a bit of practise would be useful so I used it to help make the drawers. They are only 12mm ply so I just used the 4mm dominos. A few slots were not quite right but easily rectified, all user error. I managed to not set the depth wrong and blow clean through one side which was nice! I did however manage to blow out a little when putting the glue and dominos in on a couple of parts. Slowly slowly putting them dominos in helps there.
Next was getting the runners in the cabinet. As I said, this cabinet was made some time ago just to be A.Size. No planning went in to it so drawers were made to fit it. I opted for 2x 150mm deep and 2x 100mm deep with a gap between. The bottom runners are easy right? Just use the base as a reference. After that though they need to be spaced correctly. Balls. A bit of faffing and I got that done and got the drawers all fitted. Somehow not all as evenly as I'd liked.
Then I cut the fronts from one lump of ply, I even took care to get the grain matching. I cut the sheet a fraction too small for some reason and so I couldn't make all the fronts exactly the size I wanted, so these are 3 different sizes rather than 2! Then I cut them to length with the tracksaw and cut one too short. Fortunately a clean cut so I glued the offcut back on and re cut it and you can't see it now. Phew.
Just time to fit them all in then, right? Did that and the right hand side are not sitting flush with the cabinet. Why? The runners aren't in square to the face of the cabinet. Why? Because the base isn't in square and I referenced off of it! More faffing around and finally they're all in. I need to just chamfer the edge a bit and make some handles, but I learned a lot, not only what to do but what to think about for the next lot. I know some of you must think I'm a right prat for being able to build a workship but cockup some drawers!
Most importantly I finally have some more space to put things away. Just the 5 drawers I have will make a big difference and there is still a lot to do.
The electrician is back hopefully this week to fit my other 16A socket for the extractor. In the new year I can decide what I'm doing about getting that plumbed up.
[url=https://flic.kr/p/2keoqA2]
DBT85
Established Member
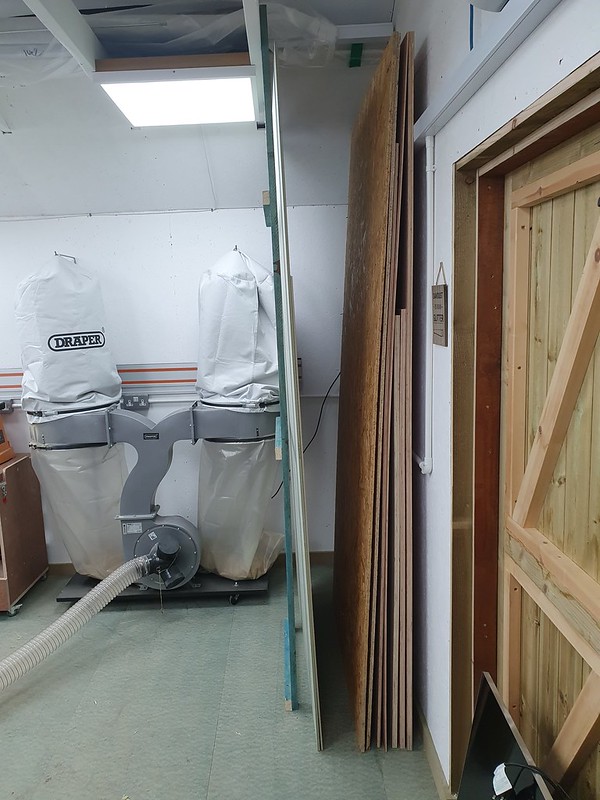
After using the large sheet cart for a few months I've decided its not working out. To get one sheet off I had to move the whole thing out into the middle of the floor, get the sheets off and then slide it all back. Entirely impractical. at 2400x800mm footprint it also took up a fair amount of space and wasn't that great for smaller offcuts.
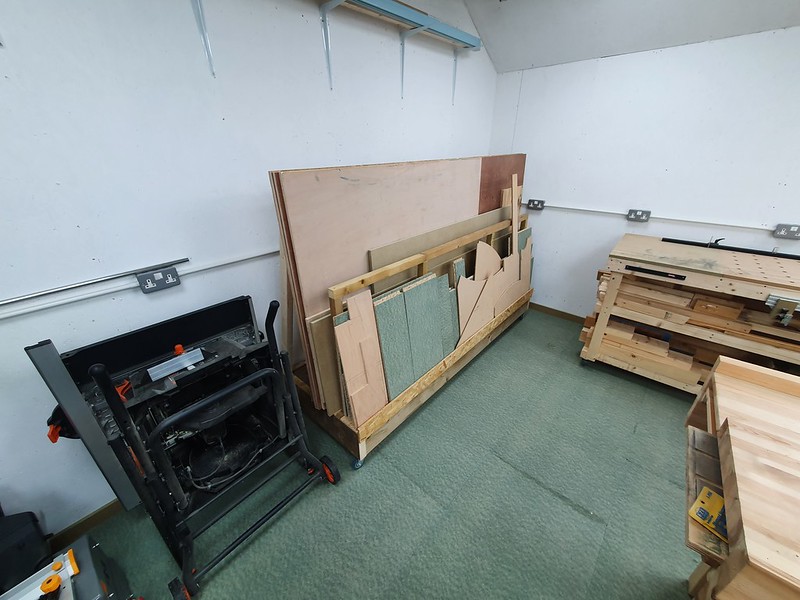
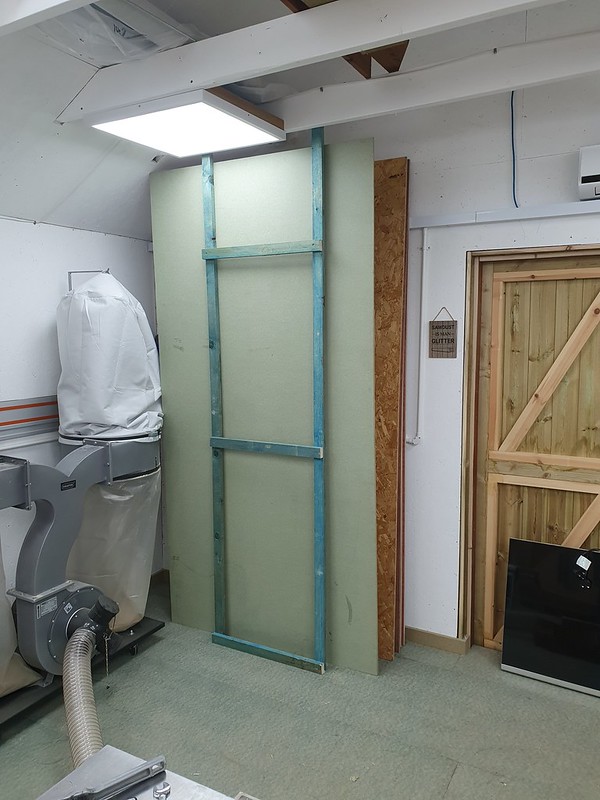
Instead, I have made a standing storage by the door. It's the width of one stud gap or so, so doesn't take up nearly as much room. I can't slide a full sheet up against the underside of the rafters as its not quite tall enough at the eaves, but the gap that remains can either be used to hide part of the extractor or eventually become a cupboard or something. This new storage method only takes up about 500x1200 of floor space, but because it's right by the door I don't need to keep any extra space clear to actually get to the sheets as the door obviously has to remain clear anyway. This is also better as hauling sheets all across the property was daft enough, without then having to shift them to the far corner of the workshop.
With this in place I might put a sheet of OSB over this visible side and essentially get more wall space back. This was only quickly thrown up with some 50x25 roof batten, though its more than strong enough to take the loads being applied by sheets standing up like this. The top of those battens is overlapped 150mm with the rafter ties and its up near there that most lateral load is being applied.
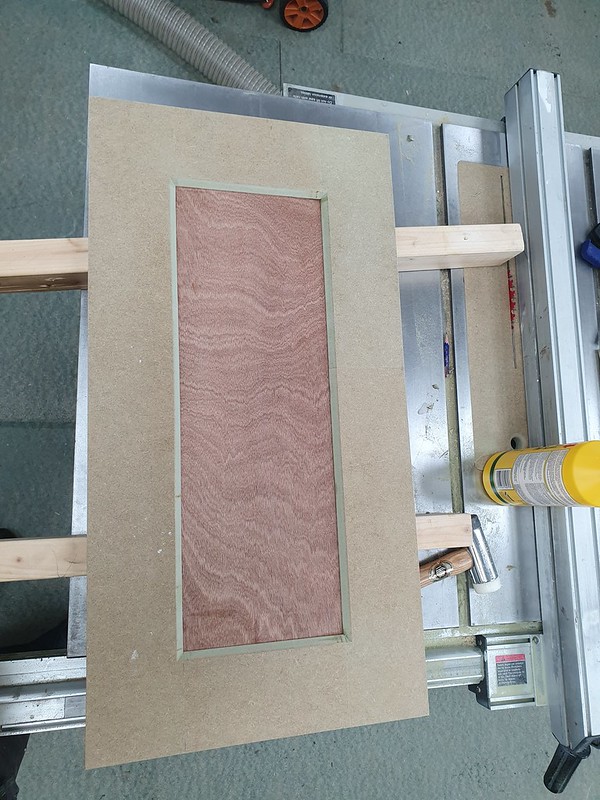
Oh and I made a utility room corner cabinet topped with oak worktop. This is the single door (my first) required on it. It and the 2 drawer fronts are currently drying after their first 2 coats of Farrow and Ball Blue Ground paint to match the kitchen. I used the domino to join the rails and stiles and had to unguard the tablsaw to route the groove for the panel. I really need sort out a router in a board.
Will get a pic of it when its all finished.

Instead, I have made a standing storage by the door. It's the width of one stud gap or so, so doesn't take up nearly as much room. I can't slide a full sheet up against the underside of the rafters as its not quite tall enough at the eaves, but the gap that remains can either be used to hide part of the extractor or eventually become a cupboard or something. This new storage method only takes up about 500x1200 of floor space, but because it's right by the door I don't need to keep any extra space clear to actually get to the sheets as the door obviously has to remain clear anyway. This is also better as hauling sheets all across the property was daft enough, without then having to shift them to the far corner of the workshop.
With this in place I might put a sheet of OSB over this visible side and essentially get more wall space back. This was only quickly thrown up with some 50x25 roof batten, though its more than strong enough to take the loads being applied by sheets standing up like this. The top of those battens is overlapped 150mm with the rafter ties and its up near there that most lateral load is being applied.


Oh and I made a utility room corner cabinet topped with oak worktop. This is the single door (my first) required on it. It and the 2 drawer fronts are currently drying after their first 2 coats of Farrow and Ball Blue Ground paint to match the kitchen. I used the domino to join the rails and stiles and had to unguard the tablsaw to route the groove for the panel. I really need sort out a router in a board.

Will get a pic of it when its all finished.
Makes sense. I've always found it easier to plonk sheet materials down'vertically' (easier on the back) even though I've used a sheet lifter.After using the large sheet cart for a few months I've decided its not working out. To get one sheet off I had to move the whole thing out into the middle of the floor, get the sheets off and then slide it all back. Entirely impractical. at 2400x800mm footprint it also took up a fair amount of space and wasn't that great for smaller offcuts.

Instead, I have made a standing storage by the door. It's the width of one stud gap or so, so doesn't take up nearly as much room. I can't slide a full sheet up against the underside of the rafters as its not quite tall enough at the eaves, but the gap that remains can either be used to hide part of the extractor or eventually become a cupboard or something. This new storage method only takes up about 500x1200 of floor space, but because it's right by the door I don't need to keep any extra space clear to actually get to the sheets as the door obviously has to remain clear anyway. This is also better as hauling sheets all across the property was daft enough, without then having to shift them to the far corner of the workshop.
With this in place I might put a sheet of OSB over this visible side and essentially get more wall space back. This was only quickly thrown up with some 50x25 roof batten, though its more than strong enough to take the loads being applied by sheets standing up like this. The top of those battens is overlapped 150mm with the rafter ties and its up near there that most lateral load is being applied.


Oh and I made a utility room corner cabinet topped with oak worktop. This is the single door (my first) required on it. It and the 2 drawer fronts are currently drying after their first 2 coats of Farrow and Ball Blue Ground paint to match the kitchen. I used the domino to join the rails and stiles and had to unguard the tablsaw to route the groove for the panel. I really need sort out a router in a board.

Will get a pic of it when its all finished.

£17.99 (£1.80 / count)
£27.44 (£2.74 / count)
3M 8822 Disposable-fine dust mask FFP2 (10-pack)
Amazon.co.uk

£13.99 (£2.80 / count)
VEVOX® FFP1 Dust Mask - Set of 5 - Valved Face Masks - Respirator - Protection e.g. for Construction, Building Work, Sanding, Woodworking, Fine Dusts, Aersoles or Particles
SLSK Ventures GmbH (UK)

£12.50 (£1.25 / count)
£14.45 (£1.44 / count)
JSP M632 FFP3moulded Disposable Dustmask (Box of 10) One Size suitable for Construction, DIY, Industrial, Sanding, dust protection 99 Percent particle filtration Conforms and Complies to EN 149
Amazon.co.uk

£96.56
£101.95
O'SKOOL Mortise and Tenon Jig is Ideal for cabinets, Chairs, and Table Construction Using a Plunge Router
Amazon US
DBT85
Established Member
Well nice news was that my delivery of MRMDF is all Medite now after Kellaway Worcester switched from some other random brand. So I've got enough in for a few other projects I'd like to get done.
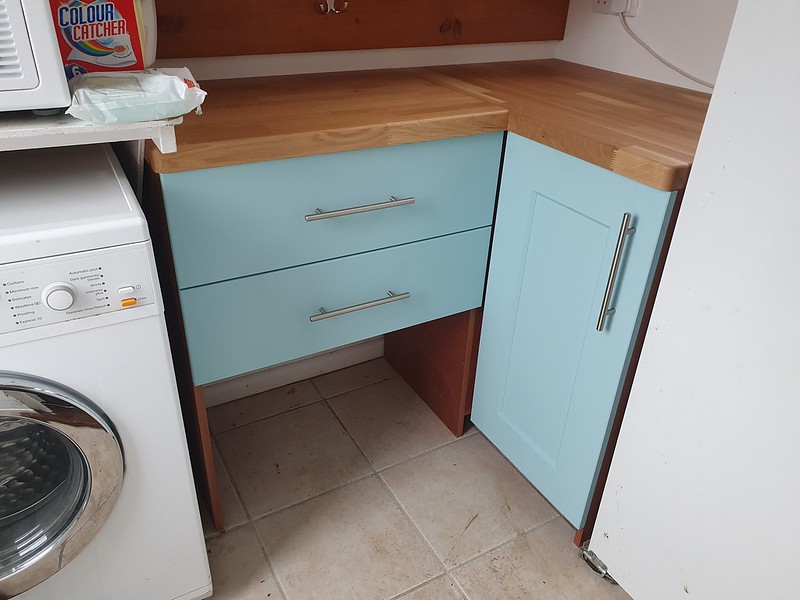
In other news the utility cabinet is done. The doors are painted but how long that paint lasts is an experiment in itself. I'm assuming the doors we got when we ordered the actual kitchen had some kind of hardener or something added to/on top of the paint as after 5 years the doors are all still perfect.
The finish is different as these were rollered, but since it's in a different but adjacent room, it's not obvious but still matches so that wins points.
On the cabinet itself, I'm happy with it overall. The gap between doors and drawer fronts is a little snug so I need to leave more room next time. There are a couple of places where my experiments with edge banding trimming went through the very thin veneer on the ply, but none that are noticeable with the doors on. I've refined my method for that now which was at least good practise.
On hinges/sliders, the blum bluemotion hinges are great and have the damper built in. I've disabled one for this door. I guess in a larger application one could use one soft close and one standard like you do with the plug on dampers. The drawer slides are ball bearing full extension. They roll fine but feel/sound like something is rubbing somewhere. I'm used to my kitchen units which are branded ultima but I think are actually blum tandembox, so the the feel is different there. Maybe I could splurge on the tandem drawer runners but I'm sure the sizing would be different.
Anyway, it's a job done, space intelligently filled and now actually useful rather than just having crap pile up there.
Until next time!

very smart and professional looking. I'm planning to do our utility room doors in MRMDF. Did you buy the worktops from Ikea ready made or did you route them yourself?Well nice news was that my delivery of MRMDF is all Medite now after Kellaway Worcester switched from some other random brand. So I've got enough in for a few other projects I'd like to get done.
In other news the utility cabinet is done. The doors are painted but how long that paint lasts is an experiment in itself. I'm assuming the doors we got when we ordered the actual kitchen had some kind of hardener or something added to/on top of the paint as after 5 years the doors are all still perfect.
The finish is different as these were rollered, but since it's in a different but adjacent room, it's not obvious but still matches so that wins points.
On the cabinet itself, I'm happy with it overall. The gap between doors and drawer fronts is a little snug so I need to leave more room next time. There are a couple of places where my experiments with edge banding trimming went through the very thin veneer on the ply, but none that are noticeable with the doors on. I've refined my method for that now which was at least good practise.
On hinges/sliders, the blum bluemotion hinges are great and have the damper built in. I've disabled one for this door. I guess in a larger application one could use one soft close and one standard like you do with the plug on dampers. The drawer slides are ball bearing full extension. They roll fine but feel/sound like something is rubbing somewhere. I'm used to my kitchen units which are branded ultima but I think are actually blum tandembox, so the the feel is different there. Maybe I could splurge on the tandem drawer runners but I'm sure the sizing would be different.
Anyway, it's a job done, space intelligently filled and now actually useful rather than just having rubbish pile up there.
Until next time!

DBT85
Established Member
Just bought a 2m lump on ebay, though in the past I used worktop express. This only has a straight join though with solid worktop I'm not sure I see a reason to have the fancy join we do with laminate? There's no hiding the join when you've got staves at right angles to the adjacent piece!very smart and professional looking. I'm planning to do our utility room doors in MRMDF. Did you buy the worktops from Ikea ready made or did you route them yourself?
So did you just butt them then round over with the router? It looks very neat. What finish did you use?Just bought a 2m lump on ebay, though in the past I used worktop express. This only has a straight join though with solid worktop I'm not sure I see a reason to have the fancy join we do with laminate? There's no hiding the join when you've got staves at right angles to the adjacent piece!
DBT85
Established Member
Yeah I butt joined with worktop bolts and did the round over in the workshop. It's 3 coats of Osmo 3032. Same as we've got in the kitchen and it's been great for 5 years maintenance free.So did you just butt them then round over with the router? It looks very neat. What finish did you use?
I'm in the planning stages (unfortunately planning permission) of a build that's hopefully going to be quite a bit bigger (45m2) than you've shared. Your build log has very much inspired me to self build, but I don't want to take on something and realise too late that it's bigger than I can manage.
Am I correct in thinking that you were able to work on it (nearly) full time for the first month or so? Do you think you could estimate how many days you've put in to it?
Am I correct in thinking that you were able to work on it (nearly) full time for the first month or so? Do you think you could estimate how many days you've put in to it?
Last edited:
DBT85
Established Member
Honestly I'm not sure. I still had a 3 year old that I wanted to help look after so I wasn't working as late as I could every day and with that in mind I also didn't always start much before 10! A lot of time was spent learning as I'd never laid a brick or made even a stud wall before, despite being very handy in general.I'm in the planning stages (unfortunately planning permission) of a build that's hopefully going to be quite a bit bigger (45m2) than you've shared. Your build log has very much inspired me to self build, but I don't want to take on something and realise too late that it's bigger than I can manage.
Am I correct in thinking that you were able to work on it (nearly) full time for the first month or so? Do you think you could estimate how many days you've put in to it?
Also remember 95% was done entirely alone. I had a little help for the hole being dug and the pour, and then the only other help I had was lifting the walls up. That help came from a 70+ year old farmer who does like to talk!
I'd like to think if I were doing another today I could go from brick plinth to roof on in a shorter span, if only because it isn't all new to me. Hopefully something in this thread among all the others can help you and anyone else bypass a bit of the uncertainty we get when taking on a project this big for the first time.
I went from starting framing to the tiles being on in about a month, in hindsight that seems like ages, but there's a new house build half a mile from here that had already stated when I did and the roof is still only half finished!
A larger footprint shouldn't really take that much longer. Its really going to be in the roof covering that'll make the larger difference. If you can get any construction minded assistant that's fit and able at all it could go much faster.
But yes, in essence I was on it full time. The date stamps in the OP fmgive an idea of how long it took.
Honestly I'm not sure. I still had a 3 year old that I wanted to help look after so I wasn't working as late as I could every day and with that in mind I also didn't always start much before 10! A lot of time was spent learning as I'd never laid a brick or made even a stud wall before, despite being very handy in general.
Also remember 95% was done entirely alone. I had a little help for the hole being dug and the pour, and then the only other help I had was lifting the walls up. That help came from a 70+ year old farmer who does like to talk!
I'd like to think if I were doing another today I could go from brick plinth to roof on in a shorter span, if only because it isn't all new to me. Hopefully something in this thread among all the others can help you and anyone else bypass a bit of the uncertainty we get when taking on a project this big for the first time.
I went from starting framing to the tiles being on in about a month, in hindsight that seems like ages, but there's a new house build half a mile from here that had already stated when I did and the roof is still only half finished!
A larger footprint shouldn't really take that much longer. Its really going to be in the roof covering that'll make the larger difference. If you can get any construction minded assistant that's fit and able at all it could go much faster.
But yes, in essence I was on it full time. The date stamps in the OP fmgive an idea of how long it took.
As somebody with no children, I'm not one for starting much before 10 either
My heart tells me to build it, my head (and wife) tells me to throw money at it
DBT85
Established Member
If you've got the money then sure, its certainly gets it done a lot faster and with a lot less back ache. But if you feel you're handy enough and have the time then do it! Its a huge sense of pride and everyone that sees it thinks I'm frankly amazing haha. Most of the folk we know havn't had a chance yet as they've not been over thanks to covid, but my wife has been sharing pics on facebook about her husbands large erection and getting lots of interestAs somebody with no children, I'm not one for starting much before 10 either. My wife would be able to provide some assistance, and I have a roofer on my estate that I'm somewhat friendly with.
My heart tells me to build it, my head (and wife) tells me to throw money at it
I've wanted to do this for years, but lockdown 1.0 finally gave me the chance to be home enough to make it happen. We'll all be here to help with moral support and advice when you need it.
Looks like an impressive build
You don't need 10mm cable because you have a TT means of earthing but thinking ahead it will provide a measure of future proofing if you ever get some large piece of machinery and will also keep any volt drops lower. Also rather than just burying it we always used to run them in pvc ducts.
https://www.drainageonline.co.uk/underground-drainage/ducting/38mm-coiled-electric-duct
As for your drain, just dig a soakaway, unless you are going for the luxury of a shower/bath then it will be fine and the tap is essential in order to keep the kettle filled.
Power and network will be trenched in (with a gap between them) approx 25m from the house with my electrician to give me the electricity cable spec. We could probably get away with 6mm 2 core SWA just fine but will most likely be 10mm 2 core SWA to keep the regs happy. We have a TT supply so a earth rod will have to be installed near the workshop negating the need for 3 core from the CU.
You don't need 10mm cable because you have a TT means of earthing but thinking ahead it will provide a measure of future proofing if you ever get some large piece of machinery and will also keep any volt drops lower. Also rather than just burying it we always used to run them in pvc ducts.
https://www.drainageonline.co.uk/underground-drainage/ducting/38mm-coiled-electric-duct
As for your drain, just dig a soakaway, unless you are going for the luxury of a shower/bath then it will be fine and the tap is essential in order to keep the kettle filled.
everyone that sees it thinks I'm frankly amazing
honestly my number 1 motivation
DBT85
Established Member
Bit late to the party there Spectric, electrics were signed off months ago! Though I'm interested why you think I wouldn't need 10mm cable due to the type or earth? What does one have to do with the other?Looks like an impressive build
You don't need 10mm cable because you have a TT means of earthing but thinking ahead it will provide a measure of future proofing if you ever get some large piece of machinery and will also keep any volt drops lower. Also rather than just burying it we always used to run them in pvc ducts.
https://www.drainageonline.co.uk/underground-drainage/ducting/38mm-coiled-electric-duct
As for your drain, just dig a soakaway, unless you are going for the luxury of a shower/bath then it will be fine and the tap is essential in order to keep the kettle filled.
Mine was buried in PVC ducting.
No need for a kettle in my workshop as I don't partake. A mini fridge might be nice though.
Regulation 13.7.2 applies to outbuildings with extraneous conductive parts and in particular 411.3.1.2 requires that if the property is supplied by a Protective Multiple Earthing (PME) / TN-C-S where the DNO provides a combined Neutral and Earth then the main protective bonding conductors must be 10mm2 from the supply MET to the extraneous conductive parts in the outbuilding. If there are no extraneous conductive parts in the outbuilding or you are not on a PME system then this reg no longer applies along with the 10mm2 bonding. If you were on a PME system then you could run just Live and Neutral from the property and use an Earth rod/mesh so with your TT supply you need earth rod and RCD in outbuilding probably needing an S type protective device to protect the cable at the supply end to provide discrimination, but cable size determined by max load and length of run only, not a requirement to meet min bonding.
DBT85
Established Member
Ahh ok interesting!Regulation 13.7.2 applies to outbuildings with extraneous conductive parts and in particular 411.3.1.2 requires that if the property is supplied by a Protective Multiple Earthing (PME) / TN-C-S where the DNO provides a combined Neutral and Earth then the main protective bonding conductors must be 10mm2 from the supply MET to the extraneous conductive parts in the outbuilding. If there are no extraneous conductive parts in the outbuilding or you are not on a PME system then this reg no longer applies along with the 10mm2 bonding. If you were on a PME system then you could run just Live and Neutral from the property and use an Earth rod/mesh so with your TT supply you need earth rod and RCD in outbuilding probably needing an S type protective device to protect the cable at the supply end to provide discrimination, but cable size determined by max load and length of run only, not a requirement to meet min bonding.
10mm was on the spec more for the amount of things I might have running at once over that distance really. 4hp tablesaw, 3hp extractor, 2kw heater, 12 LED panels etc.
Similar threads
- Replies
- 2
- Views
- 344


