coffee table design - robust enough?

UKworkshop.co.uk

Help Support UKworkshop.co.uk:

This site may earn a commission from merchant affiliate links, including eBay, Amazon, and others.

nabs

Established Member
Joined
24 Aug 2015
Messages
1,456
Reaction score
19
Location
Herts
I have now swapped both my horrible furniture-land side tables with Richard-Maquire-esque replacements and (predictably) have now been told the coffee table has to go too.

IUMYqSPZ606By-yDQxXFbFjC_tF1-yZv5J2eJKYt4Z0np__7BUG1OA


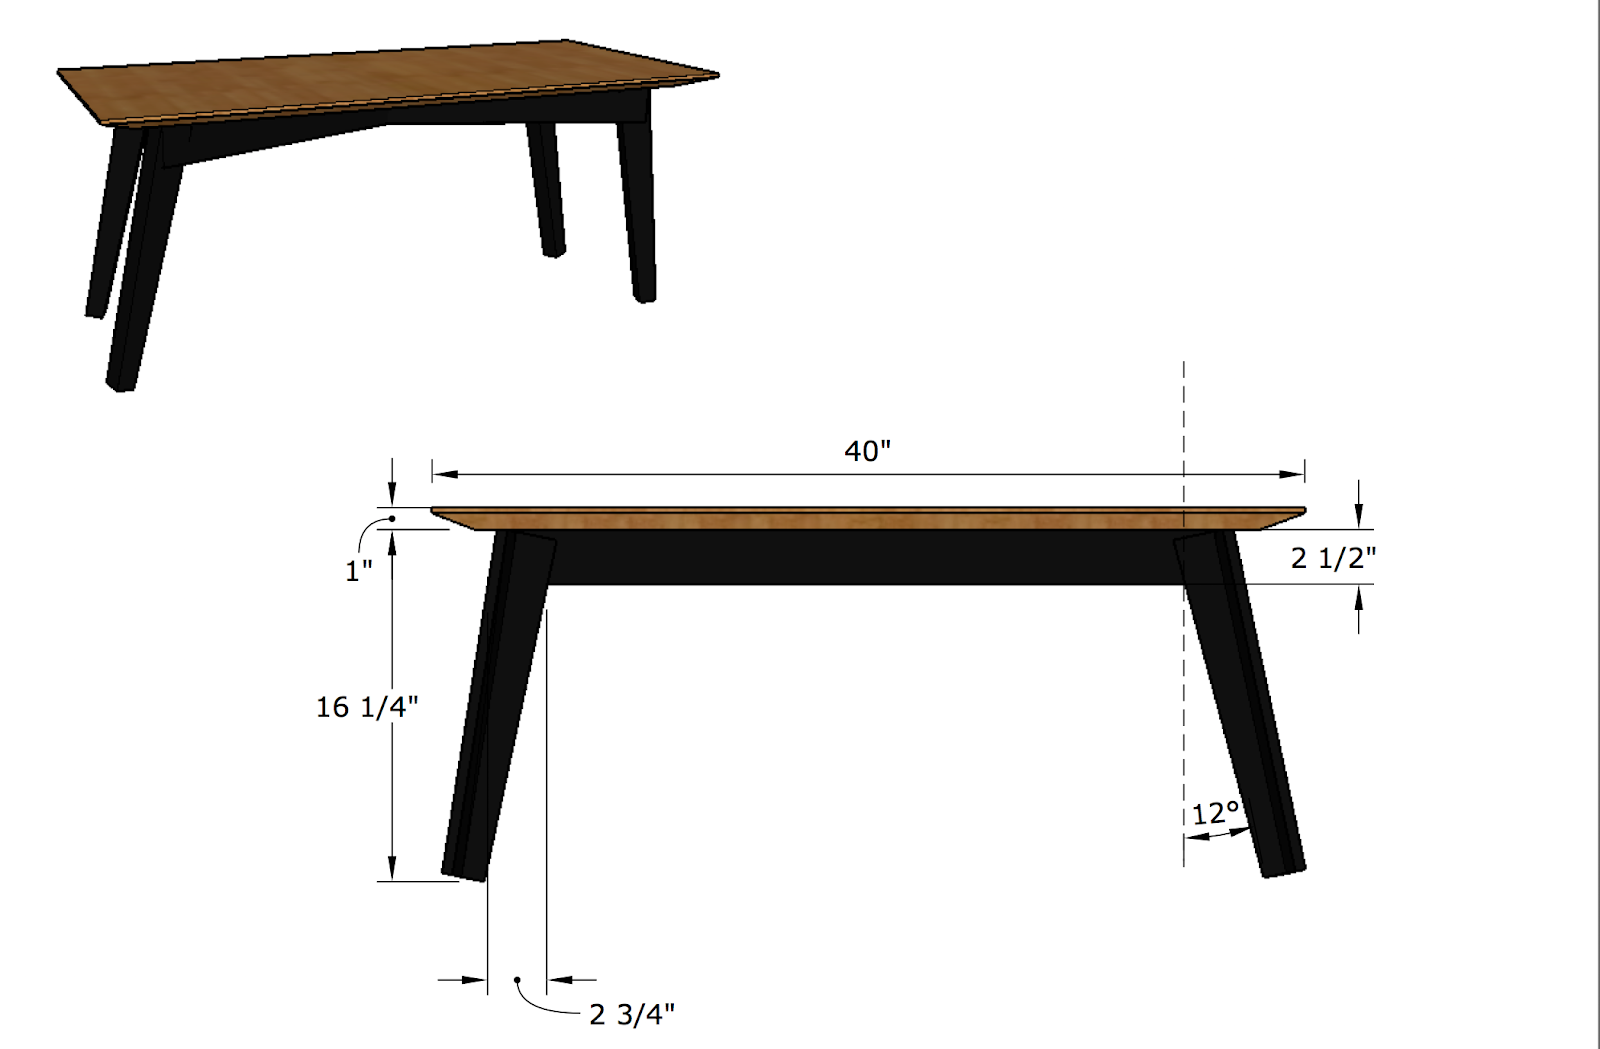
I would like to keep to the same design if possible but guess I will have to beef up the apron and legs slightly (they are held together with bridle joints - and will be tbd hardwood), Here is what I was thinking:

7PYIel2M8Gyr6rDvkn3i2jIYNopSP24UDNDZnqzp6EP78BhbKj8lXd1fzo0


I am concerned about the strength of the joints, particularly since the legs are slighly splayed. Additionally my children seem unable to tell the difference between table and chairs and just loaf around on any surface that is available, so inevitably this will get sat on (hopefully not often, and possibly only once !)

What do you think?
 
I will be interested in the replies that you get because I have been thinking beyond the side table design to a coffee table.

If you don't get why specific advice about the dimensions, I would consider making the top over long and over wide and then trim it once you have seen it sat on the legs.

Re joint strength, I think Richard said in the video that for a future similar table design he would add dowels to the joints.
 
Superb job Nabs, absolutely superb! Contemporary, original, well crafted, what's not to like. And hopefully your success will inspire other people to tackle something similar.

In answer to your question, I don't think you'll have to beef up the components that much if at all. There's a huge glue surface in a bridle joint, probably a bigger glue surface than in the "side rail to rear leg joint" in many of the chairs I make, and that's the really critical joint in any chair.

The bit that might cause a few problems is the halving joint on the aprons. There's a side table I make that has cross over stretchers with halving joints,

Tiger-Oak-Table-1.jpg


When the halving joints are at 90 degrees it's reasonably straightforward (although the curve means it's best to do the actual joinery before shaping the curves).

Side-Table-Tiger-Oak.jpg


But I find the joinery becomes increasingly trickier with rectangular versions of the same table, the further you move away from a straight 90 degree cross over the harder it becomes to execute it really neatly and without any gaps.

Side-Table-Oak.jpg
 

Attachments

  • Tiger-Oak-Table-1.jpg
    Tiger-Oak-Table-1.jpg
    58 KB
  • Side-Table-Tiger-Oak.jpg
    Side-Table-Tiger-Oak.jpg
    107.2 KB
  • Side-Table-Oak.jpg
    Side-Table-Oak.jpg
    91.6 KB
How rigid is the side table ? if you grasp the top and make as if to twist it around, is there much flex?

I'd expect the bridle joints to be just fine. What I'd be a lot less confident of is the effect of torsion in the crossed rails. They look quite thin stock. Especially after cutting a loose halving joint in the middle.
 
Sheffield Tony":1b2vwzp6 said:
How rigid is the side table ? if you grasp the top and make as if to twist it around, is there much flex?

I'd expect the bridle joints to be just fine. What I'd be a lot less confident of is the effect of torsion in the crossed rails. They look quite thin stock. Especially after cutting a loose halving joint in the middle.
I agree. If you sat on it hard would it twist out of shape?
The unconventional design is a compromise for ease of making but I don't think would be very sturdy. Compare it with Custard's examples - much more structure involved.
 
thanks all - I am glad I asked!

Clearly RM gave the side-table design a fair amount of thought since the legs are splayed 12 degrees from vertical, and the aprons cross over at the same angle. He was thus able to recommend creating a small 12 degree angle guide which could be used as a saw and marking guide on all the joints. very clever!

but.. as per the suggestions above it is not very rigid left-to-right when facing the short edge (if that makes sense). If sat on hard I think the aprons would twist in this direction and either break or detach from the top (I think this is what you predicted, Tony?).

Admittedly the aprons are only 3/4'' b 2'' (and the legs are only 7/8'' wide) - I suppose that if they were doubled in width it would help. Also the angle the aprons cross over would be over 20 degrees on a longer table, which I would presumably reduce the strain on the aprons when twisted.

however, now I understand the weakness in the design, I have feeling is that it would still not be satisfactory.

Incidentally, I went back to the bit on RM's video/blog where he describes making a dining table with the same design and he was making it with a round top with the legs crossing over at right angles, which I suppose must get rid of the weak point.

So I think I will have to use a more traditional design like custards' with vertical legs and aprons all round - I think if I keep the same overhang on the top and ebonize the legs, there will be enough similarities to make them seem part of a set (and now I think about it the subtle difference in the legs might actually be a plus point).

PS those side tables are excellent Custard - I love the design ( the curved stretchers are brilliant)
 
nabs":1tp6cx47 said:
vertical legs and aprons all round - I think if I keep the same overhang on the top and ebonize the legs, there will be enough similarities to make them seem part of a set

It would be very straightforward to splay the legs even with aprons, and adding splayed legs would very much retain the family appearance. Here are some small tables by Garrett Hack which illustrates the general arrangement,

Garrett-Hack-Table.jpg


Garrett-Hack-Table-03.jpg


I've made several pieces that are very similar and I can talk you through the joinery details if you're interested.
 

Attachments

  • Garrett-Hack-Table.jpg
    Garrett-Hack-Table.jpg
    66.9 KB
  • Garrett-Hack-Table-03.jpg
    Garrett-Hack-Table-03.jpg
    27.8 KB
I've just found a photo of one of my pieces that has the same tapered and splayed leg arrangement. The taper on the leg really accentuates the appearance of an angle, in fact the true splay is only around three or four degrees.

Side-Table-English-Walnut.jpg


The only tricky thing about this is the string inlay on the top, because the stringing needs to be cut cross grain for the short sides, omit that detail and it's all very straightforward.
 

Attachments

  • Side-Table-English-Walnut.jpg
    Side-Table-English-Walnut.jpg
    81.6 KB
custard":1cjek9kk said:
nabs":1cjek9kk said:
vertical legs and aprons all round - I think if I keep the same overhang on the top and ebonize the legs, there will be enough similarities to make them seem part of a set

It would be very straightforward to splay the legs even with aprons, and adding splayed legs would very much retain the family appearance. Here are some small tables by Garrett Hack which illustrates the general arrangement,


I've made several pieces that are very similar and I can talk you through the joinery details if you're interested.
Yes much better!

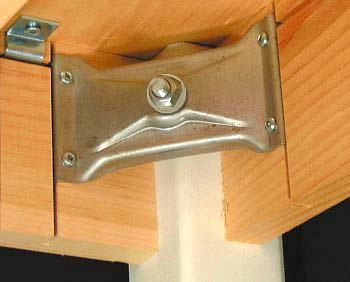
But if the splay leg joinery is a bit challenging go for hardware instead. These work very well:

4074-k462A-0212.jpg


Then you could flat pack it!
 
excellent - thanks - I shall have a go at splayed legs with aprons then. Funnily enough, re flat-packing, Richard Maquire was originally planning to do just that so he could sell them on (he bolted his tops on with captive nuts so the table could be dismantled)

Custard, any tips on the joinery would be much appreciated - I am happy to do my own research and practice pieces, but if you had a couple of tips/pointers that would be great!
 
Custard, Jacob, et al

Could the side table design be used with some added features to strengthen it, for a coffee table, whilst not being visible in normal use?

I have also bought the RM side table design and like 'nabs' would like to progress to a coffee table of similar design.

Thanks
 
Custard, any tips on the joinery would be much appreciated

Draw out the end and side views of the table full size, you're checking that your design satisfies two requirements. Firstly that the feet are inside the footprint of the top, if the legs protrude beyond the top they'll get kicked and the table will be knocked over. Secondly, that the chamfer on the underside of the top's edges doesn't interfere with the apron rails and legs.

I normally make these with legs that are 32mm x 32mm tapering down to 25mm x 25mm. But if you want something a bit beefier you could go to 35mm x 35mm tapering to 28mm x 28mm. I taper the legs on all sides, in other words it isn't like a traditional leg with an untapered section at the top to accommodate the apron tenons, and then tapers on the inside faces of the leg only. It's this tapering on all sides, and straight through from top to bottom, that gives it a contemporary look.

The splay as measured at the ends of the aprons is seldom more than five or six degrees, sometimes less.

The leg/apron mortice & tenons should be drawn out full size. Personally I don't like the two mortices in each leg "crossing over" and connecting with each other, the reason is I like to glue up in stages, two opposite sides then glue these two sub assemblies together, if the mortices cross over then you get squeeze out running from one mortice into another which complicates that two stage glue-up. I like a small haunch at the top of these tenons to help resist any twist; to be honest I'll sometimes just run the mortice straight out the top of the leg (i.e. cut the mortice on the router table). You definitely need a shoulder at the bottom of the apron tenon, if you try and use a bare faced tenon at the bottom it'll just look gappy and nasty. I cut the mortice perpendicular to the leg face, so the tenon needs a small angle, another reason to draw out your joinery full size.

If you cut a curve on the lower edge of the apron rails (very nice touch, especially if the top has matching curves on two or four edges), then ensure the curve terminates about 2 or 3mm before the end of the apron rail, don't run the curve right to the end because firstly it leaves a bit of short grain which can get broken off and secondly it's too easy to get a bit over enthusiastic spokeshaving the curve and before you know it you've exposed the mortice.

I leave the legs say 1/4" over length top and bottom and trim and flush off after assembly (remember the tops of the aprons need flushing down to level. Trimming the bottom of the legs is just the normal procedure, level the table on a flat surface with wedges, then scribe around the bottom the legs 3-6mm above the flat surface, then saw them off and go down to the scribe line with a block plane. If the splay is greater than five or six degrees I chamfer/cooper the bottom edges of the aprons so they're parallel with the top edges, if the splay is six degrees or less I don't usually bother.

If you're ebonising the legs you can orientate the grain any way you like, if the legs are given a clear finish I always ensure the end grain runs diagonally from corner to corner so that the legs look similar whichever face you look at.

Attaching the top to the apron rails is a bit trickier with angled aprons, in that you can't use buttons or brackets. I often use a pocket hole type arrangement and screw through the apron rails from the inside directly into the top. If you've never done it before practise on some scrap.

I hope this doesn't sound too prescriptive or off-putting, once you get stuck in it's all fairly obvious and straight forward.

Good luck!
 
galleywood":f52j4jyw said:
Could the side table design be used with some added features to strengthen it, for a coffee table, whilst not being visible in normal use?

Not necessary. There's a general hobbyist tendency to over engineer furniture, but if the basic joinery is well made and tight fitting then that's all you need.
 
custard":3kcxhgi0 said:
galleywood":3kcxhgi0 said:
Could the side table design be used with some added features to strengthen it, for a coffee table, whilst not being visible in normal use?

Not necessary. There's a general hobbyist tendency to over engineer furniture, but if the basic joinery is well made and tight fitting then that's all you need.
Plus good design. Design is king. No amount of craft skill can make up for it if it is missing.
 
With tables like those Custard, is the splay of the legs small enough that you don't have to worry about the compound angle, i.e., whether the legs should be square in cross section, and the shoulders angled, or the legs square in the horizontal plane (so not square in cross section) but the joints square ? Always confuses the hell out of me.
 
Sheffield Tony":x4niz8d8 said:
is the splay of the legs small enough that you don't have to worry about the compound angle

Basically yes.

The straight through tapered leg adds to the visual impression of the angle, it looks more "dynamic" than it actually is.

Regarding the joinery, just leave a decent shoulder at the bottom of the apron tenons (say 12mm) and that'll soak up any issues. It's easiest to just treat each side as a separate component, then there are angles but not compound angles. When it's assembled the entire top line needs flushing down so it mates with the top, that's the only time you're really aware of compound angles.

Projects like this are good practise before getting into the seriously compound angles you deal with on things like complex jointed chairs. It's joinery like this that, as my daughter would say, really twists your melon!

Pear-Chair-1.jpg


Pear-Chair-2.jpg
 

Attachments

  • Pear-Chair-1.jpg
    Pear-Chair-1.jpg
    51.5 KB
  • Pear-Chair-2.jpg
    Pear-Chair-2.jpg
    54.5 KB
Thanks again for providing the extra information - I thought I had understood, but then I was a bit confused by this comment:

custard":1liojpdm said:
Regarding the joinery, just leave a decent shoulder at the bottom of the apron tenons (say 12mm)

... anyhow, I have tried to draw the joints - is this how it works?


YTUv7iIstp35vDEPzEXiokFzNdWdoVu3sYjIYYfdz3A5Anj8WzmfxRYjiTc


VVI1flFJTIlNgWctTo8NcOtkx6v57LRBwcYMW2L2y-smRiUVeS5aWgUFejo


yjpnF5zNHT-a8dBVbSKpComEi9-reMvYuFCjwb-E1H701y34ztEt-heu9gA
 
nabs":vlux7nw8 said:
I have tried to draw the joints - is this how it works?

Yes, that is how it works, with a finer leg (say 32mm or less) you can effectively merge the tenon into the haunch and turn the mortice into a "stopped groove", which then makes it a doddle to produce on the router table.

I envy your SU skills by the way, how long did it take you to become that proficient ?
 
I used it to design my shed/workshop which meant I used it for hours and hours - I had never used any 3d design software before, so possibly they all work in similar ways, but I found it quite unintuitive at the start.

Once I got to grips with the basics then it was quick to pick up the rest (actually there is quite a limited set of tools to learn - and the way they work will be familiar from real world tools, it is just getting used to how to manipulate them efficiently on the computer that is the tricky bit, IMO)
 
a quick question Custard - if you were doing the joints with hand tools, would you angle the tenon to take account of the splay in the legs, or keep the tenon square and angle the mortice? Or does it make no difference either way?!?
 
Back
Top