Building a tool wall

UKworkshop.co.uk

Help Support UKworkshop.co.uk:

This site may earn a commission from merchant affiliate links, including eBay, Amazon, and others.

Wend

Established Member
Joined
21 Jan 2017
Messages
155
Reaction score
57
Location
Oxfordshire
Hi folks,

It will probably not shock you to hear that I have a collection of homeless tools and clamps which migrate between my workbench, router table and various bits of floor, to make room for whatever I'm trying to do at any given moment. However, above the router table and workbench is this piece of wall:

workshop.jpg


So my plan is to convert that into a tool wall - ideally without acquiring too many more tools in the process! It's about 1.6m wide by 1.5m tall. A handful of planes and some clamps are the heaviest things I plan to keep on it. I've read what I could find on this site, and watched some videos on youtube, and come up with a plan that I think will work.

Unfortunately, while I know very little about woodworking, I know even less about DIY, so I thought I'd run this by you and see if this sounds sane?

I'll start off by screwing some 1"x1"s to the wall in a pattern like

frame.jpg


I have some brown rawl plugs that say they'll take up to 45mm of no10-no14 screws (which looks like 5-6 in modern sizes), so I was thinking of getting a pack of general purpose 5x70mm screws and using three per piece of 1x1. I don't see any advantage in also attaching the 1x1s to each other.

Does that sound strong enough? Do I need to worry about the wall (and hence the 1x1s) not being flat?

Then on top of that, a sheet of 12mm plywood. If I glue a couple of blocks of wood at the top of the back, then I should be able to use those to hang the sheet on the top 1x1s while I screw it on to the 1x1s, with three 30mm wood screws for each 1x1.

I think that this 2-step process will be easier to do than to try to attach the plywood directly to the wall, and will also mean that the plywood will be able to go over the electrical trunking.

Would that be strong enough? And would the cheaper "hardwood external grade" plywood be OK, or should I go for "marine grade"?

Finally, some 18mm plywood, cut into 100mm strips, then cut in half at 45 degrees on the bandsaw to make some french cleats about 60mm tall, glued to the plywood sheets at about 150mm intervals. I'm guessing this needs to be marine grade, or there may be inconvenient voids.

Should the bandsaw produce good enough cuts for this? And do those sizes/spacings sound sensible?


Thanks in advance for any advice.
Wend
 

Attachments

  • workshop.jpg
    workshop.jpg
    103.6 KB
  • frame.jpg
    frame.jpg
    121.5 KB
When you're putting your battens on the wall you can use a level to see how far out the wall is and pack the battens accordingly to make them completely level and in the same plane as each other so you have a dead level and flat surface to fix your plywood to, which is really the only advantage of using battens behind the plywood unless you wanted to stuff some 1" Celotex insulation in the cavity too.

Regarding what ply to get, I wouldn't splurge too much on it and buy top quality marine ply, but I wouldn't buy the cheapest and nastiest shuttering ply either. Get what feels like good quality for a good price, if you're painting it or you're not too fussy the face doesn't need to be perfect. I'd personally paint it white, it's amazing how much it brightens a workspace compared to grey concrete blocks.

I think those french cleat systems were all the rage back about 4 or 5 years ago, I believe most people have realised how clunky they are and how much more space they take up now compared to making bespoke holders for all the tools and just simply fixing them to the backing with some screws and forgetting about it.

MAKE SURE YOU MARK WHERE YOUR TRUNKING IS WHEN YOU PUT THE PLY ON TOP OF IT! You really don't want to drill or screw into it without thinking about it because you can't see it anymore. Don't ask me how I know that! :lol:
 
Trevanion":1t28vwbe said:
When you're putting your battens on the wall you can use a level to see how far out the wall is and pack the battens accordingly to make them completely level and in the same plane as each other so you have a dead level and flat surface to fix your plywood to, which is really the only advantage of using battens behind the plywood

Is there an easy way to get holes in the plywood sheet to line up with the holes in the wall if attaching directly?

Trevanion":1t28vwbe said:
Regarding what ply to get, I wouldn't splurge too much on it and buy top quality marine ply, but I wouldn't buy the cheapest and nastiest shuttering ply either. Get what feels like good quality for a good price, if you're painting it or you're not too fussy the face doesn't need to be perfect.

I'm not fussed what it looks like (especially as it'll be largely covered), but being carless I expect I will be ordering it online without having the chance to see it first. So finger crossed!

Trevanion":1t28vwbe said:
I think those french cleat systems were all the rage back about 4 or 5 years ago, I believe most people have realised how clunky they are and how much more space they take up now compared to making bespoke holders for all the tools and just simply fixing them to the backing with some screws and forgetting about it.

I think the stress of having to get everything in the right place first time will make me take twice as long as just making the cleats!

Trevanion":1t28vwbe said:
MAKE SURE YOU MARK WHERE YOUR TRUNKING IS WHEN YOU PUT THE PLY ON TOP OF IT! You really don't want to drill or screw into it without thinking about it because you can't see it anymore. Don't ask me how I know that! :lol:

Noted, thanks :)


Wend
 
Have a look at the Fischer hammerfix - makes life really easy if you don’t know what you are doing!

Is you wall that uneven that you really need the battens? Mine went straight on, drill some holes, hammer in the hammerfix, job done :)
 
Wend":3uaaaav5 said:
Is there an easy way to get holes in the plywood sheet to line up with the holes in the wall if attaching directly?
Make the holes in the plywood first. Then hold the plywood to the wall and tap screws or similar through the holes to mark the wall. You can get a little spray marking chalk that will shoot through holes as well which is good for marking blocks.
 
If you go for the direct fixing option, there are masonry bits which will also drill through wood. Mine were sold as "construction" bits by Bosch. They won't make cabinet grade holes but would be fine for a project like this.
 
I wouldn't bother with the 1x1s, I'd just fix the plywood (or even OSB3) directly to the wall.
I'd use a couple of screws to start with, this will hold it in place whilst you get the remaining screws in place. As someone else mentioned you can get a drill bits that'll drill through both the timber and the concrete.

https://www.screwfix.com/p/bosch-multip ... lsrc=aw.ds

Alternatively have you considered dropping the tool wall idea entirely and installing a couple of wall hung cabinets with doors? You could use cheap kitchen units from wickes/B&Q etc. These should be fine weight wise and will keep all the dust off your tools.

I am slowly replacing all my workshop shelving with cabinets, it is much easier to clean than trying to vacuum around all the stuff that gets piled up on shelves.
 
My first job would be to relocate the wiring for that socket, to one side, and add about 6 more sockets. I would not want plastic trunking dictating the design and being in the way. Would take about an hour to rewire it sensibly. Then you have much more flexibility.
 
AndyT":3loe6690 said:
If you go for the direct fixing option, there are masonry bits which will also drill through wood. Mine were sold as "construction" bits by Bosch. They won't make cabinet grade holes but would be fine for a project like this.
+1 for these they make attaching timber to masory with frame fixings a complete doddle
 
AJB Temple":mpgp8s1h said:
My first job would be to relocate the wiring for that socket, to one side, and add about 6 more sockets. I would not want plastic trunking dictating the design and being in the way. Would take about an hour to rewire it sensibly. Then you have much more flexibility.
+1 for this too!
 
Thanks for all your suggestions; a lot to think about!

I think the trunking will be annoying wherever it is, but I might go for 18mm plywood directly on the walls. By my measurements that should be a hair thicker than the trunking, so the trunking shouldn't be in the way. Might be worth having someone put another double socket in before I get started, though. Another advantage of 18mm is I can use the offcuts to make the cleats.

Cupboards might be useful for some things, but I don't think I want everything in them. I think what I might do is keep an ear out for anyone local chucking some out, and then hang them with a french cleat stuck to the back.

Thanks again for all the ideas!
Wend
 
Please think twice before doing cleats. It's just flavour of the month on Youtube, and not actually that practical a way of doing storage in a workshop. The supposed advantage is that you can move stuff around.........but not only can you do that anyway just by undoing some screws, but nobody moves stuff anyway after the initial construction. All that at the cost of bulky and space-wasting ugly strips of wood across your wall.
 
Surf for "french cleats"
Minimal drilling of walls. run the cleat across the entire wall with just a cut out for the trunking.
maximum versatility while making final resting place decisions.
Far and away the easiest answer to your problem.

I see I've crossed mikes post, saying the opposite. :shock:
All opinions are usefull though =D>

You dont often move stuff because what youve built is so difficult to move. I've spent the last 5 years moving my woodworking tools around, as I get more stuff or decide I dont want other stuff.
Lost count of how many holes I've drilled and subsequently filled in later. next time I move something, I will use cleats.
 
Personally I would fix the battens for the French cleats straight onto the wall and forget the ply. I do like the flexibility of the FC system, especially as you are in the early stages of setting up, It allow easy changes of mind.

I think it is worth making a dedicated holder for your clamps, though. Clamps come in so many shapes and geometries that no one holder fits all. For example, the illustration is one that I've found very good for the Irwin one-handed clamps:

clamp rack - 1.jpg


It's just bandsaw-made slots in a single piece of ply, with a single bar running along it to hook the clamps over.

This goes on a batten already there, but could go on a French cleat.
 

Attachments

  • clamp rack - 1.jpg
    clamp rack - 1.jpg
    176.3 KB
Finally got this finished. It's not as neat and tidy as the camera makes it look, but so far it's stayed on the walls, which is a good start! Getting all the cleats cut, glued and painted took quite a bit of time, but I still think it was the best choice.
wall.jpg

As you can see, I've made holders for some of the tools that never had a home before, but I've got a way to go before everything I want on there has a home.

Thanks again all for the advice.
 

Attachments

  • wall.jpg
    wall.jpg
    73 KB
Nice going Wend. Always nice when you get it done. Now to spend 15 times as much time making intricate holders and stuff!

MikeG.":13cawg66 said:
Please think twice before doing cleats.
sunnybob":13cawg66 said:
Surf for "french cleats"
Something something opinions something something bumholes haha
 
Prototyping a flexible lighting bracket:
light.jpg


I think I'll probably bolt the top light about where it is and drill a hole through so the cable and junction box can sit on top.
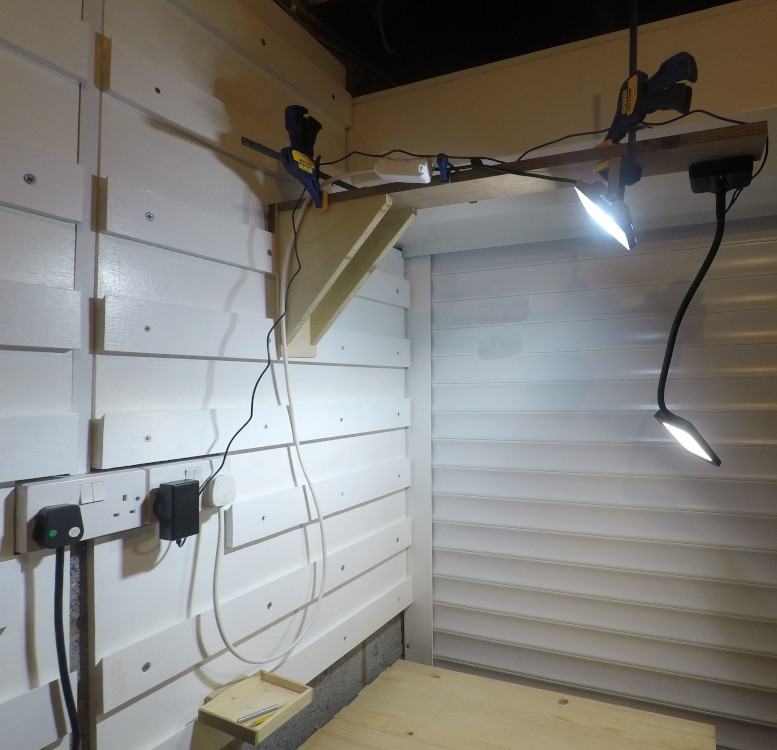
The other light has a large bulldog-style-clip built in, so can be clipped anywhere. Hopefully some sort of dowel or hook on the top near the wall will be enough to keep the cable on a sensible route.

Perhaps another dowel or hook on a cleat above the power sockets will allow me to get the cables to run on top of the trunking, for better use of space.
 

Attachments

  • light.jpg
    light.jpg
    118.2 KB
Back
Top