Blade sharpening, avoid getting nicked

UKworkshop.co.uk

Help Support UKworkshop.co.uk:

This site may earn a commission from merchant affiliate links, including eBay, Amazon, and others.

Demusss

Established Member
Joined
4 Jan 2019
Messages
53
Reaction score
0
Location
Manchester
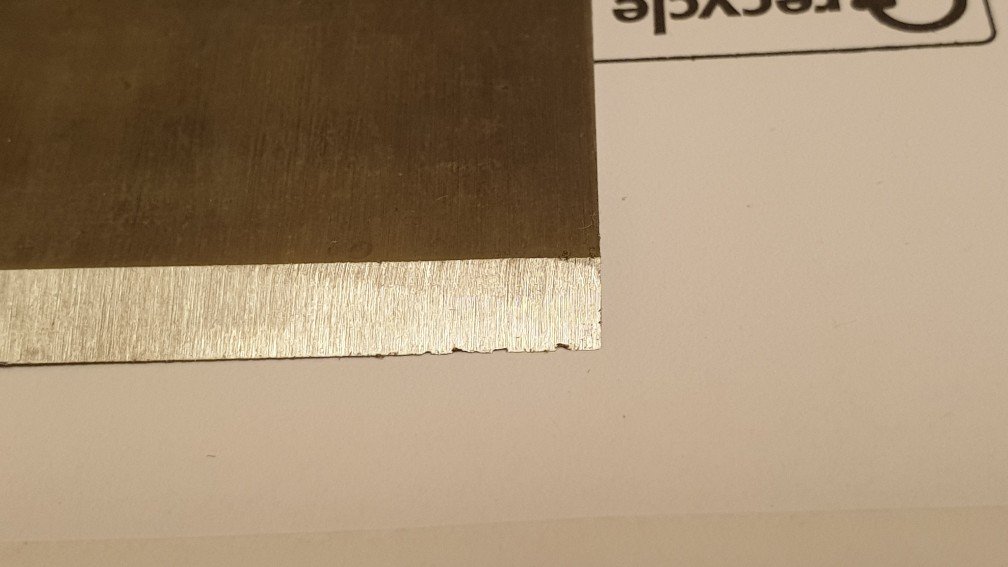
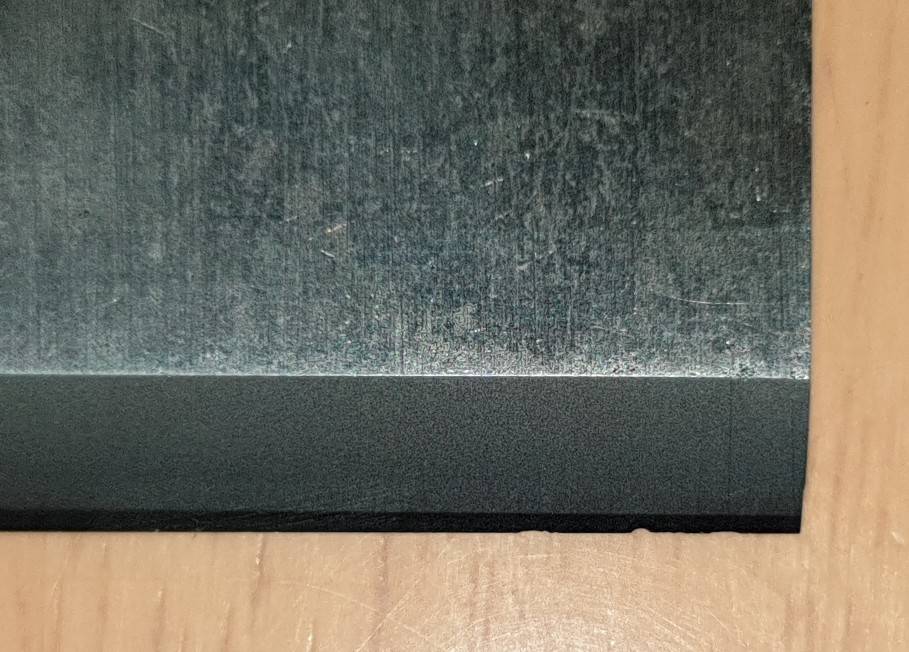
I'm after some advice on the best way of sharpening this blade. It's marked Stanley sweetheart from a number 7. It seems to be a laminated one as there is a line going across the middle of the blade.

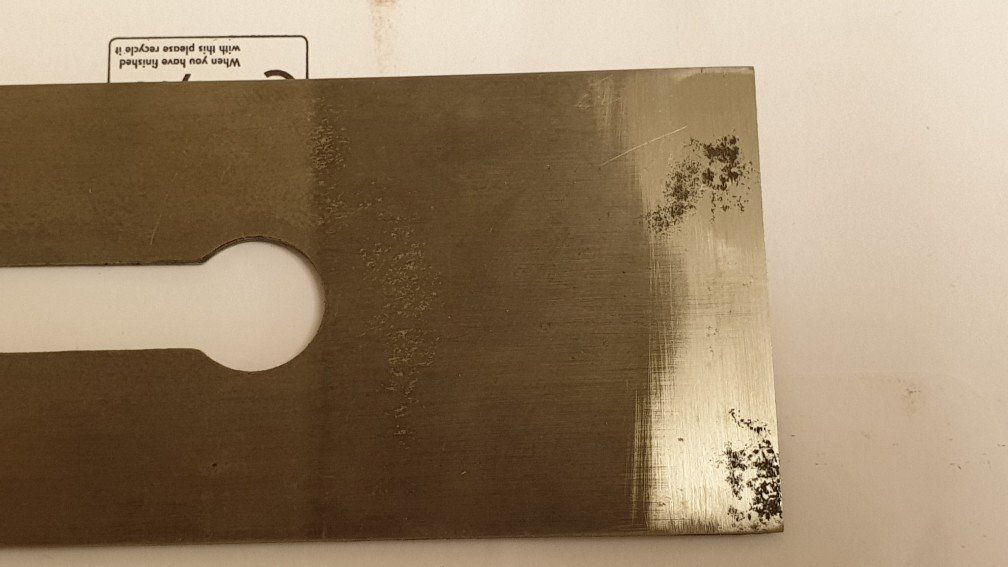
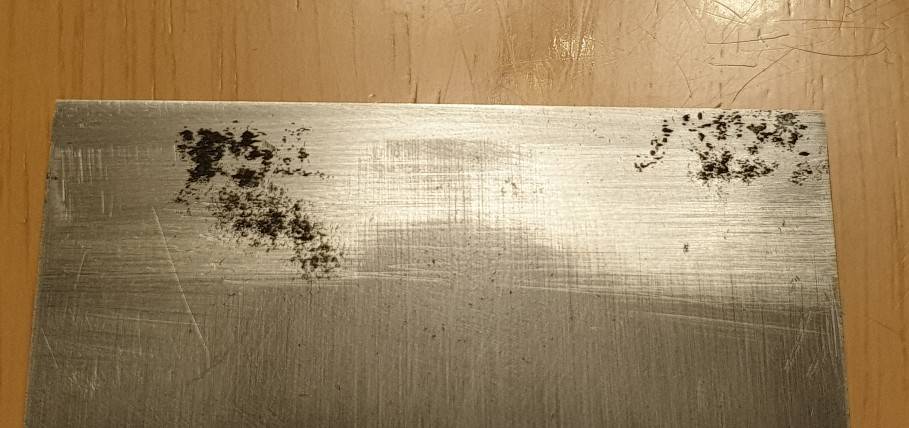
The problem I have is that there are small nicks on the right edge due to pitting on the back side.

Do I have to grind the blade all the way past the 2 sections of pitting, one on the left and one on the right. It's about 1.5cm of blade.
Or can I just keep on flattening the back to remove the pitting?
Or is there something else I can do?

Thanks
Anthony
7a3a24203194563bbdfee6f4c73464d2.jpg
819ce60e0cccef05bb99c54c85a2c3d7.jpg
f98d5186c64e7178882da21ed629e0ef.jpg


Sent from my SM-G965F using Tapatalk
 
Is that thin line at the tip of the iron a wire edge, or is the lamination you are referring to visible in the first photo, and what would be getting closer to half the thickness of the iron, if the bevel was ground a bit more acutely?
If its that thick of a lamination, I would keep doing what you're doing tapering the back a bit
but with a more aggressive abrasive.
I'd be wary of making a convex surface, especially with a coarser abrasive as you are not registering off the entire surface of the back.
so focus working on the middle of the iron a bit more than you might otherwise.
If your using diamonds beware of sheering them off with the square edges of your iron.
 
Thanks for the quick reply

The first photo shows the lamination. The dark line across the tip of the blade in the second is just a shadow.

I'll continue working on the back as you suggest. I was working on a 400 grit diamond plate but I do also have a 400 grit stone, so I'll use this instead.

Cheers
Anthony

Sent from my SM-G965F using Tapatalk
 
Whatevers fastest, which the diamond probably is.
How long have you been working on it, is the question...
If its a brand new hone it will probably be OK, if not you could have an embarrassingly long time
to flatten it.
Another valid question before going any further is...
Is the iron flat to begin with?
If it needs some small tapping to flatten it out, it might be best to do it now
Some have reports of the laminated irons cracking so maybe best to wait for a reply
if you think it may need to be done.
This could speed things up nicely.
The diamonds sheering off comment was if your trying not to create a step in the back
face of the iron and end up working up the sides somewhat.
Tom
 
The pragmatic solution is just to ignore the pitting and carry on as usual. The patch closest to the edge is well over to one side, and as most try planes do most of their work more towards the middle of the iron's edge, the pitted area may not even be in cut for a lot of edge-truing work. It might be for face-truing jobs, but any slight lines left on the job can be easily removed with a pass or two of a smoothing plane. You'll do a lot of planing and sharpening before the other patch gets to the edge, so for the next few years, don't bother about it.

You could grind away the blade's length until you're past the pitted areas, but it's a lot of work. You could flatten away the pitting from the flat face, but that's even more work. You could find a replacement iron, which would be the best and quickest solution, and not necessarily that expensive, or you could just live with it and follow up your try plane work with a swipe or two of a smoothing plane if the job needs it. Frankly, given that try planes are not generally finishing planes, I'd probably go with the latter, and if surface imperfections on the job did bother me, I'd replace the iron.
 
Thanks for the advice guys. I'll sharpen and crack on then :)


Sent from my SM-G965F using Tapatalk
 
The pits in this iron don't look so deep that it wouldn't be the best plan to work the back until you got beneath them, although it's impossible to be sure from a photo. Sometimes hard to tell in advance IRL! Either way, I too was going to suggest you ignore them in this case as they're unlikely to be much of an issue due to the fortunate location well off to one side. Many users today camber the irons on their 7s, which would further reducing the possible interaction of the pits with a shaving taken.

If you did want to try to get them out manually 400 is really much too fine for this kind of work, even with diamonds. It'll do it, but it's a hard slog. It's for precisely this kind of thing that I picked up a very coarse diamond plate, much coarser than most name brands offer at 150. You can get even coarser then this with generic diamond plates, 120, 100 and 80-grit plates are also available. This kind of plate is dirt cheap but seem to be fairly uniformly of good quality and they last.

So to the punchline: using my 150, which is now well broken in, I'd guess that I'd be able to get out this degree of pitting out in no more than six or seven minutes, but possibly much less because I concentrate effort right at the edge to end up with about 2-3mm of unpitted steel.
 
Know anybody local to you with a milling machine? I'd flycut those pits clean out. Sorted. Big enough lathe (min 6" chuck) would do the same job, albeit with more set up.

Sam
 
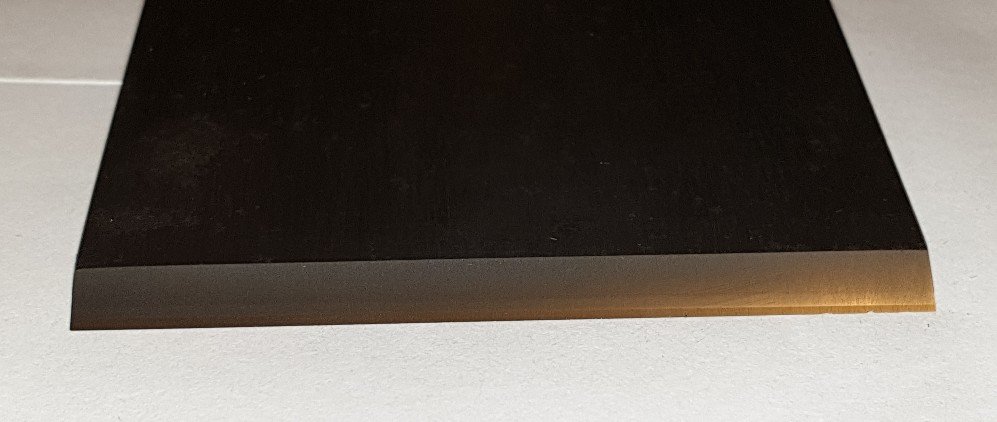
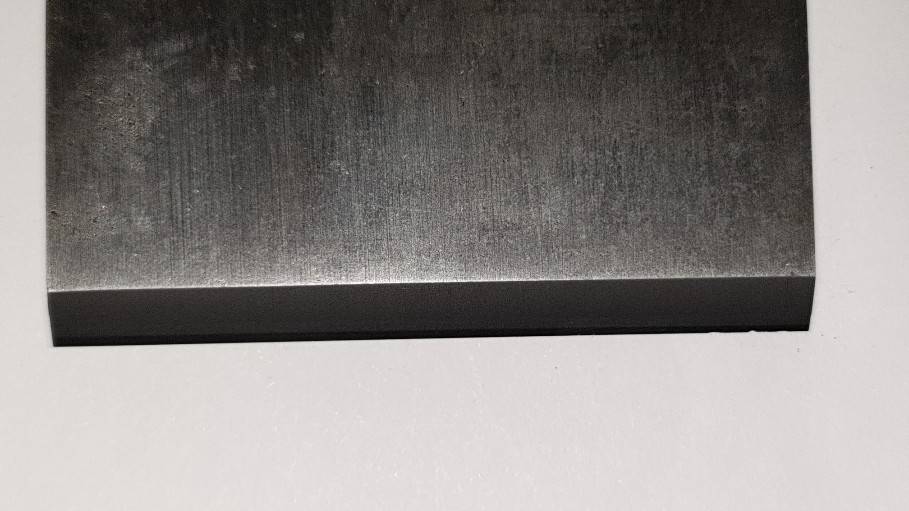
Thought I'd give you an update on what I did.

I worked on the back using 400grit diamond plate for about 10 mins concentrating mainly on the last 4mm. This seemed to reduce a quite a bit of the pitting.
Then just cracked on with the front.
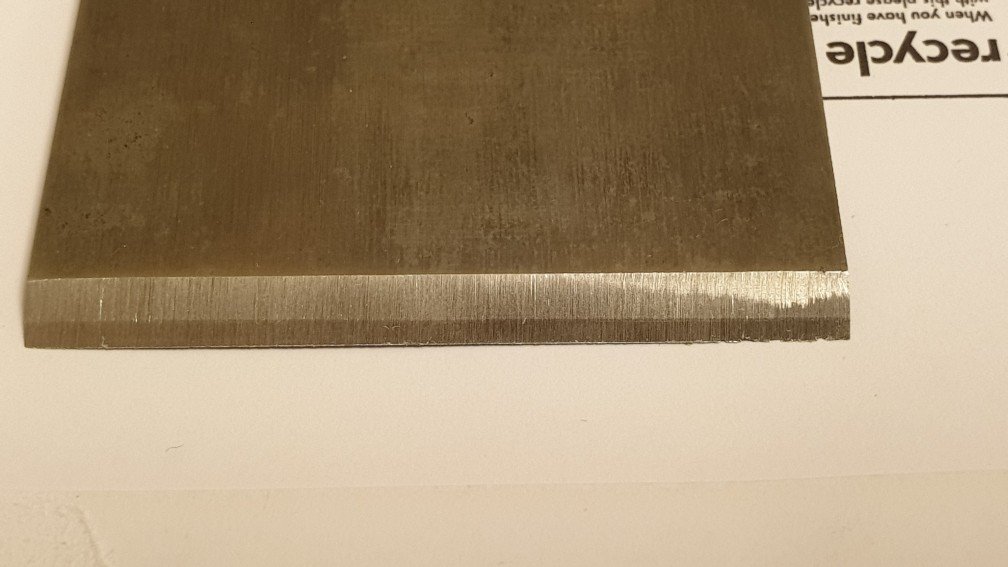
The result is much better than I thought it would be.
There are some small nicks but as suggested as it's on the side so doesn't really matter.

Thanks all for your help.

Here's the results
93bd8249b58c37512a4f46b8f3e67718.jpg
4cfe92ed8ccf416083b7cf851424578b.jpg
2c0b0dce49b9a3df6c4d80d4c6bffad0.jpg
acaf6a1dd9df430fdaea56e1628461f0.jpg
8f166d4f27d876eadc2f71f22297670e.jpg


Sent from my SM-G965F using Tapatalk
 
I would grind that length off rather than grinding off any more thickness.
 
Basically it's knackered blade. I'd just carry on, as others have said, and apply a little face bevel if necessary - a.k.a. "the ruler trick" though it's easier without the ruler.
If you have to keep doing that'd be OK you'd eventually work your way back into the better bits.
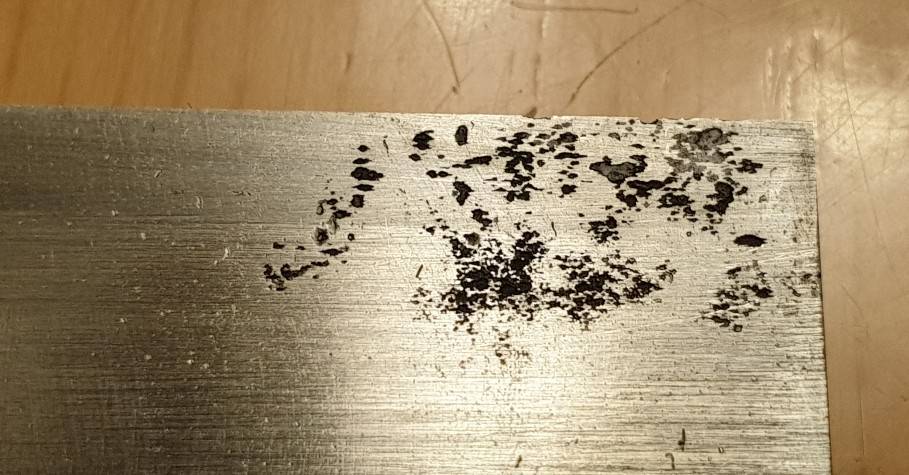
 
That one is a bit deep for the ruler trick. I'm not sure how deep a back bevel goes, but when it gets to a couple of thousandths, it will get long.

If the poster has a grinder available, best to mark it square at the pitting or just shy of it and slowly grind off the offending length. It'll still be a lifetime of use for even a serious amateur user - sparing the length at the cost of hassle and irritation (and quality) just isn't a good trade.

I wouldn't be surprised if 100 years ago, someone instead would've just found another iron and set that one aside, but it's fixable if the desire is there.
 
I would try another 10 to 15 minutes working on the back. Accept that the sharpened blade will have a couple of nicks in it and every time you sharpen it work a decent amount on the back.
Trying to grind that much length off will take a long time .
Fortunately the deeper pitting on the left of the blade is a way back so will have had a significant amount of back flatting before you reach it
Ian
 
I should add before I mention grinding something like that off that it should be done on a very coarse wheel that's dressed.

There's no good reason to burn the iron, of course. doing that grinding with bare hands will generally prevent you from doing any significant damage to the iron itself.

I could understand the desire not to address the grooves, but they will drive you up a wall.

Not sure about the availability of replacement vintage irons there, but that would be choice number one.

Before I started making wooden planes, I went through a rash of trying old planes to find out what aspects I liked and wanted to incorporate. Some of the irons had pitting two or three times as deep as that, and I eventually figured out how to remove all pitting from all of them on the platen of a belt grinder - without burning any irons.

Trouble is, I literally ground away a third of some of the irons and then they were undesirable because the geometry was altered.

I could probably grind and re-establish the primary bevel on that iron in about 10 minutes total, but others may not be as comfortable. I wouldn't use a belt sander, so I don't want the mention to cross contaminate the message - bench sanders with platens make a VERY hot point of contact if any pressure is put on the contact point with the platen. Instant blue (not an issue at the outset, but chasing the blue down the iron isn't that great, either).
 
D_W":2zzjp4cg said:
I could understand the desire not to address the grooves, but they will drive you up a wall.
Isn't that mostly OCD though?

When edge-jointing boards, where the plane is likely the last tool used, the raised lines don't matter as clamp pressure will easily compress them. And that's only IF that edge of the iron even makes contact, which certainly won't be that common.

When used for face work they're an aesthetic annoyance only. The 7 won't be the last thing to touch the work and they'll easily be taken off by the next operation, whatever it is.

D_W":2zzjp4cg said:
Not sure about the availability of replacement vintage irons there, but that would be choice number one.
Not sure I'd call that choice number one! I dare say this iron was in worse shape :) As awful as that looks it was easily recoverable, and without recourse to a grinder.
 
Demusss":1lsmudg7 said:
Thought I'd give you an update on what I did.

I worked on the back using 400grit diamond plate for about 10 mins concentrating mainly on the last 4mm........
That's what I'd call "the without a ruler trick" :lol:
It's much the same except you have a shallow 4mm bevel on the face, and it's easier.
As long as the cap iron fits tight you can just keep doing that as necessary.
 
ED65":2gu8pxf4 said:
D_W":2gu8pxf4 said:
I could understand the desire not to address the grooves, but they will drive you up a wall.
Isn't that mostly OCD though?

When edge-jointing boards, where the plane is likely the last tool used, the raised lines don't matter as clamp pressure will easily compress them. And that's only IF that edge of the iron even makes contact, which certainly won't be that common.

When used for face work they're an aesthetic annoyance only. The 7 won't be the last thing to touch the work and they'll easily be taken off by the next operation, whatever it is.

D_W":2gu8pxf4 said:
Not sure about the availability of replacement vintage irons there, but that would be choice number one.
Not sure I'd call that choice number one! I dare say this iron was in worse shape :) As awful as that looks it was easily recoverable, and without recourse to a grinder.

Those grooves may be large enough to cause issues when comparing joints by eye before clamping. You can smash them if the joint is close, but they could be an obnoxious annoyance. If the plane is being used to finish a jointed edge, then it will have to be followed by a smoother.

It's possible to use irons like that, but it's annoying. The shavings are feedback to you about what's happening with the wood, and you want the cut to be as uniform as possible because it will affect the accuracy of your planing if it's not uniform. The lines may not threaten certain things, but there's no great reason to have them in the mix. The longer I plane, the less tolerance I have from bad behavior in anything other than a jack plane.

I tested a few irons for durability a couple of months ago and when I started to actually examine what was going on with plane irons that were anything less than sharp and pulling themselves into the cut, I was somewhat shocked. I expect a surface off of a jointer that may not be finish ready, but that is close. Smoother use after such a thing (if not sanding or scraping) should be only a few light passes.

Because I was literally counting strokes (and feeling the level of effort) planing with planes that were coming out of the cut a little bit (which was what I deemed to be the failure point), I got a very good sense of how much wasted effort occurred in each X strokes if I had to control or fight the plane at all. Enough for me to reform my ways of thinking that I might be saving anything by pushing a plane that was starting to come out of the cut a little bit. It is very difficult to get a clean surface, and the nicks will expedite even that occurring.

These comments assume working with something relatively fine. I can see why someone may not care about those lines on something like house joinery.
 
Back
Top