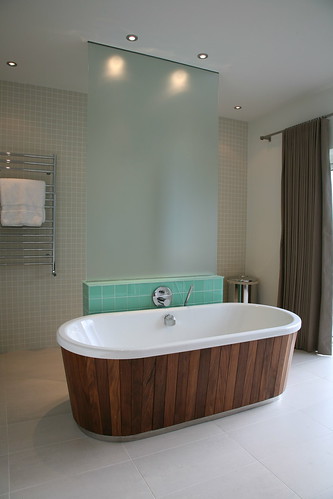
Bath Panel Construction - Now Finished

UKworkshop.co.uk

Help Support UKworkshop.co.uk:

This site may earn a commission from merchant affiliate links, including eBay, Amazon, and others.
To avoid the mitres being on show you could put the plinth behind rather than in front, a bit like this.

2150191202_a84abf5d00.jpg
 
Doh, why didn't I think of that?

Like this you mean?

bath-panel4_001.png
 
Yep, I have done a lot like this and haven't had any problems. Keeping the perps short of the floor stops the end grain from sitting in water and adds to longevity. If you are feeling clever about it you can scribe the ends into the wall and fit the centre section on french cleats so it can be lifted off without any fixings showing.
 
Jake":37bbk3su said:
Rebate the underside a little to fit a steel angleplate or three on the underside to hold the mitre together.
Or just screw and glue a 1 x 1in softwood cleat at the back of the joint?
 
Well, as prompted by Si, here's how it turned out:

DSC_1521.JPG


DSC_1513.JPG


In the end I had to work around a few problems both with my own skill level and with the obstacles in my way. I had to run the bottom frame rail right along as one wide board This was because it had to cover some missing tiles where the old shower tray had been removed. In the end I didn't profile the edges as Olly suggested and just fixed them with a 2mm gap. The prep work for each slat was rather intense. It took a week, planing, jointing, ripping, sanding, chamfering, pre-finishing, etc. The mitres that I was concerned about turned out fairly ok. I did need to use a little filler. The internal mitre was luckily hidden under the bath.

DSC_1519.JPG


I rounded it to prevent bashed knees and toddler heads. It's all had a coat of danish oil to darken it slightly and then 3 coats of Osmo. I'll give it another few coats to be on the safe side.

Thanks all for your help and advice. Quite chuffed with it actually and wifey is suitibly impressed. Next job in the bathroom is decking.... :shock:
 
I'm trying to think of one Olly. Apart from a few headaches, none to speak of. I did grossly miscalculate the amount of slats I needed but I over estimated (to the factor of 12). So not really a **** up ;) I'm sure it's not done exactly as a pro would do it. But it's in, secure and solid and we like it which is all that counts, I guess.

'twas fun, even if it did take 3 weeks. ;)
 
Ton , just one comment , you realy need to make it easily removable , as one day you WILL need to get under the bath , so if you could make it in 3 sections then fit the 3 to the frame , would make life easier for the future

( I know from past experience , 5 people inc" 3 females all with long hair" , I had to disconnect the waste pipe every 2 months and remove a big clod of hair that was blocking the pipe :shock: )
 
It's 2 sections held in with neodymium magnets. :p
 
Thanks newt.

Yes Mark the whole thing was pre-finished all over with 1 coat of danish and 2 of Osmo, then it's had 1 coat of Osmo since it's been in. I'll give it a few more coats over the next week.
 
Tom,

mean't to say how nice it looks as well, lot's of brownie points from the missus then :lol:


Mark.
 
Yes and as it was finished the day before the party, I'm getting away with lots of "Oh ye of little faith" comments :lol:

Thanks mate ;)
 

Latest posts

Back
Top