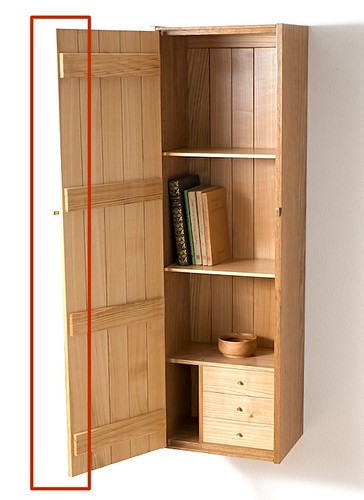
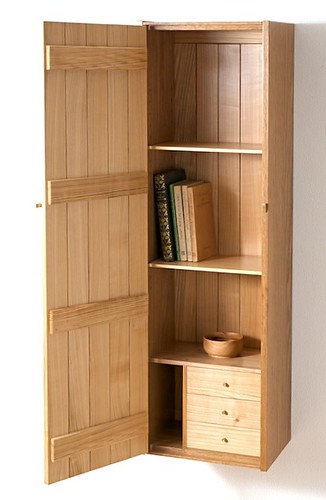
I think you might be fretting over the details and missing the big picture here; looking at the photos you’ve posted, I don’t find myself wondering why they’re not quite sharp enough, or why the shadows are so heavy, I wonder what the little thing is floating alongside the door, and where the edge of the cabinet door has gone - and why it looks a bit like it's falling over:-
I've taken the liberty of straightening it up a bit in the right-hand picture - nothing I can do with the flare on the edge of the door though. FWIW I took pictures for a living for 20-odd years before turning to the splintery side of things (was it…) over a decade ago, so by all means treat this as ‘just my opinion’ - just remember it’s an opinion honed from twenty years of playing that game for money…
So camera-wise what you have is perfectly good enough to take professional quality photographs for print or web use, assuming that they are all in good working order. The Nikon kit lenses (18-55 and 18-70) were amongst the best there were and the areas where they’re outperformed by ‘prime’ lenses or pro-level zooms aren’t generally found whilst photographing furniture. So it’s not the lens; no need to spend anything here unless you want to, just make sure that it's spotlessly clean, and if you have e.g. a UV filter on the lens 'for protection' take it off as it will almost certainly be doing more harm than good. Again FWIW, most of my work-related pictures are taken on my iPhone, or on a Nikon D40 when I need my super-wide lens.
Lighting’s a different matter. The reason working professionals spend a lot of money on lighting setups is to make their life easier; that’s because lighting large objects is hard, especially when they’re reflective. The ‘disappearing edge’ of the cabinet above is just a reflection off the flash head/brolly when the picture was taken. This is almost impossible to see with the naked eye and really hard to see even when you view an image on the screen of a camera. Sometimes, it’s even hard to pick up on in the final image - but once you’ve seen it, you can’t help but look at it, can you?
Whilst a hand flash in a brolly is a very portable step-up from flash-on-camera, there are still better ways of doing this. Does your setup need to be ultra-portable (e.g. do you chase around peoples homes taking pictures of the work you’ve done) or does it just need to be easy to break down for storage? If the latter, then a roll of e.g. tracing paper held between a pair of stands with a halogen work light (or two) behind it will give a far, far nicer light than any hand flash, and totally predictable as you can see what you’re doing. If it’s the former and you’re feeling spendy, then lower-end portable studio flash from e.g. Elinchrom, often pops up on eBay for not too much money; a couple of flash-heads with soft-boxes instead of brollies would give a more controllable light, and would look a bit more professional too, if you’re in someone’s house.
One way of softening the shadows is to bounce some of the light back into the shot with a large reflector - I used to use 8x4s of polystyrene in a studio, and clever folding ‘lastolite’ reflectors when out and about. Again, not massively expensive, and would generally pay for themselves quickly in terms of results and convenience - or you could make your own; one guy I worked with when I was first an assistant had a big 2x1 wooden frame that he stretched white felt over; it looked a bit heath-robinson but worked remarkably well! If you're photographing a cabinet from the side, then there's always going to be an inside side that isn't seen - taping pieces of matt silver card (or white, depending on how much infill you want) will also soften those shadows down.
Whatever your setup, the main thing is to really, really look at the subject before you start taking pictures. Thanks to image-editing software, RAW formats etc.. etc.. we can weave a little magic on our pictures ‘after the act’ - but getting it right in the first place is still the best way.
So make the most of the pixels you have be cropping tightly in the camera, and minimise both distortion of the subject and a potentially messy background by using the longer end of the zoom. If what you’re shooting is static, mount the camera on a tripod, switch off auto-focus, use a mid-range aperture - lenses are usually at their softest when used wide open, nor are they at their sharpest when fully stopped down - and generally favour a longer shutter-speed over higher ISO if using continuous light. If you’re using flash and the room is reasonably dark, then you can hold the shutter open (even budget digital SLRs have a ‘bulb’ setting) and manually pop the flash a couple of times - two flashes gives an extra stop of light, four flashes = two stops etc…
Anyway, hope some of that helps. And the cabinets look nice, btw

Cheers, Pete


