Really closing in on the hardinge now - today I fixed the oil leak on the apron, which should mean it's mechanically good to go. Couple of bits left to paint but nothing that will keep it from working. Fingers crossed I'll be making chips on it tomorrow!
You are using an out of date browser. It may not display this or other websites correctly.
You should upgrade or use an alternative browser.
You should upgrade or use an alternative browser.
Adventures in metalwork and machine restoration!
- Thread starter TFrench
- Start date

Help Support UKworkshop.co.uk:
This site may earn a commission from merchant affiliate
links, including eBay, Amazon, and others.
I've made a couple of parts in the hardinge now. Its incredible how accurate it is. Bit of a revelation compared to the Harrison I will get some proper "finished" pictures when I clean up the swarf from the last job.
Already got the next patient in the surgery - the excel die filing machine. Should be much easier than the lathe, mainly a derusting and painting exercise. Of course that comment will probably come back to bite me! It's mainly stripped down to components now, and I've got the base section cleaned up and ready for paint. Once that's done I can begin to assemble it as I get bits completed.
Already got the next patient in the surgery - the excel die filing machine. Should be much easier than the lathe, mainly a derusting and painting exercise. Of course that comment will probably come back to bite me! It's mainly stripped down to components now, and I've got the base section cleaned up and ready for paint. Once that's done I can begin to assemble it as I get bits completed.
Attachments
Pictures of the completed hardinge restoration. It's not 100% yet, but it's definitely usable. The main thing mechanically I need to finish is the flood coolant system - just a case of piping it up, the tank and pump are all clean and work fine. In the future I want to add a DRO, but that's not the easiest on a Hardinge. Because I have a taper attachment (pic 4) the scale has to be mounted on the front of the bed. It's taken about a year to get it done, but I'm so happy with the result. I bored a piece the other day and hit my diameter to the thousandth, first time.
Attachments
I'm so happy with the result. I bored a piece the other day and hit my diameter to the thousandth, first time.
You damn well should be as well! It's turned out beautifully.
That level of performance makes me more than a bit envious though, I spent ages building a gun-drilling attachment to make a couple of precise deep holes when all I needed was a lathe with some real rigidity to it!

£26.99 (£1.35 / count)
VEVOX® FFP2 Dust Mask - Set of 20 - Valved Face Masks - Respirator - Protection e.g. for Construction, Building Work, Sanding, Woodworking, Fine Dusts, Aersoles or Particles
SLSK Ventures GmbH (UK)

£19.46 (£3.89 / count)
£19.99 (£4.00 / count)
Stealth Lite Pro FFP3 Face Masks UK Certified Dust Mask. 99.99% particle filtration, air filter reusable face mask. FFP3 Mask -7 day use per Construction, Woodworking, DIY and Welding Mask
Amazon.co.uk

£17.99 (£1.80 / count)
£27.44 (£2.74 / count)
3M 8822 Disposable-fine dust mask FFP2 (10-pack)
Amazon.co.uk

£12.50 (£1.25 / count)
£14.45 (£1.44 / count)
JSP M632 FFP3moulded Disposable Dustmask (Box of 10) One Size suitable for Construction, DIY, Industrial, Sanding, dust protection 99 Percent particle filtration Conforms and Complies to EN 149
Amazon.co.uk
Thanks guys. Having watched a lot of youtube the method of using equal cuts to keep tool pressure the same certainly pays off! Being able to hold work in collets is fantastic as well.
In other news, work on the die filing machine is pressing on. Got the base primed and a first coat of colour on it. The amount of fiddly little bits I have to paint to get this one finished is a bit daunting! Tested the motor and it's all good and rebuilt the air blower with new bearings.
In other news, work on the die filing machine is pressing on. Got the base primed and a first coat of colour on it. The amount of fiddly little bits I have to paint to get this one finished is a bit daunting! Tested the motor and it's all good and rebuilt the air blower with new bearings.
Attachments
KingAether
Eternal noob
Ive just been through and admired the whole thread; some great work and some lovely machines! That union grinder is a beauty.
Do you restore to use or is it your business buying and restoring?
Do you restore to use or is it your business buying and restoring?
delaney001
Established Member
Just read the whole thread also. Its absolute Golddust!!
Thanks, appreciate it! Generally I restore stuff to use. If it's to sell I just clean it and get it working. Occasionally I'll sell a restored one if I get a better model. The grinder went last year when I got the belt linisher.Ive just been through and admired the whole thread; some great work and some lovely machines! That union grinder is a beauty.
Do you restore to use or is it your business buying and restoring?
A while ago I got a small RJH ferret/trimtool tool grinder as part of a trade with a mate. Only snag - it had no wheel. I spent ages trawling through grinding wheel suppliers to try to find a suitable one, but it seems no one makes what I needed. Next option was to get a 6" diamond cup wheel from arceurotrade and modify it to suit. Finally a use for the starrett 196 indicator set - couldn't get a standard indicator close enough to work, this was perfect for the job! All done, mounted on an offcut of worktop and donated to my old man (that's his birthday sorted this year!)
Attachments
Another pleasure to read. Harrison lathes are very good, but Hardinge are REALLY good. At Warwick Uni we used a Hardinge for precision machining research because of the quality of its bearings.
Can't wait for the end of lockdown to come and drool over your machines, Tom!
Can't wait for the end of lockdown to come and drool over your machines, Tom!
delaney001
Established Member
Finally, the horizontal bandsaw was looking really sad and it wasn't cutting remotely near 90°. The coolant system was gross and silted up, the guide bearings were knackered and the blade had less teeth than the queen mother. Basically it looked exactly like we'd rescued it from a skip 20 years ago... which is exactly what happened.
Bandsaw before
All new guide bearings, new coolant line, rewired most of it, good clean, fresh blade and its awesome! I really should have done it a long time ago.
Bandsaw finished
TF, could I be a pain in the backside and ask for your help. I’m half way through restoring this exact machine at home and there’s no motor nor pulley for the gearbox. Would there be any chance you tell me what the largest diameter is of each pulley, or are they both the same size with one inverted?
I'll try and remember to check next time I'm in the workshop - PM me and remind me if I forget!TF, could I be a pain in the backside and ask for your help. I’m half way through restoring this exact machine at home and there’s no motor nor pulley for the gearbox. Would there be any chance you tell me what the largest diameter is of each pulley, or are they both the same size with one inverted?
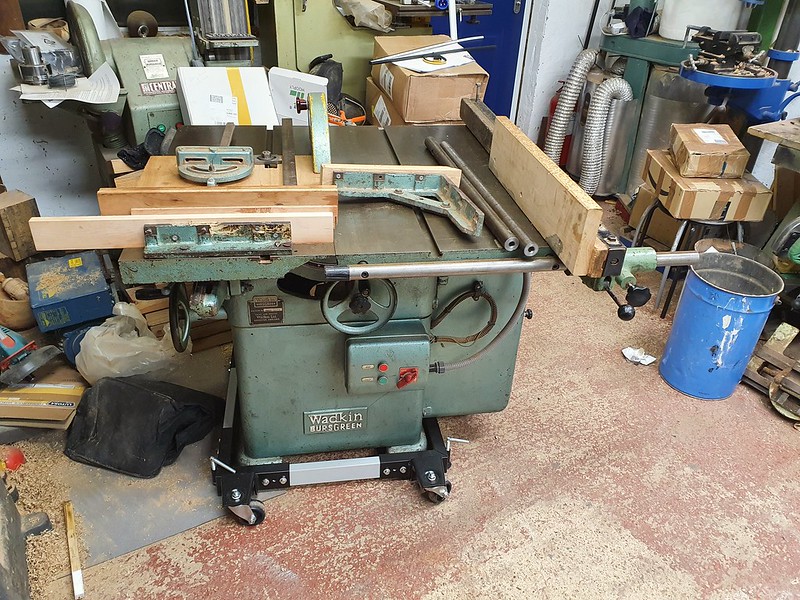
I've been on the lookout for a wadkin BGS table saw for a very long time. It's got all the features I want, without being the massive dead weight of a PK. They seem to go for silly money, or are dog rough whenever I spot them. Anyway, one popped up on ebay close to me (caught it within 10 minutes of it being listed!) for a buy it now price that was less than the littlest craft saw that axi sell. Its practically mint - came with all the fences and mitre attachments, as well as an extension table. I bought an axminster mobile base and fitted it. Made unloading it into my workshop a breeze!
 Bgs12
Bgs12
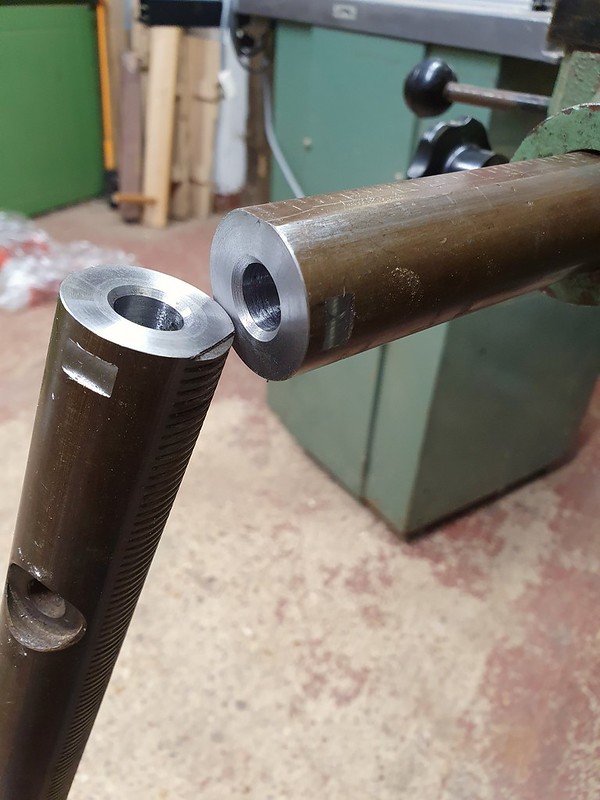
The extension table and long bars were a little too big for my workshop so I've cut the bars down and left the table off. I've faced and bored the ends of them and I will make a joining piece so I can put it back together should I ever need to. You can just see in the picture I milled flats either side of the cut. That was the best way I could come up with to be able to measure what material I'd removed so I can make a spacer so all the mounting holes line back up. We'll see if it works when I make them!
 Bgs 12 fence
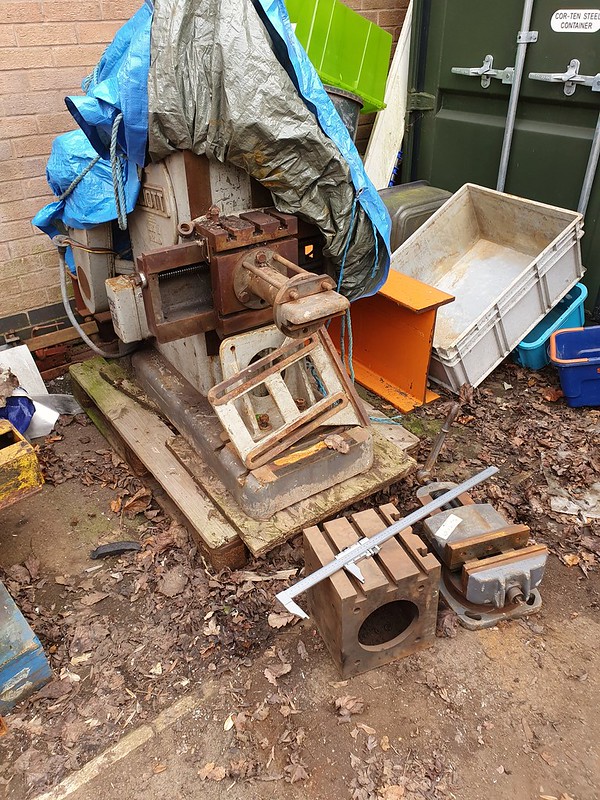
Finally I've managed to gather up the parts I was missing for the metal shaper (mainly the box table and a correct vice). Had a quick look today and the table is correct externally, just the big hole in the middle is still a rough casting. I'm pretty sure its from a plain machine without the tilting table. When it gets its turn in the surgery I'll have to bore it to size.
 Shaper parts
 Bgs12
Bgs12 The extension table and long bars were a little too big for my workshop so I've cut the bars down and left the table off. I've faced and bored the ends of them and I will make a joining piece so I can put it back together should I ever need to. You can just see in the picture I milled flats either side of the cut. That was the best way I could come up with to be able to measure what material I'd removed so I can make a spacer so all the mounting holes line back up. We'll see if it works when I make them!
 Bgs 12 fence
Finally I've managed to gather up the parts I was missing for the metal shaper (mainly the box table and a correct vice). Had a quick look today and the table is correct externally, just the big hole in the middle is still a rough casting. I'm pretty sure its from a plain machine without the tilting table. When it gets its turn in the surgery I'll have to bore it to size.
 Shaper parts
Latest project complete. Bare casting for a gap bed extension piece for the wadkin lathe. It allows you to take the gap out but still get your toolrest in the right place. Completely maxed out the travel on the milling machine - had to change setup halfway across the underside to allow me to skim the whole thing. I was particularly happy with the setup to drill the lock lever hole - I couldn't work out an easy way to hold it as it's such an awkward shape. I found a couple of original wadkin handles on eBay and I think it looks pretty original now.
Attachments
Ages ago I found an original wadkin blade guard from a big old rip saw. It's old as it's "wadkin and co", not just wadkin. Sandblasted and painted it, finally remembered to make the bracket after I'd finished work on Friday. Couple of bits of scrap pipe, bit of lathe work and welding, came up with this bracket. Worked a treat!
Attachments
Ttrees
Iroko loco!
A good place for remembering where you left your overhead guard.
Now where's that old riving knife, I fancy making a door handle
Not jealous at all of being able to knock up precision 'do da's for fun!
Now where's that old riving knife, I fancy making a door handle
Not jealous at all of being able to knock up precision 'do da's for fun!
I picked up another pantograph over the weekend - I've been looking for a knackered one for ages for a couple of parts I needed. Last one I had was absolutely mint and I couldn't bring myself to break it up! This one fit the bill nicely, cheap and nicely rusty. I stripped it down to get the bits I wanted, then had a bit of a brainwave. The work table has a X-Y movement like a milling machine and I realised it'd make a great table for my drill. Took it to work with me today and made a really good start. It just fit in the bandsaw to cut the bulk of the material off. I had to use the 9" grinder to cut the elevation housing off so the saw would clear - serious brown trouser moment when the disc decided to part company with the grinder. I've no idea why it happened - I wasn't abusing it or anything. Anyway, it missed me and all was ok. I milled it flat on the bottom so it's now ready to mount on the drill. Final picture is a quick mock up on the drill to work out where it needs to sit on the base plate.
Attachments
Similar threads
- Replies
- 24
- Views
- 870
- Replies
- 7
- Views
- 1K


