best way to cut segments for bowls

UKworkshop.co.uk

Help Support UKworkshop.co.uk:

This site may earn a commission from merchant affiliate links, including eBay, Amazon, and others.

woodfarmer

Established Member
Joined
10 Sep 2013
Messages
1,261
Reaction score
18
Location
poitiers
Hi all
Rang Aminster today and they will have the lathes i want to see in store for me in November.
Next thing is how best to cut the wooden segments to make bowls. I am supposing a good quality small accurate table saw would do the trick? maybe in conjunction with some kind of jig.

Could anyone advise me on this? eg is this the way to go and what is a suitable saw. my own (a Ryobi 315mm blade) is well worn and only really accurate enough for farm building construction.
 
For my stuff I uses a basic Chop Saw, just need to make sure everything is set up square in the vertical plane and that angles are set accurately in the horizontal.

The most important of needs is to prepare your stock for thickness & square.
 
DSCN4151 (Large).JPG
 

Attachments

  • DSCN4151 (Large).JPG
    DSCN4151 (Large).JPG
    90.2 KB
I'm impressed that you get sufficient rigidity for repeatable accuracy with a CMS. Do you have to do much abrasive fettling?
 
monkeybiter":2gujivew said:
I'm impressed that you get sufficient rigidity for repeatable accuracy with a CMS. Do you have to do much abrasive fettling?
No Abrasive at all, trying to abrade a segment is fraught with multiple chances of creating inaccuracies and a fine abraded finish is not conducive to best mechanical key for adhesive.

The Chop saw is a basic Rexon CMS.
DSCN4152 (Large).JPG

Simple and robust is often best, only want would be similar with regenerative braking to speed things up.
 

Attachments

  • DSCN4152 (Large).JPG
    DSCN4152 (Large).JPG
    68.2 KB
That is an idea, I have a little 1200watt chop saw with pretensions of being a radial arm saw I bought from Homebase a while back, almost for got about it, use it mostly for smaller constructional work. but think with a jig might just work. no slop on the chop pinion.

Thanks again.
 
Woodturner1972":1tmaufos said:
Would love to read a "how to" including pictures if you ever had the time 8)
There is an old run-through of a lidded segmented box on my web site.
Not the way I assemble them now but the stages are the same.

Since You asked I've been out and run these through.

Decide what nominal size you want to end up with.
I use my Calculator for anything new & I have printouts for most often used, saw stops etc. are marked up with regular options.
<<<< Link
Tip:-- Don't be too critical on stock width, if you have spare then allow extra thickness in your early attempts to give youself some error padding.

Sort out some scrap:-
DSCN4153 (Large).JPG

Run it through the saw:-
DSCN4156 (Large).JPG

Put it through the thicknesser to get it reasonable square and constant thickness:-
DSCN4157 (Large).JPG

Decide if you want contrast bands and do likewise and chop them off at the thickness you want:-
DSCN4158 (Large).JPG

DSCN4159 (Large).JPG

Adjust Chop Saw stop to segment length (allow for contrast width if used):-
Suggest you run a scrap length through to check your sizes.
Then just keep chopping away by turning the wood stock through 180 deg. until you have enough segments and a couple of spares if you have enough wood length:-
DSCN4160 (Large).JPG

The above sequence took 13 mins total according to the image EXIF files.
 

Attachments

  • DSCN4153 (Large).JPG
    DSCN4153 (Large).JPG
    117.3 KB
  • DSCN4156 (Large).JPG
    DSCN4156 (Large).JPG
    104.5 KB
  • DSCN4157 (Large).JPG
    DSCN4157 (Large).JPG
    75.7 KB
  • DSCN4158 (Large).JPG
    DSCN4158 (Large).JPG
    97 KB
  • DSCN4159 (Large).JPG
    DSCN4159 (Large).JPG
    94.6 KB
  • DSCN4160 (Large).JPG
    DSCN4160 (Large).JPG
    98.6 KB
Note:-- I f you want repeatability and minimum amount of aggravation and disappointments then it is essential to set up the saw correctly.
DO NOT rely on any existing graduations or stops without checking.
I use an Engineers Set Square off a dummy piece of flat stock laid across the base to set the blade vertical and that the vertical traverses is spot on.
For the Horizontal angles I cut stock and check it against a digital angle finder on a reference surface, you can get away with a few tenths of degree in cutting errors but you need to start as true as possible.
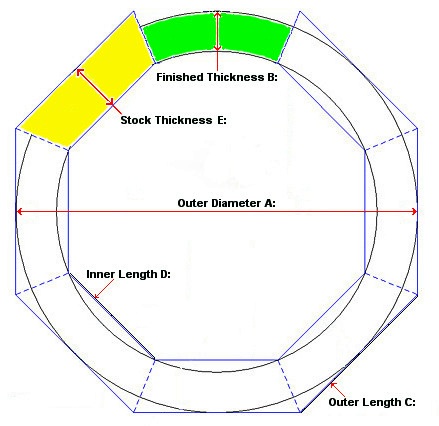
If you look carefully at the front right hand side of my saw (in previous image) you will see a knurled knob, this is in fact a location dowel inserted in a hole I drilled through the frame and rotating table when I had the table clamped correctly so that I can come back to the setting. (The table clamp and associated notches do not return close enough for segment work without trial and error checking)
 
Thanks for the pictures =D> really interesting. You make it sound easy, somehow think it's a little out of my league at the min but I can always dream!
 
Back
Top