Workbench build - WIP - Almost finished and a small treat!!

UKworkshop.co.uk

Help Support UKworkshop.co.uk:

This site may earn a commission from merchant affiliate links, including eBay, Amazon, and others.
I have the Veritas twin-screw vice and the Veritas quick-release sliding tail vice, both of which I retro-fitted to my bench
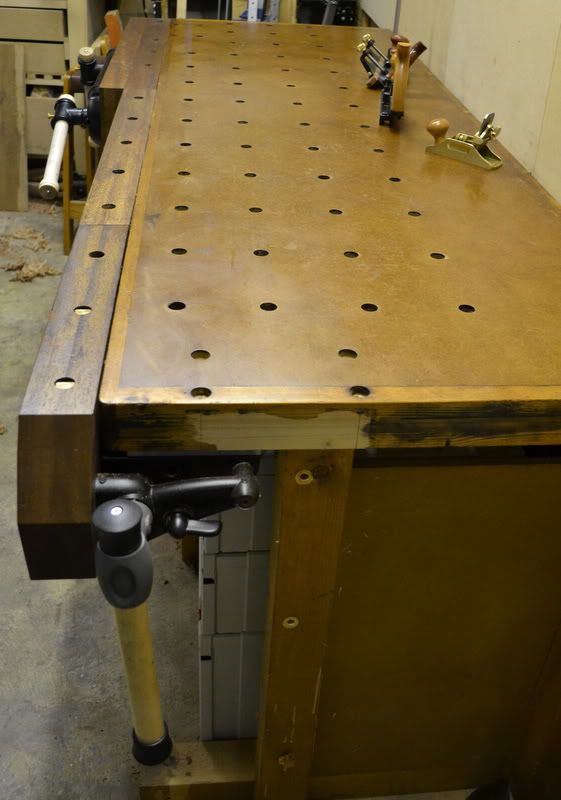
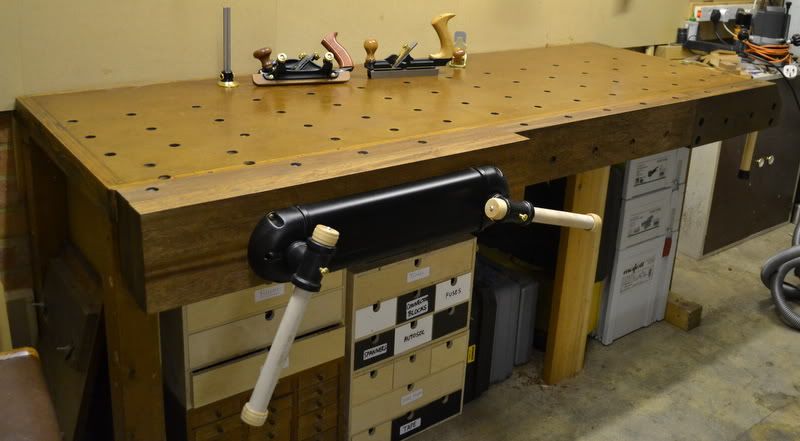


While the twin-screw vice is good, for a tail vice I would fit the quick-release sliding tail vice. I think it is probably the best tail vice available - better even than the Maguire and Benchcrafted wagon vices. It's expensive, but then the best usually is........

I did a write-up here of how I fitted them http://www.woodworkuk.co.uk/forum/viewt ... f=9&t=6113

Cheers :wink:

Paul
 
Here's what's been going on in the Man-Cave over the last few days with the workbench:

Leg frames came out of the clamps looking good - I'm always slightly nervous when I take a project out of the clamps in case it's gone all twisted or weird on me. Fortunately these were SPOT ON!! Hooray for me :D

View attachment 2014

I have to confess that these were just glued and domino'd together - 4 x 14 x 100 dominos in each 'joint' - I'm not quite at the M&T stage yet.

Next was to assemble the 'ladder frame' to go between the two end frames. This was simply screwed together. I was pretty pleased with the fit. It kind of 'sucked' itself into place with a few taps from a deadblow.

View attachment 2014

Placed the big orange slab on top to show what it'll look like once complete. It is seriously heavy and extremely stable already.
I'm thinking that rather than fix the top down I'll locate it on dominos, one in each corner. I can't imagine it'll ever move.

2014-08-26 20.50.48.jpg


I picked up a Veritas twin screw for the tail vice today and took delivery of a Record 53 QR that I bought from Gumtree for £8.
The QR mechanism is fine, the thread looks good and it really needs nothing more than a cleanup to get the gunk off it.
The only issue so far is the false jaws need to come off and the slotted screws used to fix them are seized solid. I've soaked them in WD40 and tried everything I know to get the pippers out but they will not budge. Any ideas welcome
 

Attachments

  • 2014 August 24  17-41-27.jpg
    2014 August 24 17-41-27.jpg
    176.2 KB
  • 2014 August 26  14-03-45.jpg
    2014 August 26 14-03-45.jpg
    154 KB
  • 2014-08-26 20.50.48.jpg
    2014-08-26 20.50.48.jpg
    163 KB
Excellent bench build and looks like it's coming along very nicely. Very envious of your Veritas twin screw vice. The legs look rock solid and at over 30KG each end, there's not much that's going to make that move.
I'm looking forward to the next installment :)
 
JJ1":3v7xx4wb said:
Excellent bench build and looks like it's coming along very nicely. Very envious of your Veritas twin screw vice. The legs look rock solid and at over 30KG each end, there's not much that's going to make that move.
I'm looking forward to the next installment :)

Thanks for the encouragement JJ.

I've got the front half of the top in clamps at the moment - I'll carry on with it in the morning.

2014-08-29 14.02.50.jpg


My kids are keeping me busy at the moment so I'm not getting it done as fast as I'd like but there's something to be said for making dens and cooking sausages over open fires - keeps me young!

2014-08-28 11.53.31.jpg


I cleaned up the Record Vice a bit today and managed to get the false jaws off so I'll have a go at fitting that tomorrow before the top gets completed.

The it's making the tool well and the centre slot which will be three 15mm strips of Oak with a bit left out if that makes sense. I'll try and get some more pictures up tomorrow.
 

Attachments

  • 2014-08-29 14.02.50.jpg
    2014-08-29 14.02.50.jpg
    143.3 KB
  • 2014-08-28 11.53.31.jpg
    2014-08-28 11.53.31.jpg
    206.8 KB
So - nearly finished.
Tool slot and tool well made up and clamped - all went well (ish)
Then the whole lot was glued up and clamped together.
The vice got fitted without too much of a problem.
Planing down the top was fun (not) but I got there in the end. Pictures below.

2014-08-30 12.22.59.jpg

2014-08-31 14.53.51.jpg

2014-08-31 14.54.19.jpg

2014-09-03 12.05.58.jpg


And 'cos I was feeling pleased with myself I splashed out on a wee treat.....
2014-09-03 15.17.11.jpg


I ran out of oak for the end caps so can't fit the Veritas Twin Screw yet. A mate has got a load of 2" oak in his kiln at the moment and has promised me a lump that I can use to finish it off.

It weighs an absolute ton and I'm well pleased.

Mistakes: I planed down the first half of the top before gluing and clamping it to the rear half. As a result I din't notice that I wasn't planing flat. This could just be because I'm rubbish at planing!!
Also I discovered that it's real important to check machine fences regularly. My PT fence was out by a shad which means the components don't fit as well as they should/could.
The bench top itself is therefore not totally flat - up to a 2mm deviance overall and this is something I will remedy when I've perfected my planing skills a bit more.

Thanks for looking

Pete
 

Attachments

  • 2014-08-30 12.22.59.jpg
    2014-08-30 12.22.59.jpg
    217.8 KB
  • 2014-08-31 14.53.51.jpg
    2014-08-31 14.53.51.jpg
    212.3 KB
  • 2014-08-31 14.54.19.jpg
    2014-08-31 14.54.19.jpg
    195.8 KB
  • 2014-09-03 12.05.58.jpg
    2014-09-03 12.05.58.jpg
    202.1 KB
  • 2014-09-03 15.17.11.jpg
    2014-09-03 15.17.11.jpg
    195.4 KB
Great job. I'll be very happy if mine turns out half as good.
 
Thanks for that JJ - much appreciated.

Because my photography isn't that good you can't see all the little defects/gaps and misalignments, so in some ways I'm a bit miffed that i didn't correct some of the little errors as I went along. They end being compounded into unfixable things later on. BUT...it's ONLY a workbench and I suspect that in a few months time it'll have a few battle scars and the things that bug me will be long forgotten.
The main thing is it's heavy, stable and solid. It holds things well in the vice and it's ready to use!!
 
Solid heavy bench, you won't be chasing that one round the workshop.
Lovely top, great job =D>
 
Looking very smart.

My new bench has a few mis-measurements due to relying on timber sizes. All that matters is it's solid though.
 
Paul Chapman":2bzly2wf said:
I have the Veritas twin-screw vice and the Veritas quick-release sliding tail vice, both of which I retro-fitted to my bench


While the twin-screw vice is good, for a tail vice I would fit the quick-release sliding tail vice. I think it is probably the best tail vice available - better even than the Maguire and Benchcrafted wagon vices. It's expensive, but then the best usually is........

I did a write-up here of how I fitted them http://www.woodworkuk.co.uk/forum/viewt ... f=9&t=6113

Cheers :wink:

Paul

Awfully sorry to steal the thread, I just couldn't start to find out where to find the answer to this question - Paul, I read somewhere that your bench top is MDF (sorry if I'm wrong, but it really looks like). May I ask what finish did you use on the top? Could you point me to any thread where you might have detailed its construction (it´s actually the top I am interested in, not so much the full bench )
Thanks, and my apologies to the OP.
G.
 
Hi G,

I built the bench about 12 years ago - long before I was into digital photography, so I don't have any photographs of it's construction. I'll try to explain how I made it.

You are correct, the top is made from MDF. I originally intended it as a temporary bench until I could afford to build something better but it's been so successful I've decided I don't need anything better.

The original top (before I fitted the Veritas vices) measures 75" long and 25" wide. It's made from three layers of 18mm MDF, lipped with softwood. I lipped the individual pieces of MDF first, using biscuits and PVA adhesive, then planed the lippings flush. I then glued the three pieces of MDF together, again with PVA and some biscuits to help with location. It's important to get even pressure over the whole of the top when cramping it so I used lots of curved wooden cauls and G cramps - you need quite a lot!

I used a 3/4" flat bit in a drill stand to drill the dog holes. I can't quite remember exactly how I did this, but had to get the base of the drill stand under the bench top to get enough travel. I just remember it was a bit of a fiddle.

I think I gave the top a coat of Sadolin Classic wood preservative (I don't think that was necessary but it seemed a good idea at the time) but now I just occasionally wax it with Liberon Black Bison wax - it helps to get any dried glue off.

I did worry how the dog holes would stand up to wear and tear but they have been fine. I use various Veritas dogs in them and the holes haven't distorted at all.

Overall I've been delighted with the bench. It's had a lot of use but still looks as good as new. It's very heavy, which is helpful, and has remained dead flat. If I were to build another bench, I think I would do it the same way.

Hope this helps.

Cheers :wink:

Paul
 
Paul Chapman":3ahsm79h said:
Hi G,

I built the bench about 12 years ago - long before I was into digital photography, so I don't have any photographs of it's construction. I'll try to explain how I made it.

You are correct, the top is made from MDF. I originally intended it as a temporary bench until I could afford to build something better but it's been so successful I've decided I don't need anything better.

The original top (before I fitted the Veritas vices) measures 75" long and 25" wide. It's made from three layers of 18mm MDF, lipped with softwood. I lipped the individual pieces of MDF first, using biscuits and PVA adhesive, then planed the lippings flush. I then glued the three pieces of MDF together, again with PVA and some biscuits to help with location. It's important to get even pressure over the whole of the top when cramping it so I used lots of curved wooden cauls and G cramps - you need quite a lot!

I used a 3/4" flat bit in a drill stand to drill the dog holes. I can't quite remember exactly how I did this, but had to get the base of the drill stand under the bench top to get enough travel. I just remember it was a bit of a fiddle.

I think I gave the top a coat of Sadolin Classic wood preservative (I don't think that was necessary but it seemed a good idea at the time) but now I just occasionally wax it with Liberon Black Bison wax - it helps to get any dried glue off.

I did worry how the dog holes would stand up to wear and tear but they have been fine. I use various Veritas dogs in them and the holes haven't distorted at all.

Overall I've been delighted with the bench. It's had a lot of use but still looks as good as new. It's very heavy, which is helpful, and has remained dead flat. If I were to build another bench, I think I would do it the same way.

Hope this helps.

Cheers :wink:

Paul

Cheers :wink:
Hi, Paul.
I apologise for taking this long to thank you, my computer went out of order and took some days (and quite some $$$... :( ) to repair.
Cheers :wink:
Hi, Paul.
I apologise for taking this long to thank you, my computer went out of order and took some days (and quite some $$$... :( ) to repair.
I am thinking of a much smaller size, but wanted to make sure MDF would be a viable option. The dog-holes were one of my misgivings...
Thank you very much.

G.
 

Latest posts

Back
Top