Tips and Wrinkles

UKworkshop.co.uk

Help Support UKworkshop.co.uk:

This site may earn a commission from merchant affiliate links, including eBay, Amazon, and others.
Benchwayze":3jw24l02 said:
DOOGYREV":3jw24l02 said:
To get those old rusty stubbon screws out, tighten them first then they are easier to unscrew.

To get loose screws tight again, use a scrap chunk of timber and a chisel to make some rough little pointy wedge type splinters (don't know if there is an actual word for them) then knock them into the screw holes with the flat side of your chisel and cut them flush, and voila tight screws again.

yes Doogy,

I call them matchstalks! :lol: :lol: :lol:

John :wink:

doh didn't see this one
 
The tip doesn't work so well in chipboard doors though, as some hinges in my workshop will attest. Hence new cupboards!

John :)
 
Not sure this is a tip for most but here goes..

Tape measures.

Keep the same one through the entire job you are doing (put it on your belt or in your pocket), dont have one at the mitre saw - one on the bench etc etc
This will give you consistancy with your measurements, if the tape gets damaged at the end you will be more likely to notice it before you miss measure something and waste material - if you dont notice the damage at least you have a good chance of keeping the 'correct' measurement and cutting to the 'correct' size.
Also if like me you use cheap tape measures at work you might notice that one chinese factorys interpretation of 10mm is a bit different from anothers, thus leading to wrong cutting sizes again.

hth
 
Make sure u dont strip your electric drill down cos it wont work after you have turned off the electric, to do a "safe job" or dont go out and buy a £150 drill cos ur cheap one did not work after three uses (same scenario as above) yes I t was me!
 
Cheers John, Matchstalks it is from now on, although Matchsticks would work too Mark.

Heres another one I mentioned it before in another topic, but thought it was worth noting here too.

When routing or sanding mdf, put another piece of mdf on your bench, and spray a fine mist of water on it, a couple of squirts will do, and the piece your working on will stay put and not move about.

Whist on the subject of the fine water mist, its primary purpose is to help take the dust out of the air, usually once I have rubbed down and prior to varnishing or painting, I spray mist everywhere it is absorbed into the dust an becomes too heavy to stay airborne so falls to the floor, this helps alot if you dont have a seperate painting/varnishing area.
 
That's the trouble with snow.
You know where it comes from, but you never know where it's been. I never eat snow, whatever colour it is... 8)

Someone mentioned using one rule throughout a job.. I agree.

Also, invest in a quality engineers' combination square. They are indispensable even to us woodies. Something like a Starrett fits the bill. Expensive, but they are perfect for calibrating every other 'squaring and measuring' device you have, and for setting up the saw-table.

You won't be sorry. :wink:

John
 
Benchwayze":38m6hhru said:
Also, invest in a quality engineers' combination square. They are indispensable even to us woodies. Something like a Starrett fits the bill. Expensive, but they are perfect for calibrating every other 'squaring and measuring' device you have, and for setting up the saw-table.

You won't be sorry. :wink:

John
I think you're right about the Starrett...I tempted to get hold of one of the small ones from CHT, but I have a 300mm R&C combo square as well, which is pretty accurate - Rob
 
woodbloke":34v0w4ow said:
Benchwayze":34v0w4ow said:
Also, invest in a quality engineers' combination square. They are indispensable even to us woodies. Something like a Starrett fits the bill. Expensive, but they are perfect for calibrating every other 'squaring and measuring' device you have, and for setting up the saw-table.

You won't be sorry. :wink:

John

I think you're right about the Starrett...I tempted to get hold of one of the small ones from CHT, but I have a 300mm R&C combo square as well, which is pretty accurate - Rob

Hi Rob.,

I am waiting to add the 150mm one too, but my 300mm is great. The protractor-head too is a boon.
I checked my old Rabone against the Starrett. Aside from the obvious differences in Imperial measures, the Rabone is spot on, even after 10 years! But it's always good to have a spare. :tool: :tool: :tool:

John
 
Plane shavings make excelletn shims for when you've got a bit to enthusiatice cutting housings for things like door hinges :)
 
Couple of things I think are important which I learned from one my course tutors many years ago is to always and only use engineers squares for marking out your work, this includes a 90 and a 45 degree type. The woodworking try square can and usually is not square when compared to an engineers (calibrated within a specified tolerance) square. This will increase accuracy of your marking out.

Secondly, he also taught me to use a single bevelled marking knife (e.g. a Japanese Kiridashi) with the flat side of the blade against the square and the bevelled side of the blade on the "waste side". This will make a nice perpendicular cut into the wood grain, with the bevelled part of the cut left only on the waste side where it doesn't matter. It also improves the accuracy of your cut line/marking out.

HTH :?:
Steve
 
This really isn't an excuse to go shopping, but I'd say:

Have as much choice of tools as you can.

For a lot of us on this forum, we like making furniture, and aspire to do quality work. But we also need to do ordinary household diy.

So we need proper tools for the quality stuff, and also more ordinary ones for the rest. It worries me when I hear of someone getting rid of their old chisels/planes/saws to make way for an upgrade to their choice of LN/LV/Clifton etc.

What will they use to plane down the edge of a door covered in paint, chip out old putty or pry off the beading round a sash window?
 
Andy,

Believe me I am in full agreement here. Yes, I have bought one or two of the modern high-end planes and chisels. Yet I still have my old faithfuls. Even some of those I don't want to use for rough work. That's why I buy old bangers or cheapo versions of any tool, when I think they will be useful. If I know a tool will hold an edge only for as long as it takes to do rough jobs, then I'll use it, because it doesn't matter if I chip a piece out of the business end!


Which answers the complaints/queries we used to get from some forumites, about the 'need' for so many tools.

John :wink:
 
In framing joinery, hammering the edge of the nail-head into the wood where the nail is to go will prevent splitting nine times out of ten.
Also to prevent splitting on thinner woods with brads, panel pins and the like flattening the point of the pin (normally on the exposed top of the vice) means that as the head of the pin presents less of a wedge effect on the grain and therefore is less likely to split...bosshogg 8)
You can't help a man who doesn't tell you what he wants
(homer)
 
Drum Sander Loadings

I posted this in the jigs and tips section as well.

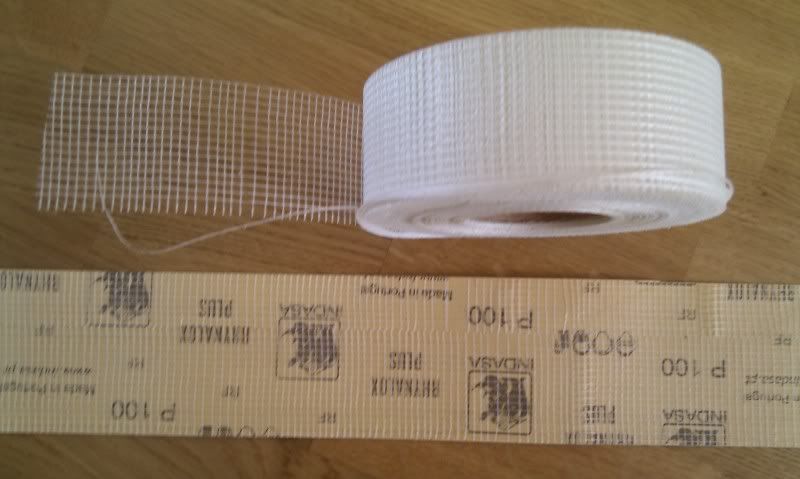
The Drum Sander is a great bit of kit but the price of the loadings/abrasives is ridiculous, £10 a time or £35 for 25 metres, I have the Jet 16 - 32, and these are not made with the woven material, I make quite a few games boards which need to be sanded flat but the paper loadings don't last long.

Here's a tip, buy the cheaper 3" wide sanding rolls, only about £15 for 50 Metres and a roll of plasterers scrim tape and stick it on the paper like the photo
IMAG0117.jpg


I do 2 strips at a time because the scrim tape is only 2" then cut with a Stanley Knife, and you have a strong Drum sander loading for a fraction of the price.

Believe me it works a treat.
 
When glueing up frames, I space my sash cramps with 6mm studding (threaded rod), nuts and penny washers, through the holes I'm not using. This works fine with Record (expensive) ones, but I was annoyed to discover that, while my el-cheapo 'Silverline' ones have the holes spaced in the bars, the bars themselves were cut off at a random points, so the holes aren't in the same place on different clamps! Infuriating, especially as they're otherwise pretty much as good as Record ones.

At least, if you're using a good set of clamps, this lets you get them exactly positioned and stops them falling over at a crucial moment. I store the studding with the clamps so it's handy.

6mm studding nuts and washers are dirt cheap from Screwfix or Toolstation, etc.

E.
 
And another one, though it's DIY really.

If you have to fit things to walls, it's a pain getting rid of the gritty dust from drilling the rawlplug holes, but a dust sheet usually doesn't catch it.

I keep used, large envelopes for this: stick the flap of the envelope against the wall with masking tape, just below where you are going to drill the hole, so that the envelope is open, facing out from the wall. Most of the muck then falls into the envelope and not into the carpet.
 
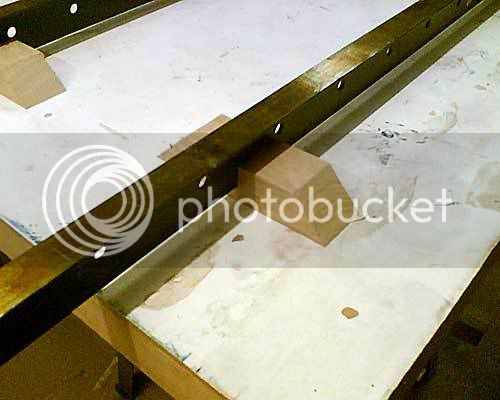
To stop my sash clamps from falling over I make a cut in a scrap and rest the clamps in like so:

clamp_support.jpg


I know I've posted this before but it was a few years ago

regards

Brian
 

Latest posts

Back
Top