"Table Saw Accident Week"

UKworkshop.co.uk

Help Support UKworkshop.co.uk:

This site may earn a commission from merchant affiliate links, including eBay, Amazon, and others.
devonwoody":2wh0ofrg said:
Is there a weight or size where there is no kickback to worry about.

I'm thinking perhaps a 12" wide board x 2" thick 6ft long would need considerable power applied to kick back?

Or it will still happen and be heavier. :roll:

Depends on the power of the machine. I've seen a 2 inch thick board of Iroko stop a 3 phase wadkin saw. It is worth noting that when ripping timber the grain of the board can often pre-warn you to expect a problem and sometimes it will not show. But as sods law dictates, a clean looking board can hide powerful stresses, one memorable one was again Iroko that two feet from the end of the rip went 'bang' and split to the end in a direction not entirely to plan :roll:
But the thing is, and stuff the bosses 'I want it now', if you think it is not going as it should STOP save you the pain and the boss a bigger problem other than the job took longer than planned. And by boss I mean those that pay and those for whom it is done out of love.
Rob.
 
JoinerySolutions":q4y5b1pb said:
One of the main causes of kickback demonstrated in the over the top bit is when the fence is not parallel to the blade. The workpiece jambs tight against the back of the blade and the teeth hit it at a flat angle thus slinging it willy nilly.
To prevent this is simple, a/ set the machine up correctly b/ if the workpiece starts to bind STOP PUSHING IT STOP the machine.
Check if it is the set up or the stresses in the timber (man made boards can suffer this too) that are the cause.

.

Hi Rob

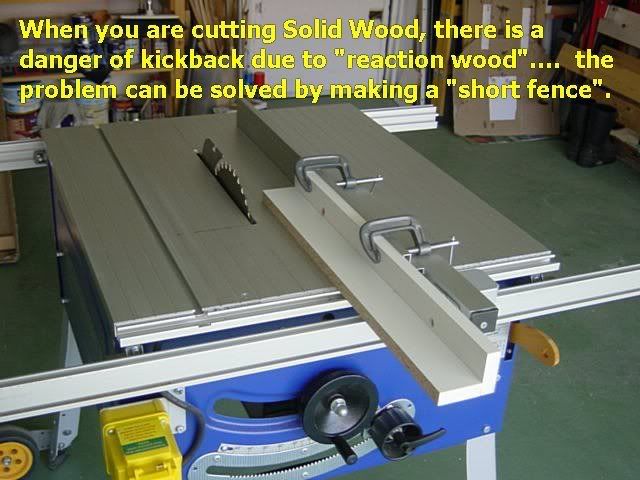
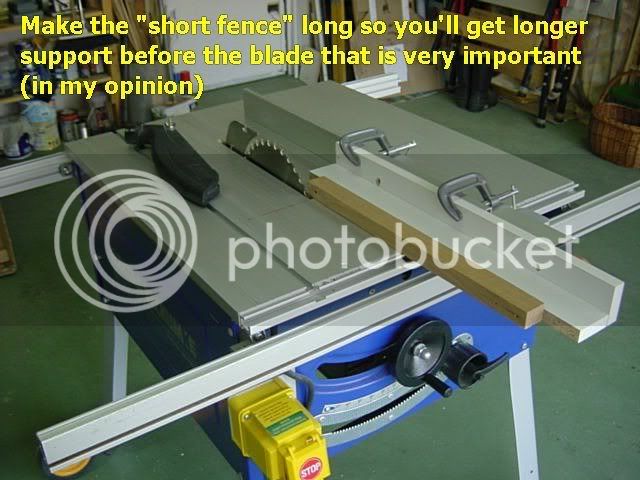
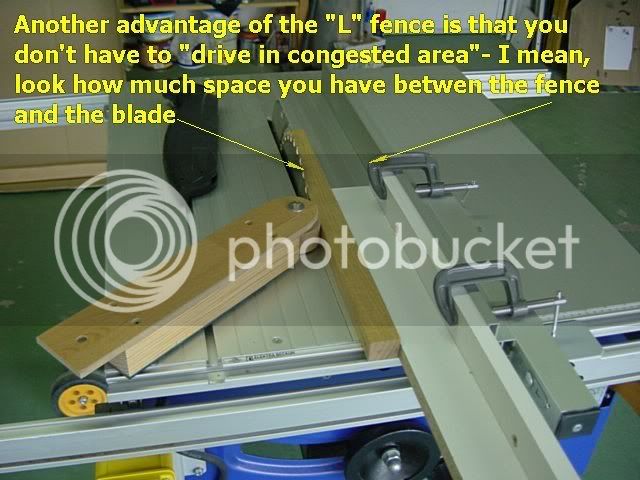
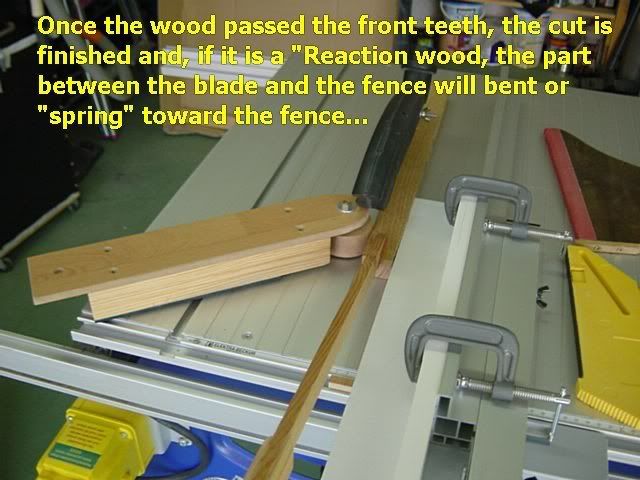
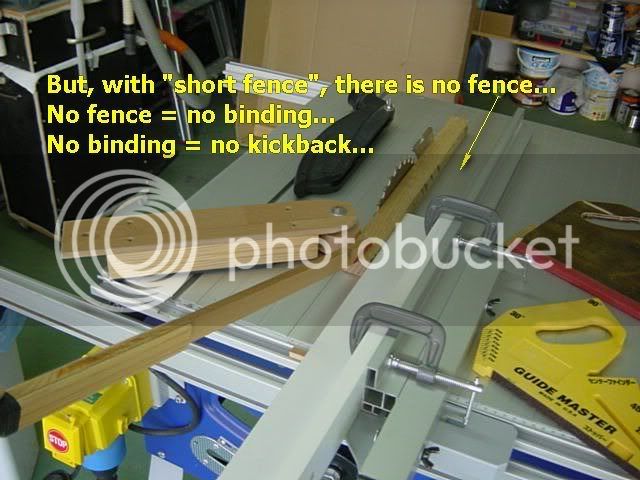
There are many things that I didn't mention because I take them for granted like...the TS is as perfectly as possible aligned - blade to miter slot and fence to blade... but, this situation can occur also when ripping "Reactive wood" and the wood "Springs out" and presses on the fence...that's why, I use short fence....no fence - no binding ---- no binding - no kickback.

JoinerySolutions":q4y5b1pb said:
Blades should also not be left at full height when cutting thin stock, this only serves to present the teeth to the material at an exaggerated angle, causing stress to the teeth and reducing performance. Saw teeth are designed to slice not hack out lumps of wood.
Just my tuppence worth.

Same goes for the "High blade", I use it usually when I cut solid wood thicker than 15mm or so....for made-made plates, I use low blade for cleaner cut (or more cheep free).

If I was using 24~34T blade, maybe the teeth were "Hack out lambs of wood" but, with a 60~100T blade, not so much "hacking of wood" - me think...

And if the blade cannot be used at "High" position, why the maker doesn't warn us....

Regards
niki
 
devonwoody":3um8406n said:
I have never touched the spinning blade with a push stick, WHAT HAPPENS if you do?

Apologies if this has already been answered but, here's my reply...

If the push stick catches the teeth at the front of the blade then, you're unlikely to be at risk unless it's too short or you're holding it incorrectly! At worst, it might damage the end of your push stick but, you shouldn't be at risk of any 'projectiles' unless you actually cut a segment off the end of the stick.

However, if the push stick comes in to contact at the rear of the blade (with those rising teeth) then, there is a great risk that it will be thrown up towards your face - just ask Nick Gibbs (it got a brief mention in an issue of BW, a few months ago and on his blog)! :shock:
 
devonwoody":3idxi3kv said:
I occasionally use a very thin piece of timber (around 6mm thick) to push timber between the fence and the blade. I have never touched the spinning blade with a push stick, WHAT HAPPENS if you do?
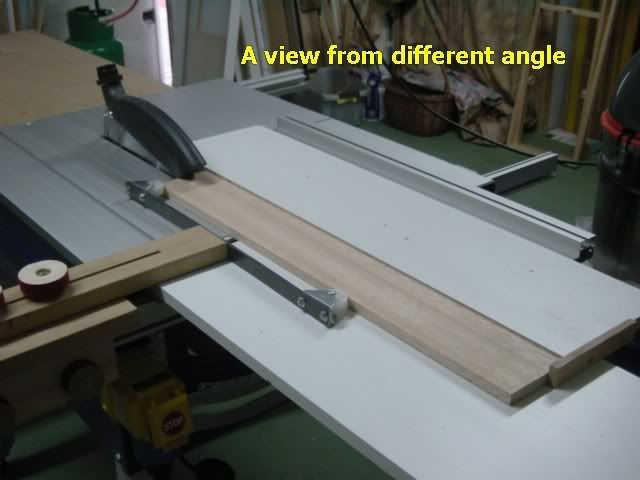
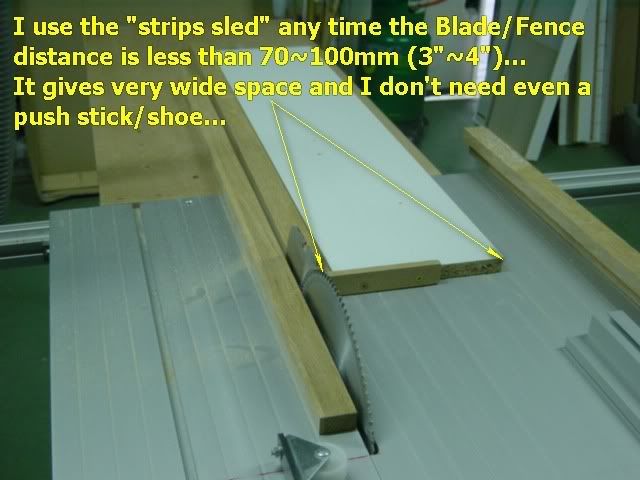
But why not to use the "strips sled"...you're never near by the blade...

16.jpg


14.jpg


Regards
niki
 
This thread is a mine of information...keep the tips coming...nobody's too old to learn new tricks!

One thing I wear when using any table saw or router is one of these:

fullface.jpg


I got a new one for a quid at a bootfair as a joke really but BOY is this thing worth it's weight in gold. It doesn't steam up...hasn't scratched and with a couple of filters acts as a fume mask for my nitro spraying.

It is faster to get on and off than goggles and if somethng hits you in the face with one of these it just bounces off.

Can't recommend it enough...the missus thinks I look like a bio-terrorist but what the hell!

:D :wink:

Jim
 
Don't forget your fence when trying to avoid kickback either. We had our machine shop induction at the beginning of term again and were reminded that the rip fence should go no further than the first gully on your saw blade, ie the amount of overlap between blade and fence is minimal.

If there's no fence to jam up against then you've removed one of the sources of kickback
 
Ironballs":31y01jb8 said:
Don't forget your fence when trying to avoid kickback either. We had our machine shop induction at the beginning of term again and were reminded that the rip fence should go no further than the first gully on your saw blade, ie the amount of overlap between blade and fence is minimal.

If there's no fence to jam up against then you've removed one of the sources of kickback

This I have heard before, but I find there is drift if the fence is not there to hold the line, perhaps you push the rear end of board equally at both corners?
 
For sliding tables and the risk of an "over the top" kickback, most have the ability to clamp the workpiece firmly to the table (which is why the sliding table should be set with it's surface slightly higher than the saw table). No way it's going to shift then.
 
Ironballs":n55haa4k said:
Don't forget your fence when trying to avoid kickback either. We had our machine shop induction at the beginning of term again and were reminded that the rip fence should go no further than the first gully on your saw blade, ie the amount of overlap between blade and fence is minimal.

If there's no fence to jam up against then you've removed one of the sources of kickback

Hi Ironballs
Look at my posts on page 3 and you'll see it with pictures...

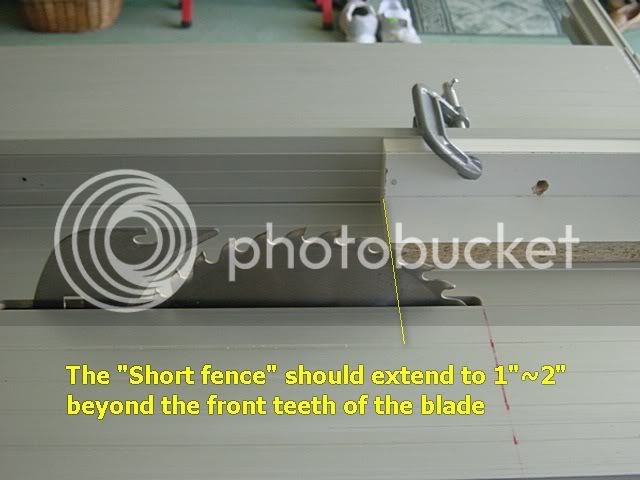
I've sent Metabo an e-mail as for the Short fence position and they recommend the centre of the blade...

---------------------------------------------------------------------------------
Dear customer,

thank you for your email regarding the setting possibilities of the rip fence.

Reactive woods (not dead woods) can move to the side just after cutting. That´s why there might be the risk of a kick back if the rip fence is set in the long position.
In order to minimize this it is recommended to set the end of the rip fence to the saw blade centre (short position).

For sawing dead wood like chipboards it is recomended to set the rip fence in the long position in order to achieve the maximum guiding length.

The riving knife is absolutely necessary and the correct position of the rip fence has to be chosen according to the wood!

If you have further questions please feel free to contact me.
Furthermore enjoy woodworking!

With best regards

-------------------------------------------
Florian Fischer
Produktmanager Holzbearbeitung
Product Manager Woodworking

Phone: +49 (0) 70 22-72-2529
Fax: +49 (0) 70 22-72-2074
Email: [email protected]

niki
 
devonwoody":2m1l4kip said:
This I have heard before, but I find there is drift if the fence is not there to hold the line, perhaps you push the rear end of board equally at both corners?
Hi DW

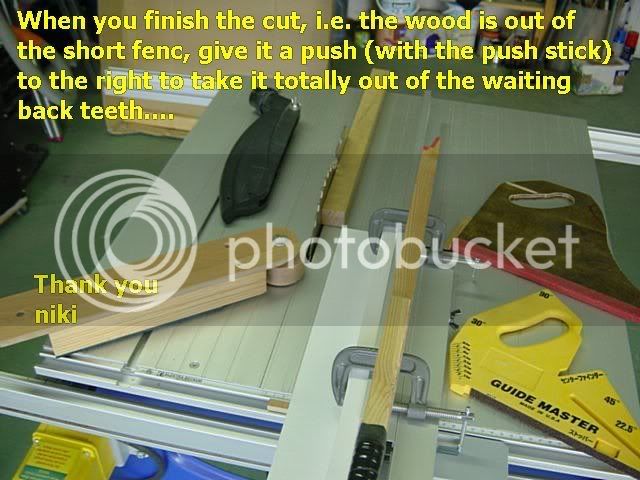
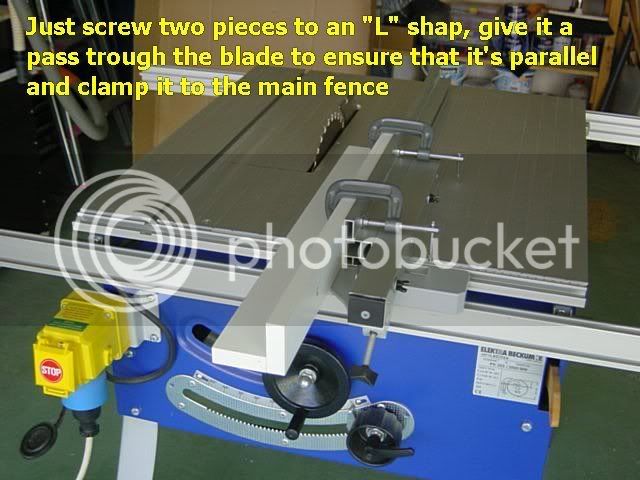
Maybe you can make a Short fence and clamp it to your existing "Long fence"...

I think that Steve Maskery have a video on YouTube.

Anyway, here are a few pics to explain the idea...

I have a mistake as for the fence position but it was based on "private knowledge" of some people before I sent the e-mail to Metabo...

09.jpg


10.jpg


11.jpg


12.jpg


13.jpg


14.jpg


15.jpg


16.jpg


Regards
niki
 
A very informative thread - it's added some great extra insight into types of kickback for me anyway.

It's got me thinking too. Sliding table saws (and i've a Hammer K3 Perform and planer thicknesser and spindle ordered for delivery in the next week or two to replace my X-260 Robland) are heavily sold on the safety as well as functional advantages of the sliding table. The Hammer guy i dealt with was inclinded to say that you pretty well don't need a rip fence on one.

I wasn't inclined to buy that 100% (i'm fitting an Incra TS-LS positioning fence on the rip side), but what it does make clear is that there's a whole new set of working methods required to make the best of a sliding table.

I've not seriously thought about it yet, but do any of you guys know of a good reference source for safe sliding table saw working methods, or better still have anything experience of the topic yourselves???
 
Indeed it is a brilliant thread and in particular Niki's excellent pictures with a running description.

I really like all the great safety jigs on that saw....superb stuff!

Thanks

Jim
 
Good points and pictures ,you just have to remember the role of the table saw and the sequence of events. Cross cut to rough length, rip to rough width on the tablesaw, take to the paner to surface, then thickness and then back to a tablesaw to dimension to the right length with a cross cut.

The tablesaw in rip mode is not designed to finish a piece, it's to provide a rough dimension. Looking back through the links at the beginning of this thread makes your blood run cold, the amount of folks on lumber jocks that don't have all their digits in the right length is quite frightening
 
Richard Findley":37cv4vqe said:
And the Yanks have the nerve to critisise the NHS!!!??? Some of that stitching looks appalling and the staples in link 1 look positively archaic!!!!

Cheers,

Richard

Oh I dunno Richard! The staples the NHS put in my knee were a bit primitive to say the least. I thought they had put a zipper over my patella!

And the scar? I guess they assume it doesn't matter to us old 'uns.
Still, there's no pain from an artificial knee, so I can't really complain!


:wink:

Regards
John
 
Benchwayze":2x139b1t said:
Oh I dunno Richard! The staples the NHS put in my knee were a bit primitive to say the least. I thought they had put a zipper over my patella!

And the scar? I guess they assume it doesn't matter to us old 'uns.
Still, there's no pain from an artificial knee, so I can't really complain!


:wink:

Regards
John
Eek!

I need one of those, but they won't do it because I'm too young. :( Told me I will just have to manage the pain for the next few years...

I'll probably be so unfit and fat by then because I can't excercise that I'll have a heart attack and save them the bother! :roll:

Dave
 
Ironballs":ky70vy0d said:
...you just have to remember the role of the table saw and the sequence of events. Cross cut to rough length, rip to rough width on the tablesaw, take to the paner to surface, then thickness and then back to a tablesaw to dimension to the right length with a cross cut.

The tablesaw in rip mode is not designed to finish a piece, it's to provide a rough dimension.

I tend to agree with that. Although, there are people out there (David Free on the Great British Woodshop, for example), who would plane and thickness a board before ripping to width... :? Then, they may even run that sawn edge over the planer - chances, the board's edges would be anything but parallel!

Sheet materials are an exception though. If I had a decent table saw with a good quality blade, I certainly wouldn't do any more work to the edges of a sheet of ply or MDF once it's been cut. :)

Another very important point is to look at the 'shape' of an edge in order to determine which one should run against the rip fence (assuming you're cutting sawn timber with two square-edges, neither of which have been over a planer). Ideally, it should always be the convex edge, as long as the curve isn't severe. I've made the mistake in the past of placing the concave edge against the fence on a long length of 3in. sapele - not something I would recommend!! :oops:

I find that having the blade set so that its height is just clear of the work piece thickness is very important, particularly with thin or narrow stuff. Otherwise - and I think Rob may have touched on this earlier - it will contact the wood in quite an aggressive manner, chattering and 'bouncing' the piece along the bed... :?
 
Back
Top