Spot the oversight

UKworkshop.co.uk

Help Support UKworkshop.co.uk:

This site may earn a commission from merchant affiliate links, including eBay, Amazon, and others.
RogerS":2spmgvnf said:
I'd be interested to hear how you'd make my architrave up from bits. The best I can come up with is this


What I've not shown is that you'd probably have to mould the semi-circle on one end of a larger piece of wood, then rip back, plane smooth then stick and pin down onto the base piece. Ditto the top LH piece, remembering that all of them are only 14mm thick...just love trying to pass them through with a powerfeeder.

I fully accept your comment re curling/cupping and that IS a valid reason for making them up piecemeal. What it is NOT, IMO, is 'less trouble'.
Could be utterly wrong but my guess is a slight mistake in the original measured drawing and it was more like this below, which would be very easy to make and also to fit.
IMG_2297.jpg
 

Attachments

  • IMG_2297.jpg
    IMG_2297.jpg
    2.1 MB
RogerS":cv4g6d9q said:
1) Yes,you are utterly wrong.

2)How are you going to feed thin pieces easily and safely with a powerfeeder ?
The moulds would be machined from a wide board then ripped back on the table saw. Mould, cut, mould, cut etc. I don't really understand question 2 ? I don't want to fuel the argument but there is more than one way to skin a cat lol. Jacob talks sense with this.

Sent from my SM-G900F using Tapatalk
 
The **** nose beading would be made using a no84 cutter from Whitehill as Colie has suggested. A no1200 is almost the profile required for the other moulding.

The method that has been used which has used beautiful knott free red wood has produced a lovely finished item. The growth ring orientation selected means that any cupping will bend the moulding edges into the piece it’s attached to rather than curling them away. Great job.

The method of making it up from bits is another way and was very common, especially when mouldings were readily available to buy off the shelf. It’s ideal for hand tools and also produces a very stable finished item. The backing piece would typically be quarter sawn.

To make up the length from parts I would actually first glue pieces of wood cut to the right width fir each moulding onto a MDF backing board and then mould as a whole or each section. This would actually be very quick, making clamping easy and keeping the costs low.
 
ColeyS1":3ldjp8qy said:
RogerS":3ldjp8qy said:
..........
2)How are you going to feed thin pieces easily and safely with a powerfeeder ?
The moulds would be machined from a wide board then ripped back on the table saw. Mould, cut, mould, cut etc. I don't really understand question 2 ? I don't want to fuel the argument but there is more than one way to skin a cat ......
Yes that's the way - board edge and clean cut with a fine TS blade.
You can actually feed small sections through a power feed and spindle if you set it up right, e.g. false fence across the gap, and some support for the profile as it comes off, if necessary. If done right you can end up feeding stuff through all day and every piece coming out perfect - marvellous machine the spindle!
 
ColeyS1":36fafnjl said:
RogerS":36fafnjl said:
1) Yes,you are utterly wrong.

2)How are you going to feed thin pieces easily and safely with a powerfeeder ?
The moulds would be machined from a wide board then ripped back on the table saw. Mould, cut, mould, cut etc. I don't really understand question 2 ? I don't want to fuel the argument but there is more than one way to skin a cat lol. Jacob talks sense with this.

Sent from my SM-G900F using Tapatalk

The thickness is 14mm. I know that you could do it by mould/cut/mould etc (mentioned it above, I think) but surely that's an awful lot of extra work ? What about the finish off the table saw blade ? Is that good enough to stick down ? Saw marks visible ?

If you are in a factory making these forever then I can see the advantage in doing it this way (especially if you have a trainee who is going to do it day in day out) and putting some away for the next project. But if the quantity is relatively few...factor in time spent changing the cutters and realigning, removing a false fence and replacing etc as well...just doesn't make sense to me but each to his own.

And if you've only got a combination machine....have you seen the hassle in changing between modes :shock: :lol:
 
deema":98121380 said:
...
The method that has been used which has used beautiful knott free red wood has produced a lovely finished item. The growth ring orientation selected means that any cupping will bend the moulding edges into the piece it’s attached to rather than curling them away. Great job.

Thanks, Deema..very much appreciated.

deema":98121380 said:
The method of making it up from bits is another way and was very common, especially when mouldings were readily available to buy off the shelf. It’s ideal for hand tools and also produces a very stable finished item. The backing piece would typically be quarter sawn.

Have you seen the price of off the shelf mouldings :eek: :wink:

deema":98121380 said:
To make up the length from parts I would actually first glue pieces of wood cut to the right width fir each moulding onto a MDF backing board and then mould as a whole or each section. This would actually be very quick, making clamping easy and keeping the costs low.

LOL...that seems like even more work than Coley's ! :wink: How would you support it on the second pass ? Bear in mind that the radius of the half-round is below that of the other edge. Also, what about the extreme right hand side - you'll be moulding away some of the MDF so you've got to factor in time faffing about getting rid of the feathered bits surely ?
 
RogerS":3lww5ssa said:
ColeyS1":3lww5ssa said:
RogerS":3lww5ssa said:
1) Yes,you are utterly wrong.

2)How are you going to feed thin pieces easily and safely with a powerfeeder ?
The moulds would be machined from a wide board then ripped back on the table saw. Mould, cut, mould, cut etc. I don't really understand question 2 ? I don't want to fuel the argument but there is more than one way to skin a cat lol. .....

The thickness is 14mm. I know that you could do it by mould/cut/mould etc (mentioned it above, I think) but surely that's an awful lot of extra work ? What about the finish off the table saw blade ? Is that good enough to stick down ? Saw marks visible ?
Fine saw blade and anyway it's the glue side with the saw marks. Or the sawn edge of the board to be moulded off.
If you are in a factory making these forever then I can see the advantage in doing it this way
Still simplest even for a small batch
And if you've only got a combination machine....have you seen the hassle in changing between modes :shock: :lol:
Yup. Mines a combi. The repeated mould/saw process gets tricky so I'd go down the small sectionPAR route with a carefully set up spindle. No problem!
 
deema":32ej07sz said:
....

The method of making it up from bits is another way and was very common, especially when mouldings were readily available to buy off the shelf. ........
In their heyday stuff like this would all have been made in the shop, with moulding planes and later with spindle. Very little off the peg.
 
Jacob":38johbrh said:
deema":38johbrh said:
....

The method of making it up from bits is another way and was very common, especially when mouldings were readily available to buy off the shelf. ........
In their heyday stuff like this would all have been made in the shop, with moulding planes and later with spindle. Very little off the peg.

I’m not old enough for when mouldings were off the shelf in most shapes. My father and his father used to have a very large workshop employing a considerable number of people and not only could they buy most mouldings very cheaply but they also produced mouldings for others. A six cutter was used with slitting saws. We are back in the 50s and 60s. The decline in the woollen mills resulted in many workshops closing down in the 70s in Yorkshire where I was brought up.
 
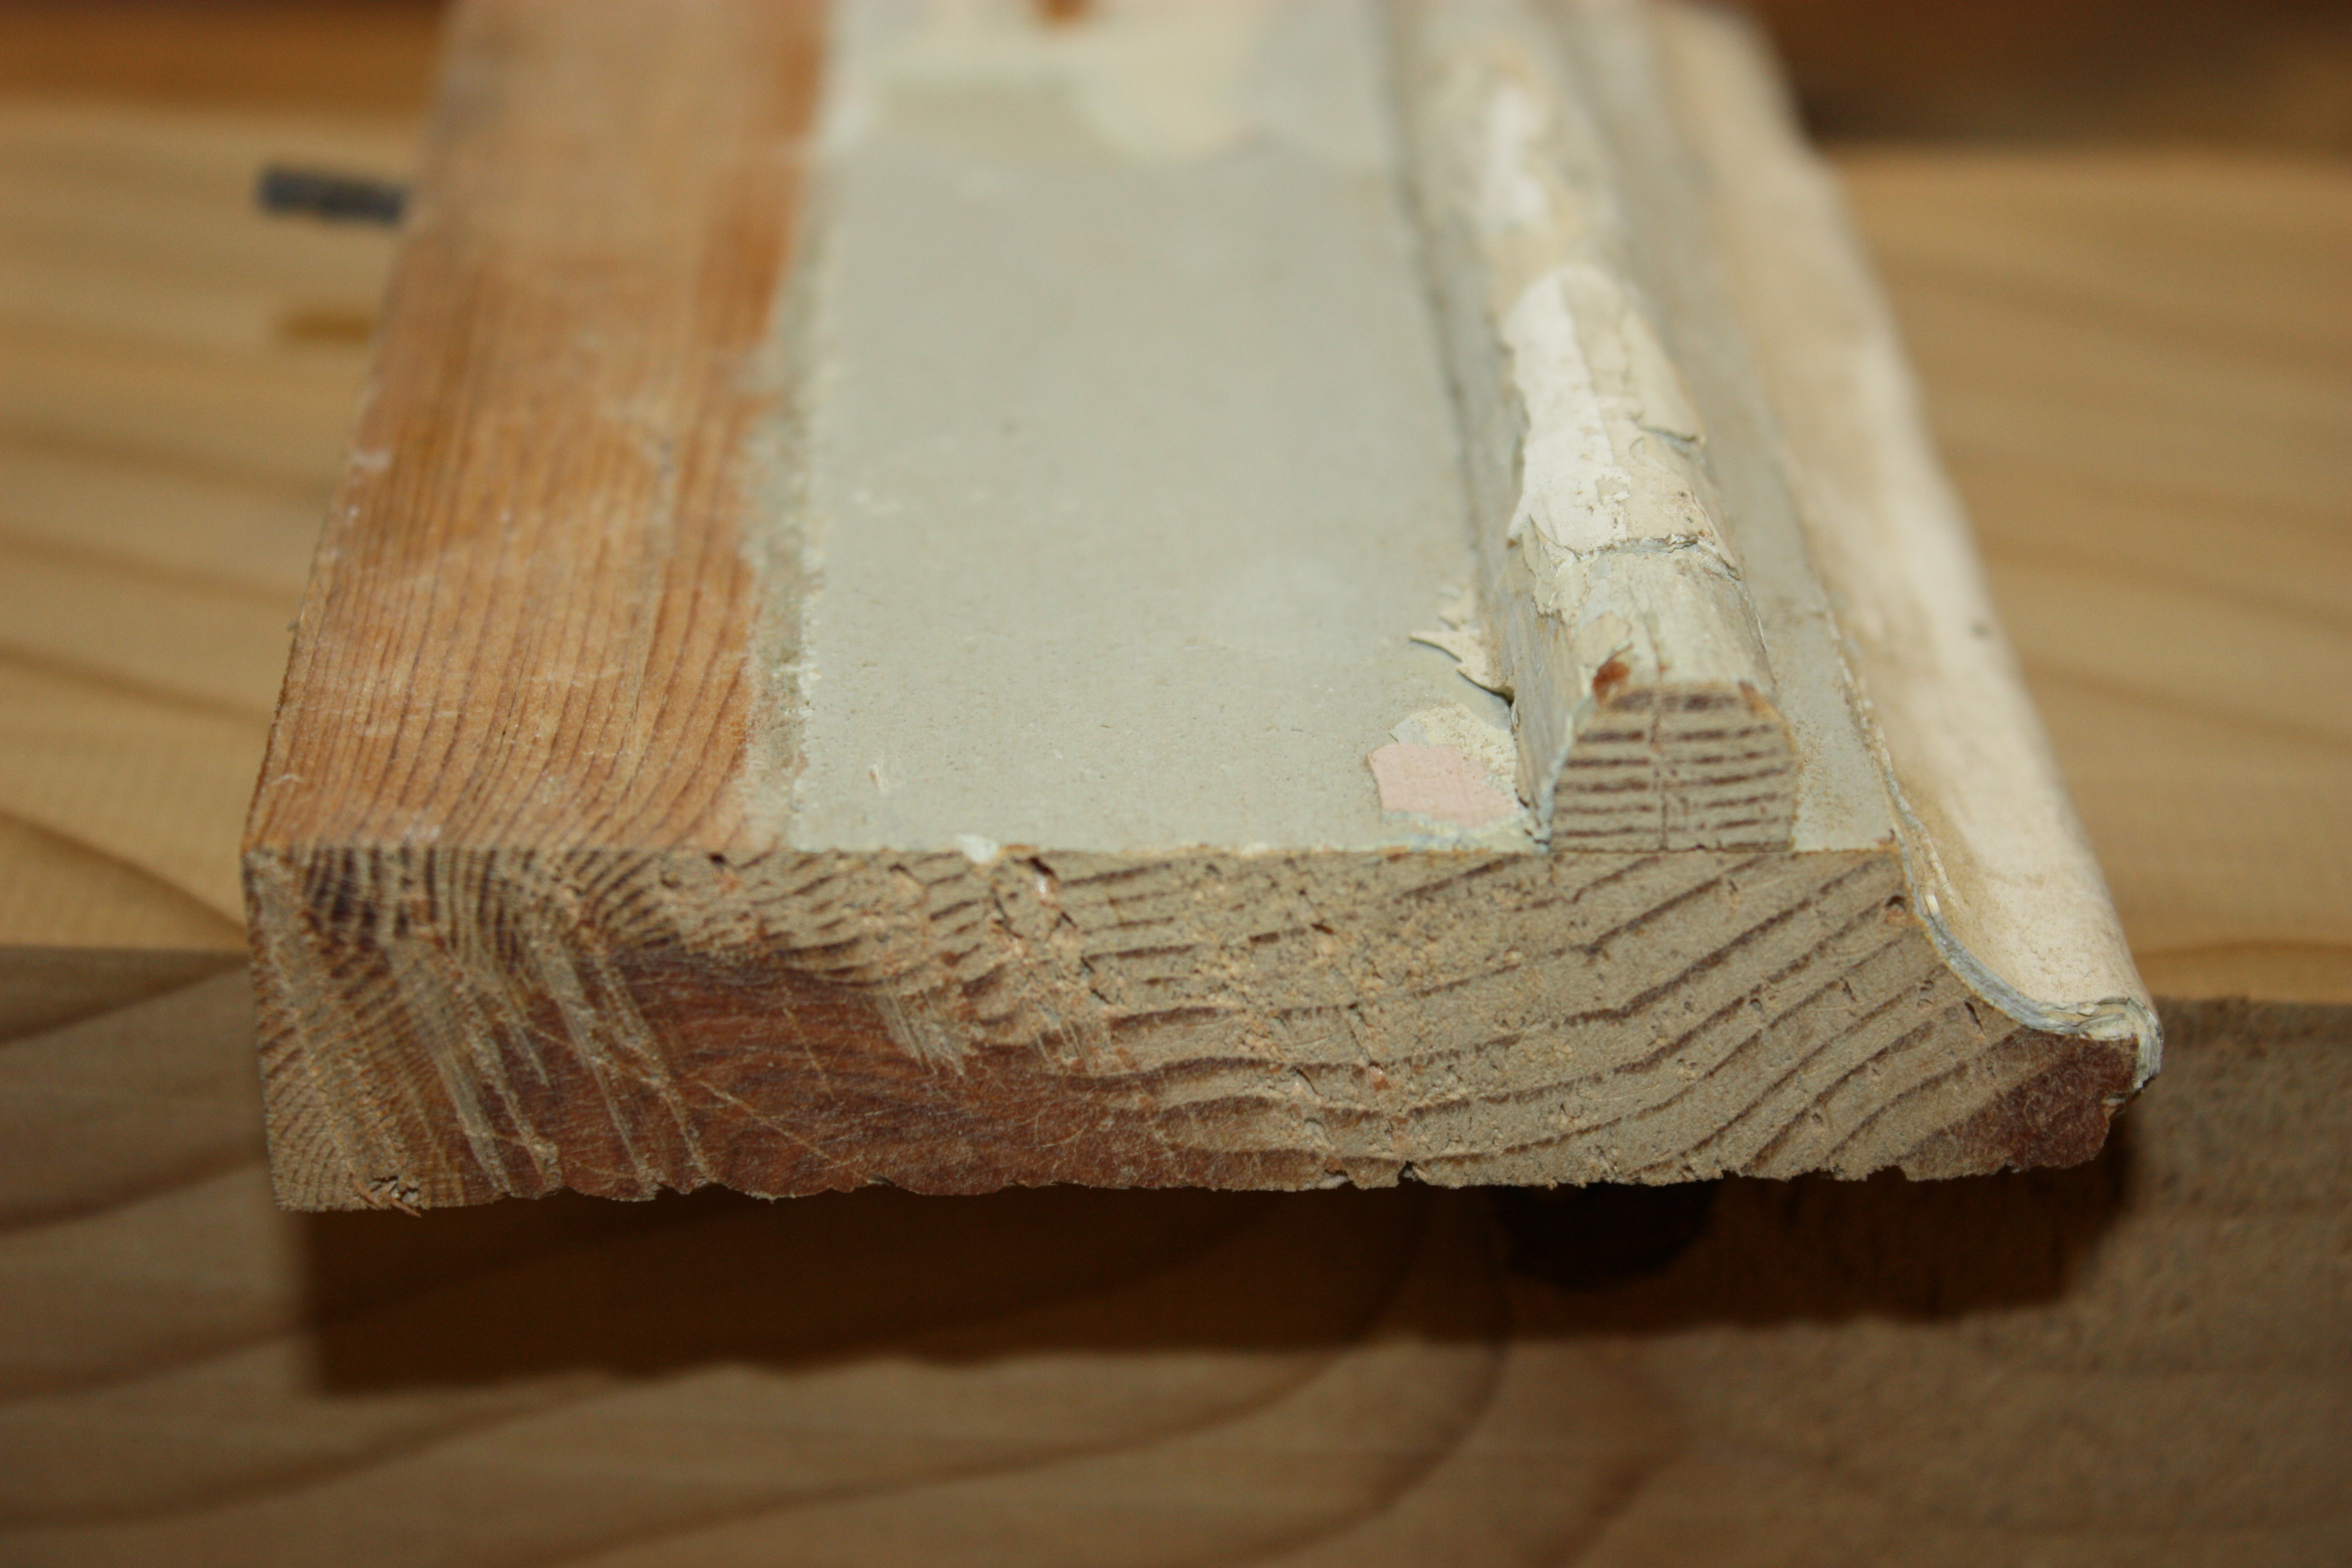
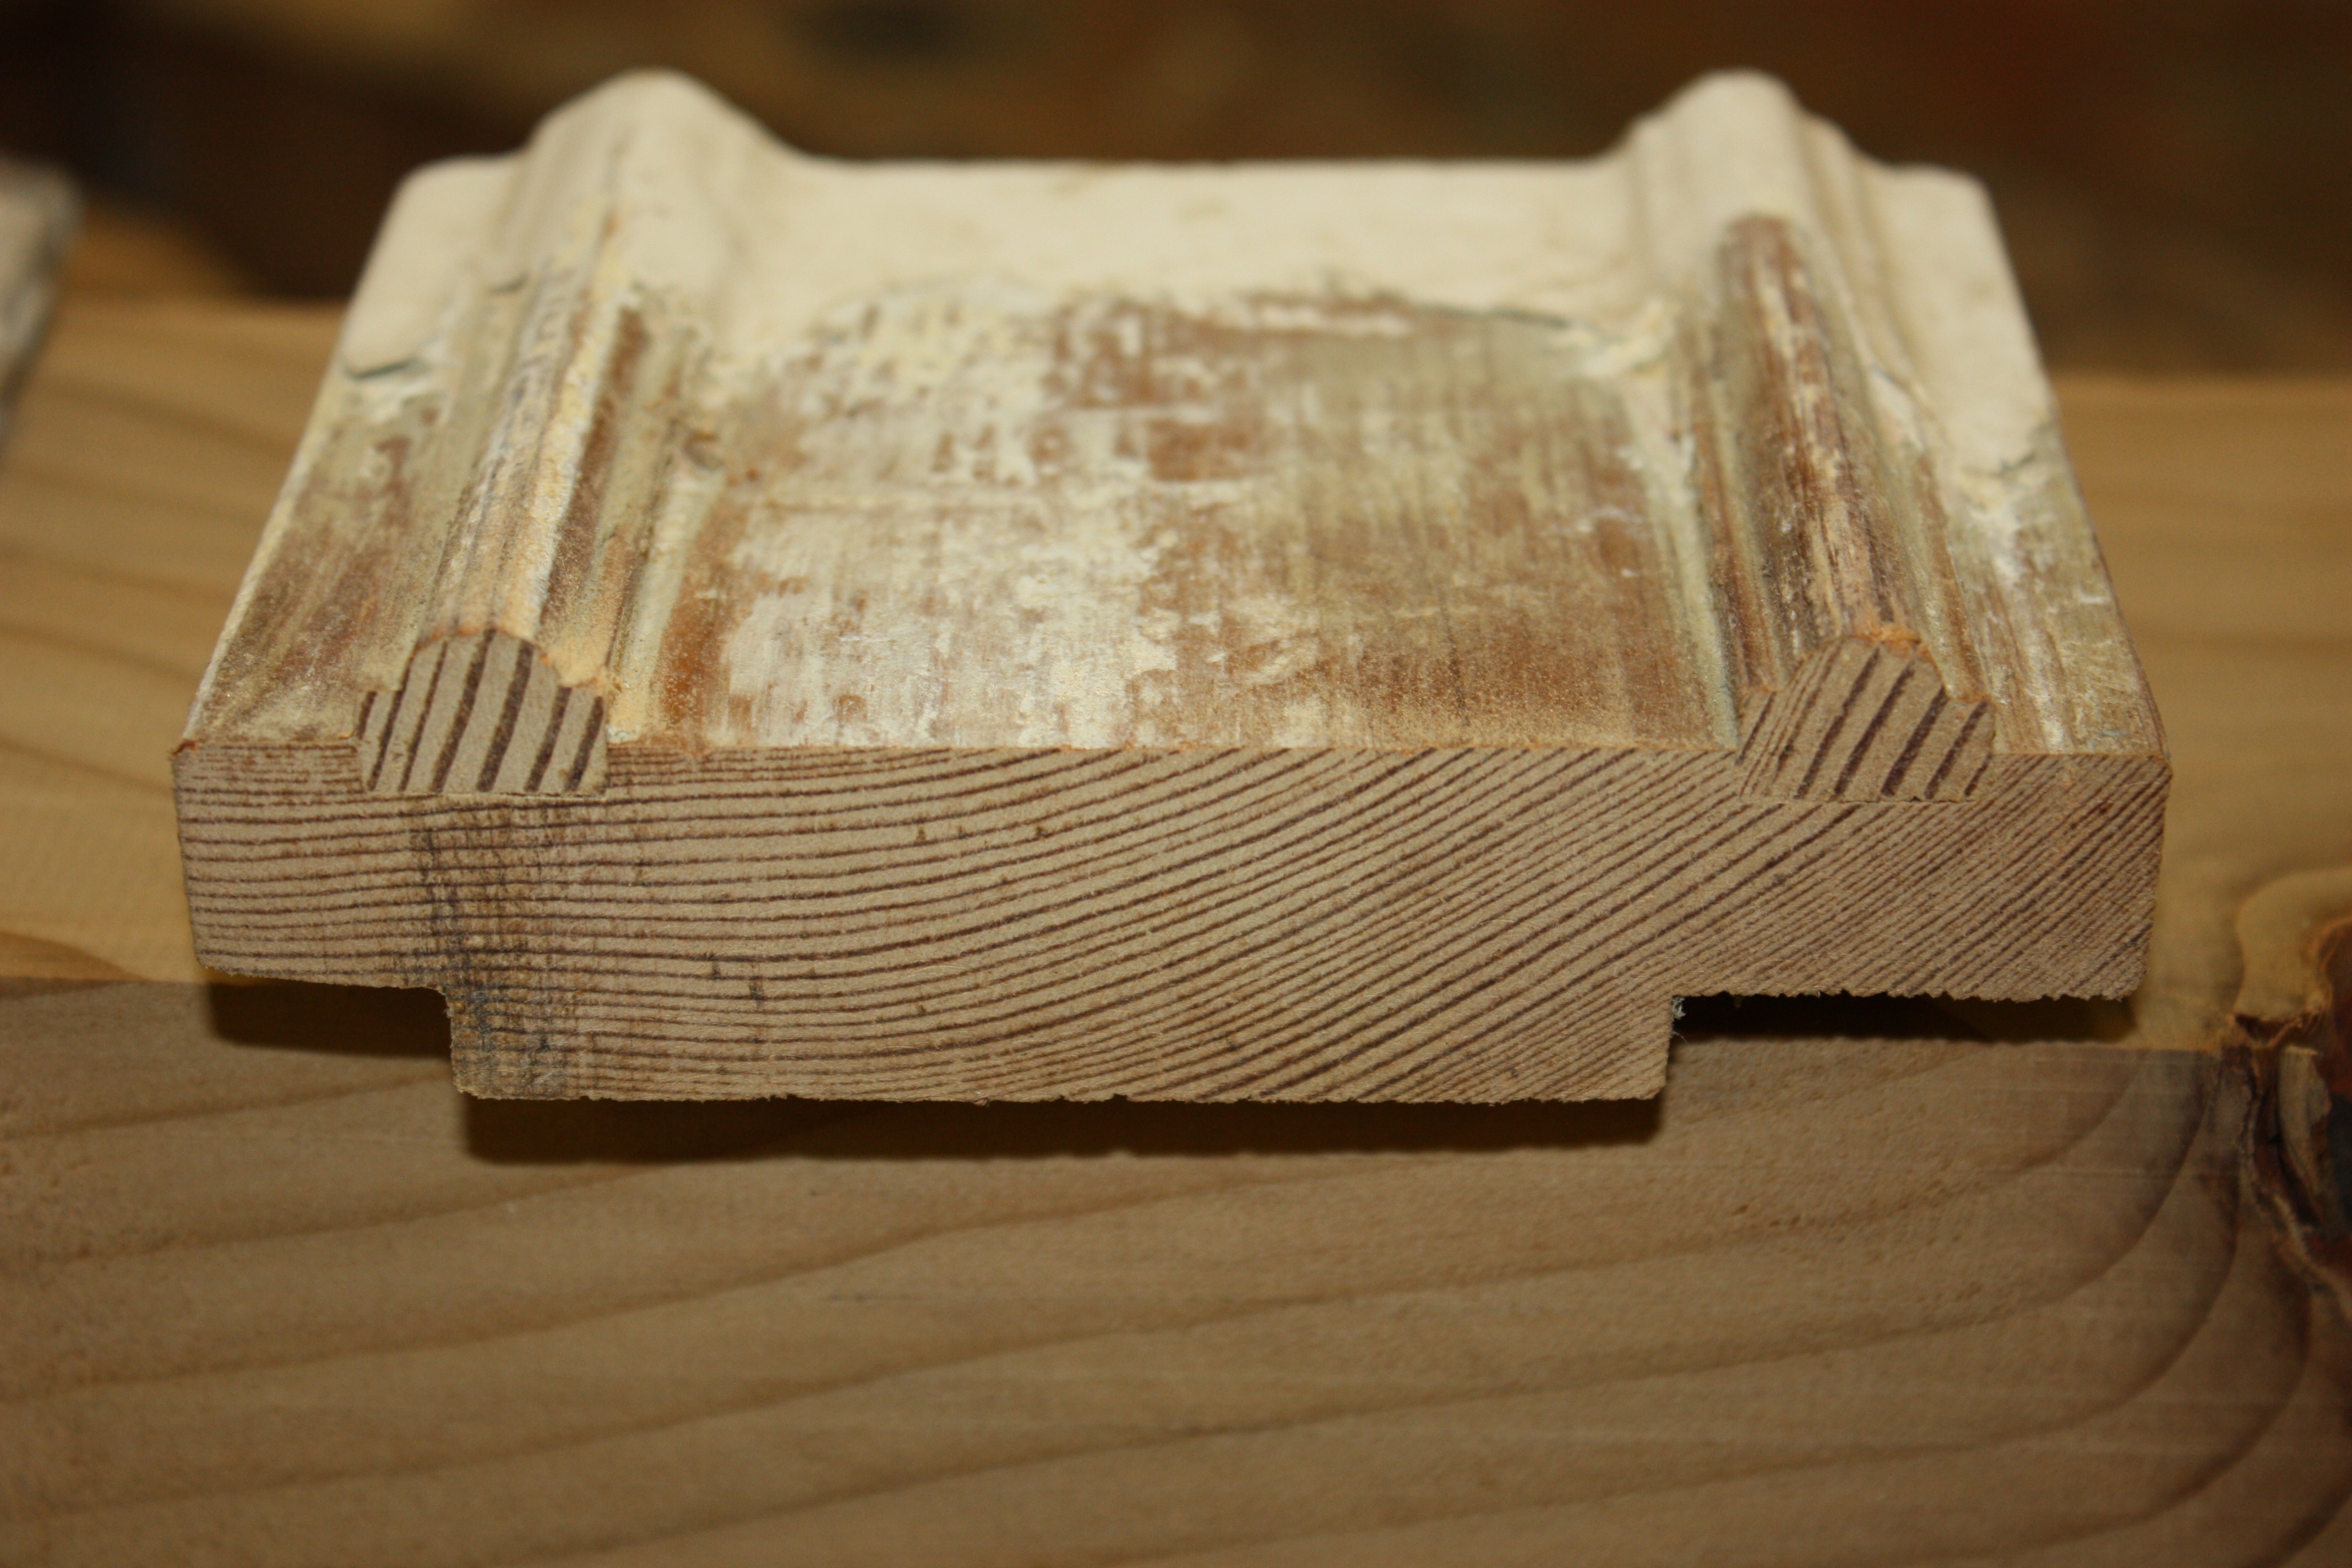
Had a dig in my sample box and found these.
First one is very similar to Roger's architrave, has a bit missing but you can see how it was put together.
Second shows the mouldings set in a housing.
They were from a Georgian window set in Nottingham with some very elaborate mouldings and other details.
This sort of composite structure was the norm except for very simple pieces, though some larger sections might be done in one piece.

IMG_2299.JPG


IMG_2298.JPG
 

Latest posts

Back
Top