side table

UKworkshop.co.uk

Help Support UKworkshop.co.uk:

This site may earn a commission from merchant affiliate links, including eBay, Amazon, and others.

nabs

Established Member
Joined
24 Aug 2015
Messages
1,456
Reaction score
19
Location
Herts
the time has come to try and make an actual bit of furniture using hand tools. I am attempting a suitably straightforward piece given my inexperience (a side table) and will be ably assisted by Richard Maquire, albeit virtually:

http://www.theenglishwoodworker.com/the ... le-guides/

I cheated and got a bit of sawn elm from St Albans Wood Recycling - a far less intimidating place to rifle through bits of wood than a proper timber yard, but not a cheap place for non-reclaimed stuff. There are two large knots about a 1/3rd of the way down, but I was just able to get enough for the bits I need from it. I *nearly* managed to avoid the sap wood for the top, but there is a small amount on one edge which I hope will be removed when I finish the top.

aZ9-Cp39eDokOU1rrZ26Zv4iGj0Q7r_MHEjDUysTu2cNpWRo9LWMkg


I did use sap wood for two of the legs, but there is not a lot of difference in colour between it and the heartwood and they will be stained black anyhow, so I hope this won't be a problem. Not a lot to report about prepping the wood other than remembering what I had learned (and subsequently forgotten) when making my bench, which is when 'being careful' starts to become 'being tentative' then things tend to work out badly. But after doing the top (slowly!) my confidence was restored somewhat and I did a more efficient job of the other bits.

JKu9MpTQfQLWdg_3dKtsrf-QziNH_4Rrkyu4gZvIRt0gkBnC4lKsvw


This was my first attempt at jointing and gluing two boards - I added a bit of 'spring' as instructed and held it together with one clamp. I think the resulting glue line is ok but I should probably reserve judgment until I finish the top :). Having looked in the morning the glued board now has a fairly noticeable cup in it - I hope this is just the wood moving after I planed it (the boards were flat originally, honestt!) rather than incompetent jointing, but tbh I am not sure.

ZojopoZit6MGnv7f2L7TOF0VIVoQadloQvh1Mk2tvs-kRzfd3qgKCA


The joinery is going to be with bridle joints, which are a bit a mortice and tennon but with the top of the mortice lopped off. This is quite exciting as I have never done a m&t joint, and if I can pull off some of these I think I will be about 2/3rds of the way to the real thing!
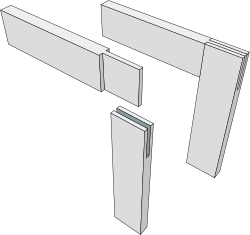
250px-Joinery-CornerBriddleJoint.svg.png


Apparently bridle joints can be time consuming because you need to get an accurate fit to avoid it looking tatty and can't rely so much on compressing the wood fibres as you might with a m&t (too tight fit will cause the sides of the mortice to push apart).

To simply matters Mr Maquire has devised some simple guides to cut these joints with, so the next job is to make those. If you want more details on the guides, plans etc they can be found in the excellent video series above, which can be downloaded for a modest fee of £26.
 
Full credit to you Nabs for giving this project a shot. I've just glanced at the finished product and you've picked a winner, that's a very nice design and I'm sure you'll get a lot of lot of compliments and probably quite a few "repeat orders"!

You say the legs are stained black, looking at the extreme depth of black achieved I'm wondering if they're done with a tannic acid/steel wool/white vinegar stain? If not that's something you might want to consider, nothing else quite delivers the same inky blackness.

Good luck, I'm sure you'll be as pleased as punch with the finished result!
 
custard":1pw3uie3 said:
I'm wondering if they're done with a tannic acid/steel wool/white vinegar stain? If not that's something you might want to consider, nothing else quite delivers the same inky blackness.

yes that is exactly how he does it - in the videos he has some close ups of the finished stained legs and it is remarkable just how deep black they are (as Maquire says, 'almost like plastic)'. I am looking forward to seeing how mine turn out :D
 
Looking at the photo on RM's website it appears he made his legs from a close grained wood like Maple or Beech. You however are using open grained Elm. So one thing you'll need to do when you stain, that RM didn't necessarily have to do, is to add one single drop of washing up liquid to both your tannin solution and to your acetic acid solution. If you don't then surface tension will prevent you getting the solutions deep into the pores and so you'll be left with little pale spots all over the job. Somewhere on the forum I did a WIP on how I scorched then wire wool/venegar stained the Oak legs on this desk,

Bubinga-Desk-3.jpg


I'm sure RM will cover the process, but he may omit the washing up liquid tip if he's assuming close grained stock, where as for Elm (or Oak) it's important.

Good luck!
 

Attachments

  • Bubinga-Desk-3.jpg
    Bubinga-Desk-3.jpg
    56.4 KB
many thanks - I don't recall him mentioning that, although I may have missed it. You may have to remind me again nearer the time!
 
The bridle joint guides are obviously optional, but are simple to make. Despite that I managed to balls up the first set - the errors at least meant I learned how they worked and the second set were done much quicker as a result.

There are plenty of details on the guides in the video series (which I'd encourage you to buy, the guides are worth the entrance fee alone!) and a quick overview in the introduction here: http://www.theenglishwoodworker.com/new ... le-guides/.

The saw needs to run against the side of the guide + the depth of the joint so you may find your back-saws are not deep enough. I was left between a choice between my two panel saws - the first (S&J) would probably have worked tbh, but I concluded it was a bit rough for the job, the second (Thomas Taylor) should have been perfect, but unfortunately it still has the last vestiges of a bend + a kink which despite my best efforts I have never been able to completely remove, and this makes it no good for doing anything very precise. A pity as it is a beautifully made saw.

Every cloud has a silver lining, though, and this was a great excuse to get a new saw. RM happened to have been experimenting with japanese saws when doing the side-table vids, so I copied him and got myself a cheapo (20 quid) one to try out.

It is perfect for the job and I really like using it - it seems to work best if you adopt the stance of an elderly butler prodding a sausage on a BBQ (arms length and with one hand behind your back) - great fun. The saw probably has a proper Japanese name but I am afraid I do not know what it is.

ha1bm-ZYPhJCA3RJY2jHHgRmpxtp2vmP4-oaiPRRE7G1fAfwuUfRCQ


Japanese saws seem to be a vast undiscovered (for me) tool-fidding rabbit hole, so I have decided not to research the topic any further :)

Here is a test joint - admittedly with softwood so I had a bit more margin for error than when I do the real thing, but not a bad effort for a beginner I think (the worst bit is my skew-whiff attempt to square the bottom of the mortice with a chisel).

As I have just proved the guides are silly person proof - you just mark the depth of the joints, saw against each guide and finally chop out the center bit from the mortice and bingo it all fits. An ingenious idea from RM!

-rn90E49EVfu6Q2twgUrthpaigEk0uHMpvSYaCNdP33yaJ58itQnUg
 
nabs":mf6x5xde said:
custard":mf6x5xde said:
I'm wondering if they're done with a tannic acid/steel wool/white vinegar stain? If not that's something you might want to consider, nothing else quite delivers the same inky blackness.

yes that is exactly how he does it - in the videos he has some close ups of the finished stained legs and it is remarkable just how deep black they are (as Maquire says, 'almost like plastic)'. I am looking forward to seeing how mine turn out :D

Can I add my small experience with oak and homemade eboniser - below pic is a fairly strong mix that was left for quite some time - about a month and adding more steel wool after 2 weeks, and the wood was freshly sanded (if the wood has been stored a while I'm led to beleive the exposed bare surface can oxidise reducing the effectiveness of this method) and 1 application.

I've read if you are going for truly inky black if it's not enough after first application to wash with a solution of "elm bark powder" which is very high in tannins and reapply the eboniser.

Ebonised door.jpg
 

Attachments

  • Ebonised door.jpg
    Ebonised door.jpg
    102.8 KB
thanks for the tip Rafezetter! RM also has his own special recipe so I'll let you know how I get on.

I did the joinery at the weekend - made a couple of mistakes: overshot when cutting one shoulder and accidentally pushed out a chunk of the bottom edge of a mortice when 'tidying it up' with a chisel (luckily not on the show face).

I am not too dispirited by what seems like a constant stream of blunders as I think I am slowly improving, and feel pretty sure if I do another one the it would be better.

The guides were a big help - the joints were a little tight compared to the tests in pine but a couple of passes with a block plane on the tenons sorted it out quickly.

Nyqd5ARrbLvi-dHUvxXarAbLVg4hvtbxoHWVgcaDtJBH0MTBLF4RTg


blunder

bOijTnNV0DXixZt3rEOVAlQiwZYIIHX8LJAnYtXgjWuAWK0FR0zImw
 
finally got round to doing a bit more on the table:

the two cross rails are held by a halving joint, which luckily does not have to be super precise since a small amount of wiggle room is needed to allow the top to expand and contract (one of my saw cuts was a bit wonky, which should cover it!)

The other job was to taper the inside edge of the legs to make them look a bit more dainty - a simple job with a bench plane.

That's all the joinery done so hopefully nothing really serious can go awry from this point onwards. Quite probably I will come to regret making that remark :)

WNaYxto8nsPrvObrjV8ZC-2Ao7pBVIUxAGLmp6qQ1NEmv5ALNoSNTA
 
thanks all (btw John15, I can't take any credit for the design, but I agree the legs in particular are very effective).

Glued the legs on - a top tip from RM is to use hide glue. As has been discussed on this forum in the past, PVA can swell the joints and this can apparently can make tight fitting ones (as the bridle joints must be) problematic. My experience with glue ups is limited to my bench and saw horse where I used PVA, but because the tolerances in the joints were fairly 'generous' :) there was no problem at all.

I could however feel the difference since the hide glue is not at all 'grabby', unlike the PVA, and this meant it was possible to get on without the sensation that it would suddenly jam forever stuck in the wrong position.

A very good side effect of the bridle joints is you end up with lots of small squares of wood from the mortices and these are very handy for protecting your work from clamps, holdfasts etc.

eZBAOGZ6B8CuoT4vWifp8VFCsovQMGRn7Hz0EHr-MXv70cS-ehJ1EQ
 
I agree about the glue - it's what I normally use - and I also have a box of little offcuts like that.
 
good news and bad news this morning - the joints turned out okay, but I suddenly remembered that I had forgotten to cut the aprons to the correct length having cut them longer than needed expecting to trim them to length later. This is a pretty disappointing cock-up, even by my standards! The aprons are about 19 1/2'' compared to the expected 18''.

1n4IN3OXvps12H10vkATRAgNbORFnb9HrdJzQ6Oz6_0sIHo9XwsY8A


In theory the legs/apron will now be out of proportion compared to the top, but I have a cunning plan. The top is about 1/2'' bigger than needed all round and I'll keep as much of it as I can, also I had already planned to cut the legs shorter than Mr Maquire's plan so hopefully this will stop them sticking out beyond the top. If all else fails I'll just have to make another top, which at least is a reasonably quick task.

After trimming the joints, this morning's jobs were to flatten and smooth the face surface of the top (the underneath will eventually be steeply tapered along all the edges so it is easier to do the smoothing now than have it wobbling around on the workbench later on)

To my untrained eye the glued panel looks okay (is it?!) but it is a pity about the small black knots (I plan to say they add character :)).

PBgHVs1ajJCCAvDQT9lgUt8vZIZdkCkgnfovTBanehgQdUSDbqnUxw


finally I rounded over the legs and cut them to length. I was a bit apprehensive about doing the round over as I had not done it before, but I relaxed once I realized that it did not matter if they were all identical (they aren't but it is almost impossible to tell by looking once it is put together).

CjfwrKn_EUN1QpF6hleKznhgq5i9di-81GPuk2XL206CqXmL-TpGng


Have my oversized aprons and stumply table legs ruined the elegant Maquire design? Tune in tomorrow to find out!
 
I strongly suspect that the answer is "No."
And I really like the look of that top!
 
nabs":2dlvpyn7 said:
To my untrained eye the glued panel looks okay (is it?!) but it is a pity about the small black knots (I plan to say they add character :)).

Looks great! In particular you've managed the grain to advantage. Your boards are the typical flat sawn boards, with "cathedral" grain in the centre and rift sawn, straighter grain out at the edges. You've carefully chosen sections where you can drop the joint into that straight grained section and kept it all nicely balanced.

Incidentally when you get those pin knots in Oak boards they're called "pippy boards", a few years ago pippy boards were much cheaper than clear boards, but now they command a premium of about 20%. So the market has voted with its wallet, and pin knots are what the market wants!

Smashing job.
 
Back
Top