Regency fluted leg - tricks please?

UKworkshop.co.uk

Help Support UKworkshop.co.uk:

This site may earn a commission from merchant affiliate links, including eBay, Amazon, and others.
jimi43":1796z3hw said:
If the tapered leg section is laid in the box and rotates around semicircular slots in the small ends of the box and the THIN end of the taper is lower than the THICK end, a scratch stock to make flutes is fitted to the long sides of the box so that it is allowed to run from thick to thin end, when it cuts the thin end it cuts less deep and the deepness gets progressively greater as it moves along to the thick end of the taper.

The sensitivity of the end point of the flute to minor variations in depth of workpiece w.r.t. the router will be MASSIVE and troublesome.

BugBear
 
I've used a box/guide over a lathe to make fluted and reeded legs for decades; however, if I were doing it today, I would probably use a trim router.

I think the attached images are self-explanatory, but feel free to ask questions.
 

Attachments

  • moulding_box_02b.jpg
    moulding_box_02b.jpg
    95.2 KB
  • moulding_box_03b.jpg
    moulding_box_03b.jpg
    73 KB
  • moulding_box_04b.jpg
    moulding_box_04b.jpg
    112.7 KB
  • moulding_box_05b.jpg
    moulding_box_05b.jpg
    99.5 KB
Hey Douglas - have a look at Matt Bickford's blog here: http://musingsfrombigpink.blogspot.com/2012/02/hubris-101b-turning-quarter-columns.html (He's a highly enthusiastic advocate of hollows and rounds to make all sorts of mouldings, so I wasn't too surprised to see he's been thinking about fluting too.)

This is what he has come up with as a method - a bit less stuff to make than some techniques, and freedom of movement to subtly set the depth of the scraped fluting.

IMG_0620.JPG
 
Many thanks for the pics woodwould - roughly what I imagined I need to make but it's good to see the detail. Also I plan to work away from the lathe so a bench-top box is my plan.
And the one above Andy looks rather neat - I can rip those clamps on the Tsaw, and my long twin-screw vice would be ideal for the clamping. And I suspect my Record 080 may serve to hold the scratch. Need to look at the video now but it looks very promising for the way I want to do this. Even have a damaged plough blade that might make a really good scratch cutter.
I feel I owe this thread an apology as I haven't made the box yet. Excuses include cold workshop, a bed to build, experiments fuming burr oak (for a job) and a need to 'work' sometimes distracts me...
Maybe this weekend - promise pics when I get started.
 
This thread was originally my fault, so I feel responsible for its upkeep.
Finally got a clear space to start the chess table, and have cut to size almost all components. More of that elsewhere maybe - this is about LEGS.

The idea was something rather Regency in form, but not a literal copy. I want the overall silhouette but I also want to reduce the details, the fussy bits.

So I turned one leg:
leg1.jpg


I shot it from that angle as that is mainly how it is seen (not on its side of course).

The top is:
leg2.jpg


and foot is:
leg3.jpg


Note there is about 2" over on the top square section, and a similar length cylinder below the foot.

I shall be making a second fluting jig very soon indeed. I made one which adjusted for everything - length, taper, diameters etc... but it was far too complex and fussy, so I plan a second far simpler one which will be stiffer too.
The cylinder at foot is to enable me to mark index positions for each flute, and the overs each end leave the turning centres in place as they are used to fix the leg in the jig.

To turn the taper I got close-ish with a skew, but finished with coarse abrasive on a block as I was having vibration problems in the centre of the leg due to lack of support.
I'm not good enough with a skew to use it single-handed, and cannot use my hand to support the stock... I need a device. Any ideas please - a thing that is easy to fit to the bed and supports long spindles in the centre.
The coarse abrasive is a turner's cheat I suppose. there's a shop up North called Turner's Retreat. I might try one down here called Turner's Cheat*.

I'll be back with my fluting jig quite soon (sounds like a kind of Celtic dance thing to me. Britain's got talent... it has now).

p.s. it was Matt Bickford's 'jig' above that made me realise I was way over-doing it. That one is very neat I think.

p.p.s. *Actually It isn't a shop is it. It's a statement of fact.
 

Attachments

  • leg1.jpg
    leg1.jpg
    24.4 KB
  • leg2.jpg
    leg2.jpg
    90 KB
  • leg3.jpg
    leg3.jpg
    55 KB
Looking very interesting Douglas - I'm sure it will be "fun" to get the legs perfect and then risk spoiling them - will you be making a spare for practice?
As for the steady, there's a very simple design in Pain's book on turning which is basically a wedge held in a shoe, which drops under its own weight to rub consistently against the work. I think it's been discussed on here somewhere; if I can't find it I'll upload a picture.
 
Long time since I done one but it was just a box and a scratchstock that I used. Turned out perfect the few times I done it.
 
Very keen to see that support jig Andy (if I had a library like yours...).
I made 4 blanks, focusses the mind. The fifth would be a parachute. But I do have a load more cherry to fall back upon although it would be nice if all 4 looked from the same stock (as with children).
Doing that box recently did discipline me to take care, so I might pull it off. Actually, just saying that was a mistake.
I will let you know, and promise to be honest.

p.s. Teckel - it will be a scratch-stock for sure. I did like the vice mounted clamp Andy showed above, and as I have a twin screw 36" face vice that can rack (hence clamp the taper) that may be the way we go. I did think that was really neat - so simple.
 
Ok Douglas, here you go. (Disclaimer - I've not used any of these - but judging from his book, Mr Pain was a professional turner of many years experience with a nice dry wit.) He shows three designs:

IMG_0866.jpg


IMG_0867.jpg


IMG_0868.jpg


As for the library, I wouldn't want to give the wrong impression, but some of the upper shelves are a bit hard to reach!
 
Many thanks Andy - they look reasonably simple to make, and I imagine different capacity vee indents for a range of diameters. I was wondering lignum for the vee wedge (just a small insert).
As I am turning a taper, rounding over the vee (horizontally) so there is one rounded contact area may help. There may be a risk the vee burnishes the stock but if it supports until the last skim, then I will have to final finish.
The second one down looks about right, will fit the bed on my lathe easily (2 round bars, Coronet). I see he says 'simple yet effective' under the pic - ideal. I shall have a go with it. It would be far better to be able to finish turn using the skew rather than cheat with abrasives. I also found having the skew fresh-sharpened helps of course, the sharper the better.
Many thanks for your research and abundant knowledge again Andy.
 
I've seen R. Underhill use one of those wedged supports - his were not weighted and his work popped out a couple of times. Looks like the weights are essential.
 
OK Richard - I happen to have some lead left over from my roof. Just need to get out there and knock one up. Pics later!
And if Mr Underhill used one, it must be worth a go.

p.s. about to embark on the making of v2 in Andy's post above. I wonder if the slip is slightly tapered also, probably doesn't need to be... easy to try it both ways anyway. had another look, it pivots on 'B' I guess.
 
Hi Douglas - I just looked back at the book and realised there is also this picture which may help:

IMG_0870.jpg


He says that (in Fig 6) the slip pivots at B. No mention of a taper on it, but the whole job is described as a trial and error experiment. At A is a bolt so that a wedge under the bed bars holds the thing in place. The work just rests on the notch and rubs it (lubricated with candle wax). The shape of the notch stops very whippy work rising up when pushed by a tool.

If the wedge is not heavy enough, add lead or a rubber band to pull it down.

There are two approaches - the one in fig 6 is supposed to adjust automatically, but in other designs he says the wedge is really just to allow a correct static position to be found, which probably made sense for production runs of chair legs by the gross.
 
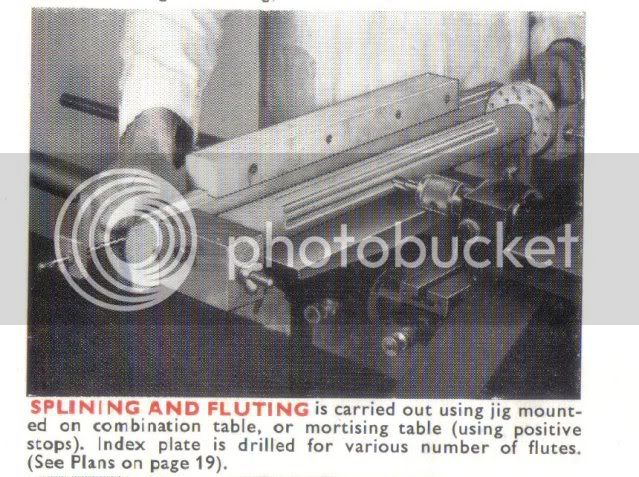
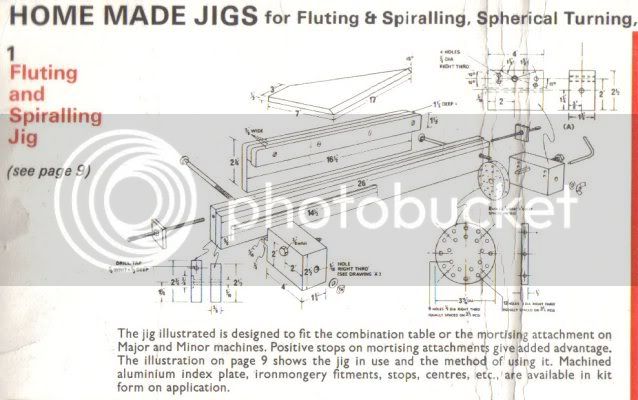
My Coronet Major has a morticing attachment that makes this easy, or so it seems, anyway photos from the manual, you may be able to adapt the idea to the machines you have
3677af02.jpg

13218fde.jpg

in feed is achieved using the morticing attachment not clearly shown in the pictures.
 
Thanks Andy - I got this far yesterday (couple of hours). I realised the pin at the bottom has to be centred vertically to the lathe centres, so vee stays central on the stock as the diameter changes. No doubt you knew that... but I came close to missing that point. (edit & retraction. that is geometric nonsense.)
j1.jpg


The vee needs to be the right height, so I have a thin kerf at the moment, a 120 degree vee to go it, and some slips of LV (end grain I feel)
j2.jpg


I have seen similar on-lathe jigs etc Wildman, but I am committed to using a scratch-stock - I'm considering the simple 2 piece clamp in vice one that Andy found (above a few post up).
I'll try and finish it soon and make the other legs - I have 3 more to do but that assumes no muck-ups.
It'll slow down a bit now - dragged back to the day-job. Damn.
 

Attachments

  • j1.jpg
    j1.jpg
    58.6 KB
  • j2.jpg
    j2.jpg
    34.9 KB
did find a bit of time today :lol:
The support device has turned into a contraption:
l1.jpg


The vee support doesn't stay central to the stock. Logical after having made it, as the lower vee face moves less than the upper (around the pin it is fixed to)... anyway, a curved support inset was made, and a cantilever instead of the wedge (which I found too 'sticky').
[I note that Mr Pain's were not pinned, but sliding, so he spotted the issue of course!]
It's working well - particularly using the skew and fine cuts. I roughed them down with a big gouge, regardless of finish, then smooth off with the skew.

So... Four legs good. But some are more equal than others.
actually not bad I felt - minor variances when inspected close, but that's hand-made for you (for me anyway).
l2.jpg


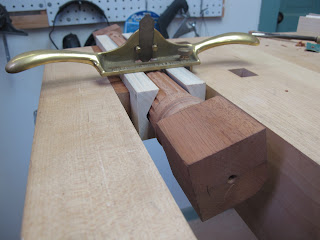
Then onto fluting. I planned to make the 2-piece jig in Andy's post, and started before realising it was a bit more complex than first seems. Then it dawned I have most of the jig on the bench already:
l3.jpg


I can set the taper flush with benchtop, front face is guide for scratch fence, and I need a round thing at the top, with index marks on (foreground).

More news later....
 

Attachments

  • l1.jpg
    l1.jpg
    63.9 KB
  • l2.jpg
    l2.jpg
    70.1 KB
  • l3.jpg
    l3.jpg
    67 KB
Update time.
I've managed the flutes on all 4 legs, and reasonably happy with the result. I appreciate there are many jigs and ways of doing these, but I wanted to do them using a scratch, partly because of the control I would get. It's slow but you can progress the cut til you are happy with width and depth along the leg. There were 64 to do, and as with everything I got better (and quicker) as I progressed.
fl1.jpg


I made 2 discs (same dia) to screw into each end.
The upper one is indexed (16 lines) and a scrap is clamped to act as the mark.
The extended fence on the stock (trusty old Wickes marking gauge) runs along vice front.
fl2.jpg

I found the scratch was best in a fat ellipse profile rather than a pure circle. As the flute progresses down the leg it needs to get narrower and slightly shallower, but the ellipse seemed to approximate the shape better all along - and by tilting it you can adjust the flute profile (though that is getting very fussy maybe).
fl3.jpg


The scratch was a bit of bandsaw blade, hardened and honed after, using a ceramic stone.
i did find a quick re-hone made a big difference every leg - cutting far better.
The absence of support all along the leg induces chatter mid-way, so going slower and taking lighter cuts helps reduce that. The full-length jigs will eliminate that, but I was impatient and didn't fancy making the full length version with accurate tapers etc.
The end result needs some cleaning up... abrasives I expect.
One mistake was to turn the small birds-mouth at the top before fluting - the cutter can easily damage the edge of the turned detail. I had to re-turn taking a tiny amount off after fluting was finished.
Anyway, 4 legs fairly well matched... a hint of the handmade but I hope that may be a part of the charm.
fl4.jpg

Next , build them into a table with no top, then make and fit 2 half-drawers (half width, full depth) and 2 slide-out sides for taken pieces. Then make a top.
No rush on this one... more later.
 

Attachments

  • fl1.jpg
    fl1.jpg
    65.5 KB
  • fl2.jpg
    fl2.jpg
    67.6 KB
  • fl3.jpg
    fl3.jpg
    63.2 KB
  • fl4.jpg
    fl4.jpg
    71.3 KB
Ooh, I like the look of this. What wood are the legs Douglas?
If I have been following this properly, you have gone for the most complicated choice, where the depth and width of the wood you take away changes along the legs, and so does the width of the wood left in between! You can do that with the hand tool approach as you are in control the whole time, and looking at what you are doing, which is rather impressive really. I'm also impressed that you have managed with a fence on one side of the work only, and have not made any sideways errors.

It's also a really good justification for the work you put into making that nice long twin-screw vice!

One little thought - if you haven't cut the rail mortices yet, I think it would be worth putting some protective wrapping round the fluting just in case it gets accidentally knocked, or a tool dropped on it or something.

And I'm really looking forward to seeing how complicated this table is going to be. If the top is to have flaps, you could do folding supports on knuckle joints - if you want another challenge!
 
Having seen one of these in the flesh as it were...I can support the view that this is a bit of fine craftsmanship...using the trained eye to keep things in line and equal...as you say Andy...not an easy task with one fence.

PLUS!>>>> I ended up with the first jig...which I have a little job for totally unrelated to flutie legs....! :mrgreen:

Nice one Douglas... =D>

Jim
 
The wood is cherry, but it's rather blonde / bland at the moment. I have a good few sawn boards and and some have better colour than others, but for the legs I went for straightest grain as the legs end up quite thin and also I assumed they would work better with the scratch (which they did, very little trouble with the actual grain).
I am considering maybe fuming the cherry at some stage later. I know that is unconventional but I tested some a while back and it was somewhat effective - a bit darker, warmer (honey) and better grain definition. But otherwise I think cherry darkens with exposure anyway, and some oil in there will help. I will ponder but plenty to do before that stage anyway.
I rarely draw things up before making them (a high-risk approach I know) but the table assembly will need some sketches I reckon, as there are complications... won't get away with working that out as I go :lol:
For the slide out side 'trays' there is a mechanism in an old Ercol table we have where the ends slide out and rise to become flush with the main tabletop. I will investigate copying that maybe. I'll do some pics later, but it's a neat simple mechanism, all wood.
Yes, the flutes are progressive in width and depth - I think they have to be to work visually. I also noted the lands are about 1/2 the width of the flute. Equal looked very wrong, far too much land. And the final flute width tuning was done on the actual scratch, before heat treating then honing. It's all one big guess :shock:

Will keep you posted of course, mistakes 'n' all.
 

Latest posts

Back
Top