Woodmatt
Established Member
Lovely work Dr Al,I imagine your wife is really pleased


What rubber dip did you use?My son is a professional drummer, so I took two of his old, cracked, cymbals and for this one made a lamp holder to go behind it. Was really glad to find a brass dome nut to attach it to the cymbal. This is in my workshop.
View attachment 103871
and on his wall
View attachment 103879
With another cymbal I simply fitted a clock movement behind it to make a wall clock.
View attachment 103873
and finally, I made some simple brackets with angled upwards coach bolts protruding. I used a rubberising dip on the end of the bolts to prevent damage to the cymbals.
View attachment 103875
No clever wood craft here, but very satisfying.
This one, and I highly recommend it. Two coats and you couldn't see any of the threads on a coach bolt.What rubber dip did you use?


My other half ordered some wool for a crochet pattern but then realised she didn't have a hook of the right size. I thought I'd have a go...
View attachment 104014
It's made out of an offcut of American black walnut. The outer diameter was made with a dowel plate; I then put it in the metal lathe and turned the inner diameter. The rest of the shaping was done with files.
I also made a simple push block for the table saw out of a bit of dowel and some offcuts of plywood:
Thank you for posting this!!
You have just solved something for me!
View attachment 104015
This is how it'll be used:
View attachment 104016
At the moment it's held together with brad nails, but after a few tests, I'll probably take it apart and glue (and maybe dowel) it instead, just in case I'm stupid enough to try to use it with the blade all the way up and cutting slightly into the push block!


It occurred to me that, and this is completely off the wall, you could try and find an old leather sofa and string the cushions together to create the futon? You could use a coloured string knotted at each end for a modern effect.As mentioned in my last project-post I was planning to build a daybed. Ideally something really simple out of oak. I liked the graphite oil look on oak that I used on the project linked above and looked around for inspiration.
Couldn't really find something that worked 100%, but did like the look of this daybed by Børge Mogensen - in particular the legs and the way the bed kinda floated carried by the round oak pieces.
Anyway here is my finished daybed
View attachment 104038
and without cushions.
View attachment 104156
I build the frame of solid 5cm thick oak and routed out for the space for the thingies to hold the mattress (pallets? what are they called, sometimes my Danglish fails me). With a template the routing was fairly easy.
View attachment 104049
The legs I made of 2.5cm thick oak timber and I tried my luck with finger joints, a first for me and it was much much harder than I thought it would be.
View attachment 104043
And I learned the hard way why it's called finger joints....
View attachment 104040
After a bit of sandpaper (and glue) they turned out fine though.
View attachment 104044
I Ebay'ed this round oak dowel
View attachment 104045
And cut out the spacers, applied the graphite oil and put the whole thing together...
View attachment 104046
View attachment 104047
The futon mattress is from Ebay as well. I would have loved to buy/make a leather one like the Børge Mogensen version linked above but it would have been way too expensive/hard
Next are some oak shelving. I need to find a good place to buy oak though, for the daybed I used ajferguson.co.uk and it was ok, but ended up fairly costly... I need to find a good sawmill to source oak from.

Thanks Mike!It occurred to me that, and this is completely off the wall, you could try and find an old leather sofa and string the cushions together to create the futon? You could use a coloured string knotted at each end for a modern effect.
just a thought, frame looks good
Where do the boxes get situated?A pair of owl boxes I’ve been asked to make. View attachment 104243 The design was adapted from the RSPB website plans which made very inefficient use of 8’ x4’ plywood boards, so I tweaked them. It’s more joinery than woodworking, though as a newcomer to the art I learned quite a bit about sawing straight, reference faces and accurate measurements.
This is a bit of an experiment. Most forums I've been on have had a "Post pics of [something topical]" thread, but not this one. There's probably a good reason for that, but I'm going to stick my neck out anyway.
The idea is, quite simply, to post a photo of the last thing you made. It can be something quite insignificant, a component of something bigger, or a completed project. It can be something that's not thread-worthy on its own, or it can be something that already has a 9 page WIP thread in the Projects section, it really doesn't matter! It's just a bit of fun, but hopefully it will generate some discussion too.
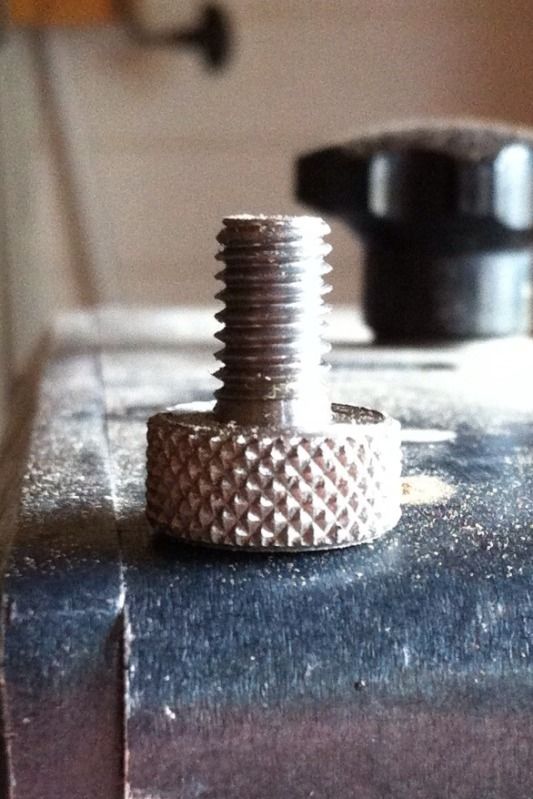
So here's my offering to get the ball rolling. I could have posted a photo of a mug of tea, but that's hardly relevant. This is a replacement guide knob for SWMBO's Burgess bandsaw. Formally it was in the care of her Dad, who isn't the most mechanically minded, hence why it needed a bit of a spruce up before going back into service!
