You are using an out of date browser. It may not display this or other websites correctly.
You should upgrade or use an alternative browser.
You should upgrade or use an alternative browser.
Post a photo of the last thing you made
- Thread starter DTR
- Start date

Help Support UKworkshop.co.uk:
This site may earn a commission from merchant affiliate
links, including eBay, Amazon, and others.
tobytools
Established Member
jimmy_s
Established Member
Froggy
Established Member
Looks good. How accurate is it?
jimmy_s
Established Member
I checked the blade with a digital vernier, both sides are parallel to within a few thousands of an inch. The stock was planed parallel, checked with verniers before setting on the brass strips. I filed these down, checked them for being parallel and then finished then off on a flat plate with wet and dry down to 400grit.
The blade can be adjusted through the stock via 2 nr m6 cap head Allen screws. These push against 2 stainless pins that move the blade - the central brass pin in the blade is a fulcrum. I could have done with making the treads finer, if I make another one I might try and get metric fine/ BA or UNF tap as the adjustment could be better.
I think it will be accurate enough for woodworking - at least when it gets dropped it can be re-adjusted to bring it back to square.

£19.33 (£3.87 / count)
£19.99 (£4.00 / count)
Stealth Lite Pro FFP3 Face Masks UK Certified Dust Mask. 99.99% particle filtration, air filter reusable face mask. FFP3 Mask -7 day use per Construction, Woodworking, DIY and Welding Mask
Amazon.co.uk

£17.99 (£1.80 / count)
£27.44 (£2.74 / count)
3M 8822 Disposable-fine dust mask FFP2 (10-pack)
Amazon.co.uk

£13.99 (£2.80 / count)
VEVOX® FFP1 Dust Mask - Set of 5 - Valved Face Masks - Respirator - Protection e.g. for Construction, Building Work, Sanding, Woodworking, Fine Dusts, Aersoles or Particles
SLSK Ventures GmbH (UK)

£12.50 (£1.25 / count)
£14.45 (£1.44 / count)
JSP M632 FFP3moulded Disposable Dustmask (Box of 10) One Size suitable for Construction, DIY, Industrial, Sanding, dust protection 99 Percent particle filtration Conforms and Complies to EN 149
Amazon.co.uk
Woodchips2
Established Member
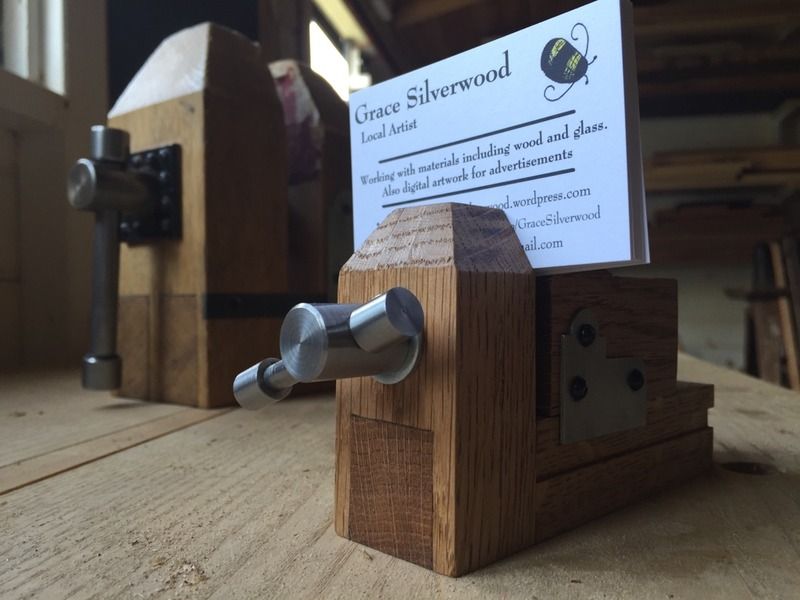
Clever idea Dave, well done =D>
What will she do when somebody asks "How much for the vice"? :lol:
Regards Keith
What will she do when somebody asks "How much for the vice"? :lol:
Regards Keith
Mr T
Established Member
Here's a couple of things I did recently. The corner shelves were one of the few projects I get to do for the home (cobblers children and alll that!). White painted 9mm MR mdf with poplar lipping and spaces to make 50mm hollow shelves that fit onto batons on the wall, quite tricky to fit.
The other thing is more simple, a laminated tea light holder. I made this for a training session I'm doing at Dakin Flathers bandsaw manufacturers. Its ten band saw cut 1.8mm laminations bend over a male/female former using three f clamps.


Chris
The other thing is more simple, a laminated tea light holder. I made this for a training session I'm doing at Dakin Flathers bandsaw manufacturers. Its ten band saw cut 1.8mm laminations bend over a male/female former using three f clamps.


Chris
Attachments
Exile
Member
John15
Established Member
I like the book shelves Chris - very nice indeed.
John
John
After having made some handles for some carbide inserts on my new mini lathe, over the last few days, out of beech and oak.

Today this was my first go at faceplate turning. Walnut and beech, I am pleased with it as a first attempt. However I made lots of mistakes and next time I will do better.

Here it is still on the lathe.

Here still on the glue block on the faceplate.
Have you guessed what it is yet?

It is a Father's day present! A very large egg cup for an ostrich egg!
I now have to do one for n emu egg!

Today this was my first go at faceplate turning. Walnut and beech, I am pleased with it as a first attempt. However I made lots of mistakes and next time I will do better.

Here it is still on the lathe.

Here still on the glue block on the faceplate.
Have you guessed what it is yet?

It is a Father's day present! A very large egg cup for an ostrich egg!
I now have to do one for n emu egg!
Attachments
Ed Bray
Established Member
Wow, that looks like a bit of a pain to clamp.
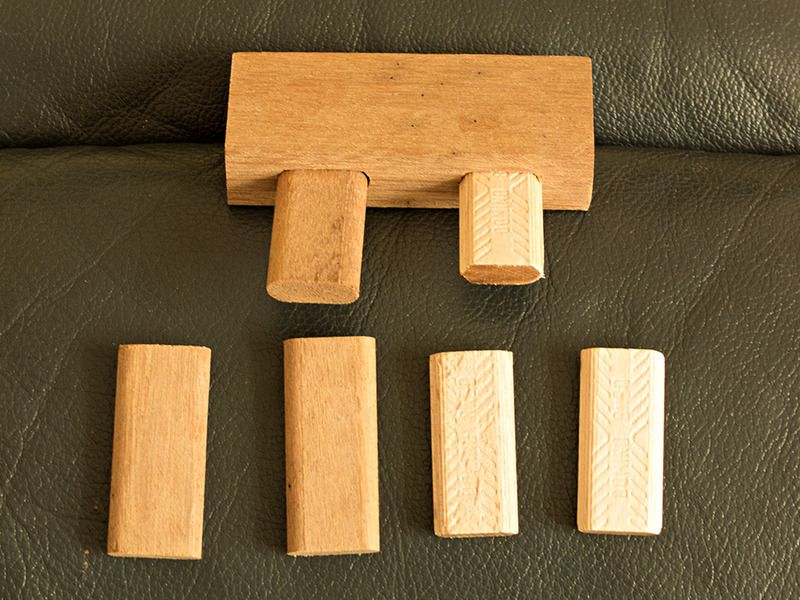
I finished 110 items this afternoon. Very pleased with how they turned out.

They are 8mm x 60mm x 24mm Dominos made from Iroko, these have been made to fit the larger width of the XL Domino and I will use them for outdoor projects. The smaller lighter ones are the original Dominos 8mm x 50mm x 22mm.
I finished 110 items this afternoon. Very pleased with how they turned out.

They are 8mm x 60mm x 24mm Dominos made from Iroko, these have been made to fit the larger width of the XL Domino and I will use them for outdoor projects. The smaller lighter ones are the original Dominos 8mm x 50mm x 22mm.
memzey
Established Member
Shultzy
Established Member
My daughter asked me to repair her stepladder. When I got it home it was so riddled with woodworm it was easier to make a new one. It's all oak; the sides, top and back are from an old pew and the steps are floorboard offcuts. Quite difficult to make as none of the cuts are square and the side slope in as well as back. I had to make a Sketchup model to find out what the angles were. She was very pleased with the result.


Attachments
Shultzy":1n4mhn3y said:My daughter asked me to repair her stepladder. When I got it home it was so riddled with woodworm it was easier to make a new one.
Lovely job =D>
John15
Established Member
Very nice indeed Shultzy.
John
John
Shultzy":15xgts6i said:My daughter asked me to repair her stepladder. When I got it home it was so riddled with woodworm it was easier to make a new one. It's all oak; the sides, top and back are from an old pew and the steps are floorboard offcuts. Quite difficult to make as none of the cuts are square and the side slope in as well as back. I had to make a Sketchup model to find out what the angles were. She was very pleased with the result.
Excellent result, and extra applause for using reclaimed wood =D> =D>
Dave-Jeffo
Established Member
So I'm just stating out with the whole joinery/working with wood scene (I'm an engineer so I'm used to metal and machines)
Recently I managed to get hold of some solid wood worktop (a few different ones) and decided to try my hand at making some chopping boards.. Here is a few of the outcomes.
There nothing special like end grain butchers blocks I've seen but you got to start somewhere
Cheers Dave
Recently I managed to get hold of some solid wood worktop (a few different ones) and decided to try my hand at making some chopping boards.. Here is a few of the outcomes.
There nothing special like end grain butchers blocks I've seen but you got to start somewhere
Cheers Dave
Attachments
Similar threads
- Replies
- 1K
- Views
- 106K
- Replies
- 7
- Views
- 2K
- Replies
- 44
- Views
- 5K


