Post a photo of the last thing you made

UKworkshop.co.uk

Help Support UKworkshop.co.uk:

This site may earn a commission from merchant affiliate links, including eBay, Amazon, and others.
8FAD5F67-8CB6-4C53-BACF-8A5C1BF8EAF7.jpeg

Here's a picture of a box I'm making out of some oak offcuts. It's been a useful learning exercise, especially with the dovetail joints which are a bit gappy, but that will improve with practice.
 
Made this key holder out of Oak and walnut.
Made it as an experiment, really. There is NO joinery in this and NO hardware except for hanging hooks. It is purely held by glue, wanted to find out how long it will last.
20201129_112341.jpg
20200322_100948.jpg
20200321_193111.jpg
 
I went out and got trolleyed...

Black Friday sales thoroughly destroyed my inbox and I've never really seen the point in buying a fancy new TV when my 13-year-old one still works, so I squandered on a new toy: a thicknesser. I'd wanted one for a long time, but felt like the lack of space was a bit fundamental. It probably still is (I only have a vacuum cleaner for dust extraction due to space again) to be honest, but I bought one anyway!

I made a trolley for it, mostly out of 30 × 30 × 2 mm box section, with some plywood sides and some 20 × 20 × 2 mm "wings" to provide material support (with a roller made out of my next-door-neighbours old TV aerial pole). The trolley lifts the thicknesser up high enough such that it can feed out onto my workbench or table saw, while also sliding through the (very narrow) gap between the table saw in its parked under the bench position and the motorbike. The desire to get the thicknesser up high is part of the reason for making a steel trolley with heavy duty drawers - the low-down weight should help stabilise everything.

Here's a front view:

1607188105429.png


and back view:

1607188118441.png


The back panel gives storage for the dust extraction port and a couple of different adaptors:

1607188151767.png


The brass knurled knobs were a case of me getting carried away!

The material supports look like this when they're swung up:

1607188176237.png


They can be adjusted very accurately to be at exactly the same height as the bed, using a couple of M6 cap screws on the end of the support arm. I'd spent ages trying to figure out how to get an angled surface for the cap screw to rest on (not that it would have mattered that much really). In the end I used a small off-cut of angle iron and ran a TIG weld bead along the corner:

1607188193077.png


This picture shows how cosy the path through the garage is - between the motorbike and the table saw:

1607188218980.png


and this is what it looks like when its parked between the lathe and motorbike (using some space freed up by mounting my lathe tool holder rack to the ceiling):

1607188231329.png


While I was at it, I also glued two lengths of MDF together (actually the moisture resistant stuff as I had some left over from something unrelated). I wanted the resulting sheets to be flat and was lacking a good supply of big flat surfaces, so I clamped them to my dining-table/office desk (which is made out of a bit of 40 mm oak kitchen worktop):

1607188250597.png


I then trimmed it to fit through the thicknesser, added some blocks on the corners to hold it against the rollers of the trolley's "wings" and covered the top surface in some UHMW-PE tape:

1607188277284.png


Close-up:

1607188292607.png


The idea of the MDF is that it gives a continuous flat surface for the wood to run on as it goes through the thicknesser. I did a quick test after taking this photo and couldn't detect any snipe in the planed piece of wood so I'm really pleased with how well it works.

I'll probably have to take it all apart when the weather warms up so I can paint it (although I said that about the table saw trolley and still haven't got round to it - I'm glad I don't have a rust problem in the workshop!).
 
I went out and got trolleyed...

Black Friday sales thoroughly destroyed my inbox and I've never really seen the point in buying a fancy new TV when my 13-year-old one still works, so I squandered on a new toy: a thicknesser. I'd wanted one for a long time, but felt like the lack of space was a bit fundamental. It probably still is (I only have a vacuum cleaner for dust extraction due to space again) to be honest, but I bought one anyway!

Great work! Love the design, and you've squeezed every last inch of usable space out of it too.
 
Ok guys this is a WIP and a first time at this sort of thing.
A big step up from the bedside table and coffee table.

Be kind and no zooming in!!

Cheers James
Hi James, I recommend if you are doing a WIP thatyou start again with its own thread or it will just get lost on here, looks like it’s going to be a proper piece of work. Ian
 
I went out and got trolleyed...

Black Friday sales thoroughly destroyed my inbox and I've never really seen the point in buying a fancy new TV when my 13-year-old one still works, so I squandered on a new toy: a thicknesser. I'd wanted one for a long time, but felt like the lack of space was a bit fundamental. It probably still is (I only have a vacuum cleaner for dust extraction due to space again) to be honest, but I bought one anyway!

I made a trolley for it, mostly out of 30 × 30 × 2 mm box section, with some plywood sides and some 20 × 20 × 2 mm "wings" to provide material support (with a roller made out of my next-door-neighbours old TV aerial pole). The trolley lifts the thicknesser up high enough such that it can feed out onto my workbench or table saw, while also sliding through the (very narrow) gap between the table saw in its parked under the bench position and the motorbike. The desire to get the thicknesser up high is part of the reason for making a steel trolley with heavy duty drawers - the low-down weight should help stabilise everything.

Here's a front view:

View attachment 97754

and back view:

View attachment 97755

The back panel gives storage for the dust extraction port and a couple of different adaptors:

View attachment 97756

The brass knurled knobs were a case of me getting carried away!

The material supports look like this when they're swung up:

View attachment 97757

They can be adjusted very accurately to be at exactly the same height as the bed, using a couple of M6 cap screws on the end of the support arm. I'd spent ages trying to figure out how to get an angled surface for the cap screw to rest on (not that it would have mattered that much really). In the end I used a small off-cut of angle iron and ran a TIG weld bead along the corner:

View attachment 97758

This picture shows how cosy the path through the garage is - between the motorbike and the table saw:

View attachment 97759

and this is what it looks like when its parked between the lathe and motorbike (using some space freed up by mounting my lathe tool holder rack to the ceiling):

View attachment 97760

While I was at it, I also glued two lengths of MDF together (actually the moisture resistant stuff as I had some left over from something unrelated). I wanted the resulting sheets to be flat and was lacking a good supply of big flat surfaces, so I clamped them to my dining-table/office desk (which is made out of a bit of 40 mm oak kitchen worktop):

View attachment 97761

I then trimmed it to fit through the thicknesser, added some blocks on the corners to hold it against the rollers of the trolley's "wings" and covered the top surface in some UHMW-PE tape:

View attachment 97762

Close-up:

View attachment 97763

The idea of the MDF is that it gives a continuous flat surface for the wood to run on as it goes through the thicknesser. I did a quick test after taking this photo and couldn't detect any snipe in the planed piece of wood so I'm really pleased with how well it works.

I'll probably have to take it all apart when the weather warms up so I can paint it (although I said that about the table saw trolley and still haven't got round to it - I'm glad I don't have a rust problem in the workshop!).


"Between the motorbike and the table saw" now that's a phrase I recognise !
 
Building a sauna out of two sheds salvaged from a school. Made one good shed out of the bits but had to do replacements of sole plates and other timber (some shiplap). Levelled a patch, put in 9t of type 1, built a base, then 22mm T5, then the shed. Salvaged some new uPVC windows and used those. Installed subfloor for tiling and now building the sauna inside.

Large picture window in sauna is also salvaged - it was a patio door.

Idea is you can sit in sauna and look at view across Kent!

Fair bit still to do. Saunas are complex.

IMG-20201204-WA0000.jpeg
IMG-20201127-WA0005.jpeg
IMG-20201127-WA0008.jpeg
 
My very small shop dust extractor system, again never built anything, worked out ok though I think
 

Attachments

  • 20201205_161349.jpg
    20201205_161349.jpg
    96.4 KB
@Dr Al, great idea for the thicknesser, that might well be copied, hope you don't mind!
@kelsallcustombats, beautiful bat, shame I've 'retired', would have loved giving a ball a clobber with one of those!
@nickds1, love how you've matched the sauna to the current shed, some very clever work!
@sed9888, another clever piece that might get copied!

Well done guys and thankyou for your posts.
 
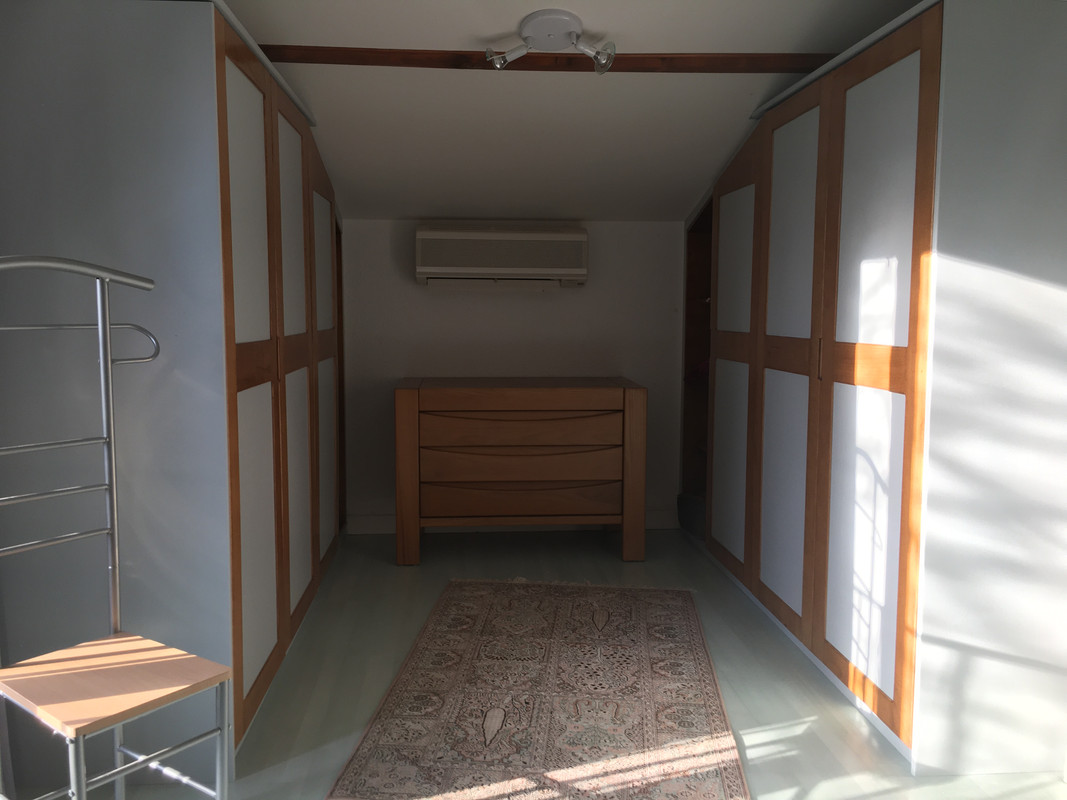
Work over the lockdowns has been two fitted sets of wardrobes and a chest of drawers. The wardrobes were complicated by only being able to source 37mm by 3M by 50cm live edge rough sawn beech for the doors which were 21mm thick when finished. And my wife deciding it would be nice if the frames were lacquered and the panels painted. Everything was sprayed using a Fuji HVLP set up from Axminster.
The chest of drawers was started at the same time but out of some elm that I had been saving for a few years.

 
Back
Top