Possible can of worms

UKworkshop.co.uk

Help Support UKworkshop.co.uk:

This site may earn a commission from merchant affiliate links, including eBay, Amazon, and others.
Hi,

It's easy spending a great deal of money buying the best sharpening system and try for the ultimate sharpness but I wonder how many don't bother sharpening at all just switching to tipped tools which I don't think have been mentioned but I see a lot of. Recently I made three tipped tools at little cost the carbide tips bought in packs of ten through eBay. Because of the winter weather I've not yet really tried them out but hope to once I can get into the workshop without being frozen.

I've been around a bit and seen many instances where this or that is best; best chisels including Japanese types very expensive planes bought more for show than actual use; whilst restoring vintage valve radios some guys insisted on buying very expensive balanced valves for amplifiers saying they could tell the difference in sound?

Sorry if I'm diverting this interesting thread but what about the skill of the turner; an experienced turner can produce a very good finish on the work straight from the tool which is ground on less than perfect equipment but a novice using a perfectly ground tool could well produce a poor finish on the work.

How many spend more time sharpening chasing the perfect cutting edge than actually doing turning; sharpening and collecting tools can become an obsession; once the work is sanded and finished who could tell what tools had been used to create it?

What do production woodturners use to sharpen their tools after all time is money to them.

I believe tipped tools stay sharp up to 40 times longer than HSS tools; I've used TC tooling for years on my lathes and in my routers but have only just got around to spending time in the workshop although the time has been cut short by our dire climate. A razor sharp HSS tool won't stay sharp for long hitting bark or knots.

Buying tipped turning tools can be expensive but making my own is interesting and not difficult at all.

Obviously the person with the money has the choice of what to buy; I'm just a tight Yorkshireman who likes to make his own tools and even machines at a fraction of new prices for something not as good. Just a thought so please don't jump all over me. :)

Kind regards, Colin.

View attachment 99886

My new tipped tools; two are finished the third still needing the handle but finished after the picture was taken; What's the difference between these I made and those bought from a tool stockist apart from price? Round bright steel bar stock for shafts; 2" square blanks for handles; a bit of steel pipe for ferrules and the tips plus the enjoyment of making and using my own tools.

View attachment 99887

The three tip profiles to date but more can be added later if required. I drilled and tapped for two of the tips but just because I have the kit I brazed the third tip; I have a high speed diamond hone I made using a very cheap router and diamond cup wheel so I can even sharpen my carbide tooling.

I have a large selection of turning tools but generally only use about three of them

Has anyone some spare warm weather I could scrounge then I can start making shavings again.
I bought three Easywood tools on the advice of a club member who only uses these carbide tip tools ‘ I can’t manage with ordinary tools’, he says.
(He’s been ClubTurner of the Year a couple of times, so he’s no mug).
They are certainly easier to use than traditional tools, but, in the long run, I think they are an expensive option. The initial outlay for the tools is over £120 each (slightly cheaper but inferior makes are available) The replacement tips cost between £15 and £20, and in my experience don’t last that long. For the cost of 3 of these tips you can buy a traditional tool made by a decent maker. You can continually sharpen the traditional tool (using whatever method suits you) and it will last a long time. I know Craft Supplies USA reckon you can resharpen carbide tips using a diamond stone, but, having tried it, I don’t think you can recreate the edge found on the new tip.
Having laid out a shed load of cash on these tools, I now only use them occasionally. I have persevered with the traditional tools -catches and all- and am now fairly confident in their use. As i’ve noted previously, I keep them sharp with the ProEdge kit.
My club friend produces some fantastic work, so I suppose that it doesn’t really matter what tools you use, provided they work for you. Certainly carbide tools have a place in turning (hollowing springs to mind) and my decision to go with traditional tools was a largely economic one, allied, I confess, to a bloody minded determination to master traditional tools.
I am comparatively new to turning and I’m sure there will many experienced turners who will disagree with me, but I have learned that, as in most crafts ,woodturning is full of different ideas. Wherever there are 3 turners gathered together, there will be 4 opinions!
Best wishes to everyone for the New Year.
D.
 
Last edited:
I bought three Easywood tools on the advice of a club member who only uses these carbide tip tools ‘ I can’t manage with ordinary tools’, he says.
(He’s been ClubTurner of the Year a couple of times, so he’s no mug).
They are certainly easier to use than traditional tools, but, in the long run, I think they are an expensive option. The initial outlay for the tools is over £120 each (slightly cheaper but inferior makes are available) The replacement tips cost between £15 and £20, and in my experience don’t last that long. For the cost of 3 of these tips you can buy a traditional tool made by a decent maker. You can continually sharpen the traditional tool (using whatever method suits you) and it will last a long time. I know Craft Supplies USA reckon you can resharpen carbide tips using a diamond stone, but, having tried it, I don’t think you can recreate the edge found on the new tip.
Having laid out a shed load of cash on these tools, I now only use them occasionally. I have persevered with the traditional tools -catches and all- and am now fairly confident in their use. As i’ve noted previously, I keep them sharp with the ProEdge kit.
My club friend produces some fantastic work, so I suppose that it doesn’t really matter what tools you use, provided they work for you. Certainly carbide tools have a place in turning (hollowing springs to mind) and my decision to go with traditional tools was a largely economic one, allied, I confess, to a bloody minded determination to master traditional tools.
I’m sure there will be many who disagree with me, but I have learned that, as in most crafts ,woodturning is full of different ideas. Wherever there are 3 turners, there will be 4 opinions!
Best wishes to everyone for the New Year.
D.

Not yet having tried either I will most definitely be sticking with traditional tools.

I think my reasoning behind that is that I would always be wary that the tip will fly off and embed itself somewhere on my body, no doubt they are extremely safe and my fears are unfounded but as a newcomer the last thing I want to be thinking about is the tip.

Does the tool holder jig Robert Sorby 472 Tip Holder / Cutter Holder hold the tips?
 
I think that that is the correct holder for carbide tips I think you also need the diamond belt.

at some point Garno you may want to explore the carbide tools, but for now stick with traditional.
 
Yes all very interesting answers BUT..

No one has asked how on earth he persuaded Mrs G to divvy up her half of the £400 to sharpen chisels?? It makes me shudder even contemplating the prospect of asking such a thing...

Trust me if I end up not taking to woodturning I am in a whole lot of trouble.
I was going to do down the road of saying how good it would be having nice sharp knives but thought better of it.
We cashed in our premium bonds, at least that way we will have something to show for our money only having won £25 in the last 15 years of having them. Also I promised to stop going on about how bad I am at woodwork 😜
 
As a Sorby Pro Edge owner I find that I can't get the tools as sharp as from the grinder so have reverted to the cheap jig from Ebay ( edit: seem to have got somewhat more expensive) eg
- chisel sharpening jigs for woodturning,3 jigs / tools 8944717301833 | eBay

The Pro Edge is outstanding in its ability to obtain repeat angles when using the platform but there are still 2 adjustments to make when using the gouge jig, ie, the gouge protrusion & the angle of the holder, which, as it is a copy of the Tormek gouge holder, I believe to be 60° as standard. Once set it's not often needed to be changed.
The Ebay jig also requires 2 adjustments, the gouge protrusion & the distance from the grinding wheel. The gouge holder is solid so the angle can't be adjusted. Easy way to adjust the distance is to colour the bevel of the gouge with a marker pen & rotate the wheel with the fingers to see where the marker is removed. The aim is to remove a thin line of colour from top to bottom of the bevel. Move the bottom slide in or out until the adjustment is correct.

Which ever equipment or method is used the goal is to achieve consistency so that as little metal as possible is removed to sharpen the tool.
 
Hi,

I bought three Easywood tools on the advice of a club member who only uses these carbide tip tools ‘ I can’t manage with ordinary tools’, he says.
(He’s been ClubTurner of the Year a couple of times, so he’s no mug).
They are certainly easier to use than traditional tools, but, in the long run, I think they are an expensive option. The initial outlay for the tools is over £120 each (slightly cheaper but inferior makes are available) The replacement tips cost between £15 and £20, and in my experience don’t last that long. For the cost of 3 of these tips you can buy a traditional tool made by a decent maker. You can continually sharpen the traditional tool (using whatever method suits you) and it will last a long time. I know Craft Supplies USA reckon you can resharpen carbide tips using a diamond stone, but, having tried it, I don’t think you can recreate the edge found on the new tip.

Best wishes to everyone for the New Year.
D.

£120 each for a tipped turning tool is indeed costly and tips at between £15 & £20 each these would bring tears to my pocket and I'd never pay such amounts even though I can afford to.

My home made three tipped tools in post #57 cost under £20 for the three; as Phil Pascoe correctly states 3 mixed tips can be bought from China for under a fiver; obviously not the best quality but still proper tips.

I buy steel From K Steels here in Huddersfield they are a quarter of the price of the model engineer stores but there is a minimum spend of £25 which doesn't bother me; I collect the steel having requested it be cut into 4' lengths to fit into my car. 1/2" BMS (bright mild steel) bar stock bought like this makes it cheap for a turning tool length of steel; a cheap tap wrench even a decent Eclipse can be had through eBay for £6.50. A small HSS tap and correct sized HSS tapping drill size are also cheap and readily available through eBay; an engineers 8" hand file with handle won't break the bank; as to the tool handle just looking around home or local skips can produce suitable sized hardwood to turn into handles costing nothing; ferrules can be short lengths of copper tubing or in my case steel pipe I have kicking around. Now three tipped tools are made costing very little indeed and the tap wrench; tap and twist drill with file are available for other jobs; this is how I built up an enviable workshop crammed with all manner of tools and machines; I'm tight and don't part with hard earned money buying new when I can make equally us useable tooling or machinery at a fraction of the cost.

I'm often told "I can't do that" the person saying this never will do anything; I'm told I have the skills; I have the tools; I have the workshop etc. but I wasn't born with a tool in my hands I've worked hard for a lifetime to now have the workshop I enjoy; to spend around £400 just to sharpen HSS woodturning tools which become dull after a little use is fair enough to anyone wanting to spend such money; for £400 I can do a great deal more good in my workshop expanding my range of tools whilst often enjoying making them; most of my machinery has been bought in scrap condition and rebuilt at little cost to as new; I don't think I'd like having so much money that I could buy everything brand new that I fancied; I like pottering around.

When my wonderful wife bought me the new DML all those years ago it cost us dearly because after paying the £200 new DML's were then on sale for £100 lesson well and truly learned. The DML came with three basic carbon lathe tools and I did lots of turning using these and still have them; I'm not in any way knocking anyone for spending their own money just putting another option over.

Sharp tools of any kind are a must but there are more than one way to achieve this.

I'm a keyboard warrior at the moment its too cold to play out.

Kind regards, Colin.


How much does a Sorby fingernail grinding jig cost?

Turning_0001.JPG


My home made finger nail grinding jig made to fit my home made belt grinder.

Turning_0002.JPG


I even turned inserts to suit different diameter tool shafts but then because I've been tight over the years I have good workshop facilities like my Lorch lathe bought as scrap and rebuilt by me.

Turning_0003.JPG


I made my own 4" belt sander and 2" belt grinder the belts costing more than I spent making the machines; I always have plenty of offcuts in both metal and timber. I keep my eyes open for electric motors.

Turning_0004.JPG


When I bought my Graduate lathe in scrap condition it came with lots of tooling and expensive chuck and assorted face plates; I totally rebuilt the Graduate costing little but just look at the tools that came with it seen above; to buy these tools new would have cost more than buying the Graduate and its rebuild. These tools are in addition to the many tools I already had but having such a large choice of high quality tools to hand I often only use about three different tools on a project. I'm a tool junkie and as I'm a mechanical engineer I fancied having a go using tipped tooling but definitely not paying £120 quoted for such a tool. I can make a decent job of turning using carbon; HSS and tipped tooling; I can even re-sharpen TC tipped tooling having made a high speed diamond honing machine using a cheap 1250W router; I'm old fashioned and proudly admit it; as long as I can potter in the workshop and around home I'm happy.

Wishing everyone a joyful turning 2021.
 
Well done, Colin, you are clearly a proud and resourceful craftsman. It strikes me, however, that In order to make your own jigs, belt sanders, grinders etc, you must have metal working machines etc, and experience in metal working. I assume you must also have spent a lifetime in such an industry ( I recall you saying that you’d worked in a ? mine maintenance workshop) acquiring the skills to design and make tools, to strip down and refurbish machines, and to be generally self sufficient in a workshop. We don’t all have that background or the time to develop such new skills (I was a university teacher, and will be 75 this month) so we have to buy our tools, This process is littered with pitfalls, and we have to rely on advice from more experienced craftsmen, and a degree of trial and error. Sometimes it works out, sometimes it doesn’t, and I have made some expensive mistakes. However, it’s an interesting journey, and, taking the view that there are no pockets in shrouds, I just get on with it.
Best wishes for the New Year.
D
 
Not yet having tried either I will most definitely be sticking with traditional tools.

I think my reasoning behind that is that I would always be wary that the tip will fly off and embed itself somewhere on my body, no doubt they are extremely safe and my fears are unfounded but as a newcomer the last thing I want to be thinking about is the tip.

Does the tool holder jig Robert Sorby 472 Tip Holder / Cutter Holder hold the tips?

Re The jig , read the small print

A handy little accessory which will accept most Robert Sorby cutters. It avoids skinning fingers when sharpening.

You need to find out the hole size in the carbide cutter and the Sorby cutters or it may not work
 
Hi,

Many thanks Democritus. Yes indeed I have a lifetimes experience to fall back upon and I was taught by top class mining engineers but even before starting work at the age of 15 in the pit I was already repairing my own cycles learning by mistakes which I still do even now. My hope by posting my tipped turning tool details was that I could encourage others to consider making things; not just tooling but to look at things differently rather than through money.

Making tipped turning tools the way I described doesn't involve lots of special tools or skills or even a lot of time; it does require anyone to leave their comfort zone to have a go and once they succeed it's a stepping stone to even bigger projects. I spent the first ten years of my retirement during winter restoring vintage valve radios; I started from scratch and made many mistakes in such an highly dangerous hobby where I could be electrocuted just by lifting a "Live" chassis with both hands but if I don't know I research first especially where safety is concerned. I'm 74 this year and am looking into making a Metal Melter;


I'm self taught having wound many coils; chokes and transformers but I've never attempted this using a micro wave oven transformer. I've bought an industrial 1,950W second hand micro wave transformer to experiment with; I've already replaced the secondary winding now giving 975W output but this is too high for my needs so I've also bought a motor speed controller to see if I can bring the amps down. If not I've lost nothing much but gained an awful lot of useful knowledge.

I'm very sorry to hijack this excellent thread but now when old timers die they take their skills with them; I'm learning new skills and what's a micro wave transformer got to do with woodturning; it's to do with the way I think and look at things; I've also been subjected to an intense week long Kaizen training course; my aim is to make a machine that will braze TC tips onto tooling without recourse to gas heating; I want to tame the output from one of these transformers; I can make anything I want to make and have yet to fail; I always gain more knowledge; I don't encourage anyone to follow my lead though because many projects I do involve great danger that could easily prove fatal.

It's a long story but a friend who owns a company asked if I could help brazing TC tips onto tooling for him; his son had a go but in use the tip was thrown; he had tried ready brazed tips but they weren't up to the job he had bought 22 top quality tips. Looking at the failed tool I explained the tip had been thrown due to a "dry" joint. I brazed all 22 tips; half using brass shim the other half using bronze filler rod the only difference was that I dreamt up a way of avoiding dry joints that I've never seen done before; very simple when known but I center popped each land on the tool these throwing up a slight burr ring; this would prevent the tip coming into full contact with the tool allowing a thin layer of braze. I did the first half and posted them to be informed they were perfect so I then completed the second half and posted these. I tried using a paraffin blowlamp which failed it wasn't hot enough so I then used my Map gas torch which did the job but used a lot of gas hence having seen the Metal Melter on YouTube I hope to make a dedicated brazing machine. I'm not too old to try new ideas and I've also got a second project lined up involving making an industrial induction heater. I'm not taught on electrics but I am taught regarding safety.

Having just one practical skill is so useful in that it can then be transferred to so many other subjects; I hope I never stop learning or experimenting.

In 2020 I learnt two new skills; TIG welding aluminium; metal spinning and a bit of panel beating making a new petrol tank for a mower I fully restored.

Sorry once again for hijacking this thread and no offence meant in the least to anyone; I love learning and getting my hands dirty.

Kind regards, Colin.

Tool bodies_0004.JPG


Roughing out the tip "land" using hacksaw then hand filing.

Tool bodies_0013.JPG


My idea to center pop the lands and it worked perfectly.

Tool bodies_0001.JPG


Tool bodies being prepared for accepting the TC tips. No fancy machinery to make life easy just relying on hand skills.

Brazing TC tips_0008.JPG


A piece of brass shim in place; flux was added both faces before locating the TC tip and heating it to cherry red.

Brazing_0001_01.JPG


Not pretty but once cleaned up they looked a lot better.

Petrol tanks_0005.JPG


New skills involving Tig welding aluminium and panel beating; old steel leaking petrol tank top right new home made aluminium tanks left; I found learning Tig welding to be a lot more difficult than I imagined after all I've been arc welding for almost 60 years.

Metal spinning_0004.JPG


Metal spinning on my Graduate lathe; another very difficult skill to learn and also dangerous. This is one of two petrol tank ends seen in the above picture of the round tank.

The only sure way to fail at anything is not to have a go. I've rambled on enough and hope I'm not boring anyone.
 
Re The jig , read the small print

A handy little accessory which will accept most Robert Sorby cutters. It avoids skinning fingers when sharpening.

You need to find out the hole size in the carbide cutter and the Sorby cutters or it may not work

I think that is one of the very few items that has not yet reached my "Oh I would like one of those and can find a good use for it" list, everything else I could use 😜 ;)
 
Hi,

Many thanks Democritus. Yes indeed I have a lifetimes experience to fall back upon and I was taught by top class mining engineers but even before starting work at the age of 15 in the pit I was already repairing my own cycles learning by mistakes which I still do even now. My hope by posting my tipped turning tool details was that I could encourage others to consider making things; not just tooling but to look at things differently rather than through money.

Making tipped turning tools the way I described doesn't involve lots of special tools or skills or even a lot of time; it does require anyone to leave their comfort zone to have a go and once they succeed it's a stepping stone to even bigger projects. I spent the first ten years of my retirement during winter restoring vintage valve radios; I started from scratch and made many mistakes in such an highly dangerous hobby where I could be electrocuted just by lifting a "Live" chassis with both hands but if I don't know I research first especially where safety is concerned. I'm 74 this year and am looking into making a Metal Melter;


I'm self taught having wound many coils; chokes and transformers but I've never attempted this using a micro wave oven transformer. I've bought an industrial 1,950W second hand micro wave transformer to experiment with; I've already replaced the secondary winding now giving 975W output but this is too high for my needs so I've also bought a motor speed controller to see if I can bring the amps down. If not I've lost nothing much but gained an awful lot of useful knowledge.

I'm very sorry to hijack this excellent thread but now when old timers die they take their skills with them; I'm learning new skills and what's a micro wave transformer got to do with woodturning; it's to do with the way I think and look at things; I've also been subjected to an intense week long Kaizen training course; my aim is to make a machine that will braze TC tips onto tooling without recourse to gas heating; I want to tame the output from one of these transformers; I can make anything I want to make and have yet to fail; I always gain more knowledge; I don't encourage anyone to follow my lead though because many projects I do involve great danger that could easily prove fatal.

It's a long story but a friend who owns a company asked if I could help brazing TC tips onto tooling for him; his son had a go but in use the tip was thrown; he had tried ready brazed tips but they weren't up to the job he had bought 22 top quality tips. Looking at the failed tool I explained the tip had been thrown due to a "dry" joint. I brazed all 22 tips; half using brass shim the other half using bronze filler rod the only difference was that I dreamt up a way of avoiding dry joints that I've never seen done before; very simple when known but I center popped each land on the tool these throwing up a slight burr ring; this would prevent the tip coming into full contact with the tool allowing a thin layer of braze. I did the first half and posted them to be informed they were perfect so I then completed the second half and posted these. I tried using a paraffin blowlamp which failed it wasn't hot enough so I then used my Map gas torch which did the job but used a lot of gas hence having seen the Metal Melter on YouTube I hope to make a dedicated brazing machine. I'm not too old to try new ideas and I've also got a second project lined up involving making an industrial induction heater. I'm not taught on electrics but I am taught regarding safety.

Having just one practical skill is so useful in that it can then be transferred to so many other subjects; I hope I never stop learning or experimenting.

In 2020 I learnt two new skills; TIG welding aluminium; metal spinning and a bit of panel beating making a new petrol tank for a mower I fully restored.

Sorry once again for hijacking this thread and no offence meant in the least to anyone; I love learning and getting my hands dirty.

Kind regards, Colin.

View attachment 100081

Roughing out the tip "land" using hacksaw then hand filing.

View attachment 100082

My idea to center pop the lands and it worked perfectly.

View attachment 100080

Tool bodies being prepared for accepting the TC tips. No fancy machinery to make life easy just relying on hand skills.

View attachment 100077

A piece of brass shim in place; flux was added both faces before locating the TC tip and heating it to cherry red.

View attachment 100078

Not pretty but once cleaned up they looked a lot better.

View attachment 100079

New skills involving Tig welding aluminium and panel beating; old steel leaking petrol tank top right new home made aluminium tanks left; I found learning Tig welding to be a lot more difficult than I imagined after all I've been arc welding for almost 60 years.

View attachment 100084

Metal spinning on my Graduate lathe; another very difficult skill to learn and also dangerous. This is one of two petrol tank ends seen in the above picture of the round tank.

The only sure way to fail at anything is not to have a go. I've rambled on enough and hope I'm not boring anyone.


I genuinely envy your skill set.
 
Yes, but my question was not regarding the relative merits betwixt hollow and flat grinding. :)
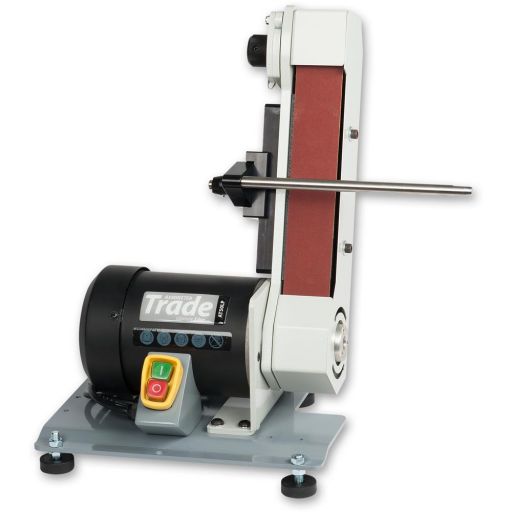
It was specifically regarding Axminster's reverse running belt linisher.

Axminster Trade Ultimate Edge Reverse Running Sharpening System

Axminster Trade Ultimate Edge Reverse Running Sharpening System


What possible advantages might there be to having the belt running away from the workpiece, as opposed to, the more traditional, running toward.

ATB,
Daniel 🎄
Maybe if things all go to cr@p one doesn't get peppered with shrapnel.
 
Colin
Thanks for the information concerning your metal suppliers. There is a branch of K Steel in Rawtenstall, close to where I live. When next I need any metal (I do from time to time), I , and anyone else on UKWorkshop who lives In the North West , will know where to go.
D.
 
Thank you Colin.
From the other end of the scale, home made, Ebay, Sorby & Wolverine gouge holders.

Gouge Jigs.JPG


The first 2 require a washer sandwiched on top of the gouge to centralise it & keep it level.
The Wolverine is designed for 6" grinders & had to be lengthened when I acquired an 8" grinder
 
Pulled the trigger today and ordered this Robert Sorby ProEdge Plus Deluxe Special Edition Package Deal I also ordered the large knife Jig and small knife holder, they will not be in stock though for a few weeks. I ordered over the phone and have to say the staff (or at least those I spoke to) were top notch and it was clear they knew the products they were selling. I will say it was a pleasure dealing with them made more so by the fact they threw in 2 trizact belts free of charge so I will have the full range, Oh happy days :) ;)
 
Hi,

Colin
Thanks for the information concerning your metal suppliers. There is a branch of K Steel in Rawtenstall, close to where I live. When next I need any metal (I do from time to time), I , and anyone else on UKWorkshop who lives In the North West , will know where to go.
D.

You're most welcome. K Steels are excellent and you might also be interested in another steel supplier I've used and can highly recommend;

Steel from Stock to Meet any Fabrication Specifications - F H Brundle

Buying steel in small quantity through places like model engineers suppliers and eBay is expensive; both K Steels and Brundles are much more affordable and even with a minimum order why not stock up as I do.

Here in Huddersfield we still have a couple of scrapyards the largest being Schofield's

Home - Schofield

A while ago I wanted to use steel for decking framework and to buy new would have cost a fortune so I headed to Schofield's with tape measure wearing lots of safety kit like helmet; safety shoes; Hi Vis waistcoat and rigger gloves; I popped into reception and asked for permission to look around which was granted; I selected long lengths of assorted heavy steel sections and these were pulled out on a fork truck and taken to the weighbridge to be weighed. All this scrap is sold on weight. Schofield's don't deliver but I was very fortunate indeed; a customer with a pickup truck was just dropping off a load of scrap and was happy to deliver the steel to our bungalow it only cost about £30 cash; the heavy steel only cost £120 so what a bargain. It's a case of being flexible and working with what's available; the steel was rusty and had a few drilled holes in it but at the price I wasn't going to grumble; I removed the rust and used a liquid to treat the cleaned steel; I forget the name of the liquid and it's down in the workshop but I can post details later; this liquid kills rust and it's brilliant.

Bungalow exterior makeover August 2016 (8).JPG


The new decking steel I bought from Schofield's; it looks very rough; has a number of drilled holes and end brackets welded to it; it's covered in rust and old paint but I knew what I wanted and this is perfect at very cheap price compared to buying brand new; I don't mind work or dirty hands.

Bungalow exterior makeover August 2016 (12).JPG


Cleaning the steel using 9" angle grinder and paint stripper.

Bungalow exterior makeover August 2016 (25).JPG


Here's brand new steel from Brundle's ready to be welded for the new decking railings.

Bungalow exterior makeover August 2016 (38).JPG


The bespoke railing posts made to my design and special sizes.

Bungalow exterior makeover August 2016 (45).JPG


The new steelwork installed; it's heavy; I used a winch and ladder in order to raise the long heavy channel sections; the posts are incredibly heavy being very thick steel. This old steel looks no different to new steel once its fettled and painted as seen here; the new railings still need painting. I also made the side hung garage now workshop doors.

Bungalow exterior makeover with new steel decking..JPG


Just the handrail to attach to complete the job. I gave the bungalow a comprehensive makeover both interior and exterior; the paint used is expensive Benjamin Moore; this paint was applied over four years ago and still looks like new. I also dug out using pick and shovel tons of wet sticky clay removing steps then added the 42' long sloping pathway making access to the bungalow rear very easy I dug out more tons of clay to the rear of the bungalow. After 33 years of nothing but hard graft our bungalow is now immaculate as are the gardens. The decking boards are scaffolding planks.

Kind regards, Colin.
 
Back
Top