Oak Sideboard build

UKworkshop.co.uk

Help Support UKworkshop.co.uk:

This site may earn a commission from merchant affiliate links, including eBay, Amazon, and others.

Aled Dafis

Established Member
Joined
29 Sep 2005
Messages
1,173
Reaction score
0
Location
New Quay, West Wales
Hi i'm about to start building an oak sideboard for a mate of mine as a wedding gift (I was one of the best men). He's been married just over a year, and I'm making good progress, the drawings are just about done. :roll:

This project started out with my wife offering them a coffee table as a gift, which they were very pleased with, and they'd have a think about the style - this was a few months before they were due to get married so I thought that I'd have plenty of time to get it done. Months passed, and I asked them if they'd thought about the coffee table, they had, and came to the conclusion that they didn't have enough room in the middle of the lounge for a coffee table, but they had a small alcove that would take a sideboard. :shock: :shock: I couldn't really say NO could I? So I took a deep breath and agreed with a smile on my face and a though going through my head of "what the **** have let myself in for?"

Here's a pic of the 3D model so far, I can't get my head around sketchup, so this is produced in Autodesk Inventor.
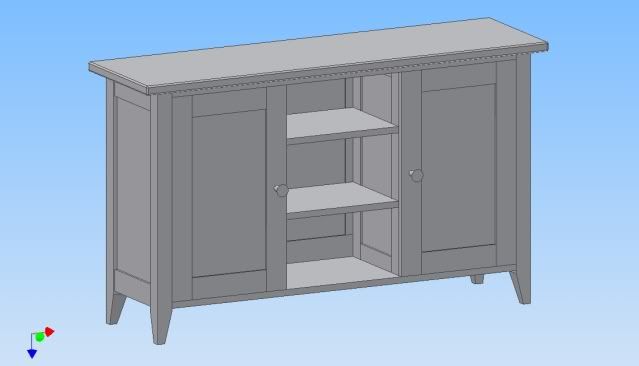
Sideboardassy.jpg


I used to use Inventor a few years ago when I was an engineer, and I've finally managed to get a free 20 seat licence for school, it really is a fantastic CAD package that's easy to learn and very powerful in what it can do.

And here's the orthographic drawing.
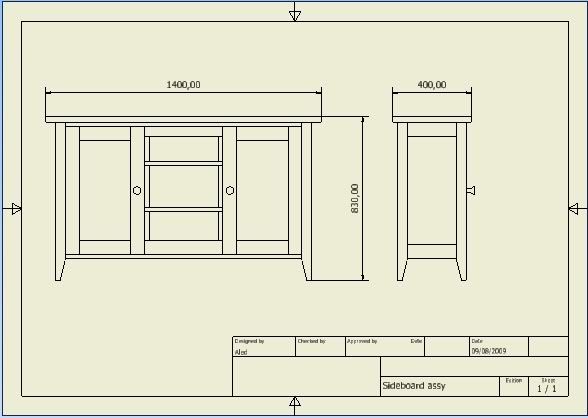
Sideboardassydrawing.jpg


Cheers

Aled
 
I used AutoCad every day at work for many years and moving to sketchup for home use was a struggle. Once you learn the sketchup way of doing things - which can be very different to a CAD approach it gets easier and easier. Now sketchup is my choice for woodwork design.

Good luck with the project. Hope you are quicker at things than I am :)

keep the pictures flowing.
 
Thanks Guys.

I forgot to mention in the OP that I bought a Festool Domino last December with the intention of starting this job in the new year. I've used the Domino for a few small jobs, but this will be it's first outing "in anger". I've decided that most, if not all joints will be assembled using the Domino to see whether it really is as good as everybody makes it out to be. I'm sure I won't be dissapointed.

Does anybody on here make doors using the Domino? I seem to recall Kevin Ley making doors in F+C once, but I don't think I've seen anybody else do it. What do you think?

Cheers

Aled
 
Aled Dafis":1x506vtj said:
Does anybody on here make doors using the Domino? I seem to recall Kevin Ley making doors in F+C once, but I don't think I've seen anybody else do it. What do you think?

Not tried it on doors yet, Olly, but I see no reason why it would not work. After all, the Domino machine cuts, in effect, a mortice, and the Domino is, in effect, a loose tenon.

It comes down to size - if the Dominos are an appropriate size for the door you are making, it should be OK.

Cheers :wink:

Paul
 
Aled. I use the domino for joining doors. no problems with any joints yet. just make sure to use the biggest domino you can.

regards mike
 
I've just been out to try the Domino on the size of rail that I intend to use (70mm wide) and found that when I use the stop dogs, the mortice is quite a way from the edge of the rail, but not quite far away in order to place another Domino closer to the edge. Pics would help here, but my battery's flat, I'll try and post pics tomorrow night.

What I'd really like is to be able to place two Dominoes in each rail/stile joint, but still use the inbuilt accuracy of the stop dogs to reference from the edge of the workpiece. Has anybody managed to do this? If so, how?

I hope that this is one of the final stumbling blocks that I encounter before actually cutting material, so any advice would be much appreciated.

Cheers

Aled

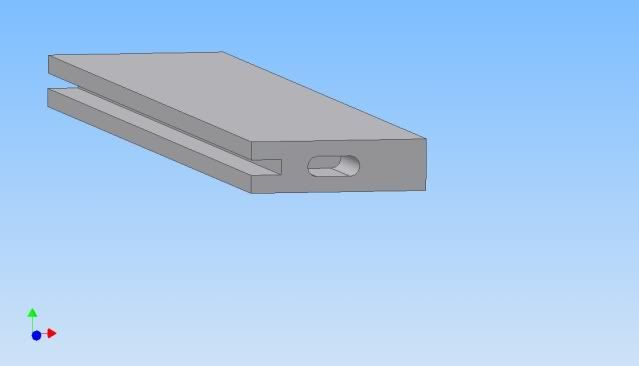
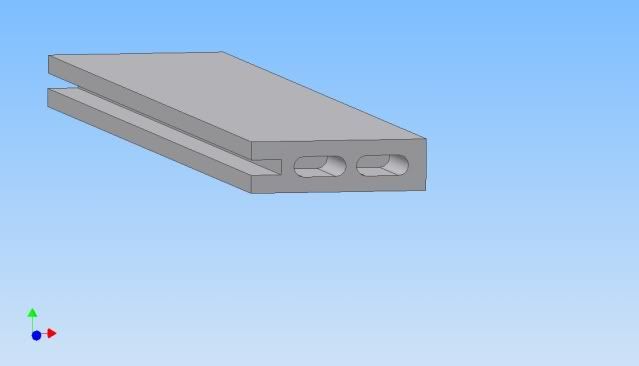
Edit: I've just modelled the situation so that you can see what's going on.

Here's what the stop dogs produce

Stile1Domino.jpg


And here's what I'd like it to produce.

Stile2Dominoes.jpg
 
Dont bother with the stop dog thingys! Just cut your 1st 2 dominos tight. then alter the settng for the width of cut. rRealy easy mate

regards mike.
 
Thanks Mike.

I had considered doing it your way, but was worried about accuracy. I find that the Machine skates about a little when plunging. It might be that I'm being too anal, or that I need to improve my technique.

I'll have a go tomorrow night to see how I get on.

Cheers

Aled
 
Aled. its a simple machine to master, practice is the best thing. i use mine for all sorts of joints. windows. doors . furniture. it does take some getting used to the uses of the machine. your very skilled in your trade and you will master it.
 
Aled Dafis":2wz1kut4 said:
I find that the Machine skates about a little when plunging. It might be that I'm being too anal, or that I need to improve my technique.

I think you are just being a little timid with it, Olly. Once you get used to it you'll find that it doesn't skate about at all.

One accessory you might want to consider getting is the one designed specifically for cutting mortices in the ends of narrow pieces of wood. The part number is 493 487. It fits onto the fence and the wood is clamped into it, so that nothing can move as you plunge the cutter in. I think there's a demo on the DVD that comes with the machine.

Unfortunately, for the particular job you want to do, it takes pieces from 22mm to 70mm wide, which would mean that you wouldn't be able to cut two slots. However, I would have thought that for the job you want to do it should be possible to clamp a piece of wood to the bench so that you can butt the workpiece up against it, and another piece to butt the side of the machine against, so that you could accurately cut the slots.

If you use the tight setting for the two slots, I think I'd be inclined to make a saw cut along the length of the Dominos so that there's plenty of room for excess glue to escape.

Cheers :wink:

Paul
 
Paul Chapman":1e21pyc7 said:
I think you are just being a little timid with it, Olly.

Have you took you pills today Paul - it's Aled's thread...... :lol:

Cheers

Karl
 
Here's one I made earlier, as the saying goes, pic is of the back of the door, the front was flush. Not glued up or finished.
Made quite a few more doors and most other things with the domino, what a great but expensive tool :roll:

ogfdkk.jpg

2j2gfwk.jpg
 
Thanks Bloonose, that's exactly what I hope to achieve. How wide are your rails/stiles?

By the way, which is the rail and which is the stile, i'm never sure.

Cheers

Aled
 
These were 60mm wide 18mm thick, but have gone down to 38mm x 18mm and just rebated the back to fit a mirror then bead to hold it in.

Glad to be of help, more pics below of the dry fit and the lipped panel which went inside.
2hxyc5d.jpg

rk3cwp.jpg
 
Aled Dafis":h1mq29lc said:
By the way, which is the rail and which is the stile, i'm never sure.

Aled, stiles run vertically while rails are horizontal. :wink:
 
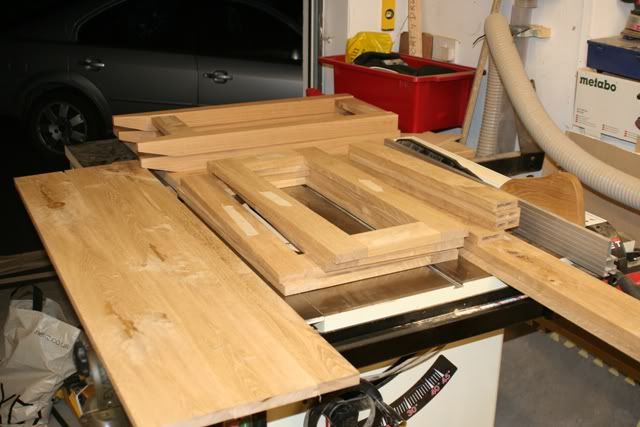
I had the day to myself yesterday, so a little progress was made with the sideboard.

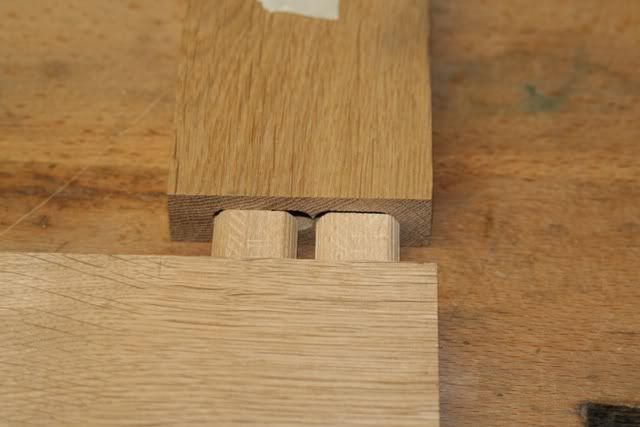
Firstly I sorted out the double Domino issue. I had previously used the domino without actually clamping the wood to the bench, and in hindsight, it was inevitable that the work would shift a little whilst cutting the mortice. Yesterday I clamped the work between the dogs in the bench, and everything stayed exactly where i wanted them to stay Hurray!!! Below is a pic of the double domino, one is set with a tight mortice for registration and the other is cut using the next setting to allow a little play. Thanks for your advice guys.

I hadn't cut the groove for the veneered MDF panels at that time by the way.

IMG_57731.jpg


And here's a complete door.

IMG_57741.jpg


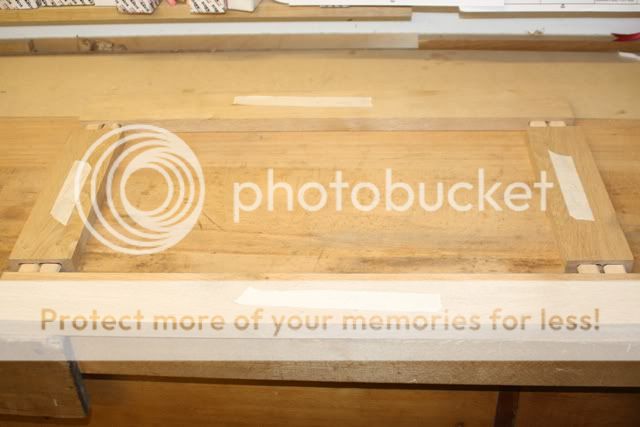
In fact I got quite a bit done yesterday. All the jointing is done. I just need to cut the panels and think about the finishing. Do you thing I should pre finish all parts or just the panels before assembly?

IMG_57721.jpg


The Domino is just brilliant! I know it was expensive, but my workshop time is pretty limited, so it's going to allow me to make things much quicker than if I had to cut mortice and tennon joints.

My little shortcut is that all the parts except for the legs are made from Oak floorboards. Using floorboards is in fact a very efficient and quite economic way of working if you just need 20mm boards. These boards were kept back from when I fitted the Oak floor in the house, so I picked out the good boards, but I'm sure that your local flooring supplier would let you pick and choose if you slipped him a few beer tokens. I worked it out that these boards cost me nearly exactly the same as if I had bough 1" rough sawn, the difference being that all the machining was done for me and there's very little waste, in fact the total ammount of wasted wood is just a bucket full of small offcuts and bits of tongue/groove.

Cheers

Aled
 
Another good thing about using the domino is not having to add on extra for tenons so mistakes are easier to avoid when laying out and cutting etc.
Keep posting the pic's :wink:
 
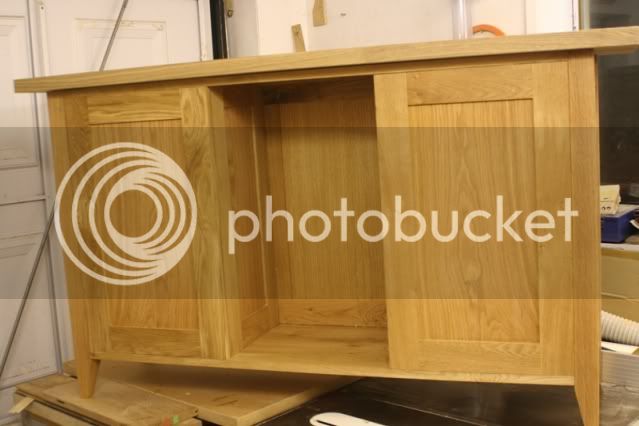
It's been a while, but the sideboard is now almost complete. I just need to fix the top to the cabinet, turn a couple of handles for the doors, and give it one final light coat of Osmo. All the sub assemblies were oiled before gluing, but the final coat will ensure that it all looks nice and uniform.

IMG_6378a.jpg


Cheers

Aled

Edit : I just remembered that I haven't made the shelves to fit in the centre section and cupboards yet.
 
Back
Top