SkinnyB
Established Member
Thought this may be of interest to some people....
I required a way to flatten a wide slab for a large live edge table top (2.3m x 900m) that I have been asked to make.
Looking at some designs of just screwing 2x4s to the side of the slab... I was looking to make something a little more polished/reusable/flexible that could be used multiple times and take up a small footprint when being stored.
My main points I wanted:
3m long x 800mm wide
Portable
Adjustable for different sized/thickness timbers
Work holding clamping system
Fast setup
Ease of use
Work levelling system
Small footprint when stored
Dust Extraction
Easy to level/coplanar.
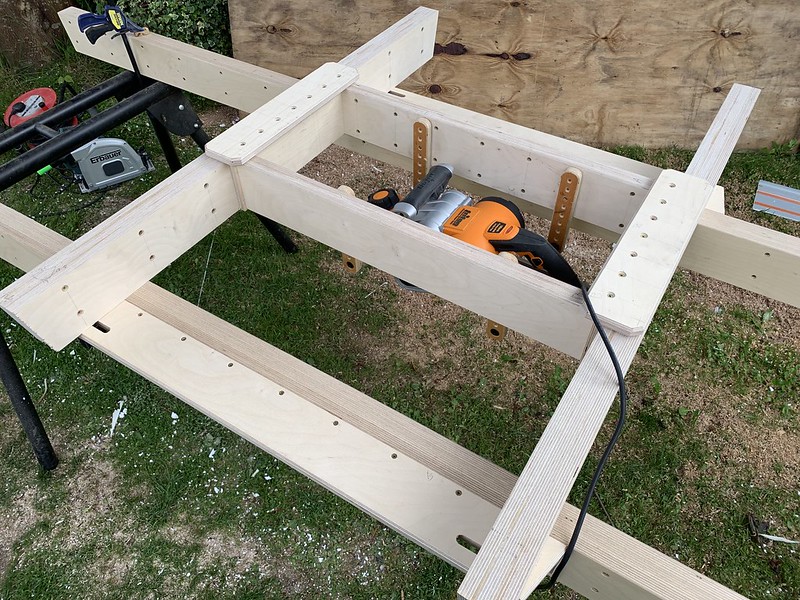
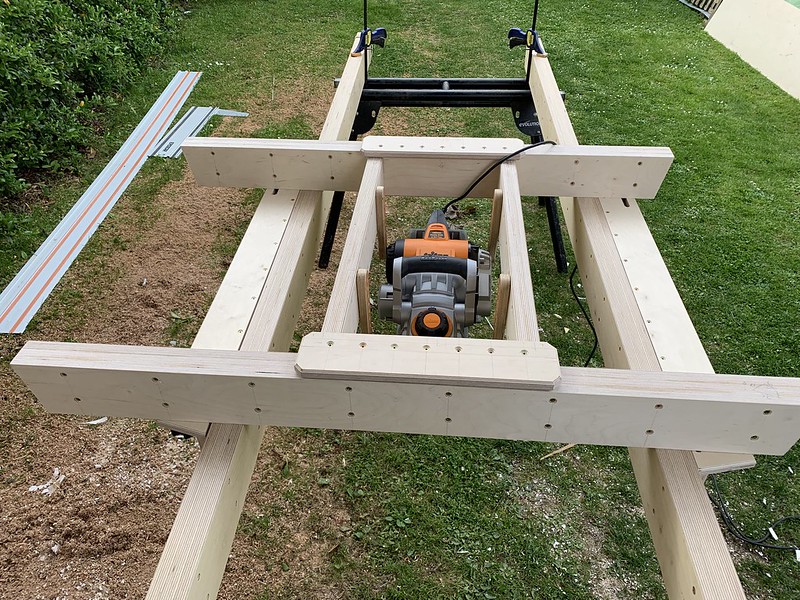
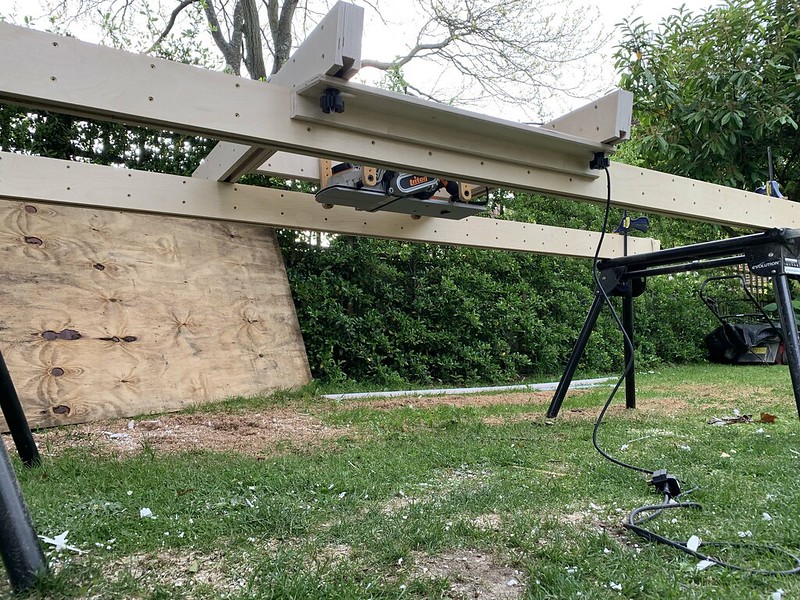
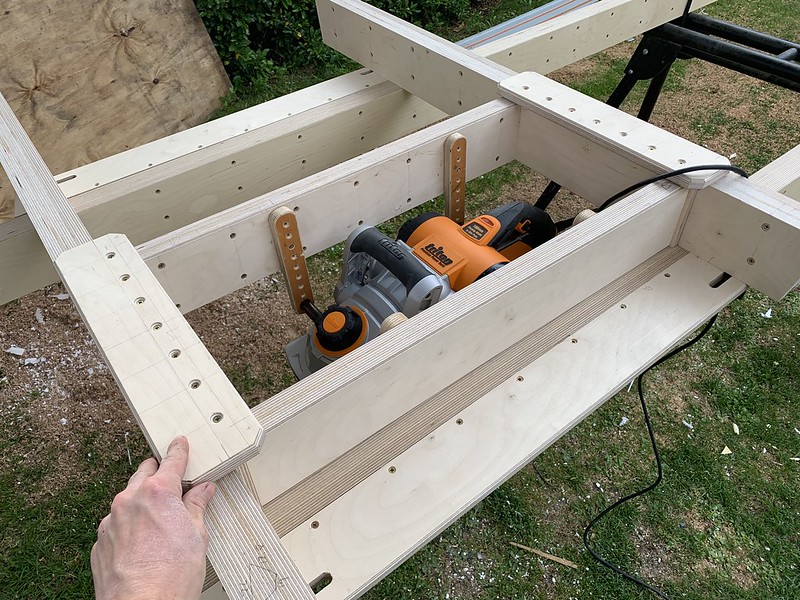
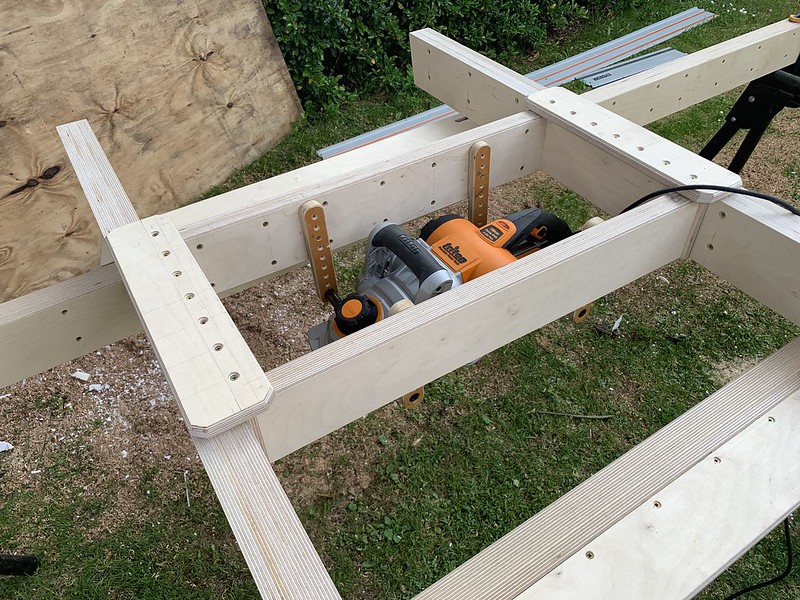
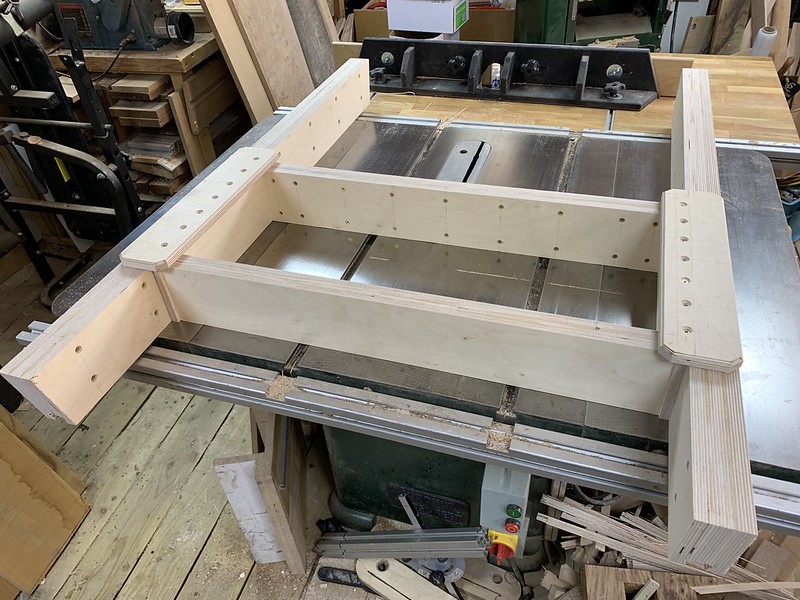
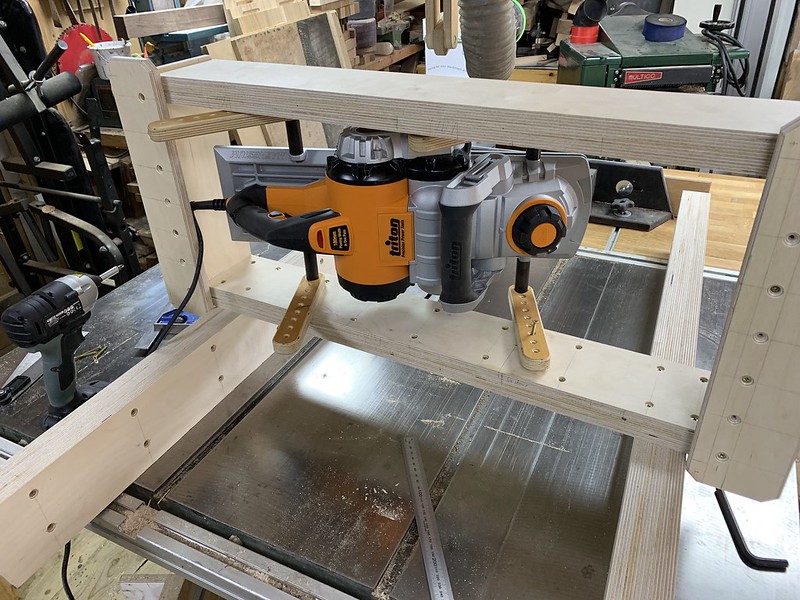
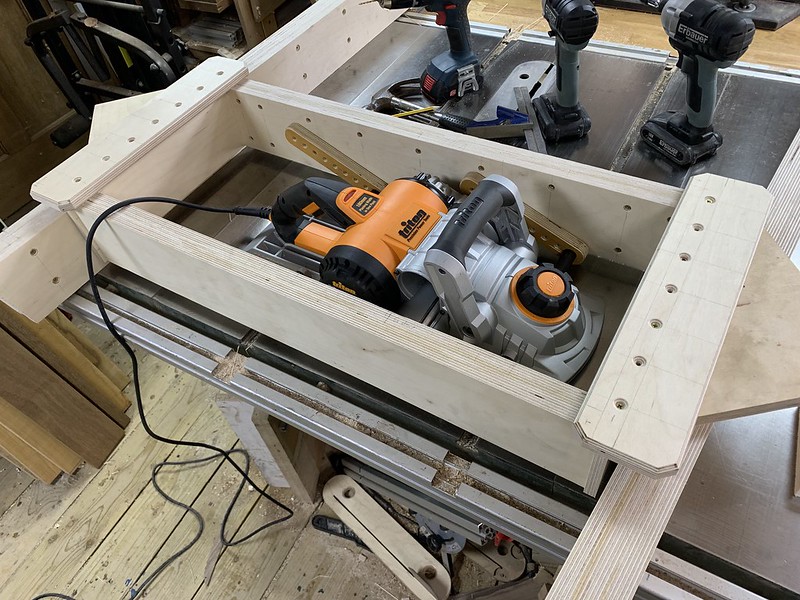
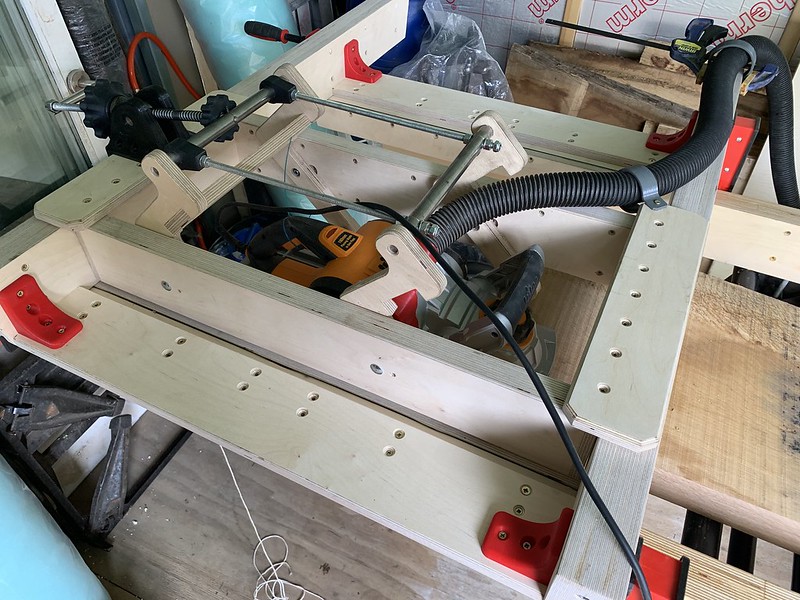
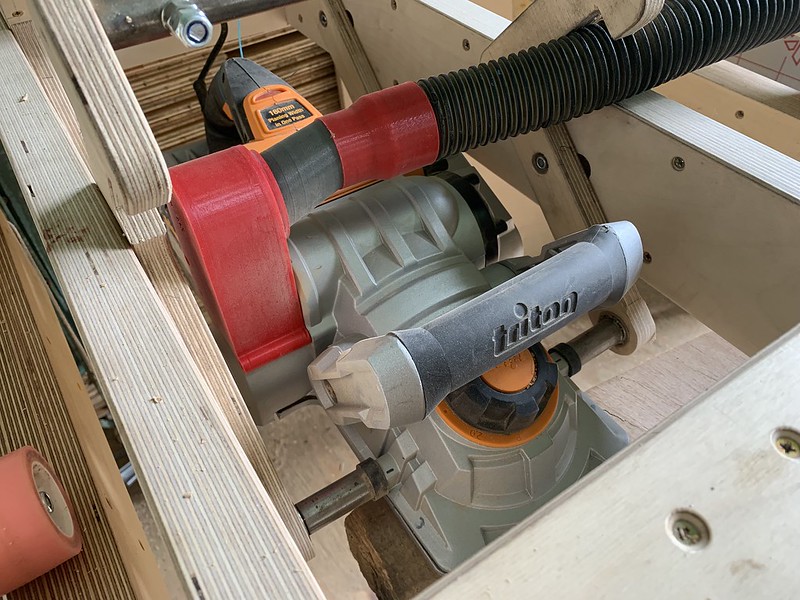
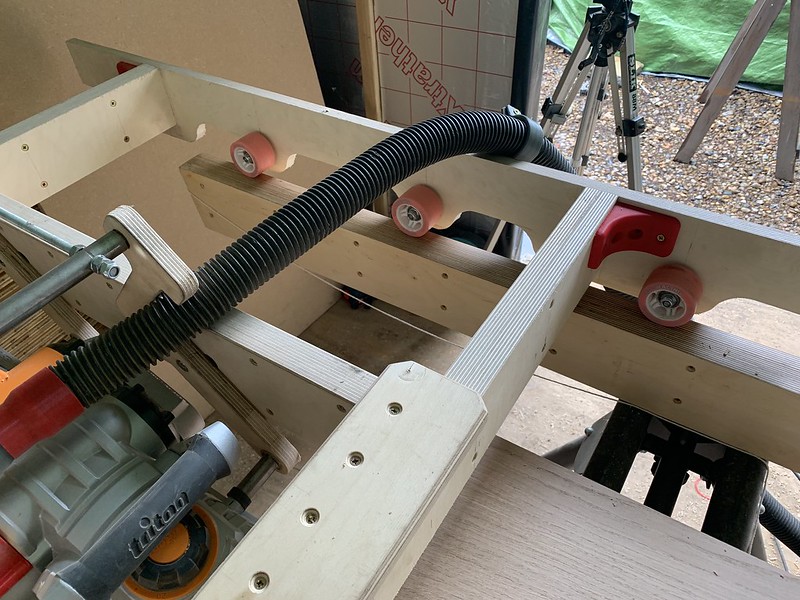
This is what I ended up creating:
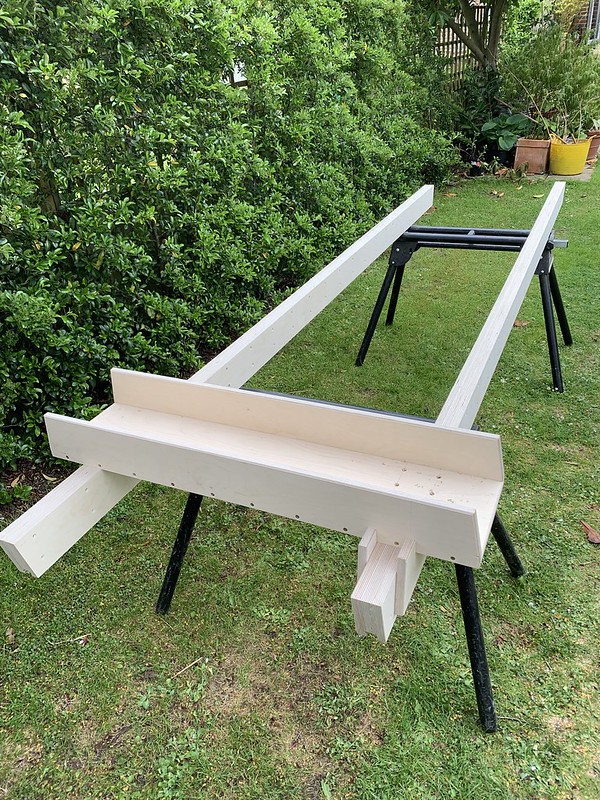 IMG_4196 by jamie skinner, on Flickr
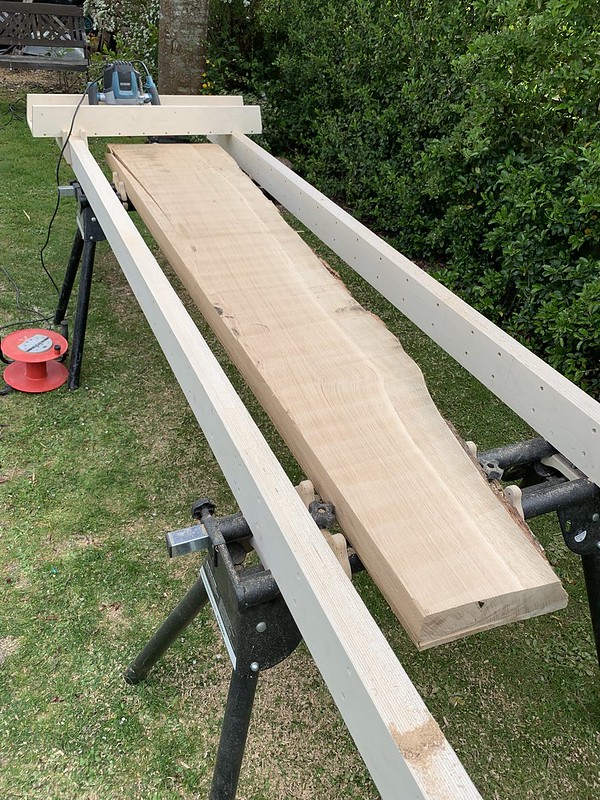 IMG_4206 by jamie skinner, on Flickr
The main parts consist of:
2x Evolution mitre saw trestle stands
2 x 3m laminated plywood guide bars
1 x router sled
I chose multiple pieces of laminated plywood as it will be more stable than a regular softwood 2x4.
Managed to make the whole thing from a single sheet of 18mm Birch ply which was pleased about. So only cost me a days work and £50.
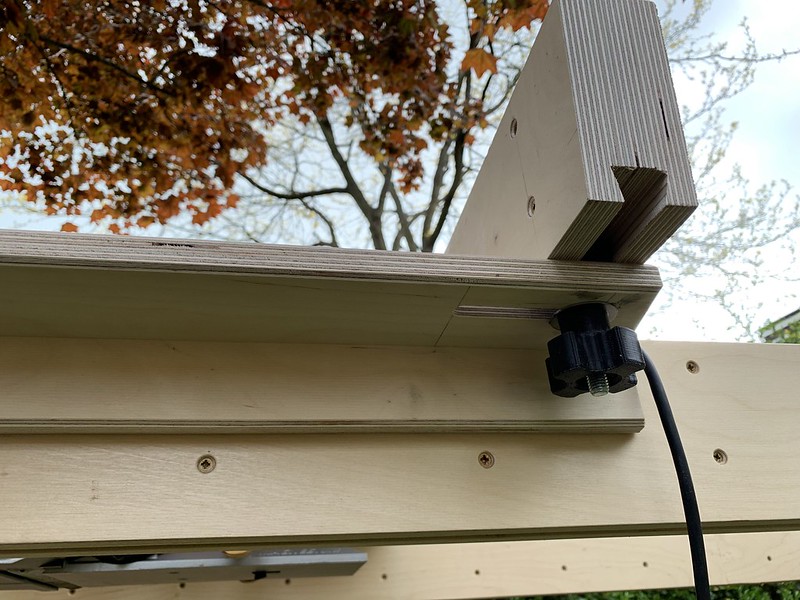
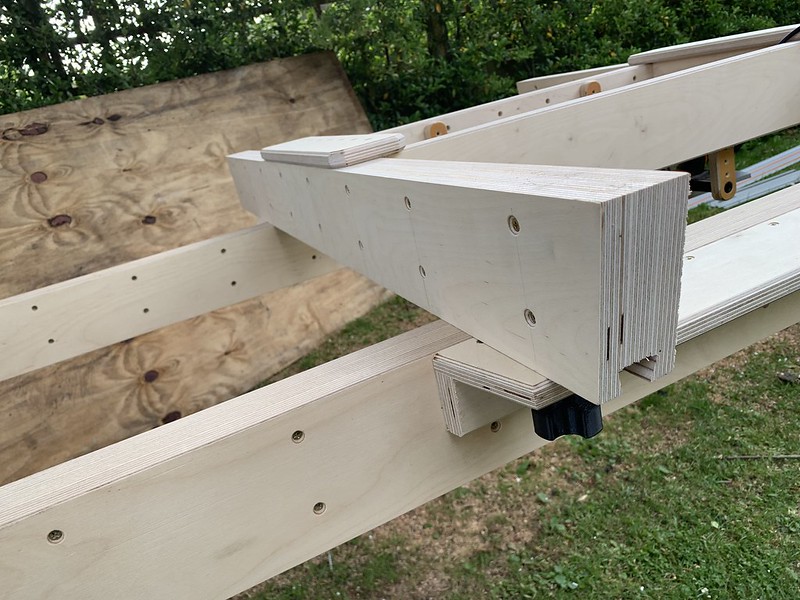
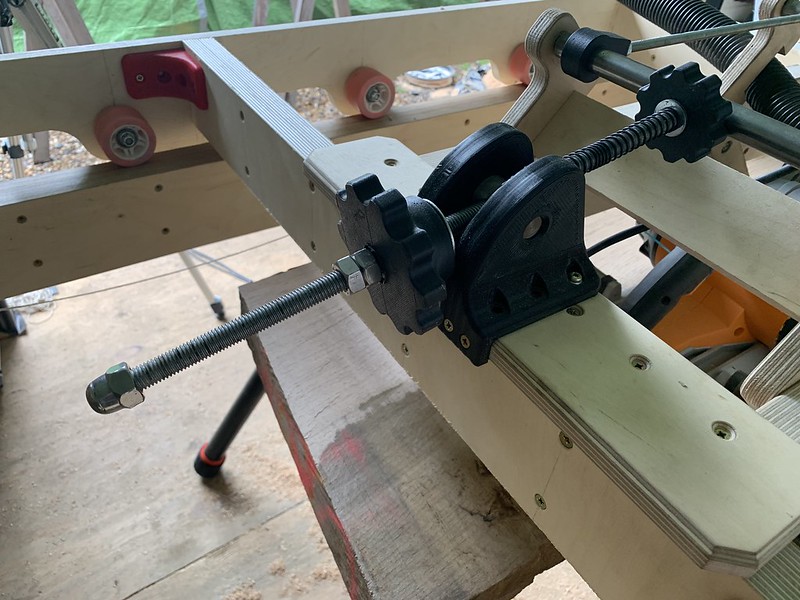
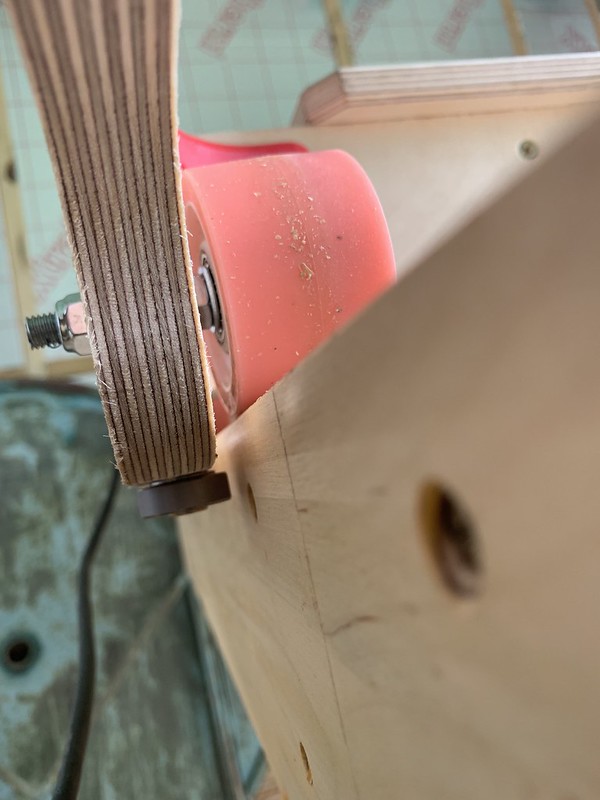
The guide bars are attached to the trestles via a sliding dovetail system. This enables me to mount the trestles to any point along the length of the guide bar depending on the timber to be flattened.
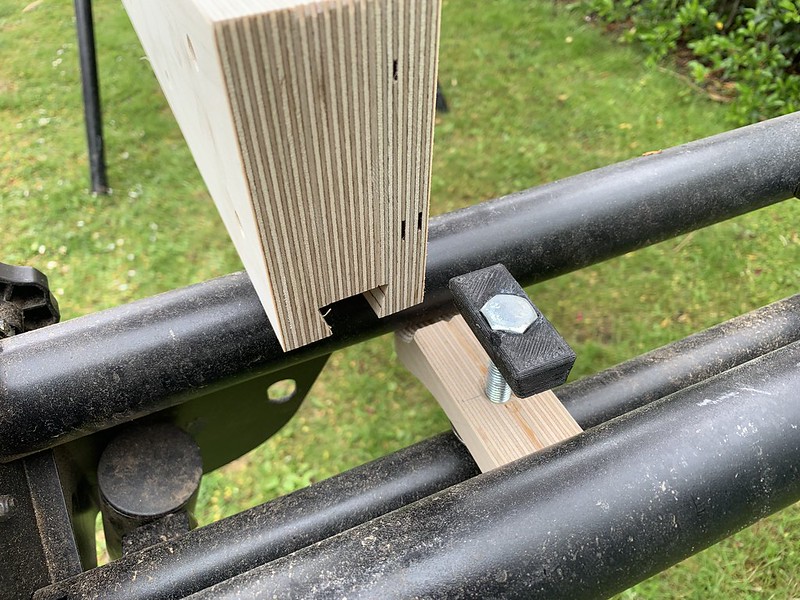 IMG_4195 by jamie skinner, on Flickr
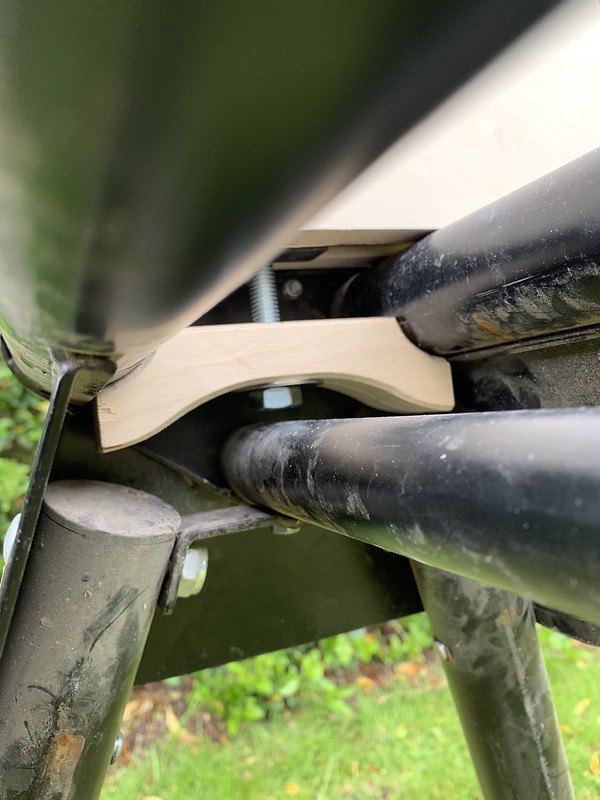
Mounted via bolt from underneath. I originally had planned to use a knob instead of a nut in my original design. However due to this central bar in the middle there is only just enough space to get a nut in there.
 IMG_4194 by jamie skinner, on Flickr
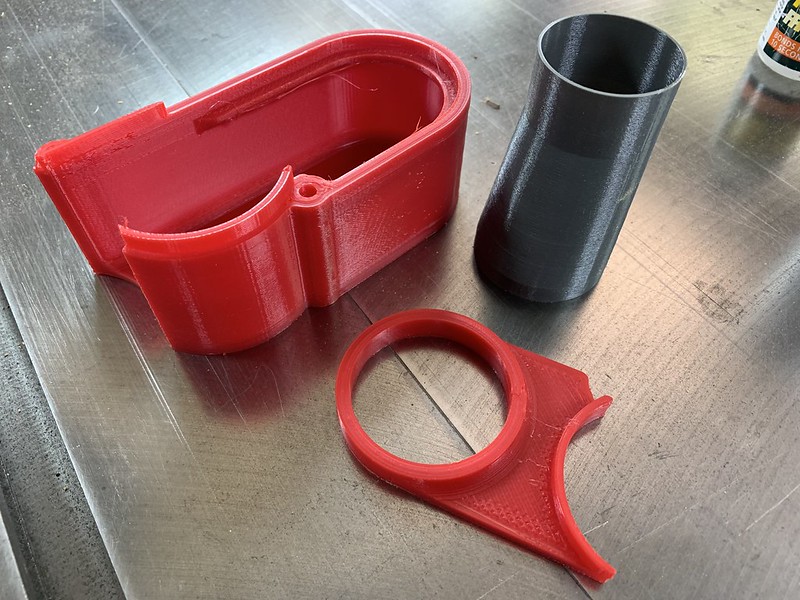
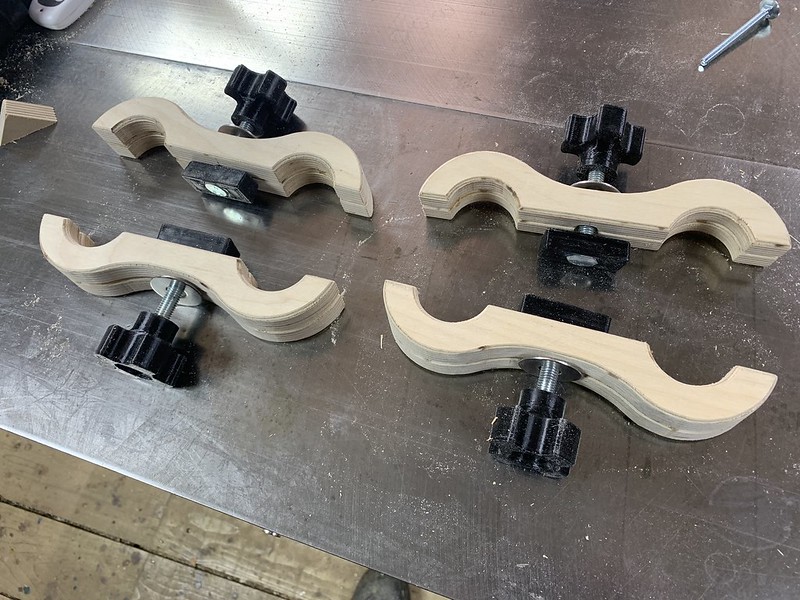
Original designed pieces:
 IMG_4189 by jamie skinner, on Flickr
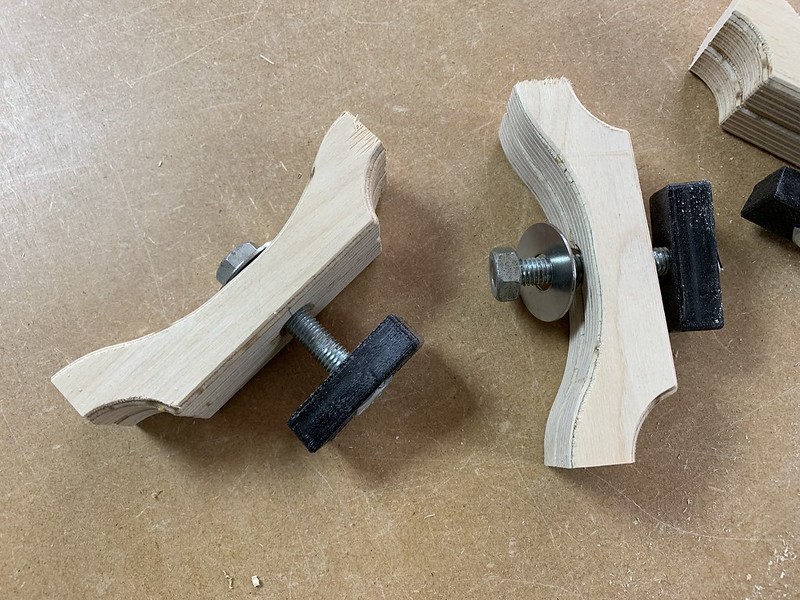
Modified to fit as there was not enough space for the full sized hooks. They need to spin 90 degrees to go under the bars.
The mounts are made from plywood with a 3d printed dovetail slider with captured bolt.
 IMG_4191 by jamie skinner, on Flickr
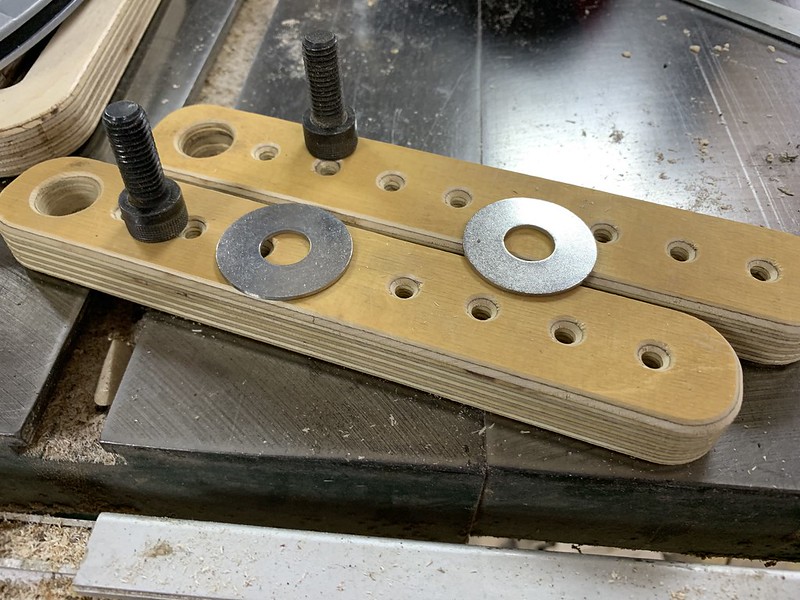
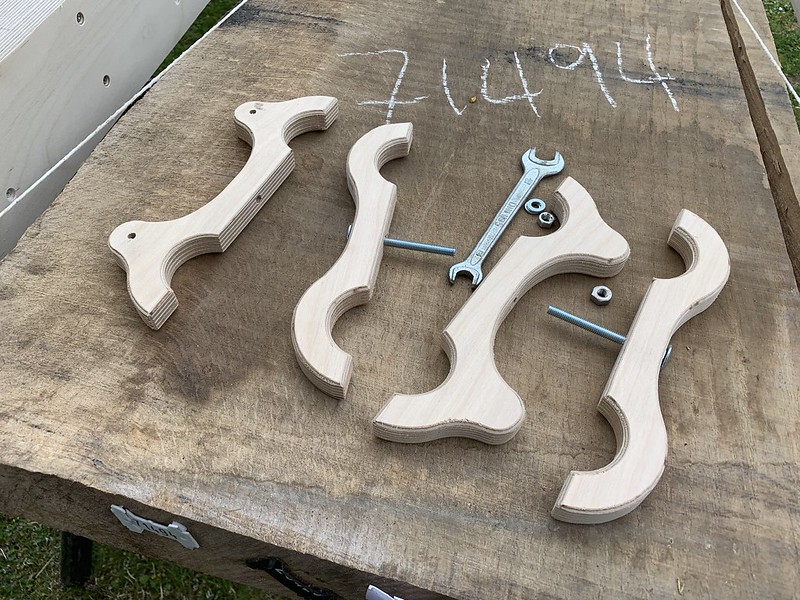
My initial design to hold timber on the trestles are like so:
 IMG_4205 by jamie skinner, on Flickr
And clamp like this... (Bottom right) The holes are for screws if needed.
 IMG_4206 by jamie skinner, on Flickr
To make each guide rail coplanar with the other I took inspiration from Marius Hornberger (Link)
He uses two strings attached at each end with cross diagonally. then lifts one string up by a few mm. The strings must they lay onto of each other but not touch. This can be adjusted by raising each leg of the trestle in my version until the strings are above one and other.
Strings attached:
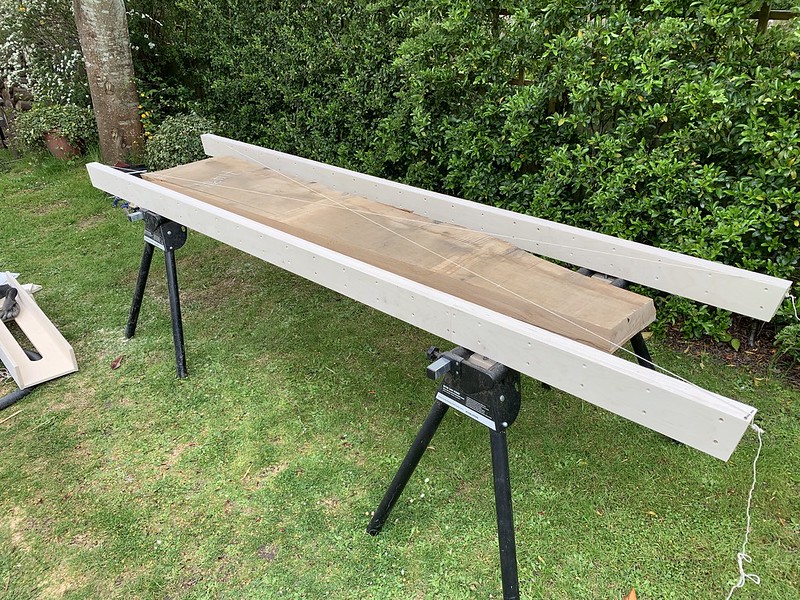 IMG_4202 by jamie skinner, on Flickr
Raised the top string up by the width of one string using a nail.
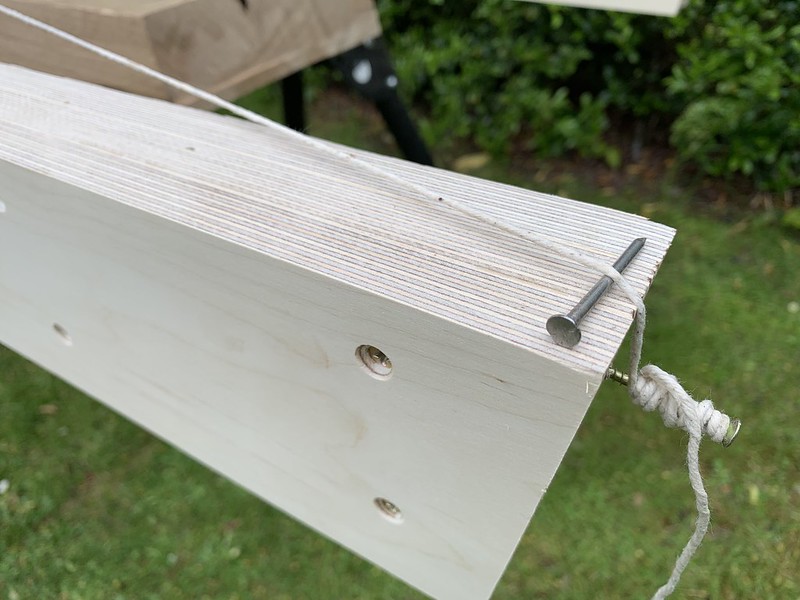 IMG_4203 by jamie skinner, on Flickr
Strings are on top of each but do not touch. Each guide rail is now coplanar with the other.
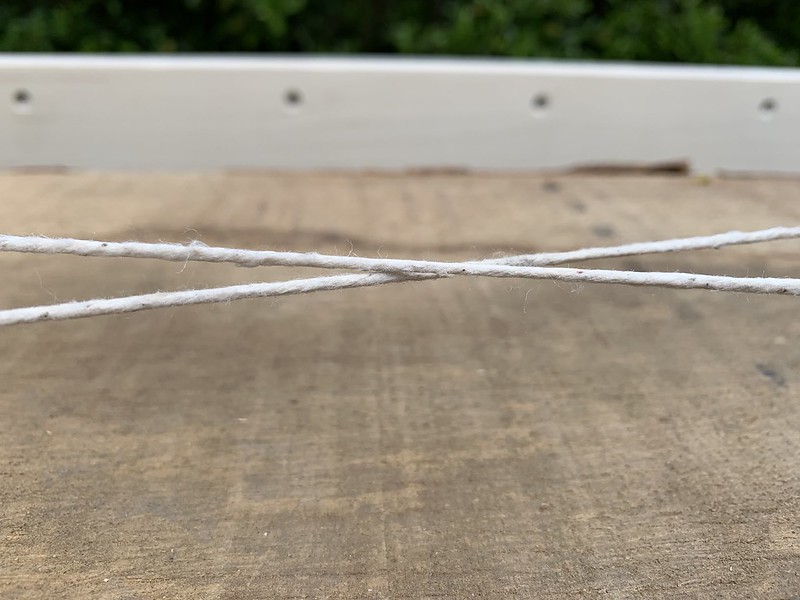 IMG_4204 by jamie skinner, on Flickr
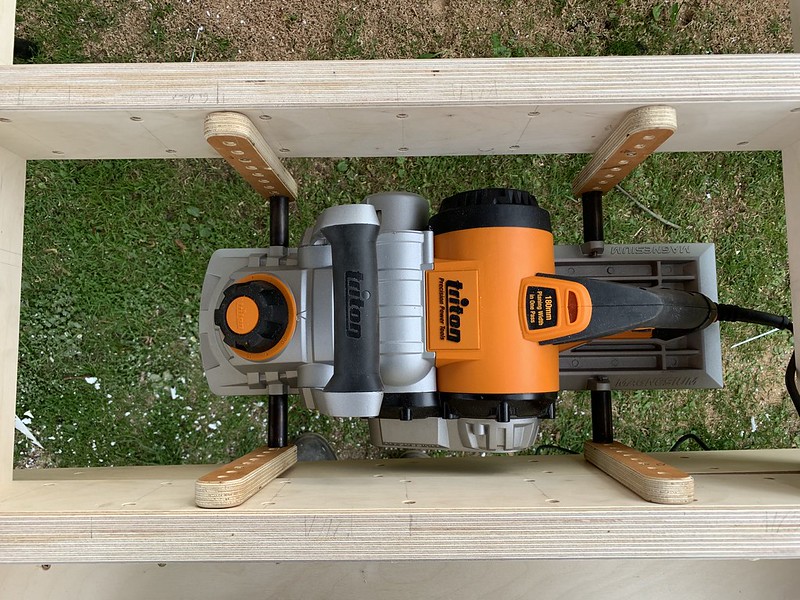
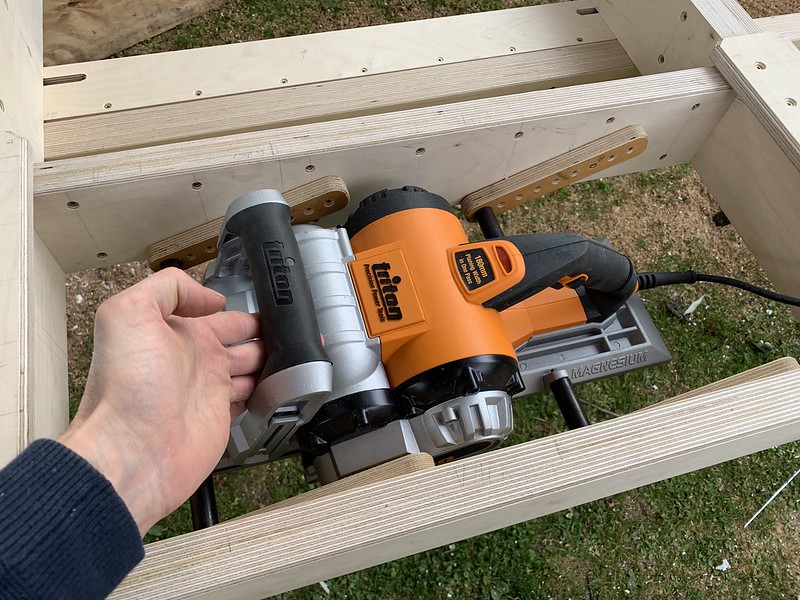
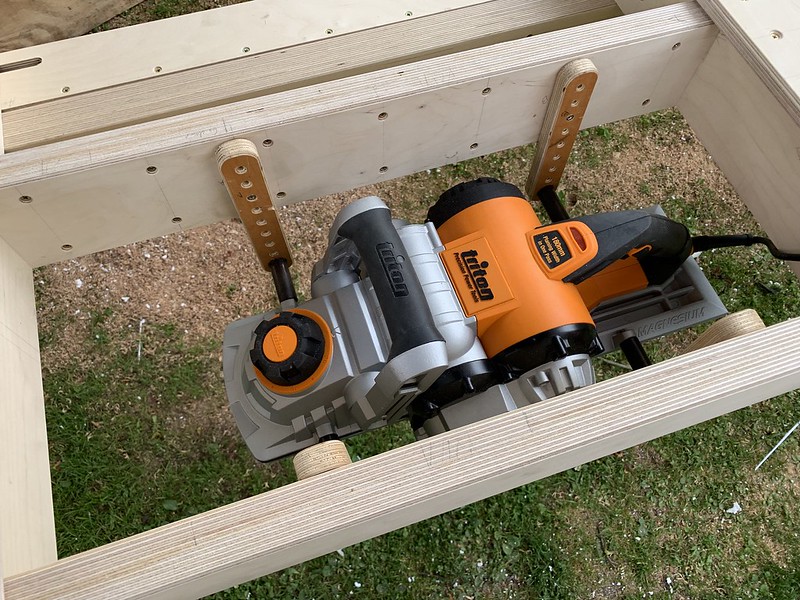
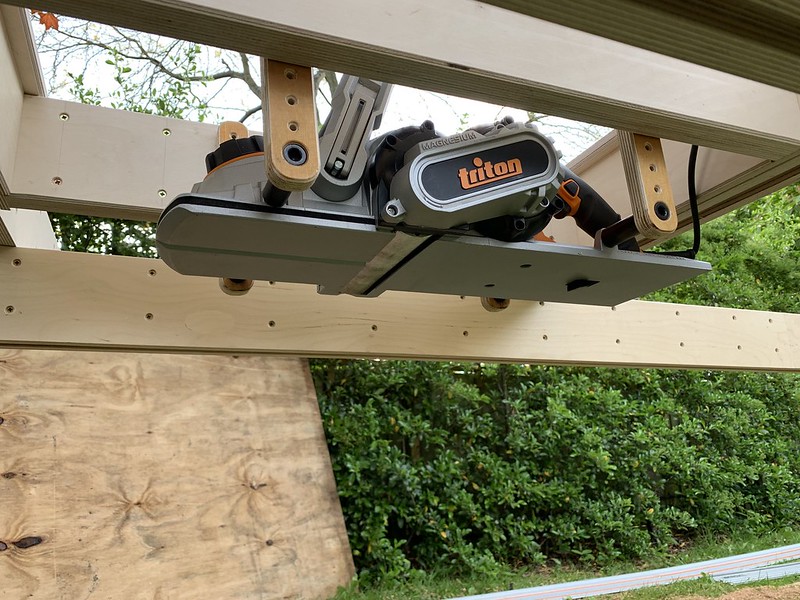
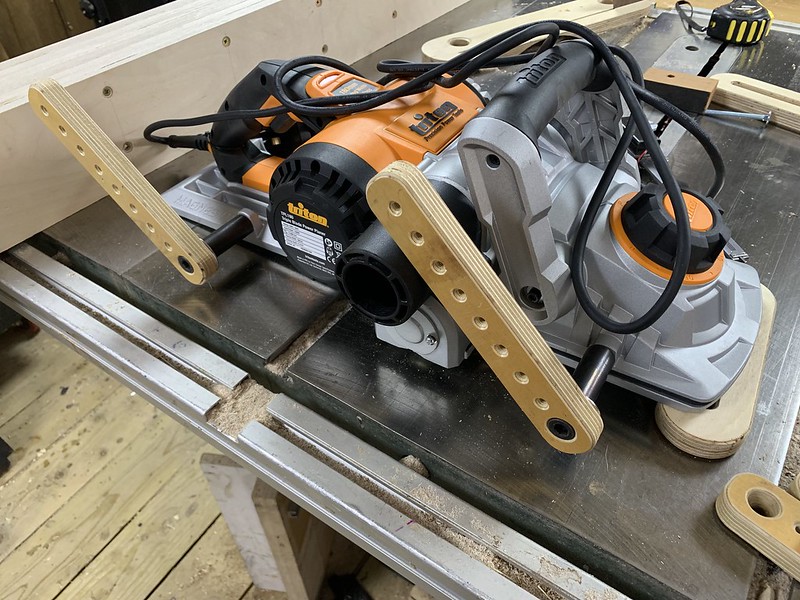
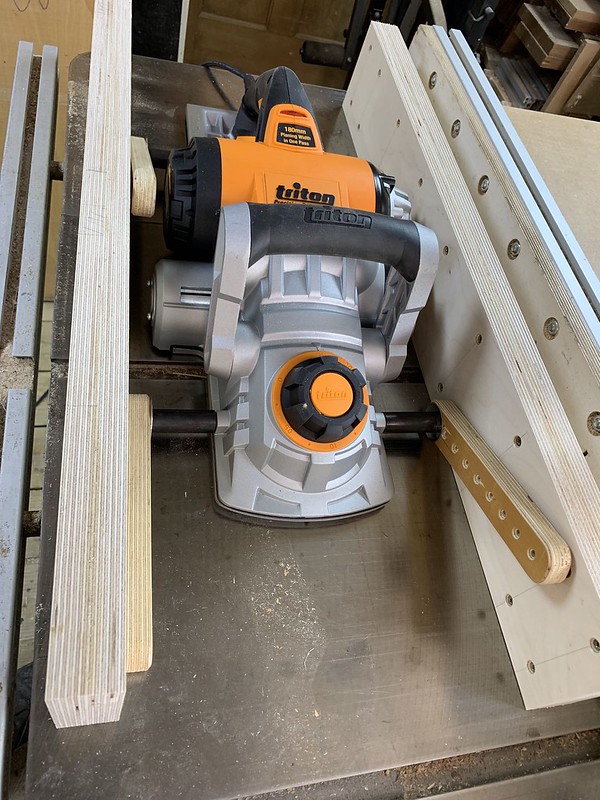
The router slides back and fourth on the sled.
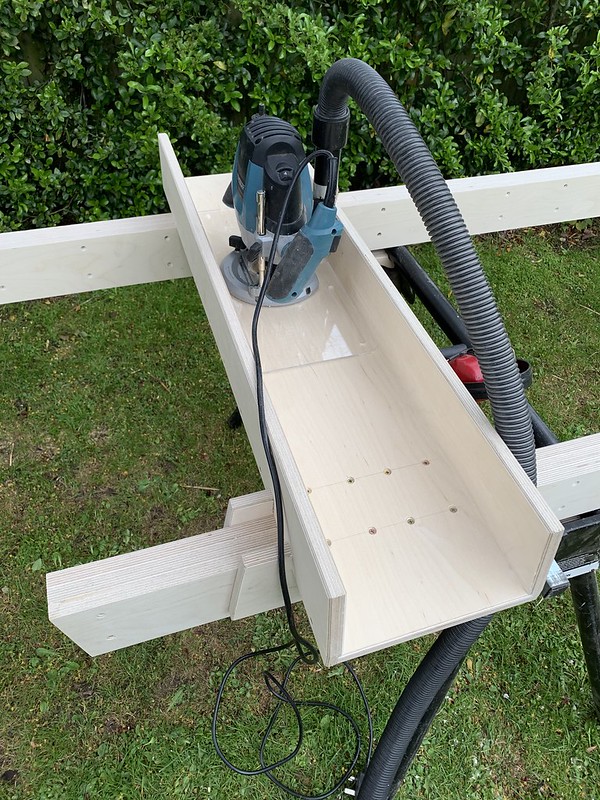 IMG_4200 by jamie skinner, on Flickr
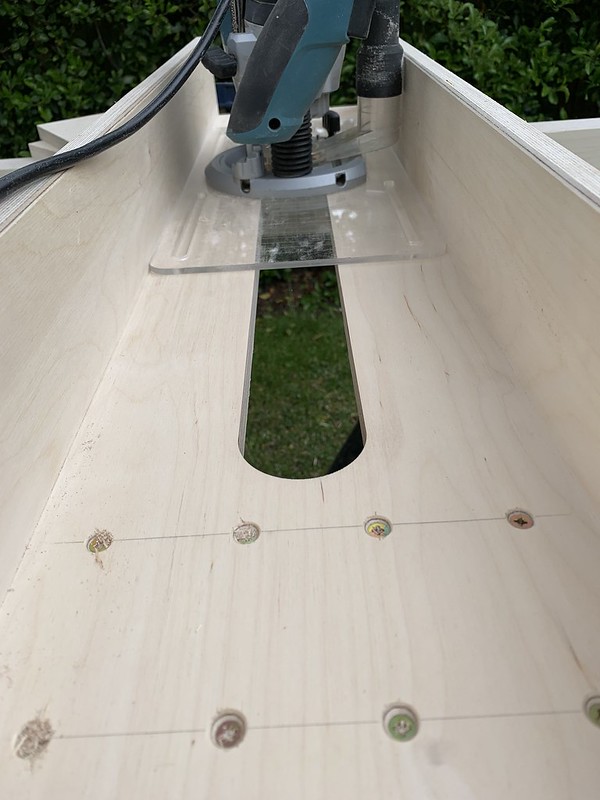 IMG_4201 by jamie skinner, on Flickr
The sled is attached to one rail with two pieces of Plywood. A sliding fit enables the sled to move freely left and right but without to much play.
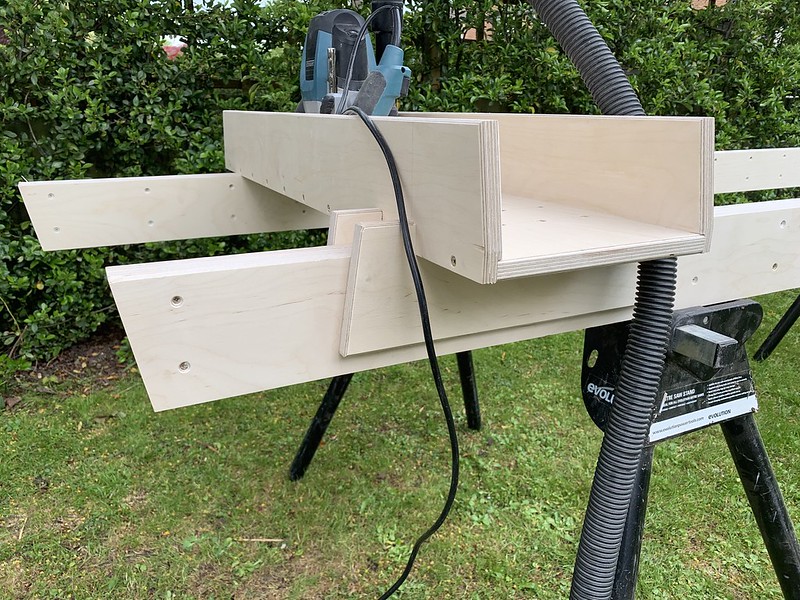 IMG_4197 by jamie skinner, on Flickr
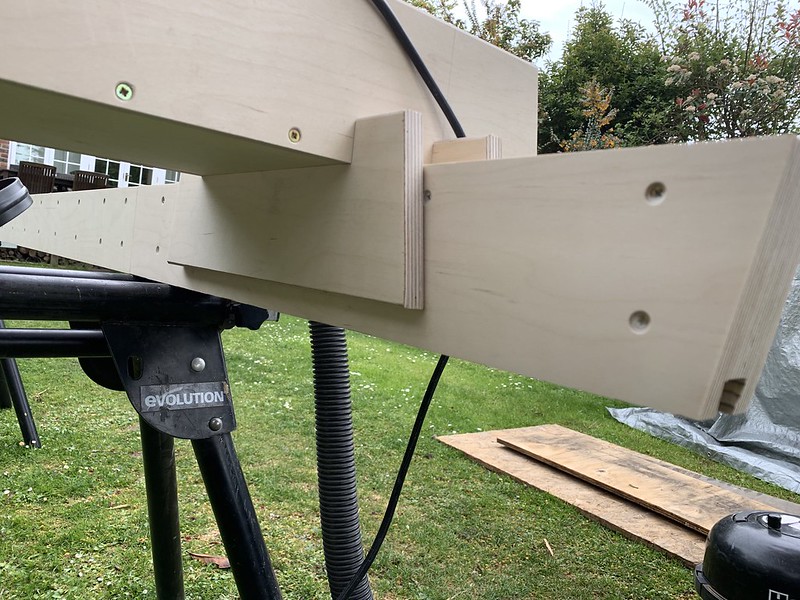 IMG_4199 by jamie skinner, on Flickr
1st test:
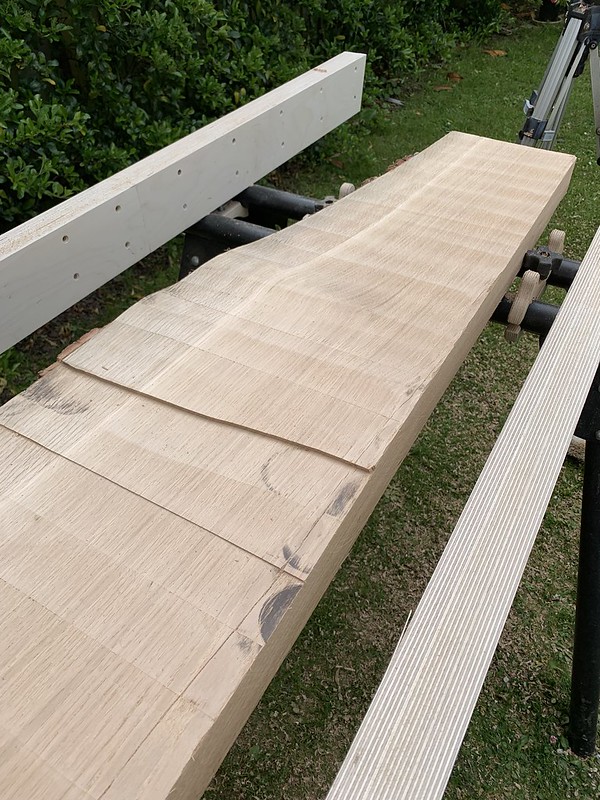
1.I had a little issue with the router that seemed to lower the router bit further into the work is I went. I guess I must not have locked it down enough.
2.The router moving forward and backward wasn't as friction less as I hoped. Fixed by sanding it a little wider where the plastic router base goes and then adding paste wax.
3. Work holding isn't great. The clamps I made work great as stops but I need a way of clapping the timber down.
4.Knobs on clamps are too big.
Router dropped:
 IMG_4207 by jamie skinner, on Flickr
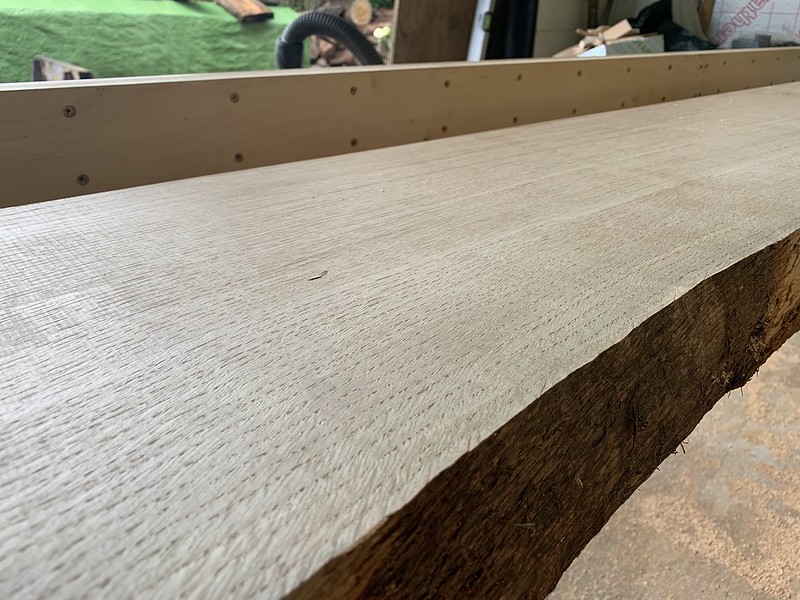
I was very happy with the cut finish I got:
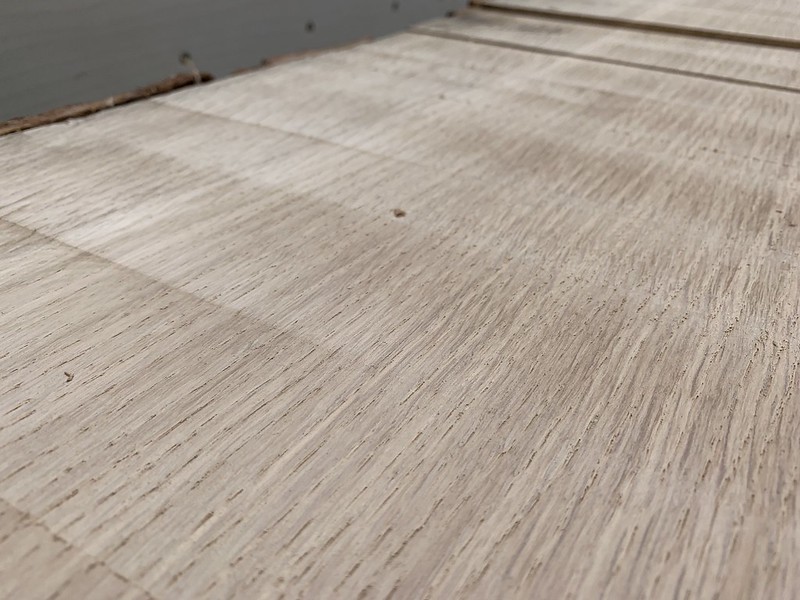 IMG_4208 by jamie skinner, on Flickr
I then spray vanished everything with Ronseal clear varnish to protect it.
2nd test: (This was on the actually piece/s)
Weight of the timber (Oak 80mm 2.5m 700 wide) was enough that I felt I didn't not need to secure it.
The piece had a slight twist to it which I shimmed out using some this wood under it. Using a straight edge running across both guide rail I measured down until I had and even amount to remove of each side. I need to design an adjustable system where I can lift/hold each corner of the timber to shim out the twist.
All went pretty well although....
I had the chuck come loose on the router... Which meant the bit plunged deeper that I wanted. Luckily it was just above the final pass once I had finished so was fine.
I also set my Erbauer router on fire...Was my favourite router for all my hogging out/rough jobs. It had worked hard I think maybe running it at a low speed means the internal cooling is not as great so burnt out.
Picked up the 'new' style Erabuer router from Screwfix... What a pile of crap they are... Locking system still allows router to move up/down by 2-3mm. So much play in the plunge mechanism. Base plate screws weren't countersunk into he base enough and stuck out... And finally after 3 minutes attached to my jig also caught fire... Returned It!
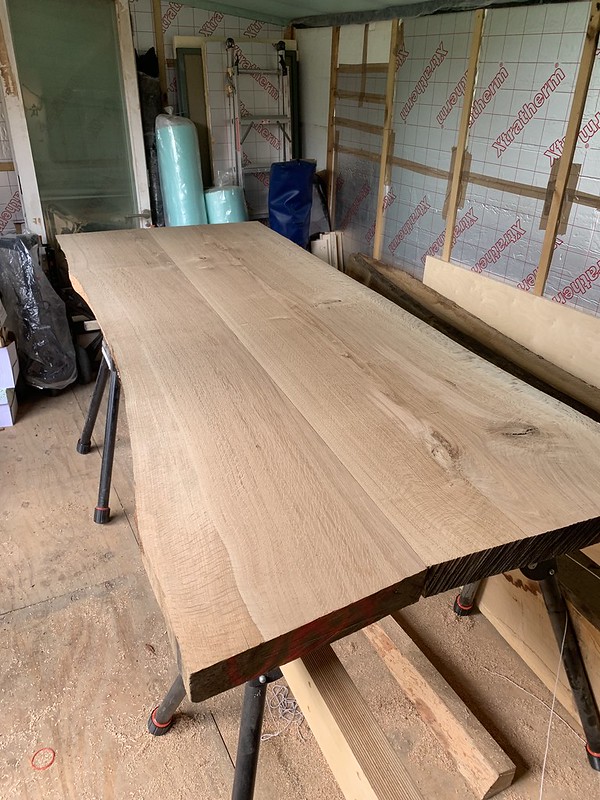
The 80mm slab has been flattened to 60mm due to the cupping of the board. I could have cut the board in half and the flattened it but wanted a complete slab. An extra price will be joined on to this to being it to the 900mm final dimension.
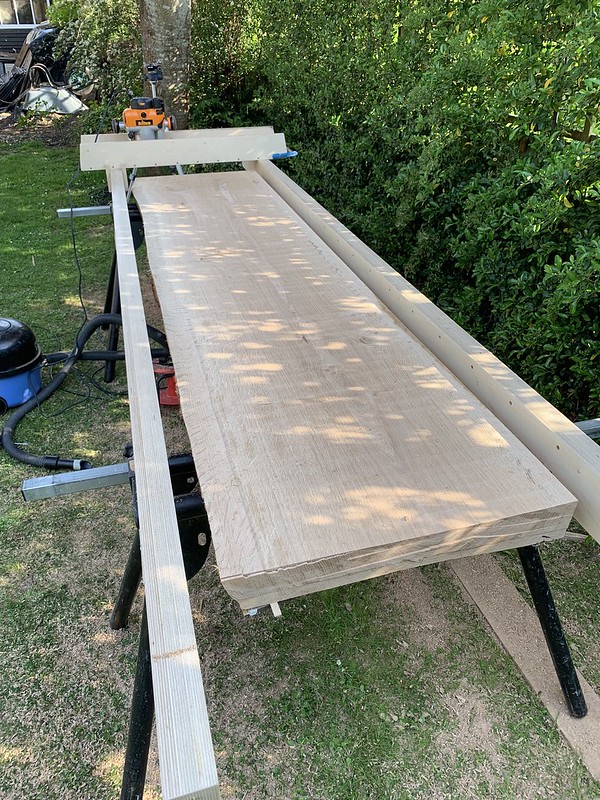 IMG_7146 by jamie skinner, on Flickr
Just need to flip it over and repeat and flatten the other section which gets glued on.
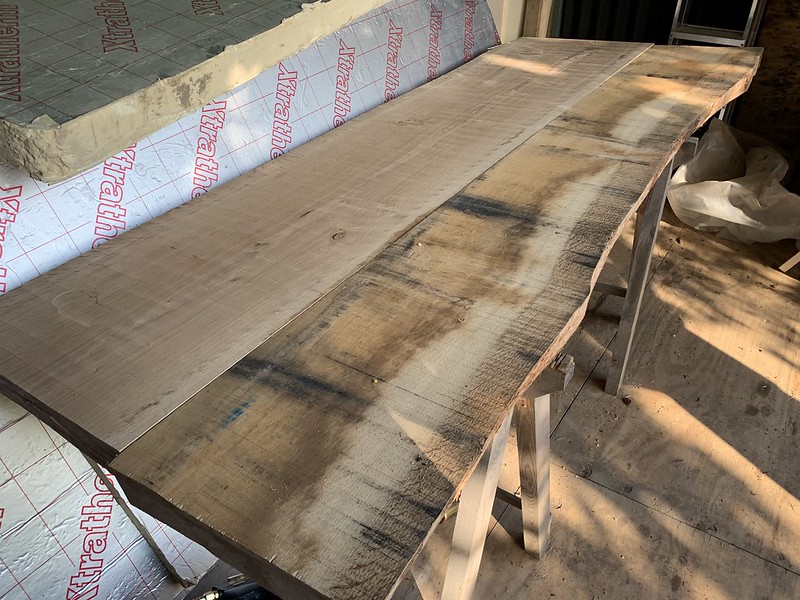 IMG_4267 by jamie skinner, on Flickr
How I made the jig:
Each guide bar consists of 3 layers of 18mm birch plywood. To make the 3m length I added a piece on the end and over lapped the glue join with the next layer creating a strong single length piece. The two outer pieces are run through the router table with the largest dovetail bit I had.
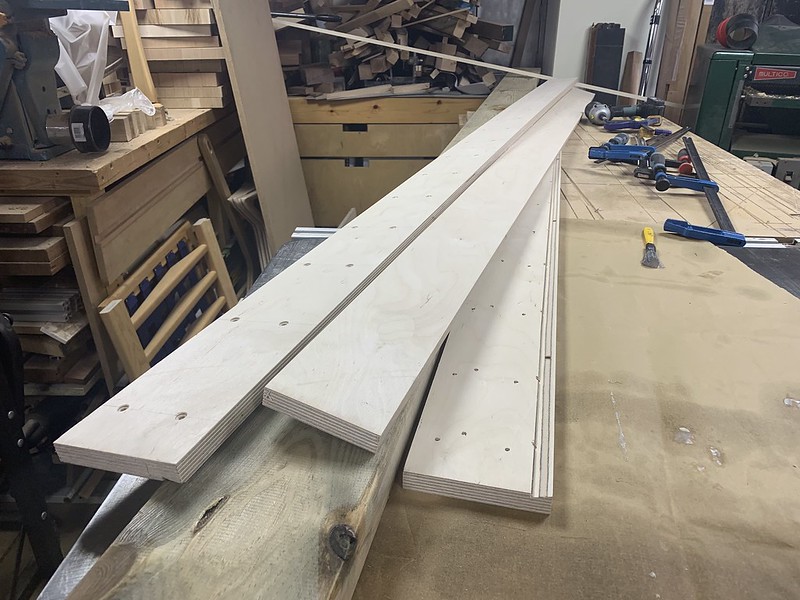 IMG_5213 by jamie skinner, on Flickr
The outer pieces are drilled and countersunk ready to receive screws. To get a straight edge I used the straightest 2x6 I had which was neigh on perfect. I used this to align and clamp the plywood to as I was gluing/screwing it together.
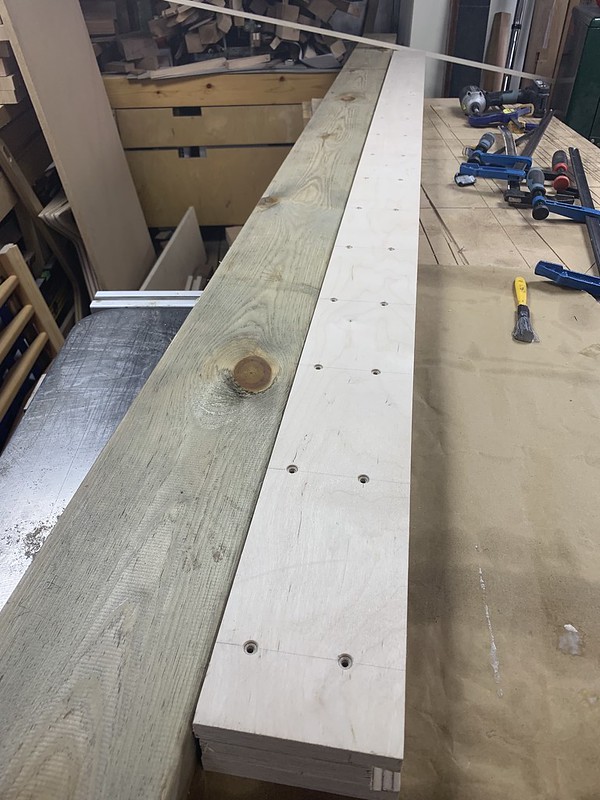 IMG_4173 by jamie skinner, on Flickr
Assembled like so:
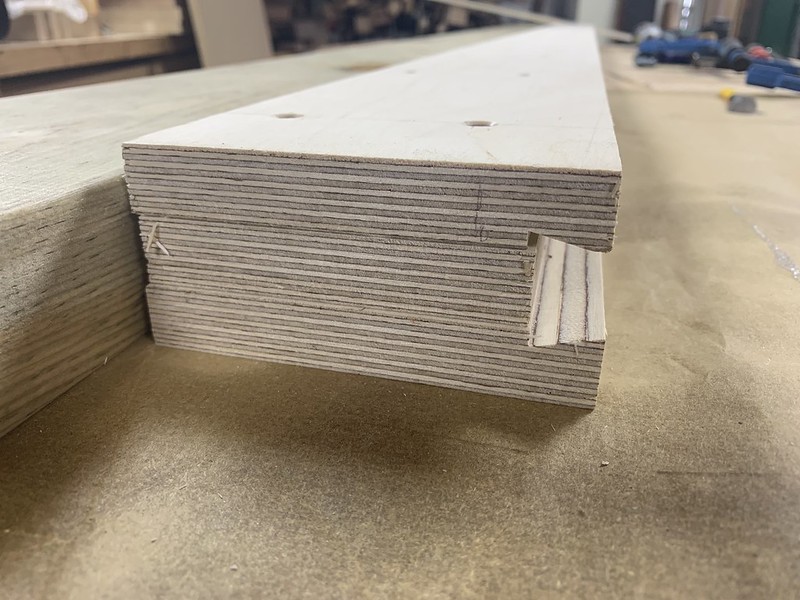 IMG_4065 by jamie skinner, on Flickr
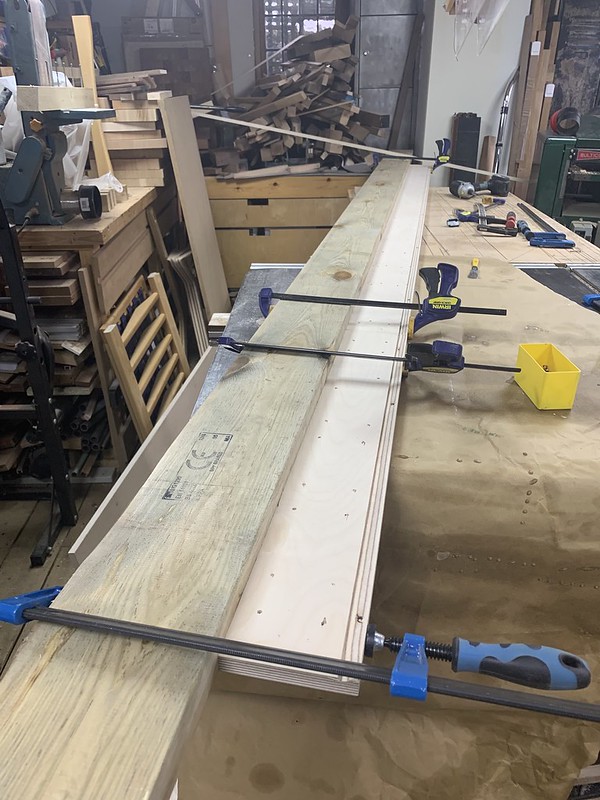 IMG_4174 by jamie skinner, on Flickr
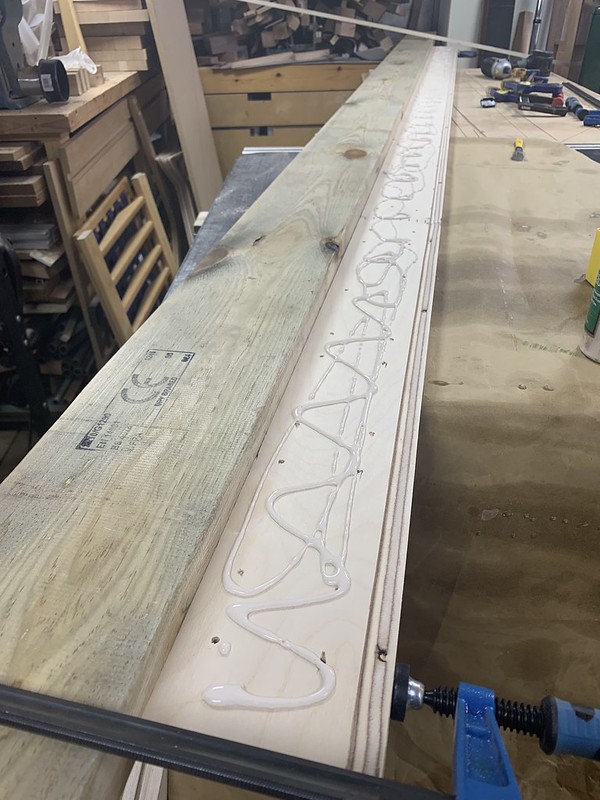 IMG_4176 by jamie skinner, on Flickr
Next layer glued on and clamped to 2x6.
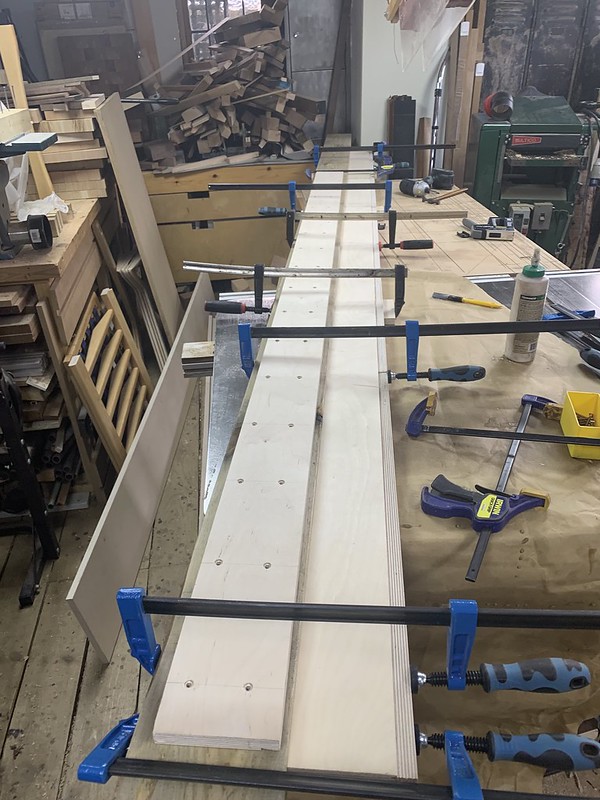 IMG_4178 by jamie skinner, on Flickr
Assembled:
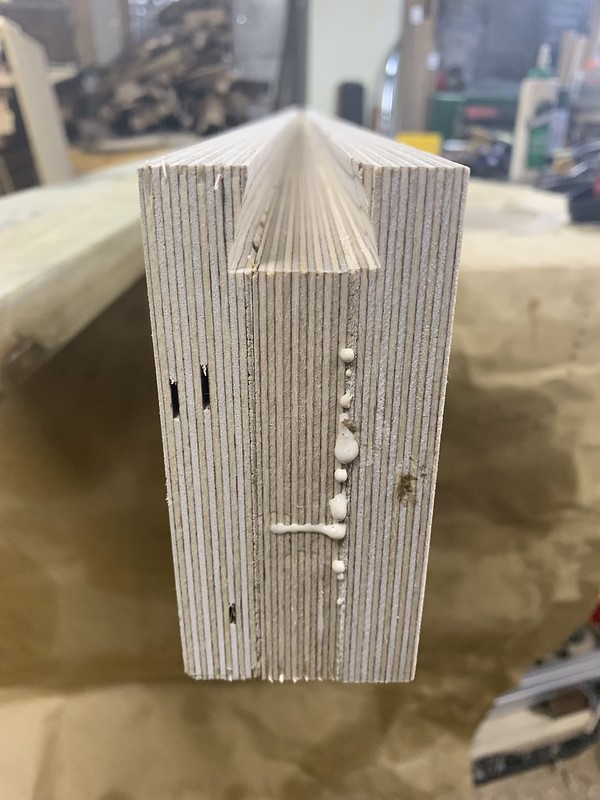 IMG_4181 by jamie skinner, on Flickr
Two guide rails made.
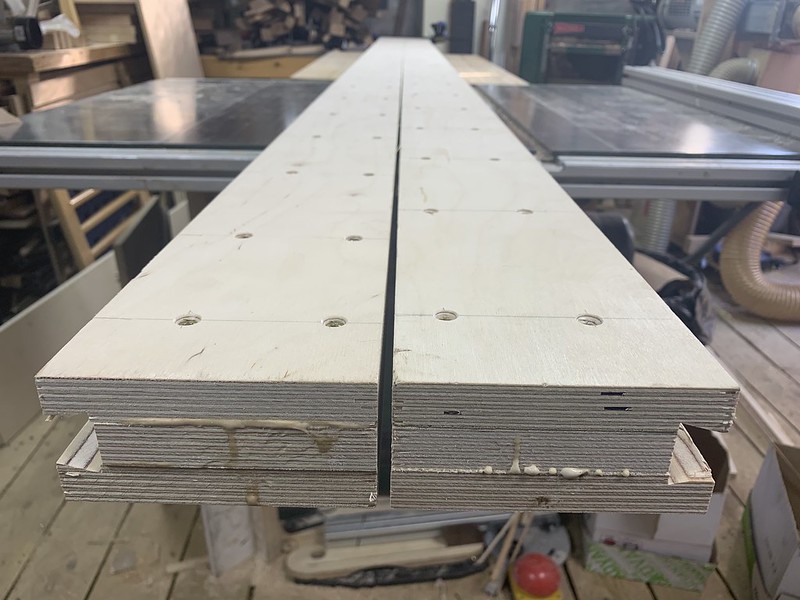 IMG_4182 by jamie skinner, on Flickr
I clamped both guide rails together at one end to see how straight they are. I got 4mm gap at one end over 3m which I am happy with.
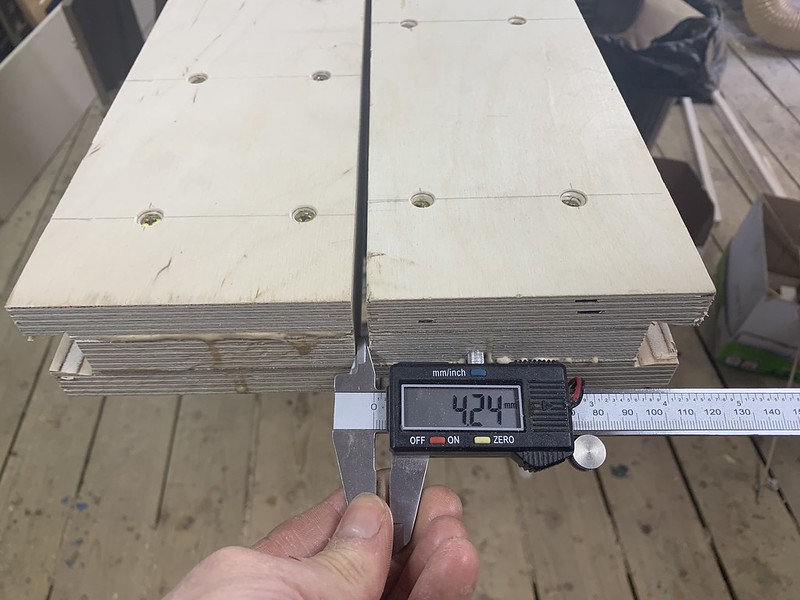 IMG_4183 by jamie skinner, on Flickr
Started to put it together:
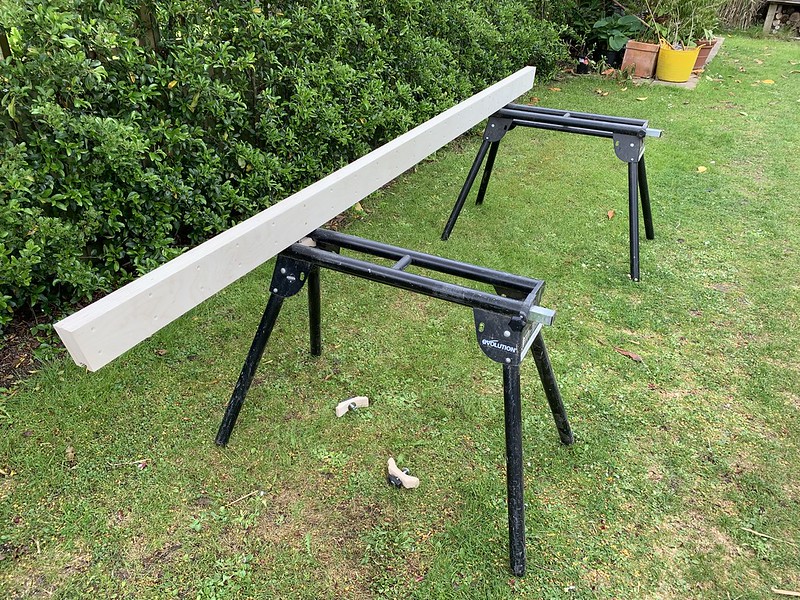 IMG_4193 by jamie skinner, on Flickr
To do:
1. I need to add a dust extraction system. I will be making a small version (1m long) of this to use in my workshop on projects so want extraction for that.
2. I need to make some levelling feet for the trestles asI just used some pieces of wood to get the right level. Adjustable feet will enable me to dial it in more.
3. I need to make some brackets to hold it not the wall for storage.
4. Get a heavy duty router for this purpose.
5. Adjustable under trestle support for timber to allow for holding twisted timber.
6. Wind up string holder to store string for each time it is setup.
7. Invest in a replaceable insert flattening router bit.
8. Improved work holding/clamping system.
I hope you enjoyed my post!
I required a way to flatten a wide slab for a large live edge table top (2.3m x 900m) that I have been asked to make.
Looking at some designs of just screwing 2x4s to the side of the slab... I was looking to make something a little more polished/reusable/flexible that could be used multiple times and take up a small footprint when being stored.
My main points I wanted:
3m long x 800mm wide
Portable
Adjustable for different sized/thickness timbers
Work holding clamping system
Fast setup
Ease of use
Work levelling system
Small footprint when stored
Dust Extraction
Easy to level/coplanar.
This is what I ended up creating:
 IMG_4196 by jamie skinner, on Flickr
 IMG_4206 by jamie skinner, on Flickr
The main parts consist of:
2x Evolution mitre saw trestle stands
2 x 3m laminated plywood guide bars
1 x router sled
I chose multiple pieces of laminated plywood as it will be more stable than a regular softwood 2x4.
Managed to make the whole thing from a single sheet of 18mm Birch ply which was pleased about. So only cost me a days work and £50.
The guide bars are attached to the trestles via a sliding dovetail system. This enables me to mount the trestles to any point along the length of the guide bar depending on the timber to be flattened.
 IMG_4195 by jamie skinner, on Flickr
Mounted via bolt from underneath. I originally had planned to use a knob instead of a nut in my original design. However due to this central bar in the middle there is only just enough space to get a nut in there.
 IMG_4194 by jamie skinner, on Flickr
Original designed pieces:
 IMG_4189 by jamie skinner, on Flickr
Modified to fit as there was not enough space for the full sized hooks. They need to spin 90 degrees to go under the bars.
The mounts are made from plywood with a 3d printed dovetail slider with captured bolt.
 IMG_4191 by jamie skinner, on Flickr
My initial design to hold timber on the trestles are like so:
 IMG_4205 by jamie skinner, on Flickr
And clamp like this... (Bottom right) The holes are for screws if needed.
 IMG_4206 by jamie skinner, on Flickr
To make each guide rail coplanar with the other I took inspiration from Marius Hornberger (Link)
He uses two strings attached at each end with cross diagonally. then lifts one string up by a few mm. The strings must they lay onto of each other but not touch. This can be adjusted by raising each leg of the trestle in my version until the strings are above one and other.
Strings attached:
 IMG_4202 by jamie skinner, on Flickr
Raised the top string up by the width of one string using a nail.
 IMG_4203 by jamie skinner, on Flickr
Strings are on top of each but do not touch. Each guide rail is now coplanar with the other.
 IMG_4204 by jamie skinner, on Flickr
The router slides back and fourth on the sled.
 IMG_4200 by jamie skinner, on Flickr
 IMG_4201 by jamie skinner, on Flickr
The sled is attached to one rail with two pieces of Plywood. A sliding fit enables the sled to move freely left and right but without to much play.
 IMG_4197 by jamie skinner, on Flickr
  IMG_4199 by jamie skinner, on Flickr
1st test:
1.I had a little issue with the router that seemed to lower the router bit further into the work is I went. I guess I must not have locked it down enough.
2.The router moving forward and backward wasn't as friction less as I hoped. Fixed by sanding it a little wider where the plastic router base goes and then adding paste wax.
3. Work holding isn't great. The clamps I made work great as stops but I need a way of clapping the timber down.
4.Knobs on clamps are too big.
Router dropped:
 IMG_4207 by jamie skinner, on Flickr
I was very happy with the cut finish I got:
 IMG_4208 by jamie skinner, on Flickr
I then spray vanished everything with Ronseal clear varnish to protect it.
2nd test: (This was on the actually piece/s)
Weight of the timber (Oak 80mm 2.5m 700 wide) was enough that I felt I didn't not need to secure it.
The piece had a slight twist to it which I shimmed out using some this wood under it. Using a straight edge running across both guide rail I measured down until I had and even amount to remove of each side. I need to design an adjustable system where I can lift/hold each corner of the timber to shim out the twist.
All went pretty well although....
I had the chuck come loose on the router... Which meant the bit plunged deeper that I wanted. Luckily it was just above the final pass once I had finished so was fine.
I also set my Erbauer router on fire...Was my favourite router for all my hogging out/rough jobs. It had worked hard I think maybe running it at a low speed means the internal cooling is not as great so burnt out.
Picked up the 'new' style Erabuer router from Screwfix... What a pile of crap they are... Locking system still allows router to move up/down by 2-3mm. So much play in the plunge mechanism. Base plate screws weren't countersunk into he base enough and stuck out... And finally after 3 minutes attached to my jig also caught fire... Returned It!
The 80mm slab has been flattened to 60mm due to the cupping of the board. I could have cut the board in half and the flattened it but wanted a complete slab. An extra price will be joined on to this to being it to the 900mm final dimension.
 IMG_7146 by jamie skinner, on Flickr
Just need to flip it over and repeat and flatten the other section which gets glued on.
 IMG_4267 by jamie skinner, on Flickr
How I made the jig:
Each guide bar consists of 3 layers of 18mm birch plywood. To make the 3m length I added a piece on the end and over lapped the glue join with the next layer creating a strong single length piece. The two outer pieces are run through the router table with the largest dovetail bit I had.
 IMG_5213 by jamie skinner, on Flickr
The outer pieces are drilled and countersunk ready to receive screws. To get a straight edge I used the straightest 2x6 I had which was neigh on perfect. I used this to align and clamp the plywood to as I was gluing/screwing it together.
 IMG_4173 by jamie skinner, on Flickr
Assembled like so:
 IMG_4065 by jamie skinner, on Flickr
 IMG_4174 by jamie skinner, on Flickr
 IMG_4176 by jamie skinner, on Flickr
Next layer glued on and clamped to 2x6.
 IMG_4178 by jamie skinner, on Flickr
Assembled:
 IMG_4181 by jamie skinner, on Flickr
Two guide rails made.
 IMG_4182 by jamie skinner, on Flickr
I clamped both guide rails together at one end to see how straight they are. I got 4mm gap at one end over 3m which I am happy with.
 IMG_4183 by jamie skinner, on Flickr
Started to put it together:
 IMG_4193 by jamie skinner, on Flickr
To do:
1. I need to add a dust extraction system. I will be making a small version (1m long) of this to use in my workshop on projects so want extraction for that.
2. I need to make some levelling feet for the trestles asI just used some pieces of wood to get the right level. Adjustable feet will enable me to dial it in more.
3. I need to make some brackets to hold it not the wall for storage.
4. Get a heavy duty router for this purpose.
5. Adjustable under trestle support for timber to allow for holding twisted timber.
6. Wind up string holder to store string for each time it is setup.
7. Invest in a replaceable insert flattening router bit.
8. Improved work holding/clamping system.
I hope you enjoyed my post!


