Mechanism for Raising Router Table Top?

UKworkshop.co.uk

Help Support UKworkshop.co.uk:

This site may earn a commission from merchant affiliate links, including eBay, Amazon, and others.
I agree, the supplied handle is just a short straight with a plastic cross on the top and you're right that its a bit of a pain. I've just been looking in the current Trend calalogue and the fast winder isn't there so either I've imagined it or they had stopped doing it. Probably becasue it's just a standard winder, 3/8" extension with a long socket on the end. It's taking no strain so any crappy brand would do and I guess that's what most people did so they didn't sell any of the overpriced Trend ones.

Granted it would be nice if the collet came up high but I believe the Triton is unique in this feature. Even the latest Festool doesn't do it. In the end when I had to choose which one, it was the ability to adjust easily and accurately from the top that won it for me especially as in my table I wanted the router set well back to give plenty of room infront of the bit for work piece support. Opening the door to reach in and wind up the Triton would be a pain. Mine works the other way around. I wind the bit down quickly, about 5 revolutions to make the collet easier to reach when the top is tilted. If it's slower than the Triton it's not my much and when I do take the router out of the table for the jobs my T5 can't handle, it's a much better hand held proposition obviously only IMO.

To be fair at the time when I made the choise the Triton only seemed to be available from B&Q. I notice D&M are selling it now which coincidentally is where I bought the T11 from. The biggest down side was the availability of local servicing and replacement parts so basically I looked at it, tried it, didn't like it and moved on. I recall thinking it was quirky but not quality or at least that how it felt. Again just my opinion.
 
p111dom":2oft0hf8 said:
Really Nick what's wrong with the raising mechanism on the T11? I find it much easier to set a fine height than with the Triton

I am surprised at that - you did know that the rack and pinion mech is for coarse adjustment and that there is a separate fine adjust?
 
I agree. The height adjustment on the Triton is superb, with speed adjustment and fine adjustment. It is a fantastic package.

The Festool 2200 collet protrudes well through the base (though I need to run down to the workshop to check by how much). The amazing Festool ratchet system takes some getting used to, but I'm sure it's a major breakthrough. I can't help thinking, though, that the Festool is a bit big unless you're doing serious kitchen work, compared to the simplicity and balance of the Trend T11 and DeWalt. And, of course, there are other routers as well.

For table router I'm still with the Triton. For dedicated hand-held work and a bit of both I'm not sure yet.

Nick
 
I'm beginning to realise that the big Triton isn't ideal for HH use. Still a winner in the table for me.
 
I think you'll find that the smaller Triton is even better in the table than the larger one. I can't seem to see anything wrong with the small one for hand-held work either.

Cheers

Nick
 
Jake":381pxsc9 said:
p111dom":381pxsc9 said:
Really Nick what's wrong with the raising mechanism on the T11? I find it much easier to set a fine height than with the Triton

I am surprised at that - you did know that the rack and pinion mech is for coarse adjustment and that there is a separate fine adjust?

Of course but from recolection the fine adjustment was/is just a black plastic knob similar in looks to a radiator valve cap. You still have to reach underneath the table to adjust it and like I say with my set up that would be a pain. I really should take a pic of the inside to highlight the problem and show the dust extraction. With the T11 you can put a 2 foot bar on to the height adjustment so a few mm at the end equates to micrometeric ammount at the cutter head. I just thought it would be more difficult with the Triton being stuck with a knob 20mm across. Then taking into account that it's all upside down and enclosed etc the T11 won out. Like I say its the from the top adjustment that's the winner for me.
I've oftern read that the Triton was designed with table mounting in mind and that that's a justification for it's lack of balance when HH. To be honest I know people who have the Triton they have bought it, put it straight into a table and never used it HH. Cheeky friends borrow my T11 if they need big HH power. They pointed out to me at the time how much more expensive the T11 was but if most people only use the Triton in a table they you would have to buy another router anyway for HH use which would surely cost more.

Nick I didn't realise that the Festools collet protruded far enough below the base to allow bit change. I've never looked at it that closely as I know I could never justify spending that kind of cash. I spent £220 making my router table and the big Triton goes for £200. I would be thinking that if I were only getting a tool that works well inverted and the outlay is £400+, we're not that far off spindle moulder money which would have more power again, height adjustment from outside the cabinet and unlike all of the router tables can tilt as well.
 
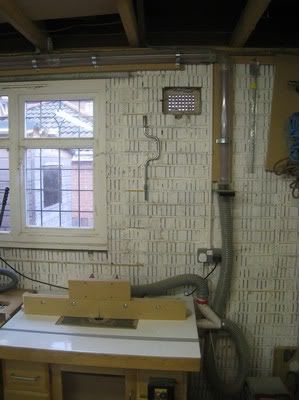
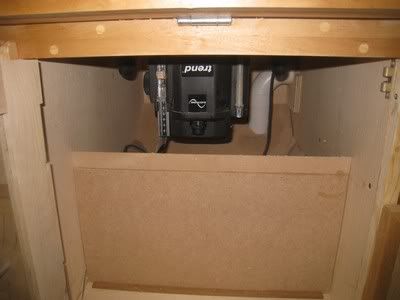
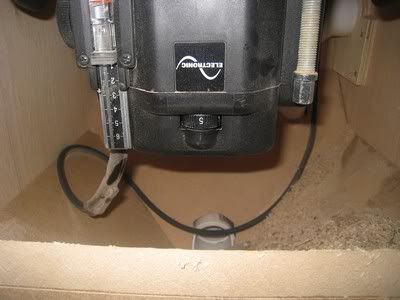
Finally got around to taking some pics of the innards of my router table.

woodnet20.jpg


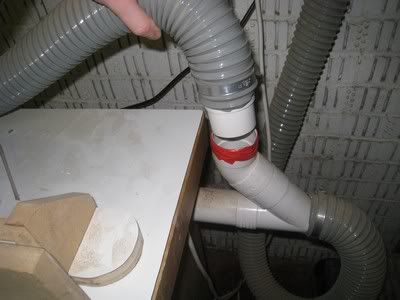
Here's the external extraction setup of the table.
You can see the NVR switch at the front which meant that I couldn't fit a drawer at this location. To avoid wasting this space the wiring is at the front of this space and the extraction tube at the back.
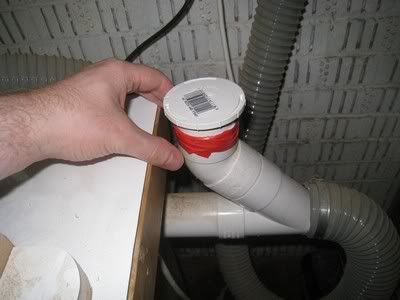
woodnet18.jpg


The upper pipe goes to the fence and I do quite a bit of work without the fence fitted so when necessary I can block this connection off to increase suction power form below like so.

woodnet19.jpg


Inside it gets quite complicated. This router table has been through quite an evolution for the better. Leaving the internals as just a box the extraction was very poor so...

woodnet15.jpg


This is the set up. The pipe enters from the right hand side and routes down to the bottom centre of the space. I then built a an MDF hopper to guide the dust down to the start of the pipe. The hopper isn't fixed just tight fitting and can be removed if required. (not that I ever have). This dramatically improved the effectiveness of the extraction. When I built this I was still using a cheap B&Q router.
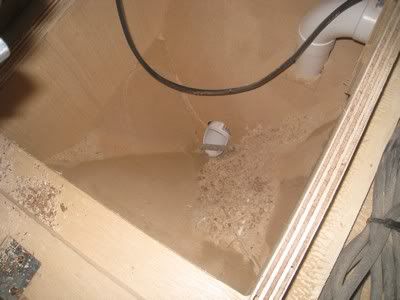
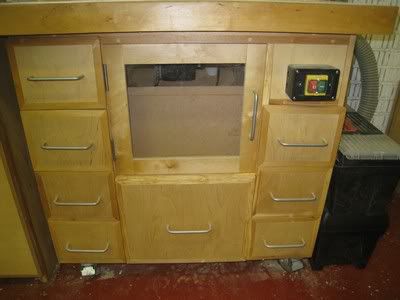
The down side was always that while I had made a large door at the front access was still a pain and when I added the hopper I was left with this.

woodnet11.jpg


woodnet12.jpg


So I was left with the sharp edge of the hopper and limited access to the router which is why I hinged the top. Once I had this set up I went looking for a quality router for and the Trend with this set up just worked better than the Triton. With the hopper like this even getting into raise the Trition by it's wheel would be a pain. To be able to raise and lower the cutter from above is ideal.

I now only really use the door to adjust the speed which is handy again.

woodnet13.jpg
 
Thanks for these photo's, Dom. :)

I still don't know what I'm gonna do with the top, I may just hinge it in the end, as you have done.

I like your dust extraction setup. I came up with something quite similar after browsing through Lord Nibbo's old thread except mine was to protrude from the back - I like the way yours comes from the side, which wastes less space behind.

If I was building a full-size, floor-standing table then I'd probably borrow your 'hopper' idea as well! :wink: Instead, I'm just gonna add two slopes inside so that the waste falls down to a port at the back. I'll also add a second port down slightly from the top - with a pipe to collect fine dust directly from the router cutter.

I don't see any holes for ventilation in your design - is this not important or does the extraction cater for it?
 
I did have holes in the first door but the problem I have is distance of my router table from the extractor. It's probably a 50 run of pipe with 11 blast gates along the way. The table is right at the end of it all. Even with carefull taping, gluing etc you always get a slight amount of leakage from the gates and some fittings. Origionally I only had 5 gates over a shorter run and the first time I turmed the extractor on it ripped the bag. So I added holes. Only 4 but even on the shorter run the extraction went poor. I guess that the air just taked the path of least resistance, goes straight through the holes and into the pipe picking up very little on the way. The solution was to make a new door with out holes and just run the extrcator with one motor. This was better than 2 motors with holes in the doors. When I rerouted the rextraction system to what I have now again the extraction went a bit poor. I find that when I have a new bag on the extractor with the smaller machines I have to run one motor until there's a bit of weight in the bag. Once there is I can run 2 motors and the extraction to phenominal. I have to confess to running a few scrap pieces throught the thicknesser to get the weight in the bag at the beginning so I can run the 2 motors ASAP. Extractor bags were £2 each but perspex for the door is £10. I would advise against drilling holes in the door unless you need them and then add them gradually and sparingly if you do. You'd be suprised in the difference when you add even one hole too many there can be a huge drop off in suction and you're back to square one. Basically theres a 1-2mm gap all the way around the door and then there's the gap around the cutter. In my case that seems to be enough. There's probably some long mathematical equation to work out the optimum but this was trial and error and that can be expensive. Most of the designs I've seen have the pipe exiting at the back which would have stopped me from placing the table against the wall. Don't know why anyone would want that.
 

Latest posts

Back
Top