How long did it take you ( or your students) to learn to cut gapless dovetails

UKworkshop.co.uk

Help Support UKworkshop.co.uk:

This site may earn a commission from merchant affiliate links, including eBay, Amazon, and others.
I think the piece is just too narrow to get perfect results whilst marking out,
Bearing in mind a reference needs to be firmly resting on two points, and not see sawing about on one.
Did you do a hinge pivot test of any sort with whatever you're using to establish that is not the case?

This is either more noticable or of lesser importance with a longer reference to set the tool on.


The results you achieved with that saw, appear to be really good to my eyes,
I see no changing of direction which would widen the kerf, which suggests to me it's the
marking out that is the issue.

Look at Derek Cohen's posts like this one
One can see exactly what I mean in one particular photo.
https://www.ukworkshop.co.uk/threads/apothecary-chest.111915/page-3#lg=_xfUid-47-1644844178&slide=0
Taken from the above article from Derek.....

"Turning the board over, and repeating the manoeuvre, the result is a tent ...


21a.jpg
"

Say you look at Peter Sefton paring shoulders from the edge and not from the face afterwards gradually lowering the tent down afterwards.

The iroko I use doesn't tolerate any sort of vertical chiseling very well,
not to mention what it would be like to undercut the work!
I'd never do the ends like some show, maybe pushed for time I can see the
reasons between the rest.
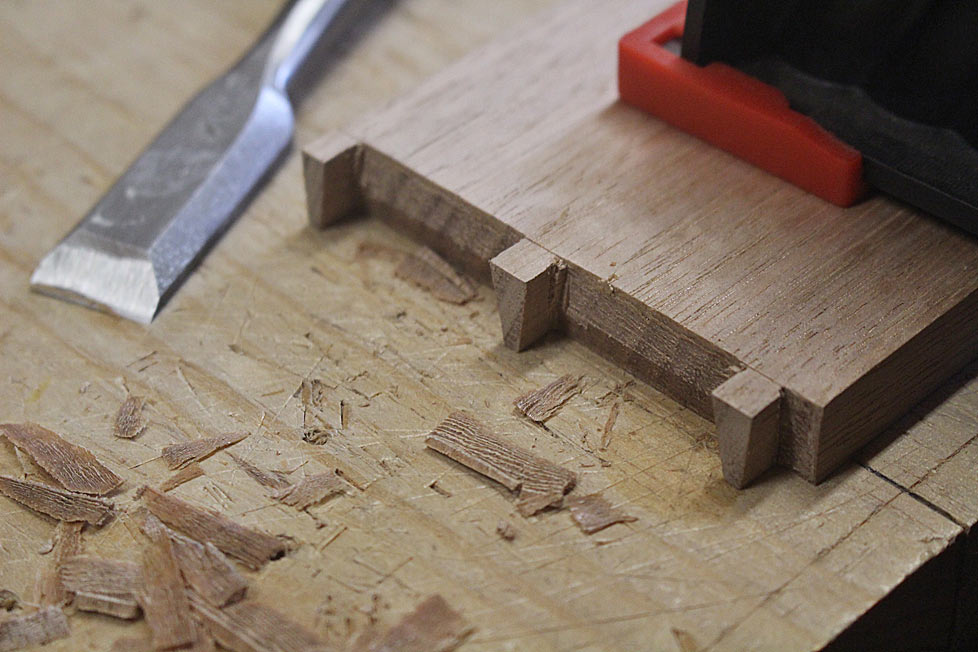
And the waste always needs somewhere to escape, as the chisel is not a drill
which pulls the chips upwards

Might be a bit slower doing this method, but is more guaranteed.


SAM_3733.JPG


David W made an article or video of the chisels he made, which vastly reduces the chisel diving into the work, as there is an intentional slight curvature to them so they can be steered out of the cut, same thinking.
Not that those would help you there, as those are thin components you are working on.

Hope that helps
 
I'm not sure which parts I may have made or said that talked about diving, though I have said that I don't particularly care for surface grinder flat chisel backs - its' limiting for a skilled user to not have some contour.

All of the little aspects add up to things not diving, though - even better chisels (bit tent stake chisels have no spring, but to thin and that's no good either - the older chisels with some strength up by the tang and then relatively thin at the business end really work well.
 
I don't remember the first dovetails that I made that fit right. They might've been the 5th or 6 set of them - I think small wall shelves, but it took a long time for me to get them to fit.

I do remember that for a while, I didn't make that many dovetails after switching mostly to hand work (hand dimensioning) and that after switching from power dimensioning to hand dimensioning, all smaller joinery work was twice as fast and twice as accurate. That was the end of faffing with overly prissy dovetail markout, and generally there's nothing that doesn't close with glue or remains visible as a gap - if there is, it's the bad habit of using subpar stock that isn't stable.
 
T
I think the piece is just too narrow to get perfect results whilst marking out,
Bearing in mind a reference needs to be firmly resting on two points, and not see sawing about on one.
Did you do a hinge pivot test of any sort with whatever you're using to establish that is not the case?

This is either more noticable or of lesser importance with a longer reference to set the tool on.


The results you achieved with that saw, appear to be really good to my eyes,
I see no changing of direction which would widen the kerf, which suggests to me it's the
marking out that is the issue.

Look at Derek Cohen's posts like this one
One can see exactly what I mean in one particular photo.
https://www.ukworkshop.co.uk/threads/apothecary-chest.111915/page-3#lg=_xfUid-47-1644844178&slide=0
Taken from the above article from Derek.....

"Turning the board over, and repeating the manoeuvre, the result is a tent ...


21a.jpg
"

Say you look at Peter Sefton paring shoulders from the edge and not from the face afterwards gradually lowering the tent down afterwards.

The iroko I use doesn't tolerate any sort of vertical chiseling very well,
not to mention what it would be like to undercut the work!
I'd never do the ends like some show, maybe pushed for time I can see the
reasons between the rest.
And the waste always needs somewhere to escape, as the chisel is not a drill
which pulls the chips upwards

Might be a bit slower doing this method, but is more guaranteed.


View attachment 129392

David W made an article or video of the chisels he made, which vastly reduces the chisel diving into the work, as there is an intentional slight curvature to them so they can be steered out of the cut, same thinking.
Not that those would help you there, as those are thin components you are working on.

Hope that helps
Thank you Tom,

Now I now what you are talking about. You build a tent and than you lower it to nothing. I think it is useful for not blowing the chisel through the other side, so you aim for the roof from both sides and then gradually erase the tent.

I have read that it is a good idea to undercut the base, so that the lowest point is in the middle of the thickness of the board. That way you have no high spots that would make a visible gap between the tailboard and the base of the pinboard.
 
I don't remember the first dovetails that I made that fit right. They might've been the 5th or 6 set of them - I think small wall shelves, but it took a long time for me to get them to fit.

I do remember that for a while, I didn't make that many dovetails after switching mostly to hand work (hand dimensioning) and that after switching from power dimensioning to hand dimensioning, all smaller joinery work was twice as fast and twice as accurate. That was the end of faffing with overly prissy dovetail markout, and generally there's nothing that doesn't close with glue or remains visible as a gap - if there is, it's the bad habit of using subpar stock that isn't stable.
Thank you David,

I will gradually learn the techniques that will make my dovetails better. I have already learned today that even if I want to saw out the middle with a coping saw, it is good to establish a knife wall for the base, because when I have no material to create a notch to, then it is much more difficult to pare away the remains and I would ruin the base as I did in the first shown example.
 
Now I now what you are talking about. You build a tent and than you lower it to nothing. I think it is useful for not blowing the chisel through the other side, so you aim for the roof from both sides and then gradually erase the tent.
It's not specifically for that, maybe my photo which was more to do with the majority of the work, i.e escapement of the waste confused matters, sorry bout that.
Regarding Derek's post, it is also a glimpse of sneaking up on the fine work.
On dense dry timbers which is all I have experience with, and my chisels (one set lapped flat)
If you don't tent, you WILL undercut, as the waste pushes the against the bevel and pushes below the line.

Might seem a bit faffy and overly dramatic, but a guaranteed method should you want to make things slowly
but end up with the result of gapless quality.
Which might or might not be quicker in the end.


Avoiding work for me just ends up with more time spent in the end.
I suspect with the work you're doing, and from what you're posts are coming across to me as, (a stickler for quality work with as little flaws as possible, kinda thing)
it would be the same deal.

One more thing to add, a perfect example of where a long reach angle poise lamp with a 7.5 or 8" shade casts a perfect light to enable one to easily see the facets,
should you be using something which can't be moved easily and one of those facets are blinding you.
That fundamental tool is missing from a lot of utubes, suppose its because the camera can't look at a light directly in front very clearly or well without glare.

All the best
Tom
 
Last edited:
It's not specifically for that, maybe my photo which was more to do with the majority of the work, i.e escapement of the waste confused matters, sorry bout that.
Regarding Derek's post, it is also a glimpse of sneaking up on the fine work.
On dense dry timbers which is all I have experience with, and my chisels (one set lapped flat)
If you don't tent, you WILL undercut, as the waste pushes the against the bevel and pushes below the line.

Might seem a bit faffy, but a guaranteed method should you want to make things slowly
but end up with the result of gapless quality.
Which might or might not be quicker in the end.

Avoiding work for me just ends up with more time spent in the end.
I suspect with the work you're doing, and from what you're posts are coming across to me as, (a stickler for quality work with as little flaws as possible, kinda thing)
it would be the same deal.

All the best
Tom
Yes Tom, you are right. I do not mind being slow, as I am doing woodworking for learning to make quality stuff that I will be once proud of. Quality of the craftsmanship matters to me, so I will accept any trick, procedure or practice exercise that will yield to a more professional looking product.

I will also start leather working in the next winter as a substitute hobby, as my workshop is too cold in winter and I do not want to get ill. And heating up 4 hours prior working in the workshop for 1-2 hours every day is not very economical. There I would like to also work slowly, but learn to make everything looking good.

I have never seen antique furniture stamped with: Excuse the slopiness, I made this quickly.
 
As mentioned mastering the basic skills is paramount. Being able to accurately saw to the line followed by your ability to pare with a chisel. Practice sawing exercises if you need help here!

Then you should always keep in mind when starting that a dovetail is an interference fit!!! If you exceed those gage lines in any way your going to have gaps!

while you can safely under cut the end grain portions make sure that your visable edges are not damaged and you don’t exceed your lines!

many of us add a bit for finish when setting the marking gages. It’s easier to plane down the proud portions than plane an entire side. But if the gaps are tiny you can take a hammer and peen some of this down to fill gaps. While wood does not move as much as metal it still can move a little!

In retrospect my issues were 1). Sawing accurately to the line in two planes and chopping out waste. I slid the chisel into the gage line on start. This moved the gage line back and bruised the fibers. Lastly I had to come to grips that this is an interference fit. So the more you fiddle the more material is removed ultimately yielding good looking joints with ugly gaps.
 
Thank you David,

I will gradually learn the techniques that will make my dovetails better. I have already learned today that even if I want to saw out the middle with a coping saw, it is good to establish a knife wall for the base, because when I have no material to create a notch to, then it is much more difficult to pare away the remains and I would ruin the base as I did in the first shown example.

Always good enough to have a knife line or a mark strong enough that the mark isn't lost if there's some turbulence around it, even if it's accidental turbulence. Same goes with dimensioning to thickness - if the mark is deep, you'll see it appearing a few strokes prior to planing through it.
 
Nobody really likes this answer either, but it's what i'm working toward with carved top guitar #1 - expect mistakes, then once making them, eliminate them one at a time. There usually aren't 67 mistakes in something we make. What we do might not be the same as the next person, so the mistakes may not be, either, and thus what we do to avoid them may not be the same.

When we make a few mistakes and develop our own method of dealing with them, the chance that we do 15 other things that we don't need to (that makes the process tedious) is much lower and it feels more like making and less like stressful "I have to do this step, and this step, and what will happen if I don't?"

If we make mistakes and don't force ourselves to think about them a little bit, though (vs. "well, I just need to do more of those" and then make the same mistake again), an opportunity is lost. My biggest issue early on was getting too close to a mark and then lining up a wider chisel only to have some part of it end up in an area that I'd just cut, taking a little more off. It wasn't hard to figure out how to solve that, but I'd bet I did it 4 times thinking it just happened by chance.
 
Today's best results ( I cut 3 or 4 single dovetails today). There is no glue yet. I understand that cutting a set of 10 dovetails on the same board and making everything neat will be much more complicated. I do not have currently a smoothing plane, so I tried to make it flush with a no.6. I will sand it off tomorrow. My smoothing plane is on the backorder, so I am waiting.

IMG_0087.jpg

IMG_0089.jpg
 
Today's best results ( I cut 3 or 4 single dovetails today). There is no glue yet. I understand that cutting a set of 10 dovetails on the same board and making everything neat will be much more complicated. I do not have currently a smoothing plane, so I tried to make it flush with a no.6. I will sand it off tomorrow. My smoothing plane is on the backorder, so I am waiting.

View attachment 129406
View attachment 129407
I'd be happy with those!
Seen much worse in antique dealers!!
 
I'd be happy with those!
Seen much worse in antique dealers!!
Thank you, but I know that this is just a single dovetail. Once I will cut 3 or 4 on the same board, I might get varied results. Once all 4 are consistent then I can say I can do it up to that level. Now it just might be good luck of a beginner.
 
This will be my last picture of the dovetails before actually cutting them on the coat hanger. Here is the today's test in softwood. The boards were not planed or finished.
View attachment 129437
View attachment 129436

Your there!

So answer your own question. How many goes did it take to get to acceptable dovetails?
It is very satisfying when it comes together.
 
Your there!

So answer your own question. How many goes did it take to get to acceptable dovetails?
It is very satisfying when it comes together.
Yes, it was much quicker than I actually expected. There is still some paring involved, but I know it does not take months or years. Thank you all, for the advice and support.
 
Yes, it was much quicker than I actually expected. There is still some paring involved, but I know it does not take months or years. Thank you all, for the advice and support.
Looks good!
 
I remember doing them at school in 1959, made a money box (long since gone unfortunately). As i remember there were no gaps. The glue was heated up on an open flame burner and i stuck it all together. I loved the smell of that glue.
These days i use a dovetail jig and router.
 
@tibi Looks like you are getting good results already, I put this video together for the UK Men's Sheds association last year which shows the way I teach students. Some will make excellent dovetails first time but some will require a fair bit more practice, and anyone can easily cut the wrong side of the line even after a fair bit of practice.


Cheers

Peter

Thank you Peter, I will definitely take a look at your video.
 

Latest posts

Back
Top